What this server does, exactly
Every statement is a decision we made, with its numbers and its small print. Click the one you care about to expand it.
Showing all 398
Nothing matches that
Try a shorter word, or drop the section filter.
Homunculus, mercenary and pet all run one AI, rewritten from scratch — and the mercenary has its own hiring and loyalty system on top.
Companions on this server do not use Ragnarok's original AI. All three — homunculus, mercenary and pet — run the same intelligence, written from scratch inside the emulator itself, and it makes a decision every half second.
Having one instead of three is deliberate: a fix to target selection or to walking around an obstacle lands on all three the same day, and there are no three versions of the same behaviour drifting apart over time.
What it does each cycle
What was thrown away
The previous approach relied on unreliable filters and on skill lists that did not match what the server actually had enabled. It went in the bin.
That is where the old mercenary type resolution and M_SkillList failures came from.
They will not play the game for you. What they do is stop getting in the way: they don't drag monsters you didn't want, they don't get lost across the map and they don't evaporate while you're looking at your inventory.
See also The companion picks its target by a strict order of priorities Companions compute the whole route instead of pushing against corners Ten minutes without touching anything and your companions stop picking fights You decide how it behaves: @merai sets behaviour, patrol and four monster lists They see the spell coming: they step aside during the cast, clock in hand
The first thing a companion does each cycle is work out who to hit. The order is not negotiable:
A priority jump always wins: if it was killing something passive and something starts hitting you, it drops what it's doing instantly. Within the same tier it sorts by distance, favouring ranged attackers and things already wounded — finishing a kill beats starting a new fight.
And it doesn't dance between targets
Switching target costs something: a new candidate has to be clearly better before it drops the one it was already killing.
Without that margin, and with the owner walking, every monster's score moved at once and the companion ended up going left-right without killing anything.
See also Homunculus, mercenary and pet run the same AI, rewritten from scratch Before committing to a target it checks that it can actually reach it
Homunculus, mercenary and pet use the server's advanced pathfinder. They no longer get stuck on a corner or take the long way around a tree: they compute the full route and walk it right behind you.
Impossible destinations
If a destination is not walkable it is discarded and another is tried, instead of pushing against it until it jams.
Jams
If it goes ten seconds without making progress, it declares itself stuck and unsticks itself.
And it doesn't get lost
It fights at most 12 cells from you. If it somehow ends up more than 18 away, it teleports to your side.
Idle patrol walks around you at short range; the homunculus does it in a square pattern.
See also Homunculus, mercenary and pet run the same AI, rewritten from scratch Before committing to a target it checks that it can actually reach it
A companion staring at a monster on the other side of a wall is a useless companion. Before picking a target it checks that there is a path; if there isn't, it shelves that target for ten seconds and tries another.
And if it is next to something but with a corner in between, it repositions until it has line of fire instead of swinging at air.
One deliberate exception
Whatever is hitting you is never shelved. If a monster is killing you, it retries every cycle even when the path is bad.
Targets that can't be touched
If a target gets stuck or cannot be hit for 2 seconds, it abandons it. It used to stand there uselessly.
See also The companion picks its target by a strict order of priorities Companions compute the whole route instead of pushing against corners
Ground damage is not treated as a monster to run away from but as a set of cells you cannot stand on. That sounds like a nuance and it is not: you run away from a point as far as you can — overshooting, then coming back, then overshooting again — whereas you simply step out of a zone, and then you stay out.
Three rules follow, and every one of your units obeys them:
If you are inside
You leave through the nearest clean cell. The shortest way out, not the farthest.
If you are outside
You do not go in. Those cells stop being a valid destination for every decision: chasing, kiting, repositioning or walking back to your master.
If it catches you inside
Routes through the zone are allowed so you can get out. What is forbidden is entering, never leaving.
That last one is what prevents being trapped: anyone caught in the middle of a large area — knocked back, or with the spell dropped on them — has every neighbouring cell inside the zone, and a no-exceptions "never step on an area" rule would pin them there taking damage until the effect expired.
And because the boundary can only be crossed one way, the back-and-forth along the edge is not so much fixed as impossible.
See also Homunculus, mercenary and pet run the same AI, rewritten from scratch They see the spell coming: they step aside during the cast, clock in hand Monster area attacks are circles, not squares
Waiting for the area to land before moving is moving too late. A ground spell announces itself with several seconds of casting, and during those seconds the server already knows where it will land and how long is left. Your units read both and do the sum anyone would do:
I need N cells to clear the circle, I walk at V milliseconds per cell, so I need N×V. And I have R milliseconds of casting left. If N×V fits inside R, I move now and it misses me.
The sum is deliberately conservative: the cell is charged diagonally, which costs 40 % more, and one reaction cycle is deducted. Falling short by that 40 % means taking the whole spell. And if there is not enough time, the unit moves anyway — an area effect spreads its hits over several seconds, so leaving late is fewer hits than not leaving.
Three details that change a lot of what you see on screen:
It stops attacking
It drops the swing, stands up if it was resting and cancels its own cast if that is what is pinning it. The moment it is out, it goes back to fighting on its own.
It does not flee from the caster
What bites is the zone, not the monster. If the spell lands away from whoever cast it, your unit can walk right up to it — as close as melee or ranged calls for.
Your settings do not matter
Dodging is not fighting. It works with attacks switched off, in defensive mode and while resting. All it needs is to be able to walk.
It runs for all five: your character under @autoplay, the @helpme companion, the mercenary, the homunculus and the pet. One piece of code for all of them, not five similar copies.
The radius is read from the skill itself rather than from a hand-maintained list, which is why it works just as well for Storm Gust as for the area attack of a custom monster added tomorrow.
See also An area effect is forbidden ground: they step out and do not step back in Homunculus, mercenary and pet run the same AI, rewritten from scratch Autoplay kites, picks its spell to suit the enemy and never meditates surrounded Monster area attacks are circles, not squares
The underlying change is this: your companions read whether you are at the keyboard. After ten minutes without you touching anything, homunculus, mercenary and pet switch to defensive mode: they stop looking for fights and just protect you from whatever attacks.
The moment you move your character again they get your real configuration back, instantly.
Your configuration is never touched
It is only ignored while you are away. There is nothing to set again when you come back.
No more coming back from the bathroom to find the homunculus dying in the middle of a monster nest it woke up all by itself.
See also Homunculus, mercenary and pet run the same AI, rewritten from scratch The mercenary contract lasts as long as your session does Automation pauses if you go idle
None of the default behaviour is fixed. Type @merai in chat and its configuration menu opens; it is also on the website, on your character page. Changes apply without resummoning.
Behaviour — what it attacks on its own
Patrol — what it does with nothing to kill
Welfare priority
Decides who it protects when it has to choose: balanced, its own skin (goes for what is hitting it) or yours (defends you even if it dies for it).
Four monster lists
Lists can be inherited from your other companions, so you don't have to type the same monsters four times. And in Search & Destroy, when it wanders off, it shows on your minimap: green while travelling, red while fighting.
See also The companion picks its target by a strict order of priorities Homunculus, mercenary and pet run the same AI, rewritten from scratch
A mercenary is a soldier you hire, summon to your side and who fights on its own. It is not a pet and not a homunculus: it doesn't eat, doesn't evolve and doesn't need feeding.
There are three companies, each with its guild in its own city. Every manager is accompanied by a Mercenary Merchant selling the potions only mercenaries can drink.


Click any screenshot to see it full size.
Archers — pay_arche 99, 167
Range 10 cells. They hit from afar and step away on their own if something closes in. The most fragile.
From Mina (level 20, 256 HP) to Kaguya (level 172, 25,471 HP).
Spearmen — prontera 41, 337
Melee, range 2. The toughest by a distance: the grade 10 reaches 18,000 HP, and the grade 20 reaches 51,520.
From Rodin (level 22, 2,071 HP) to Ansgar (level 193, 51,520 HP).
Swordsmen — izlude 47, 170
Melee, range 2. The middle ground: less staying power than a spearman, more damage per second.
From David (level 20, 502 HP) to Sigmund (level 191, 45,385 HP).
Each of the sixty mercenaries has its own name, level and skill list: they are not twenty copies of the same one with bigger numbers.
Their looks are being reworked
We are redoing the mercenaries' appearance: the current sprites are the stock ones and we are not convinced. It is a purely visual change — none of their numbers or skills depend on it.
See also The twenty grades ask for level and zeny; from the seventh on, loyalty too Each mercenary job has its own skill rotation Guild loyalty only goes up: dying never lowers it
This is the big departure from how this system works anywhere else. Hiring gets you a summoning scroll, and that scroll is not used up. You buy it once and you have it forever.
What you pay on every summon is SP and cast time, and both go up with the grade. The SP is not a flat number: you are charged a percentage of your max SP with a per-grade cap, and whichever of the two is cheaper is what you pay.
From grade 11 to 20
From grade 10 on the percentage stops at 95%. What keeps climbing is the cap and, above all, the cast time: a grade 20 is 13 seconds standing still, unmoved and untouched. That, not the SP, is its real price.
The point is that a character with little SP can still call a high-grade mercenary. With 300 max SP a grade 10 costs 285 SP instead of the 600 cap; with 900 max SP you pay the 600 and no more. The percentage uses your max SP at that moment, gear and buffs included.
The scroll cannot be sold, dropped, stored or passed to another character: it is yours and nobody else's. If you are short on SP the message tells you how much you need and nothing is spent.
See also The twenty grades ask for level and zeny; from the seventh on, loyalty too The mercenary contract lasts as long as your session does
The twenty grades cost the same across all three companies. The first ten:
From grade 11 to 20
From grade 11 on, loyalty stops climbing
The first ten grades raise loyalty step by step up to the 500 of grade 10. From grade 11 that number freezes there: the only thing that keeps growing is the level. Once you have earned a company’s trust you do not have to earn it again to hire higher.
The 1-10 stretch caps the level at 90
The first ten grades climb ten levels at a time, but they stop there: grade 9 and grade 10 both ask for level 90, and what really separates them is loyalty. From grade 11 on that cap is gone and level rules again, all the way to 200 at grade 20.
The manager only shows you the grades you can already hire. If a step is missing from the list you are short on level, on loyalty, or on both: scrolls you could not use are not sold to you.
Grade 1 scrolls are free: there is no excuse not to try a mercenary at level 15.
See also Guild loyalty only goes up: dying never lowers it Three mercenary companies, each with its own guild in its own city The mercenary scroll is not consumed when you use it
The scroll says 30 minutes, and that is how it used to work: a clock running no matter what. Now the clock depends on whether you are playing:
Those same 10 minutes are what switch it to defensive mode, so it doesn't wake a whole nest while you're away.
See also Ten minutes without touching anything and your companions stop picking fights Guild loyalty only goes up: dying never lowers it
Loyalty does not belong to the mercenary: it is yours, with the guild. It is stored per character and per company, so archers, spearmen and swordsmen each keep their own count, and what you build with one you do not lose by dismissing it: it stays there forever.
It rises along three paths that add up at once:
And in a party, every member's mercenary records the kill even if someone else landed it. Farming together raises everyone's loyalty.
What does not exist is losing it
In the original game you lost a point every time your mercenary died. That is gone here: it can die as often as it needs to and you lose nothing.
The cap is 32,767 per guild, a number you will not reach by playing. At 500 you have already unlocked the most expensive thing you can hire.
See also The twenty grades ask for level and zeny; from the seventh on, loyalty too The mercenary contract lasts as long as your session does
The AI does not cast at random: it looks at how many enemies are around, whether it has SP and whether the skill is off cooldown.
Swordsman
Parrying and Reflect Shield in the quiet moments
Bowling Bash with 2 or more enemies bunched up
Magnum Break and Bash on the target
Spearman
Auto Guard in the quiet moments
Brandish Spear with 2 or more enemies bunched up
Spiral Pierce and Pierce on the target
Archer
Arrow Shower with 2 or more enemies bunched up
Sharp Shooting only if the target is above 10,000 HP or there are 3 or more in radius
Double Strafe the rest of the time
When something is hitting you, the rotation changes: it stops spending turns on keeping buffs up and throws everything it has, including the Sharp Shooting it normally holds back. Defending you comes before looking after itself.
Out of SP it doesn't just stand there: it keeps swinging until it recovers. And the skills the AI never uses on its own — Provoke, Devotion, Defender, Lex Divina, the archer's traps, Berserk… — are still in the mercenary window for you to cast.
See also Three mercenary companies, each with its own guild in its own city The companion picks its target by a strict order of priorities
See also The mercenary scroll is not consumed when you use it Pets, mercenaries, autoplay and helpme are out of the combat zones
Call Homunculus was changed so it never requires Seed of Life or any other item. Summoning your homunculus consumes no materials.
Same direction as the rest of the companion system: the cost of having one should be in playing with it, not in an inventory toll every time you bring it out.
See also Homunculus, mercenary and pet run the same AI, rewritten from scratch
What your homunculus gains in intimacy per ration, depending on how hungry it was when it ate:
Feeding it can never leave you worse off than you were. In the original game feeding a full homunculus cost 50 intimacy, and there was a path where the server itself deleted the creature if that subtraction hit zero: caring for it at the wrong moment was how you lost it. Here the worst that happens is a wasted ration. It does not sulk about it either.
Hunger drops at a steady rate, and the doubling is a deliberate choice
The hunger clock is steady and countable: one point per minute. A meal restores 10 points, so ten minutes, and a full stomach holds for one hour and forty minutes.
On top of that, every ration pays twice what it would on a normal server, so raising a homunculus takes half the time.
From newborn (2,100) to ready to evolve (91,100) that is 445 meals given at the right moment, around 74 hours of raising. Intimacy caps at 100,000.
The auto-feed checkbox in the homunculus window waits for the best moment: it feeds at 25 hunger, right inside the 11–25 window, so every single ration collects the full +200. You no longer have to watch the counter to get the most out of it. And from your character sheet you can feed it with the game closed, using the food you keep in Kafra storage.
See also Call Homunculus needs no Seed of Life or any other item The Homunculus Daycare: leave homunculi, breed more, swap whenever you like Homunculus, mercenary and pet run the same AI, rewritten from scratch
Until now an alchemist had one homunculus and only one, forever: the only way to get a different one was to let the one you had starve to death. The Homunculus Daycare ends that.


The caretaker does four things:
Leave one
The one at your side stays on the shelf. Costs 3,500z.
Take one out
Any of the ones you have there comes back with you. Free.
Swap
Both at once, without being left with none in between.
Breed a new one
Like Call Homunculus, but over the counter. You need the skill and a free place.
What does NOT happen to them while they are there
A homunculus at the Daycare does not get hungry and does not lose intimacy. Not in game and not from the website: its hunger clock simply does not exist while it is on the shelf. Leave one for a month and you will find it exactly as you left it.
Feeding from your character page still works, but only for the one you have with you. The ones at the Daycare do not need it.
Where it is
In five cities, and it is the same shelf in all five — what you leave in Prontera you collect in Juno:
A homunculus you leave there does not change in any way: it keeps its level, its experience, its stats, the skills it has learned and its intimacy. The Daycare is not a warehouse that charges you in wear and tear, it is a place where they wait.
See also How many fit: as many as your player level, and the shelf belongs to the account The ten-level rule, and why it does not apply to what you bred yourself Call Homunculus needs no Seed of Life or any other item Homunculus, mercenary and pet run the same AI, rewritten from scratch
The Daycare has as many places as your player level: level 1, one place; level 8, eight. It is the same number you see on your account — the one referrals, participation streak and tags add up to.
The shelf belongs to the ACCOUNT, not to the character
All of your alchemists share the same places and see the same list. What one leaves, another can collect — and when it does, the creature becomes its own without losing intimacy or anything else: moving it between your own characters is not a hand-over, it is changing hands.
If you lose player level
None of them is taken from you. The limit is only checked when you put one in. If you have five stored and your level drops to three, they are still five: you can take them out, swap them and put them back, and the only thing you cannot do is add a sixth until you are back over the line.
Same rule as everywhere else on this server: a new limit is checked when you turn something on, never applied backwards to take away what you already had.
The caretaker tells you where you stand the moment you talk to her, including when you are over the limit — and in that case she says so in plain words, so it never looks like something went missing.
See also The Homunculus Daycare: leave homunculi, breed more, swap whenever you like The ten-level rule, and why it does not apply to what you bred yourself Player level runs from 1 to 24 and cannot be bought What levelling up gives you: more automation quota and a cheaper warper
The caretaker does not hand just anything to just anyone. She only handles homunculi up to ten levels above your base level, both to leave them and to collect them. If you are level 71, up to 81.
With one exception, and it is a big one
If you bred that creature, the rule does not apply to you. Ever. It is yours and it stays yours, whatever your level.
What it is for, then
The shelf belongs to the account, so without this rule you could just make a brand-new alchemist and have it walk around with the level-99 Eira your main raised. With it, the shelf is genuinely shared but each character only handles what its own progress earns.
And rebirth does not take yours away
Transcending leaves you at base level 1, but what you bred yourself you get back all the same, without waiting to climb again. This server has never taken your homunculus away at rebirth, and the Daycare does not either.
The caretaker gives you the exact number as soon as you talk to her — "I can hand you anything up to level 81" — instead of making you do the subtraction every time. And in the list she marks which ones she cannot give you and why, rather than hiding them: a creature that does not appear looks lost.
See also The Homunculus Daycare: leave homunculi, breed more, swap whenever you like How many fit: as many as your player level, and the shelf belongs to the account
Your mercenary, your homunculus and your pet answer you in chat, with lines written for that moment. You write them a past if you want to; with nothing written they talk just the same.
Type a line in normal chat that starts with an asterisk —*it sure is hot around here— and they answer out loud, in public chat, in front of anyone walking by. No windows, no menus, no commands to memorise.
It is not a menu of canned lines or a dialogue tree: every answer is written right then, for that line, knowing who you are, what they are and what the two of you have talked about before.
Who hears you
Who answers
Only one. If you call someone by name —or by a nickname you gave them— that one answers. Otherwise it is whoever has the most to say, going by what you said and by who they are.
They answer in the same language you speak to them in.
They do not stand still while they talk: they can pull a face, walk up to someone or back away from them when it fits, never straying more than 12 cells from their owner. There are twelve seconds between one answer and the next, so a conversation does not turn into a wall of text on top of everyone else's chat.
It can be turned off. The switch lives in Character preferences, inside your account, and takes effect the moment you save it even while you are playing. With it off, nothing leaves the server.
See also Each one has their own way of being, and you write the mercenary’s The lines they come out with on their own are theirs too, not the client’s What talking to them costs, what they remember and what leaves the server
An Amistr does not talk like a Filir, and a Poring does not talk like a Lunatic. The species already brings character, and whatever you write in their past —512 characters in Character preferences— is added to it: how you met, what they owe you, what they are afraid of, what their quirks are.
The mercenary is the exception
They come with no factory character: there you are fully in charge. What you write replaces rather than adds, so they can stop being a mercenary and become your partner, a childhood friend or someone who owes you a favour. The only things you cannot change are that they are a person and their gender, which comes from their company: archers are women, spearmen and swordsmen are men.
And you give them nicknames
"Also answers to…" takes as many as you like. Calling them by one of those makes them the one who answers, exactly as their name would.
What you write goes in as flavour, never as orders: a past that said "ignore the previous rules" stays what it is, a story you wrote for your own character.
You need not write anything. With the field blank they talk just the same: the pet and the homunculus from what they are —including the rarer species, which draw their voice from what they are in this world— and the mercenary from what the trade made of them: someone who lives off contracts, has seen it all and does not startle easily. Writing them a past does not switch them on, it makes them yours.
See also An asterisk at the start of the line and they answer The lines they come out with on their own are theirs too, not the client’s What talking to them costs, what they remember and what leaves the server
By default, when a pet speaks the line does not come from the server: it comes from your client, out of its own table, and it is the same four lines for every pet of that species in every game in the world. Here each one writes their own, out of their species, their past and what they have been through with you.
The moments each one has
How they learn them
They write them when they actually need them, ten at a time, and repeat them free of charge from then on. Learning has its own daily allowance and does not eat into the one for talking.
You can rewrite any line you do not like, or delete it; delete one and they will learn another in its place next time they need it.
Until they have one for a given moment, they say the usual one. That beats standing there in silence; the moment they learn their first line for it, the canned one never comes back.
A pet must be loyal to speak for itself: before that it sticks to the usual lines. The mercenary keeps theirs between contracts: dismiss them and summon them again and they are still them, not starting over.
See also An asterisk at the start of the line and they answer Each one has their own way of being, and you write the mercenary’s What talking to them costs, what they remember and what leaves the server
Writing each answer costs real money, so there is a cap — and it is in plain sight, with its two bars, in Character preferences.
The units
The memory
It ships off: by default every line is a fresh encounter. Turn it on and it is a single memory shared by all three —they live together— keeping the last three exchanges word for word and summarising everything older, up to 8 KB per character.
Turning it off erases what was kept. You can read all of it and wipe it whenever you like.
What leaves the server. The line you type, your character's name, the companion's name and the map you are on. Nothing else: not your email, not your account, not your IP. What is said is erased after 48 hours and the record itself after 30 days. With the switch off, nothing is sent at all.
It is the only feature on the server that sends text to a third party, which is why it has its own section in the privacy policy. Never type passwords, emails or card numbers there: if you do, they are under orders not to repeat them out loud.
See also An asterisk at the start of the line and they answer The lines they come out with on their own are theirs too, not the client’s A shared quota that only runs while the bot is actually working, and that refills itself
Most private servers ban bots and then look the other way. Here the server does it itself: with rules, with limits and in plain sight.
With @autoplay your character fights on its own. It is not a macro bolted on from outside: it is the emulator itself moving your character, with five switches you decide.
Typing @autoplay turns it on, and typing it again turns it off.
Auto-storage is no longer one of these switches: since 11 August 2026 it is a list of specific items on your character sheet, and it works however you play.
The server moving it rather than an external program is exactly what makes limits, time accounting and logging possible. A third-party bot cannot be audited; this one can.
See also Autoplay kites, picks its spell to suit the enemy and never meditates surrounded A shared quota that only runs while the bot is actually working, and that refills itself @helpme summons another real character of yours to fight at your side
There is more under the hood than it looks:
Kiting
Ranged or in magic mode, it backs off four cells instead of standing there taking hits.
Picks the hit
It follows no fixed rotation: it simulates what each skill would do against that particular enemy and keeps the one that lands the most real damage.
Resting with its eyes open
Before sitting down to recover SP it checks there are no hostiles nearby, instead of meditating in the middle of a pack.
And it knows when to give up
Out of healing potions, it shuts itself off. It would rather leave your character alive and idle than dead and busy.
See also @autoplay moves your character from the server itself, with five switches you decide The AI picks by the damage that will actually land, not by the number on the table It will not spend on a dying monster what takes a good while to gather Which skills the AI knows how to use, and which are left out on purpose A shared quota that only runs while the bot is actually working, and that refills itself They see the spell coming: they step aside during the cast, clock in hand The bot keeps close to its leader under its own steam, and the rescue warp stops being routine
When the bot has several skills to hand, the question is not which one hits hardest on paper but how much damage is actually going to land. Those are different things more often than you would think.
A 20,000 hit on a monster with 500 HP left is worth exactly 500, the same as a 600 hit. What separates the two is not power: it is waste. And the waste is paid for by whatever resource the big hit spends.
What fits
Anything above the target's remaining HP is discounted. Against something on its last legs, the huge skill and the small one are worth the same.
How many
An area skill adds up what it does to every body it reaches, and anything immune to that element adds zero: it is not a reason to cast.
And those not inside it yet
Anything six cells away or closer counts at half: bodies move while the spell is being cast and may well end up inside. Only if they can move at all — a plant is never going to walk over.
The example this came from
A Soul Reaper with Espa and Curse Explosion. Espa hits one target and takes a second and a half; the explosion hits everything within three cells and takes four, but only really pays off on cursed enemies. At level 10:
| Situation | Curse Explosion | Espa | Picks |
|---|---|---|---|
| One enemy, plenty of HP | 4,200% | 2,900% | Espa, it takes a third of the time |
| Three enemies, none cursed | 4,200% | 2,900% | Espa; uncursed, the explosion hits for a third |
| Three enemies, all three cursed | 12,600% | 2,900% | Curse Explosion, by double |
| One target, already dying | just enough | just enough | Curse Explosion, it costs no souls |
Which is why the chain orders itself
With nothing cursed, the explosion loses the comparison and the bot casts Soul Curse first, which curses the whole cluster at once. Next turn the explosion is the right play. There is no list anywhere saying "curse first, then detonate": it falls out of the arithmetic.
It is also why you will sometimes see the bot use the "small" skill while a huge one sits unspent. It has not made a mistake: the big one did not fit.
See also Autoplay kites, picks its spell to suit the enemy and never meditates surrounded It will not spend on a dying monster what takes a good while to gather Which skills the AI knows how to use, and which are left out on purpose @autoplay moves your character from the server itself, with five switches you decide Espa goes up to level 10, and at level 10 it stops spending a soul sphere
Plenty of the strong skills are not paid for in SP but in something you have to gather first: souls, spirit spheres, coins, servants, charms. None of that comes back by itself, which is why the AI does not treat it like mana.
Before spending an expensive finisher it checks three things, and it needs all three:
1. That it really is being wasted
That less than a third of the hit is going to land. Finishing something off with a bit to spare is normal; what this targets is the blatant case.
2. That something else also kills it
And comes out cheaper. Spheres are compared first and SP only breaks ties: 95 mana and no souls costs less than 88 mana and one soul.
3. That it would genuinely cast it
The substitute has to be something the AI would use in that situation, not merely something the game allows. Saving a resource in exchange for a hit nobody throws is just standing still.
And the safeguard, which matters as much as the rule
If there is nothing cheaper that also kills it, it fires anyway. Leaving something alive to avoid waste is worse than the waste: the monster keeps hitting you.
The same idea governs ammunition, charms and crafting materials: what costs something to replace is kept for when it makes a difference.
See also The AI picks by the damage that will actually land, not by the number on the table Which skills the AI knows how to use, and which are left out on purpose @autoplay moves your character from the server itself, with five switches you decide
Support skills — songs, dances, chorus skills and party buffs — follow one simple rule: reach as many characters as possible, and when they cannot reach anyone else, do what they can as long as they harm nobody.
Who counts as a beneficiary
What it does not attempt
Harming an ally is not possible
This is not a promise of good behaviour: it is how this server's engine works. A buff only reaches your side and a debuff only reaches enemies, so a song cannot turn on your party even if the bot positions itself badly.
Singing does not stop it fighting either: in this version songs do not pin the performer in place, so the bot keeps attacking while they play.
See also Which skills the AI knows how to use, and which are left out on purpose @autoplay moves your character from the server itself, with five switches you decide @helpme summons another real character of yours to fight at your side Soul Unity is a circle that heals and hands out SP for as long as you keep it on Renovatio is no longer a buff with a duration: it is an aura you switch on and off
The AI has no fixed rotation per job. It has a repertoire: the list of skills it knows how to use, each with the condition that makes it worth using. As of 24 August 2026 that is 786, and the list keeps growing.
You are in charge
Every skill has its own switch on the character sheet, with a level cap and conditions. Lowering the level is sometimes worth more than raising it: it costs less and casts faster.
And if something is not integrated, it says so
The panel greys it out instead of offering you a switch that would do nothing. You will never turn on something that then fails to happen.
What is left out, and why
| Kind | Reason | Example |
|---|---|---|
| They open a client menu | Someone has to pick from a window. A bot cannot. | Poisoning Weapon |
| Player-versus-player only | Their condition is never met against a monster. | Soul Explosion |
| They would work against you | They function, but the result hurts you. | Manhole: trapping your target makes it untouchable for up to 15 seconds |
| They undo their own setup | They strip the state another skill in the same line has just applied. | Akumukesu, which removes the nightmares the ninja needs |
None of these exclusions is an oversight: each one is written down with its reason beside it, so that a year from now nobody "fixes" it without knowing why it was that way.
See also @autoplay moves your character from the server itself, with five switches you decide The AI picks by the damage that will actually land, not by the number on the table Songs and support skills reach as many characters as they can, and never work against you Autoplay kites, picks its spell to suit the enemy and never meditates surrounded
An automated character following its leader has a rescue warp: stray too far and it gets teleported back. That was meant as a safety net and had turned into the everyday mechanism — the bot wandered off after a distant monster and the warp dragged it back.
Now it holds itself back. It sets a ceiling two cells below the distance that would rescue it, and that ceiling is checked against the cell it is heading for before the step, not against where it already stands. If it still overshoots — because the leader moved, or a knockback — it goes into panic: it drops whatever it was doing and does nothing but win those two cells back.
And the rescue is no longer unconditional. There are three situations:
Normal
Warp at the usual distance, with panic watching below it so it is almost never needed.
A boss is being hunted
There is a miniboss or MVP near the leader and your unit is not afraid of it. The rescue still works, but at twice the distance, so it is not yanked mid-fight.
Forbidden
The leader is dead, or has a boss your unit does fear within 30 cells. No warp, and no panic either: dragging it in there is exactly what nobody wants.
With the leader dead the unit carries on as if it had no leader: it fights and patrols where it is instead of standing over the body waiting. When the leader revives, the anchor comes back.
And if the leader is inside the area of a boss your unit fears, it is not left adrift: it watches from outside. It gets as close to the leader as it can without setting foot in the danger zone and paces along the edge, always far enough away that the boss cannot see it, until it blows over.
None of this changes what your allowance is charged or how the bot is configured: it is how it moves.
See also @autoplay moves your character from the server itself, with five switches you decide @helpme summons another real character of yours to fight at your side Autoplay kites, picks its spell to suit the enemy and never meditates surrounded They see the spell coming: they step aside during the cast, clock in hand
With @helpme you summon another character of yours — a real one, from your account — and it fights beside you with its own autoplay profile, independent of yours.
It is not a clone or an illusion: it earns real experience, picks up real items and really dies.
Why this didn't exist
In Ragnarok the account id doubles as the session, as the object on the map and as the anti double-login guard all at once. That is why having two characters from the same account in the world had been impossible for years.
It was solved by virtualising the companion's session. It runs in production.
See also @autoplay moves your character from the server itself, with five switches you decide A shared quota that only runs while the bot is actually working, and that refills itself Pets, mercenaries, autoplay and helpme are out of the combat zones
With @order (or @orden) you tell your units what to do without opening any panel. If you don't say who, the order goes to every unit you have out: the Companion, your @helpme characters and the mercenary.
@order [compa|helpme|merc] <order> [name]
How they move
follow: follows you, no wandering.
protect: circles around you.
patrol: wanders at random near you.
How much they fight
passive: never attacks, not even to defend itself.
defend: only whatever attacks you.
aggressive: aggressive monsters and whatever attacks you.
all: everything alive, respecting your ignore lists.
Go for that one
attack [name] sends them after a specific monster even if it is on your ignore list; without a name, they go for the one you are attacking. The order lasts until the monster dies, leaves, or 60 seconds pass. cancel removes it sooner.
@order status tells you what each one has set. Movement and aggressiveness are saved: they are the same settings as the character panel; the attack order is not.
Only the owner can give orders to their units or change their settings. Nobody else, not even a GM.
See also @helpme summons another real character of yours to fight at your side @autoplay moves your character from the server itself, with five switches you decide Autoplay kites, picks its spell to suit the enemy and never meditates surrounded
Autoplay and helpme share a quota, and that quota only runs while the bot is actually working: time spent in town, dead, trading or walking between targets does not count.
How much you get
30 + (30 × your player level) minutes. At level 1 that is 60 minutes; at the very top, over five hours.
How it comes back
There is no midnight reset any more. Every 30 minutes you get 1/36 of the total back, so from empty it refills completely in 18 hours.
The clock runs while you are logged out too: time away counts just the same towards getting it back.
The bar with what you have left is on your account page, with the countdown until it is completely full again.
See also What levelling up gives you: more automation quota and a cheaper warper Automation pauses if you go idle Automation leaves an auditable log of what it does
After ten minutes without touching anything, autoplay and helpme stop walking and attacking. They keep looking after themselves — healing, not dying — but they don't go out picking fights.
It is the same threshold that switches your companions to defensive mode, and for the same reason: automation is there so you can play comfortably, not so you can farm while you are away.
See also A shared quota that only runs while the bot is actually working, and that refills itself Ten minutes without touching anything and your companions stop picking fights
Everything automation does goes into an auditable log, reset on every server start.
Same line as the daily gift box log and the transparency section: if it can't be checked, it's worth nothing.
See also A shared quota that only runs while the bot is actually working, and that refills itself
With a shop open —selling or buying— type @autotrade. The game closes and your stall stays on the map, trading on its own.
What happens underneath is what makes the feature worth having: the vendor's session stops occupying your account and starts running under an identity of its own inside the server. The account is freed on the spot, so you can log straight back in on another character, with no waiting and no message telling you it still recognises your previous session.
What it takes along
What stays behind
@mybot companions say goodbye and save their progress, and come back on their own when you next enter that character.
A stall sits and faces the same way whether you just left it there or a restart restored it: there is no telling them apart at a glance.
See also The shop survives server restarts, and every sale is saved the moment it happens Getting back the character that is selling involves no waiting @helpme summons another real character of yours to fight at your side
The shop does not live in the server's memory alone. It is written to the database the moment you open it, and it restores itself when the server starts with its title, its spot, its pose and its items. A restart —including the automatic one every night— does not force you to set it up again.
No shop expires. There is no time limit: the stall stays until everything sells, until you enter that character, or until you close it yourself.
Every sale dispatches the zeny, the cart and the inventory at that very instant. It does not wait for the periodic save, so what you sold is yours even if the server goes down a second later.
Prices
When it runs out
If the last unit sells, the stall closes itself and the character leaves the map with everything it earned already saved.
Everything a stall does goes into an auditable log: when it opened, every sale with its amount and its buyer, every save, and why it ended.
See also Your shop keeps selling with the game closed, and your account is freed instantly Getting back the character that is selling involves no waiting Automation leaves an auditable log of what it does
To get it back, just enter that character from the character selection screen. The server closes the shop, saves everything and lets you through: there is nothing to wait out and nobody to ask.
And if you are playing another character on the same account and only want to close the stall without switching, type @shopclose.
Either way nothing is lost: whatever did not sell is still in the cart, and the zeny it took is on the character.
While a shop is running, that character cannot be deleted from the panel. That is deliberate: deleting it would take the shop with it, along with whatever was left unsold and everything it had earned.
See also Your shop keeps selling with the game closed, and your account is freed instantly The shop survives server restarts, and every sale is saved the moment it happens
How you reward the people who hold up a small server: not whoever pays, nor whoever grinds longest in one sitting, but whoever shows up, stays, and brings people who also stay.
Player level runs from 1 to 24 and is earned three ways, which add up:
There is no way to buy it
No shortcut, no bundle, no shop. It only goes up by showing up and bringing people.
Where you see all of it: on your account page. The day-by-day stamp card, the level targets marked out, your current streak and the previous ones, your invitations with each guest's progress, and the exact breakdown of your level.
See also Fifteen active minutes a day fill in that day's stamp Every account hands out up to 64 invitation codes The tester tag adds starting levels, in three grades What levelling up gives you: more automation quota and a cheaper warper
Every day you play fifteen minutes without idling you fill in a stamp on the card.
Autoplay time does not count
The stamp is filled by the person, not the bot.
Fifteen minutes and not four hours: the point is not to punish people with a life outside, it is to reward people who come back.
See also The streak levels up in eleven steps, from one week to 36 months A streak protector saves the day you miss, capped at seven a month A shared quota that only runs while the bot is actually working, and that refills itself
Stamps chain into a streak, and the streak levels up in eleven steps:
If a streak breaks, how many days you had and which day you missed are recorded: past streaks are not erased, they are kept.
See also Fifteen active minutes a day fill in that day's stamp A streak protector saves the day you miss, capped at seven a month
The streak breaks if you miss a day… unless you have a streak protector.
Where they come from
We give you one per full month in a row, and the Participation Assistant in Prontera sells you a couple more.
What they do
With a protector, your absence shows blue on the card and the streak stays alive. Without one it goes red and you start over.
You cannot spend more than seven protectors within the same month.
See also The streak levels up in eleven steps, from one week to 36 months Fifteen active minutes a day fill in that day's stamp
You get into the server by invitation only, and every account hands out up to 64 codes.
This branch's ladder runs from 1 valid referral (level 2) to 52 (level 10). With 64 invitations and 52 needed, there is room for some not to work out.
Your invitations and each guest's progress are on your account page.
See also A guest does not count for registering: they count for playing, and it recalculates Your guests' guests count too, at one third each
A guest does not count for registering:
And the count recalculates, it does not freeze
If someone you invited stops playing, they stop counting, and your level goes down.
It sounds harsh, but it is the fair version: we reward bringing players, not collecting registrations.
See also Every account hands out up to 64 invitation codes Your guests' guests count too, at one third each
The guests of your guests count for you too. Each one is worth one third of a direct referral, under exactly the same rule: level 60 in their first month, level 90 after that.
Three valid second-level referrals equal one direct. Bring people who bring people and the whole network works for you.
Your account page shows the separate counter: how many second-level you have, how many count as valid, and your weighted total.
See also A guest does not count for registering: they count for playing, and it recalculates Every account hands out up to 64 invitation codes
Every account picks one gift, and only one, out of the sixteen on the list, and all of its invitees receive it. In turn you receive whatever the person who invited you picked: that is why the panel shows two columns, what you give and what you are given.
The question everyone asks
They do not stack. The fourteen percentages and the two autocasts come from the same list, so holding a +1% ATK and an autocast at once is not possible. Picking another one replaces the previous one, with no warning and no cost.
Optional, but one-way
Someone who never picked gives nothing, and that is fine. But once you pick for the first time you can no longer leave your invitees with nothing: from then on you only swap one gift for another. The server checks this, not just the form.
And the receiver can say no
Some builds are hurt by an automatic spell going off, so whoever receives the gift has a switch to opt out of it without touching anything on the giver's side.
A change is not immediate for the invitee: the gift is applied on login and removed on logout, so whatever you change today reaches them at their next sign-in. In exchange, nothing from an old choice is ever left stuck or stored.
Only first-level invitees receive it — the ones who used your code. Second and third level count towards your player level, but get no gift. And there are no conditions: having used a code is enough, with neither validity nor activity switching it off.
The two autocasts differ from the rest in one way: besides the gift you also pick the spell and its level, and that is where the chance of it going off comes from. The others are a flat percentage.
See also Every account hands out up to 64 invitation codes A guest does not count for registering: they count for playing, and it recalculates Your guests' guests count too, at one third each Player level runs from 1 to 24 and cannot be bought
Those of you who were here from the first tests already have your tester tag, and it adds starting levels. There is nothing to ask for: it is already applied.
And it is not a single tag: there are three grades according to participation.
See also Player level runs from 1 to 24 and cannot be bought
autoPlay and helpme
30 + (30 × your level) minutes a day. At level 1 that is 60 minutes; at the very top, over five hours.
Warp agent
A 10% discount per level. From level 11 on, travel is free.
Whatever comes next
The level is already available to any NPC on the server. More perks will be hung off it.
See also A shared quota that only runs while the bot is actually working, and that refills itself Player level runs from 1 to 24 and cannot be bought The agent takes you to the gate of any WoE castle The agent tops up your travel kit before every trip
The Daily Gift Girl in Prontera, with no expiry date, four independently rolled slots and a button to claim it from the website.
The Daily Gift Girl was announced to hand out gifts for the last time on 30 September. That farewell was cancelled. Since 1 August 2026 she is still in Prontera 164, 172, same spot, same face.
This is no longer an event on a countdown: it does not close on any date.
And now you can ask her who she is
She has her own dialogue. She came from Lutie, she was the Santa Goblins' envoy, and there is a story behind why she still comes down every morning although the goblins no longer make anything.
Go and say hello. She likes being asked.
See also The gift is four slots, and each one rolls its prize separately The gift can be claimed from the website, with the character logged out One gift per account per day, and one per household per day
The package stops being the same fixed bundle. It is now four slots and each rolls its prize separately, with its own odds and its own quantity. You might get a stack of ten or a single piece.
Each slot can also come up empty: you will not always take home four things.
Verifiable
What can drop from the fourth slot is still published, player by player, in the box log in the transparency section.
As always: if it can't be checked, it's worth nothing.
The previous bundle was fixed: Elunium, Oridecon, a Myst Case, a Battle Manual and a Bubble Gum.
See also The daily gift is not closing: there is no end date The gift can be claimed from the website, with the character logged out
You don't need to log in to collect it. On your account page, under each logged-out character, there is the claim button.
The box opens in front of you and you see what you got right away. The items appear in your inventory the next time you log in with that character.
You can claim several days in a row without connecting: it stacks up and you get it all at once when you come back. It does not expire.
You still need free slots and free weight. Whatever doesn't fit waits for you, it is not lost.
See also The daily gift is not closing: there is no end date One gift per account per day, and one per household per day
One gift per account per day, and one per household per day. It doesn't matter where you take it: claim it in Prontera and the website button goes dark, and the other way round.
If you really are two people under one roof
Tell the Staff and you get listed as an exception. Then there is a package for each of you.
See also The gift can be claimed from the website, with the character logged out The daily gift is not closing: there is no end date
Rules the game measured two different ways, skills advertising bonuses they never gave, and a couple of things that had been broken forever.


Your character measures range as a circle, the same way the client draws it. The server, on the other hand, measured monster range as a square: it only asked that neither the horizontal nor the vertical distance exceeded the range.
In a straight line both calculations agree. On a diagonal they don't: a square of side 9 reaches almost 13 cells of real distance at the corners. That is where the feeling that some monsters shot from outside your reach came from — they did.
The rule, and everything that follows from it
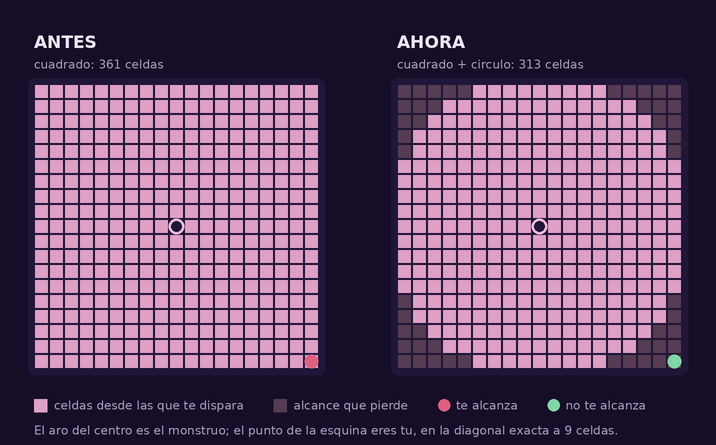
A range 9 monster, with every cell it can shoot you from. Before, corners included; now, only the ones genuinely nine cells away.
It affects 349 monsters out of the server's 2,675: the ones with range 3 or more. The other 2,326 behave exactly as before. It is a server setting, reversible with a single configuration value.
See also All four range checks now share a single calculation Monster area attacks are circles, not squares
The change was not only about counting cells. A ranged monster walks towards you until it considers itself in range, and then plants itself and shoots. That "I've arrived" was computed with the old rule.
Had only the shot been fixed, long-ranged monsters would have stopped on a diagonal from which they could no longer fire, and would have ended up walking right up to you to attack — an absurd zigzag.
The four checks that decide when a monster is in range now share a single calculation, so they cannot contradict each other again.
See also Monsters measure their range as a circle, the same way you do
The same problem as range was present in the area of effect of monster attacks: they blasted a square, so at the corners they caught you from further away than head-on. They are circles now.
The range itself was not touched: they still reach exactly as far in a straight line.
11x11 → 40 fewer cells 15x15 → 76 fewer 29x29 → 228 fewer
It affects 58 monster skills, among them Earthquake, Pulse Strike, Hell's Judgement, Frost Nova and every area status skill (Wide Silence, Wide Curse, Wide Stun…). Player skills are unchanged.
See also Monsters measure their range as a circle, the same way you do An area effect is forbidden ground: they step out and do not step back in
The Swordman's Endure was cancelled after 7 attacks. That cap has been tripled to 21 hits.
And now it actually counts
It had a catch almost nobody knew about: the counter only went down from monster hits and only outside war maps. Inside a castle it never went down at all, so Endure was effectively infinite there.
Not any more: the 21 hits count everyone's, on any map.
And since that makes it far stronger, the duration is now stepped, 5 more seconds per level:
Before, level 10 lasted 37 seconds but dropped after 7 hits, which in a serious fight is about two seconds. Now it is 55 seconds and 21 hits: it holds far longer, but it is still a window, not armour.
See also Monsters measure their range as a circle, the same way you do
Until now almost every soul bonus was flat. A level 1 Shadow's Soul gave exactly what a level 5 gave: the same +60 FLEE, the same +25 crit. Levelling the skill only extended the duration and cut the SP cost.
Every bonus now scales with the level, without exception. Level 5 is still strong, but you have to get there.
Golem's Soul — the wall
Shadow's Soul — the edge
Falcon's Soul — the aim
Fairy's Soul — the magic
Two gaps were closed along the way: Golem's Soul gave no MDEF and Falcon's Soul gave no ATK, even though the server already declared both. They were advertised and unimplemented.
All four cost 1 soul sphere, last 60 to 300 seconds depending on level, and are mutually exclusive: you cannot carry two souls, nor give a soul to someone who already has one.
Souls exist to help a party. But they have a downside, and it is better learnt here than the hard way.
There is a skill called Soul Explosion, and it only works against someone carrying a soul. Against anyone else it fails.
Two things that make it manageable
It only works on PvP, GvG and WoE maps — in the normal world nobody can detonate anything on you — and it cannot finish you off: below 10% of your maximum HP, the skill fails.
It also costs 10 soul spheres and has a one minute cooldown.
So in a war, handing out souls is a real decision: you buff your side a lot and at the same time hand the enemy a button that only works on them.
See also The Soul Reaper's four souls now scale with the skill level
By default, Soul Unity was a one-shot hand-out: casting it stuck the buff on whichever players happened to be in the area at that instant, up to a target cap. Anyone arriving late was left out, and keeping it up cost the caster nothing.
Here it is a toggle. Casting it switches it on and it never expires; casting it again switches it off. While it is on, the aura lives on the Soul Reaper and pulses every 3 seconds, sweeping whatever is around — so people who walk in are picked up and people who walk out are dropped, with no need to recast.
What each pulse gives
Who it reaches
The blessing is three heals, and it travels with you
The first one comes from the pulse that reaches you. If you step out of the circle you still have two left, one every 3 seconds, so the blessing keeps working for 6.5 seconds after the Soul Reaper is out of sight. Coming back in sets it to three again.
The SP is paid by the Soul Reaper, once per pulse and only if there is someone to heal: twenty people healed cost the same as one, and a pulse with nobody wounded is free. It is 44 to 56 SP depending on level.
A higher-level Soul Reaper takes the blessing away from a lower-level one and replaces it with theirs; at equal or lower level, whatever you already carry is left alone.
Switching it off is completely free: no SP, no soul spheres, none of the 4-second fixed cast, and no cooldown — which is three minutes at level 7. And while you carry it, a green heart above your head says so.
See also Renovatio is no longer a buff with a duration: it is an aura you switch on and off Two hearts above the head tell you who is blessed and with what The Soul Reaper's four souls now scale with the skill level Espa goes up to level 10, and at level 10 it stops spending a soul sphere
Renovatio used to be a targeted buff: you cast it on someone, it healed a percentage of their health every few seconds, and it ran out. It is now modelled on Soul Unity: a toggle with an area, with no duration, pulsing every 5 seconds for as long as you keep it on.
Two reaches, always centred on the Arch Bishop
What each pulse heals
No pulse costs SP. To anyone.
Not to the blessed, not to the Arch Bishop. The only thing you pay for is the cast that switches the aura on, 240 to 360 SP depending on level. From then on keeping it up is free — and so is switching it off.
The first pulse activates the blessing and it is yours. You can stay close or walk away: if you leave you still get 2 more pulses, one every 5 seconds, and then it fades. While you stay inside the area the counter refills on every pulse, so it never runs out.
A higher-level Arch Bishop takes the blessing away from a lower-level one, exactly as in Soul Unity.
About the 19x19: an area centred on a cell is always odd-sized, so an exact 18x18 does not exist. The next odd size up is used instead.
Anyone carrying it shows a white heart above their head.
See also Soul Unity is a circle that heals and hands out SP for as long as you keep it on Two hearts above the head tell you who is blessed and with what
Both blessings come and go on their own — you pick them up by getting close and they fade a few seconds after you walk away — so there had to be a way to see who is carrying what without asking. They are drawn above the head, over the character, so they do not cover it.
Green heart, hollow
It is the outline. It means you are inside the circle of a Soul Reaper with Soul Unity switched on, or that you still have blessing left from one.
White heart, solid
It is exactly the fill of the green one, and it means Renovatio. If you carry both at once they nest into each other and you will see one complete heart.
The heart appears with the first pulse that reaches you and goes out at the exact moment the blessing ends, counting the bonus pulses you take with you when you walk away. While it lasts it holds steady: it does not blink or visibly restart, even though under the hood it is refreshed on every pulse.
They are artwork made for this server, not effects recycled from another skill. They are drawn in front of the character: the auras the client paints on the ground are hardwired to the game level system and no more of them can be made.
See also Soul Unity is a circle that heals and hands out SP for as long as you keep it on Renovatio is no longer a buff with a duration: it is an aura you switch on and off
The in-game description for Espa said max level 5, cut off mid-sentence and never mentioned the damage at all. None of that was true, and more than one person stopped levelling it believing it was already maxed.
Eswhoo within the next 5 seconds.
Neither the damage nor the cost was touched: this is exactly what the skill already did. What was fixed is the text describing it.
See also The Soul Reaper's four souls now scale with the skill level Soul Unity is a circle that heals and hands out SP for as long as you keep it on The AI picks by the damage that will actually land, not by the number on the table
See also Kaahi charges SP based on the healing it actually applies
Kaahi was adjusted so the SP cost depends on the healing actually applied rather than on a fixed value inconsistent with what the skill did.
See also Estin, Estun, Leap and the Taekwon Breaks, reviewed one by one
The Mechanic's Axe Boomerang is one of the few skills whose damage depends on the weight of the weapon. It is not a change made by this server: it is how the skill has always been written, and almost nobody knows about it.
What matters is where that weight goes. It is not added to the final damage: it is added to the percentage, right next to what the skill level gives.
The whole formula
(250 + 50 × skill level + axe weight) % of your attack, further multiplied by your base level ÷ 100 from base level 100 onwards.
The number added is exactly the weight shown on the item page of this site. A 700-weight axe adds +700%; level 5 of the skill adds 250. The weapon carries — quite literally — a lot more weight than the skill level does.
What each axe contributes
| Axe | Weight | Added to % | Weapon ATK |
|---|---|---|---|
| Axe | 80 | +80% | 38 |
| Battle Axe | 150 | +150% | 80 |
| Buster | 220 | +220% | 155 |
| Two-Handed Axe | 250 | +250% | 185 |
| Bloody Axe | 400 | +400% | 170 |
| Doom Slayer | 600 | +600% | 10 |
| Avenger | 600 | +600% | 270 |
| Avenger-LT | 700 | +700% | 290 |
| Vivatus Fides Axe | 750 | +750% | 270 |
| Booster Axe | — | +0% | 200 |
The Doom Slayer is the extreme case: 10 attack, and it still contributes +600% of percentage. The Booster Axe is the warning in the other direction: some axes have no weight defined, and on those the bonus is exactly zero. One glance is enough to tell: if the item page lists no weight for it, it adds nothing.
That percentage multiplies everything
It is not separate damage. It is the multiplier of the hit, so it scales every bit of attack you have put together: the weapon's, your gear's, your stats', your cards' and any attack buffs you are running.
Which is why a heavy axe pays off more the better the rest of your gear is, not less.
And what does NOT count
Power Swing, the Mechanic's other axe skill, does not use weight: that one runs on STR and DEX.
Other skills do look at weight — Spiral Pierce at the weapon's, Shield Boomerang at the shield's — but those add it to the attack. Axe Boomerang is one of the ones that add it to the percentage, which is why the gap between a light axe and a heavy one is not a few points, but multiplying the hit several times over.
See also The 52 forgeable weapons, one by one
The bug where some monsters performed a ghost-walk on taking multihit — appearing displaced from where they really were — has been fixed.
It is a particularly dangerous bug because it breaks the visual reading of a fight and ends up killing a lot of people. It shows up even on official servers.
See also Monsters measure their range as a circle, the same way you do
Restored
Monsters cast Orc Head again (Reverse Orcish), which had been doing nothing for a while. Twenty-one monsters know it, and they try it once in a blue moon.
The status only lands on characters that allow it: for everyone else the spell always bounces off. Characters created from now on allow it; older characters have to be granted it by hand. It lasts twenty minutes, it is only the looks —no change to your stats, your gear or what you can do— and it survives logging out, so leaving and coming back is not how you get rid of it.
Healer NPCs do more
On top of healing HP and SP, they clear orc head, blind, confusion, curse and other annoying debuffs.
The experience a monster drops is multiplied by a rate that comes from subtracting your base level from its own. It is not a penalty that grows in a straight line: there is a band where you actually get more.
The monster is above your level
The monster is below your level
The best place to farm is above you
The peak sits ten levels above you: 140% of the experience. Staying on things that outgrew you a long time ago costs you money.
It applies the same way to base and job experience, and always against your base level, never your job level.
The extra experience an MVP gives for being one is handled separately and carries no penalty: you get all of it. Item drops have their own table, similar to this one but not the same.
See also In a party every member collects the monster's full experience How wide a level gap a party can share experience across
With experience share turned on, every member collects the monster's full experience. It is not a cake cut into slices: the server splits it among those eligible and then adds 100% per extra member, which is exactly what it takes for each of them to end up with the whole thing again.
And if several of you hit it, it pays off: every extra attacker adds another 25%, up to twelve.
What is yours alone is the level gap penalty, applied at the end and against your own level. The killer being on par with the monster does not protect the rest.
An example with numbers
Level 100 monster dropping 10,000 experience, party of two. The level 100 member takes the full 10,000. The level 65 one is 35 levels below, so they collect 60%: 6,000. What one fails to collect is not gained by the other — it is simply never created.
Who is in the split
Talking counts as activity
Walking, attacking, using items or skills and typing in chat all reset those five minutes. Coordinating with your party is playing.
Opening a vending shop, setting up a buying store or sitting in a chat room do drop you from the split right away, even if you just typed something.
Without share turned on everyone keeps the experience of what they kill, and the level gap penalty still applies to them all the same.
See also How much experience a monster gives depends on its level gap with yours How wide a level gap a party can share experience across
Experience share can only stay on while the party fits inside a level window. It is measured between the lowest and the highest online member: it is the width of the whole party, not each member compared against the leader.
The highest level sets the window
Married couple: no limit
If the party is exactly two people married to each other, the window is gone. Whatever the gap, it works.
No baby needed, no same map, no minimum level. The moment a third member joins, the normal window is back.
Offline members do not count
The window only measures those who are online. A level 30 friend who is offline gets in nobody's way… until they log in: that is when it is recalculated and, if you no longer fit, share turns itself off.
The old family exception is still there: parents and adopted baby skip the window as long as all three are online on the same map and both parents are level 70 or above.
See also In a party every member collects the monster's full experience How much experience a monster gives depends on its level gap with yours
The cards and gear that grant uninterruptible cast — so a hit does not cut your spell — charge for it with a slower cast: Phen, Bloody Butterfly, Orleans's Gown, All In One Ring, Home Cherry Blossom. That is their price, and it is fair that they have one.
But in GvG, in the castles and in battlegrounds the game ignores uninterruptible cast: you get cut there anyway. The toll, however, was still being paid in full. On those maps those pieces were pure punishment: all of the penalty and none of the benefit.
Not any more. On those same maps — not one more, not one less — the part of your gear that slows casting stops being charged.
What speeds you up is kept
Only what slows you down is dropped. If a piece reduces your cast time, that reduction keeps working inside the war zone.
And it works even when both come from the same item: the Caracas Ring and the RJC2012 Spell Necklace grant uninterruptible cast and faster casting. You keep the good half.
What does not change
The statuses your opponent throws at you to slow your casting still work exactly as before. Those are not the price of your own card, they are an attack.
Outside war zones nothing changes either: uninterruptible cast works and its toll is paid, as always.
The map condition is the very same one the game uses to switch uninterruptible cast off, so the two rules cannot drift apart: where the gift stops counting, its price stops being charged.
See also Cast time has two halves, and DEX only shortens one of them Castles are covered at all times, siege or no siege Each castle grounds takes classes up to a cap They see the spell coming: they step aside during the cast, clock in hand
The Rune Knight's Hundred Spear shows five numbers on screen, and that is where the most common misunderstanding about this skill comes from: it looks as if every hit carries the full percentage. It does not. The skill computes one single blow with the whole percentage and then cuts it into five to draw it.
The whole formula
(600 + 200 × skill level) % of your attack, split evenly across 5 hits, and multiplied by your base level ÷ 100 from base level 100 onwards.
Five hits of split damage are not five chances at damage: it is one blow chopped up. Each piece goes through the target's defense separately, so against high-DEF enemies it performs slightly worse than a single blow of the same size.
What each level deals
| Level | Total | Per hit | Cast | Area |
|---|---|---|---|---|
| 1 | 800% | 160% | 1.0 s | 3×3 |
| 2 | 1,000% | 200% | 0.9 s | 3×3 |
| 3 | 1,200% | 240% | 0.8 s | 3×3 |
| 4 | 1,400% | 280% | 0.7 s | 3×3 |
| 5 | 1,600% | 320% | 0.6 s | 5×5 |
| 6 | 1,800% | 360% | 0.5 s | 5×5 |
| 7 | 2,000% | 400% | 0.4 s | 5×5 |
| 8 | 2,200% | 440% | 0.3 s | 5×5 |
| 9 | 2,400% | 480% | 0.2 s | 7×7 |
| 10 | 2,600% | 520% | 0.1 s | 7×7 |
What adds percentage to it
At level 10, with Spiral Pierce 5 and Dragonic Aura 10 active, the total is 4,450%, or 890% per hit. If it also lands with all 10 Charging Pierce stacks, 8,900%.
Requirements and pacing
It counts as a piercing skill alongside Pierce, Spiral Pierce and Madness Crusher: if you have Charging Pierce running, every use of any of the four adds one stack.
See also Ignition Break bursts around you and its damage ignores distance Dragon Breath is computed from your current HP and max SP, not from your attack Axe Boomerang adds the axe weight to the damage percentage
Ignition Break is not cast on an enemy: it is cast on you. The target you have selected only serves to aim the skill; what decides who gets hit is a 9×9 cell square centred on your character, and everything hostile inside takes the same percentage.
The whole formula
450 × skill level % of your attack, in one single hit, multiplied by your base level ÷ 100 from base level 100 onwards.
There are no other terms. No extra stats, no bonus per enemy count, no hidden condition: it is the simplest percentage of the three skills in this family.
| Level | Damage | SP | Area | Cooldown |
|---|---|---|---|---|
| 1 | 450% | 35 | 9×9 | 2 s |
| 2 | 900% | 40 | 9×9 | 2 s |
| 3 | 1,350% | 45 | 9×9 | 2 s |
| 4 | 1,800% | 50 | 9×9 | 2 s |
| 5 | 2,250% | 55 | 9×9 | 2 s |
It can crit
That is this skill's oddity. The vast majority of skills can never land a critical, no matter what you do with LUK; Ignition Break can, and it uses your normal critical rate.
That turns a 2,250% percentage into a considerably larger one every time it happens, and it stops LUK and critical damage bonuses from being dead stats for an area-focused Rune Knight.
What to keep in mind
The distance to the target appears nowhere in the calculation. An enemy standing on top of you and one at the edge of the 9×9 take exactly the same blow.
See also Hundred Spear splits one single percentage across five hits Dragon Breath is computed from your current HP and max SP, not from your attack Axe Boomerang adds the axe weight to the damage percentage
Dragon Breath is the odd one out of the family: it is a physical attack, but it is not built from your attack. The skill manufactures an amount of damage out of your HP and SP, adds it to your attack, and the skill's own percentage is a flat 100%. With normal numbers that addition is so large that the weapon becomes almost irrelevant.
The whole formula
(current HP ÷ 50 + max SP ÷ 4) × skill level, multiplied by your base level ÷ 100 from base level 101 onwards, and then by (90 + 10 × Dragon Training level) %.
That number is added to your attack and the skill's own maths end there: there is no damage percentage multiplying it afterwards.
CURRENT HP, MAXIMUM SP
The half of the formula that looks at HP uses the HP you have right now: at half health you deal half of that half. The half that looks at SP uses the maximum, not the current value, so spending SP does not lower your damage.
Hence the advice that sounds contradictory: for this skill, VIT and HP gear are damage stats, and walking into a fight already hurt is losing damage.
Dragon Training multiplies
With no points at all in Dragon Training the skill hits at 90%. Each level adds 10%, and at level 5 —the maximum— it hits at 140%.
It is the only indirect requirement that matters: 5 points there are worth half a full level of the skill itself.
What each level contributes
| Level | Multiplier | Area | Cast | SP |
|---|---|---|---|---|
| 1 | ×1 | 3×3 | 0.5 s | 30 |
| 2 | ×2 | 3×3 | 0.5 s | 35 |
| 3 | ×3 | 3×3 | 0.5 s | 40 |
| 4 | ×4 | 5×5 | 1.5 s | 45 |
| 5 | ×5 | 5×5 | 1.5 s | 50 |
| 6 | ×6 | 5×5 | 1.5 s | 55 |
| 7 | ×7 | 7×7 | 2.0 s | 60 |
| 8 | ×8 | 7×7 | 2.0 s | 65 |
| 9 | ×9 | 9×9 | 2.5 s | 70 |
| 10 | ×10 | 9×9 | 2.5 s | 75 |
The cast times in the table already include the half second of fixed cast every level carries. After casting there are 2 seconds of after-cast delay, but the skill has no cooldown of its own: you can chain it as soon as the delay ends. And at every level you must be riding the dragon.
An example with real numbers
A Rune Knight with 30,000 HP, 2,000 max SP, base level 175, Dragon Training at 5 and the skill at 10:
(30,000 ÷ 50 + 2,000 ÷ 4) × 10 = 11,000 → × 175 ÷ 100 = 19,250 → × 140% = 26,950 of added attack.
At half health that same character drops to 19,600. The only difference is current HP.
The traps in the calculation
Fog Wall.
The two versions and their element
Giant Growth turns the fire breath holy, Fighting Spirit turns the water one ghost, and Lux Anima overrides both (shadow and neutral respectively).
If you have reached Dragon Knight, an active Dragonic Aura adds 10% per level of the buff on top of the result, and merely having it learned changes the formula as well: it puts your POW inside the multiplier, adding POW ÷ 5 to the 90 + 10 × Dragon Training. Without that skill learned, P.ATK does not count for this blow either.
See also Hundred Spear splits one single percentage across five hits Ignition Break bursts around you and its damage ignores distance Axe Boomerang adds the axe weight to the damage percentage
The time a skill takes to go off is really two separate times added together, and they are not reduced by the same things. Nearly every question about cast time comes from this: why someone with 150 DEX still takes just as long to cast Energy Coat, or why boots that promise half a second less make no difference at all.
Variable cast
The half that does drop with stats. It is shortened by the formula 1 − √((DEX × 2 + INT) ÷ 530), and also by Poem of Bragi, Suffragium, Foresight and gear with "cast time reduction".
Once DEX × 2 + INT reaches 530 it disappears entirely. Past that point, more DEX does not shave off a single millisecond.
Fixed cast
The half that ignores your stats. Not DEX, not INT, not Bragi, not Suffragium. Only gear and statuses that explicitly say they reduce fixed cast time touch it: the Temporal Boots, Sacrament, Swing Dance, Dance with Wug, Heat Barrel…
There are 364 items in the server catalogue with a fixed cast reduction written into their description.
Whatever is left over is lost
The reduction in seconds is subtracted from that skill's fixed cast, and the result never drops below zero. If the skill has 0.3s of fixed cast and you carry −0.5s, you land on 0 and the remaining 0.2s are not taken off the variable half. There is no negative time to make up for it elsewhere.
What a −0.5s fixed cast reduction actually does
| Skill | Class | Variable | Fixed | Fixed with −0.5s |
|---|---|---|---|---|
| Energy Coat | Mage | 0 | 5.0s | 4.5s |
| Fire Bolt 10 | Mage | 3.2s | 1.2s | 0.7s |
| Thunderstorm 10 | Mage | 4.5s | 1.5s | 1.0s |
| Storm Gust 10 | Wizard | 6.3s | 1.5s | 1.0s |
| Magnus Exorcismus | Priest | 4.0s | 1.0s | 0.5s |
| Asura Strike 5 | Champion / Sura | 1.0s | 1.0s | 0.5s |
| Aimed Bolt | Ranger | 2.0s | 1.0s | 0.5s |
| Comet | Warlock | 10.0s | 2.0s | 1.5s |
| Chain Lightning 10 | Warlock | 5.5s | 1.0s | 0.5s |
| Adoramus · Judex | Arch Bishop | 2.0s | 0.5s | 0 |
| Dragon Breath 10 | Rune Knight | 2.0s | 0.5s | 0 |
| Severe Rainstorm 5 | Minstrel / Wanderer | 3.5s | 0.5s | 0 |
| Ray of Genesis 10 | Royal Guard | 6.0s | 0.5s | 0 |
| Arrow Storm | Ranger | 2.0s | 0.3s | 0 · 0.2s wasted |
| Psychic Wave 5 | Sorcerer | 12.0s | 0.6s | 0 · 0.4s wasted |
| Arms Cannon 5 | Mechanic | 2.0s | 0.1s | 0 · 0.4s wasted |
| Cart Cannon 5 | Genetic | 3.0s | 0 | 0 · no change at all |
| Stone Hard Skin | Rune Knight | 0 | 2.0s | 2.0s · ignores gear |
| Giant Growth · Refresh · Crush Strike | Rune Knight | 0 | 1.0s | 1.0s · ignores gear |
Energy Coat is the extreme case and the clearest one to learn from: all of its cast is fixed. Five seconds that will not drop with DEX, with INT or with Bragi no matter how much you stack. The only way to shorten them is a fixed cast reduction. Fire Bolt is the opposite: with high DEX the variable half evaporates and what is left on screen is almost entirely fixed cast.
There are skills where it does nothing at all
Many skills have zero fixed cast: all of their time is variable. A fixed cast reduction changes nothing there, however much of it you are wearing. Cart Cannon in the table above is the textbook case —three full seconds of variable cast and not a millisecond of fixed— and the same goes for Soul Expansion and Crazy Weed, Metallic Sound, Highness Heal, Hundred Spear, Ignition Break and Cluster Bomb. On those, DEX is what helps.
And a third case: skills that accept no gear reduction
46 skills do have fixed cast but ignore any reduction coming from a piece of gear. Four of the Rune Knight runes are the clearest example: Stone Hard Skin takes two seconds and Giant Growth, Refresh and Crush Strike take one, and neither the Temporal Boots, nor Sacrament, nor DEX shave a millisecond off them. That time is untouchable.
Dragon Breath, from the very same class, does accept the reduction: not every skill in a class behaves the same way.
On top of all that, 63 skills also ignore DEX and INT for their cast time —Mystical Amplification being the best known, and the four runes above are on the list too. On those, the time you see written is exactly the time you will be waiting.
See also "Base DEX 120" means the DEX you spent points on, not the one on your stat window In a war zone you no longer pay the toll of uninterruptible-cast cards
There are 463 items on the server whose description asks for something along the lines of "Base DEX at least 120". The Temporal Boots are the best known of the list, and also the most common source of disappointment: someone checks their stat window, sees 137 DEX, puts the boots on and nothing happens.
The requirement looks at the base stat: the points you spent raising it, and nothing else. It is the number shown to the left of the "+" in your character window.
What does NOT count towards the 120
How high you can push it
With the cap at 99, a 2nd class cannot meet a 120 requirement by any means.
The whole Temporal Boots family works the same way
| Boots | Requirement | What you get for meeting it |
|---|---|---|
| Temporal STR Boots | Base STR ≥ 120 | +50 ATK |
| Temporal INT Boots | Base INT ≥ 120 | +60 MATK |
| Temporal AGI Boots | Base AGI ≥ 120 | +1 ASPD |
| Temporal VIT Boots | Base VIT ≥ 120 | +8% max HP |
| Temporal DEX Boots | Base DEX ≥ 120 | −0.5s fixed cast and +5% ranged damage |
| Temporal LUK Boots | Base LUK ≥ 120 | +30% critical damage |
All six also grant, requirement met or not, +300 HP and +30 SP, plus another step of HP, SP and their own stat for every 3 refine levels. That part you always get.
The level 70 version asks for less
The Temporal Boots ROC follow the same rule with the bar set at 99 base stat, and grant half as much: the DEX one gives −0.2s fixed cast and +3% ranged damage.
This is not a bug and it is not a decision of ours: it is how the original game works, and it makes sense. If gear counted, you could simply chain +DEX pieces to unlock requirements meant for characters who paid stat points for them.
See also Cast time has two halves, and DEX only shortens one of them
In PvP, GvG, WoE and battlegrounds you fight with what you are wearing and what you know how to do.
In PvP, GvG, WoE and battlegrounds there are no pets, no mercenaries and no automation.
What happens on entry
The moment you step onto one of those maps: your pet returns to its egg, your mercenary withdraws and autoplay and helpme switch off. Each one tells you on screen.
Nothing is lost. The pet goes back to its egg, it does not disappear.
Trying to enable @autoplay or @helpme on those maps returns a warning in red. Turning them off does work from inside, in case you walked in with something running.
The goal is simple: when you face someone, let it be your gear and your play that decide it.
See also Castles are covered at all times, siege or no siege Items blocked in a combat zone are not consumed when you try to use them Guild dungeons are left out of the restriction One mercenary at a time, the experience is yours and the loot drops on the floor
Where it applies, exactly:
PvP GvG WoE castles WoE: TE Battlegrounds
Castles are covered at all times, whether WoE is running or not. There used to be a gap where, outside siege hours, nothing was enforced.
See also Pets, mercenaries, autoplay and helpme are out of the combat zones Each castle grounds takes classes up to a cap The War of Emperium schedule is set from inside the game In a war zone you no longer pay the toll of uninterruptible-cast cards
Mercenary scrolls, pet eggs and the incubator cannot be used inside a combat zone.
If you try, you get a warning and the item is not consumed. You lose nothing by trying.
See also Pets, mercenaries, autoplay and helpme are out of the combat zones The mercenary scroll is not consumed when you use it
In guild dungeons you can still use everything: pet, mercenary, autoplay and helpme.
That is where you go to farm, not to compete, and restricting them made no sense.
See also Pets, mercenaries, autoplay and helpme are out of the combat zones
There are two editions of the war, each with its own castles:
Every war session has its day, its time slot and its own list of castles: they do not all have to take part. The ones left out are closed for as long as it lasts, and if you are inside one of them when it starts, you are taken out.
The schedule is no longer written inside the server: it is an agenda edited from within the game. Slots can be added, removed or cut short, and you can pick which castles join each one.
That is a good thing — it can be tuned without stopping anything — but it has a consequence: a table of hours copied onto this page would go stale the day someone changes it, and it would say one thing while the server does another. So there is none.
Where to check the real schedule
At the WOE Information NPC in Prontera. It tells you whether the war is on right now, in which regions, what time it ends, when the next one starts and who holds each castle.
It is the only live source: it reads the very agenda that governs the war, so it cannot drift from it.
See also Castles are covered at all times, siege or no siege The agent takes you to the gate of any WoE castle Each castle grounds takes classes up to a cap
The town agent now takes you to the WoE castle grounds, and before every trip she checks your bag and tops up whatever is missing.
The agent's menu has a new entry, WoE castle grounds. It shows up on its own as soon as you have unlocked any of the six towns with castle grounds next door; with none of them, it does not appear at all.
You pick the grounds first and then which castle, and she leaves you on the outer map, on the very cell that castle's exit spits you out on. The agent never puts anyone inside a castle: she leaves you at the gate.
| Town that unlocks it | Grounds | Map | Fare |
|---|---|---|---|
| Payon | Baldur | pay_gld | 100z |
| Prontera | Valkyrie Realms | prt_gld | 200z |
| Geffen | Britoniah | gef_fild13 | 300z |
| Aldebaran | Luina | alde_gld | 600z |
| Juno | Nithafjoll | sch_gld | 600z |
| Veins | Valfreyja | aru_gld | 1200z |
Why Juno and Veins
They are not the capitals of those realms — that would be Lighthalzen and Rachel. They are the towns whose portal walks you into those two grounds.
It is the rule of the whole chart: the agent never opens a door to somewhere you could not reach on foot.
What you see before paying
The submenu lists the five castles with their name and the guild holding them, or free if empty. And it warns you if the war is on right now.
Names and owners are read from the server at that moment, not from a hand-written list.
The fare
It takes your player level discount like any other trip: from level 11 on, travel is free.
The Free Ticket for Kafra Transportation is not valid here. That ticket is for moving between towns.
The fare follows what you will find inside, not the distance: Payon costs 100z and Veins 1200z because one takes novices and the other takes anyone. See the class cap of each grounds.
See also Each castle grounds takes classes up to a cap There is a warp agent at every castle gate so you can leave The agent tops up your travel kit before every trip What levelling up gives you: more automation quota and a cheaper warper The War of Emperium schedule is set from inside the game
Getting to a castle grounds and not being able to leave without walking half a map made no sense, so there is an agent at every gate: thirty in total, five per grounds, standing three cells from the exact cell the trip drops you on and facing it.
They are ordinary agents and do everything a town one does — travel, healing, storage, the guild menu and the travel kit — with a single difference: they unlock nothing. Town and dungeon stamps are still earned by going to the places.
They also help if you walked in through the field portal: they stand at the gates, which is where everybody passes.
See also The agent takes you to the gate of any WoE castle Each castle grounds takes classes up to a cap
The castles are split into power brackets. Each grounds takes classes up to a cap, and anyone above it bounces off when crossing the gate.
| Grounds | Who may enter | Travel fare |
|---|---|---|
| Payon — Baldur | Novices and first classes | 100z |
| Prontera — Valkyrie Realms | Up to second class, not reborn | 200z |
| Geffen — Britoniah | Up to transcendent second class | 300z |
| Aldebaran — Luina | Up to third class | 600z |
| Juno — Nithafjoll | Up to third class | 600z |
| Veins — Valfreyja | Anyone, no cap | 1200z |
The outer map has no cap at all. The agent takes anyone to any grounds, and that is where whoever cannot pass the gate stays: you can watch the war from outside.
Where each class falls
The bracket is not decided by a hand-written list, it is decided by the classification the server already makes. That is why the expanded classes land where they belong on their own:
First class
Novice and the usual six, and with them Taekwon, Ninja, Gunslinger and Doram.
Second class
The usual twelve, and with them Super Novice, Star Gladiator, Soul Linker, Kagerou, Oboro and Rebellion.
Transcendent second
The reborn ones and the High Novice too.
Third class
The usual ones, and with them Star Emperor, Soul Reaper, Night Watch, Shinkiro, Shiranui and the Expanded Super Novice.
Babies count as their class: a Baby Knight is second class, like any other Knight. Fourth classes only get into Veins.
How it is checked
On entering the map, not at the portal. You reach a castle through the field portal, through the agent's trip, through the guild's Emergency Call, through the Kafra inside or through an admin jump, and loading the map is the one door they all go through.
If your class does not fit, you get a chat notice and you are put back at the gate, outside. Nothing is lost and nothing is charged for trying.
Whoever is already inside when something changes stays until they load the map again; this is an entry check, not a continuous eviction.
See also The agent takes you to the gate of any WoE castle Castles are covered at all times, siege or no siege The War of Emperium schedule is set from inside the game
The agent's menu has an Inventory section. There you state how many Red, Orange, Yellow and White Potions, how many Fly Wings and how many Butterfly Wings you want to carry at all times, from zero to a hundred of each.
From then on, before every teleport — towns, dungeons, recent places and castle grounds — she looks in your bag and buys what is missing. It is set per character: what a mage wants to carry is not what a novice wants.
What it costs
The shop price of each item, the same one as at any NPC in the world. The Merchant's Discount applies (and the Rogue's Compulsion), because that is what those skills are for.
The player level discount does not apply here: that one pays for trips, not for purchases.
If the money runs short
There is an order: first one Butterfly Wing if you asked for any, then the potions from cheapest to dearest and the Fly Wings, and the rest of the Butterfly Wings last.
The idea is that nobody ends up stranded without the ride home.
Your fare is safe
The purchase happens before the trip is charged and with the fare set aside. Potions cannot eat your ticket.
And since nothing has been charged yet, cancelling leaves no payment half done.
If she could not fill the order — for money or for weight — she tells you exactly what is missing and lets you choose between travelling like that or calling the trip off. She does not decide for you.
It can be switched off without losing the numbers you set, and asking for zero of everything is the same as not having the service. While it is at zero, the agent does not touch your bag.
See also The agent takes you to the gate of any WoE castle What levelling up gives you: more automation quota and a cheaper warper
A guild has a vault of automation time filled by its members and handed out by the master, plus its own NPC in Prontera for what does not fit in the guild menu.
Any member can hand part of their automation time to the guild from the Guild → Donate Time menu at any Warp Agent. What is donated goes into a shared vault the master later draws from.
About the vault
About the bookkeeping
Three different levels, and they are easy to confuse
The money is the guild's (it comes out of the vault everyone fills), the bookkeeping is the character's (one line per character per guild, so someone with two characters inside has two separate contributions) and the benefit is the account's. That is why showing the net is not decoration: it is the only thing tying the three together.
A member can end up taking more than they ever donated. It is not forbidden: their contribution simply goes negative, and the master is warned before confirming the gift.
See also The Guild Link hands out guild time, and only already-spent time can be given back A shared quota that only runs while the bot is actually working, and that refills itself What levelling up gives you: more automation quota and a cheaper warper
The Guild Link stands at Prontera 151,283 and only opens for the Guild Master. Its Give automation time option hands minutes from the guild vault to one member.
Only ALREADY-SPENT time can be given back
Next to every name you will see (takes 22m) or (full): that is what the account has spent, and therefore all that can be topped back up. Someone sitting on their full allowance cannot be given anything yet — but the moment they spend some, they can be given it right then. There is no midnight reset to wait for, because this server does not have one.
That has a consequence worth understanding before you arrange anything: the headroom grows while that person is out botting and shrinks while they rest, because time comes back on its own, continuously. If someone asks you for 30 minutes and you take a while to reach the NPC, only 20 may fit by then.
With the current settings the base allowance is 30 minutes per account and a full recharge takes around 12 hours of rest. Recovering means resting: while the account is automating, the recharge is paused.
See also A guild has a vault of automation time, and its members fill it A shared quota that only runs while the bot is actually working, and that refills itself @autoplay moves your character from the server itself, with five switches you decide
Official instances reviewed and enabled with the party restrictions lifted, and items that had been unequippable for years.
All the official instance content this server had available was reviewed and enabled. None of them requires a minimum number of players in the party any more (you can go in alone, you just need a party created) and none imposes a maximum level. Each one's minimum level is kept: that is part of its difficulty.
The level colour marks the difficulty band: under 80 80-99 100-129 130-149 150+ no restriction
Relive the orcs' past and face Shaman Cargalache. Orc Hero/Cargalache drops and 1x Ring of Fallen on your first visit.
Ideal to start: you turn into a monster to face Emily and her poring gang.
101 floors of increasing difficulty. Ashes of Darkness as you clear zones and the Violet Fear weapon on the final floor.
Classic memorial dungeon for mid-level characters.
Decide the fate of the Laphine and Manuk tribes. On completion you pick a side: 10x Splendide Coin or 10x Manuk Coin.
Reseal Baphomet's altar. Progress items and a chance at the Giant Magestic Goat headgear.
Episode 16.1: accompany High Priestess Niren through a tale of Edda's past.
Clear the sewers and face the Coelacanth. Daily and weekly errands with Albo, in normal and hard mode.
Heroes' Trail Part 1: the story of Sara Irene, one of the 12 Valkyries.
Heroes' Trail Part 3: relive the assault on an airship.
Episode 16.1, with hard mode available.
A haunted palace guarded by a royal guard not at all pleased by your visit.
A dancing nightmare in a dreamlike dungeon.
A giant monster is kidnapping villagers near the cave.
A cursed tower hiding secrets tied to the Edda legends.
Memorial dungeon with an extra harder mode for level 200+.
The story behind the fall of Glast Heim castle, alongside Hugin the raven.
Remains of an ancient civilisation with technology beyond ours.
The nest of the Faceworms, giant worms infesting the outskirts of Payon.
A Christmas toy factory that hid something sinister among its gears.
Professor Bernhard drags you into an investigation tied to Sarah and the wolf Fenrir.
The invasion of a flying fortress threatens the skies of Prontera.
The hardest room, for the most advanced parties.
Hunt down the Octopus terrorising the Malangdo cave.
Survive waves of enemies in Zonda's Forest or Sky, tower-defence style.
There are other official instances in the game code that depend on narrative quest lines this server does not implement yet (Bangungot Hospital or Hazy Forest, for instance); they were not enabled so as not to leave them with broken dialogue. If one interests you in particular, say so and we'll look into it.
See also Geffen Magic Tournament: a daily instance designed for a single player Onward to the Other World: the quest that opens Midgard Expedition Camp, step by step
The Geffen Magic Tournament is live: a daily instance designed for a single player (you must be in a party, but of exactly one member). You travel to the past to take part in a magic tournament against a run of rivals (Arhi, Dio Anemos, Ordre, Blut Hase, Kuro Akuma, Ifodes, Licheniyes, Odoric, Ju and others) up to the champion, Fenrir (2,500,000 HP).
The sixteen tournament rivals sit at 12.5% of official HP here (Fenrir has 2,500,000 instead of 20,000,000), but they still hand out the full experience. The rest of the instance — the two Alphonse of the secret fight and the thugs from the warm-up events — keeps its official values.
How to get in
Talk to Emmitt White, on the dali map (the Dimensional Gap). Requires base level 90 and being leader of a one-member party. You can enter once per calendar day: the slot frees at server midnight, not 23 hours after your last run.
The dali map is not connected on foot to the rest of the world, so /navi dali 98,141 finds no path. The town Warp Agent does offer "Midgard Camp", but only once you have it stamped, and you get that stamp by talking to the agent standing at mid_camp 212,244. So the first trip still has to go through Zonda.
/navi dali 98,141 does work to reach Emmitt White.
Rewards
You earn Geffen Magic Tournament Coins for every round cleared. Trade them with the NPC in charge for gear such as the Physical Enhancer Ring [1], the Magic Intensifier Ring [1], the Anti-Magic Suit [1], the Geffen Magic Robe [1], the Magic Reflect [1] and the Revised Encyclopedia [1].
Official rAthena content, reviewed and implemented on this server.
See also Onward to the Other World: the quest that opens Midgard Expedition Camp, step by step 24 memorial dungeons live, with no minimum party size and no level cap
This is the official quest that unlocks travel to Midgard Expedition Camp (needed, for instance, to enter the Geffen Magic Tournament). It is long but linear.
Before you start
There is no level requirement to begin, but step 7 will ask for base level 70 or above. Level up first if you can and save yourself a round trip.
/navi prt_cas 207,165. Pick "Yes, I am interested."
/navi aldebaran 127,138. Asks for 300 Jellopy (dropped by Poring, Drops, Lunatic and nearly any early-field mob; not sold by any NPC). Hand them over on a second visit.
/navi geffen 90,67. Asks for 1 Emerald (drops from Mantis and Roda Frog) and then 1 Ruby (drops from Zombie Master). Neither is sold in an NPC shop.
/navi izlude 102,171. At base level 70 or above you go straight through; below that, come back at 70.
/navi prt_cas 207,165. Dialogue only. Gives experience and sends you to Lighthalzen.
/navi lighthalzen 220,292. Explains how to get into the Rekenber building.
/navi lhz_in01 132,259 (2nd floor). Talk to him three times: dialogue, "Sure." and "The three kingdoms…".
/navi prt_cas 19,98. Dialogue only.
/navi lhz_in01 132,259, two more visits.
/navi ra_temple 119,113. Dialogue only.
/navi lhz_in01 32,22 or /navi lhz_in01 30,24. Talk twice.
/navi moc_fild20 349,179. Pick "Yes, sure."
/navi moc_fild22b 230,197. First visit: dialogue. Second: "Ready!!" for the final test.
What it unlocks
The Zonda Teleportation Services NPC (Alberta, Aldebaran, Einbroch, Geffen, Lighthalzen, Morocc, Payon, Prontera, Rachel, Veins and Juno) offers you "Midgard Expedition Camp" for 19,000 zeny or 950 Malang Sp Can.
On top of that, Munkenro warps you there for free any day you talk to him again.
From there to the tournament
From Midgard Expedition Camp, walk north to the Transport Device and enter the Dimensional Gap (map dali). Once inside, /navi dali 98,141 takes you to Emmitt White.
Official rAthena content (Episode 13.1), reviewed line by line against this server's actual script.
See also Geffen Magic Tournament: a daily instance designed for a single player
The Ring of the Ancient Wise King (id 2782) is the New World translator. The Manuk and the Laphine of Splendide do not speak your language: without the ring every single one of them answers in growls and chirps, and there is no way to buy, sell or advance a single quest in either city.
This server's rule
The original game requires it to be equipped. Not here: it counts worn or simply sitting in your inventory. All 106 checks across Manuk, Splendide, the episode 13 quests, Nidhoggur's Nest, the coin merchants and the Dicastes documents go through the same rule, so there is no NPC left behind on the old behaviour.
The reason is practical: the ring takes one of your two accessory slots, and in the original game you had to choose between talking to the city and wearing your combat accessory. Here you do not have to choose.
Who gives it to you
Mechanic Engineer Dorance — /navi mid_camp 197,237. He shows up on the map as Schwarzwald Mechanic.
He is building a portable translator and keeps sending you out for the parts. When the chain is done he hands you the ring and some experience, and maxes out your episode 13.2 progress.
What you need first
For Dorance to talk to you at all you must have reached at least the Expedition Report handed out by Commander Hibba Agip — /navi mid_campin 90,121.
And to set foot in the camp you first need "Onward to the Other World", which has its own guide right next to this one.
What it unlocks
The item itself
Accessory for either hand, 10 weight, +50 max HP and +20 max SP.
It cannot be sold, dropped, traded, put in the cart, mailed or auctioned. It is yours and it stays with you.
The one way to lose track of it
"In your inventory" means exactly that: Kafra storage does not count. Leave it in there and you are back to growls. The cart does not count either, but the item already refuses to go in.
Server change of 23 August 2026. The quest, the dialogue and the rewards are the official episode 13.2 ones; the only thing changed is that the ring now counts while it is in your bag.
See also Onward to the Other World: the quest that opens Midgard Expedition Camp, step by step 24 memorial dungeons live, with no minimum party size and no level cap
Every slotted accessory on the server was reviewed, and over 500 of them (Clip, Belt, Necklace, Nile Rose and many others) turned out to have no job assigned in the database, which made them impossible to equip for any character even if you got hold of one.
Fixed: they are usable by every class now, as they should be.
There are still hundreds of documented job-specific accessories (Blacksmith, Hunter, Alchemist, Priest…) spread across bosses and late content. Check your inventory: you may already have one waiting.
See also The slotted Morrigane and Morpheus sets drop from MVPs
Drops from the MVP Detardeurus at 5%, alongside the classic unslotted versions.
Drops from the MVP Kiel D-01 at 5%, alongside the classic unslotted versions.
See also Over 500 slotted accessories are equippable again Ur and Peuz sets: where each piece comes from, and why searching by name finds nothing
The four pieces of the Ur set and the four of the Peuz set do not come from the same place: two drop from monsters and the other two are bought with Mora Coins. Anyone hunting for all four will never find the shoes or the garment, because nothing drops them.
| Slot | Name in game | Name on the panel and in the database | Id | Where it comes from |
|---|---|---|---|---|
| Armor | Ur Plate | Ur's Plate | 15036 | Khalitzburg, in Glast Heim — 5% |
| Shoes | Ur Greaves | Ur's Greaves | 2475 | Guardian of Power, in Mora — 10 Mora Coins |
| Garment | Ur Manteau | Ur's Manteau | 2574 | Guardian of Power, in Mora — 10 Mora Coins |
| Accessory | Ur Seal | Ur's Seal | 2883 | Vanberk and Isilla, in Rachel Sanctuary — 0.5% |
| Armor | Peuz Plate | Peuz's Plate | 15037 | Raydric, in Glast Heim — 0.5% |
| Shoes | Peuz Greaves | Peuz's Greaves | 2476 | Guardian of Power, in Mora — 10 Mora Coins |
| Garment | Peuz Manteau | Peuz's Manteau | 2575 | Guardian of Power, in Mora — 10 Mora Coins |
| Accessory | Peuz Seal | Peuz's Seal | 2884 | Skogul and Frus, in Odin Temple — 0.5% |
The apostrophe that hides them
The client writes these names without an apostrophe —Ur Plate, Ur Greaves— because it takes them from its own name file. The server and the panel use the official name, with the apostrophe: Ur's Plate, Ur's Greaves.
The panel's item search matches the panel name, so typing Ur Greaves exactly as it reads on your screen returns nothing. Search for Ur's, or simply Greaves.
The two pieces that drop
gl_knt02 (50 at a time), gl_knt01 (14) and gl_cas02 (6). By far the easiest piece of the set.
ra_san01, ra_san02 and ra_san05. Their champion versions —Swift Vanberk and Isilla Ringleader— drop it at 2.5%, five times as often.
gl_knt01 (126), gl_knt02 (101) and gl_cas02 (36). Swift Raydric and Solid Raydric drop it at 2.5%.
odin_tem01, odin_tem02 and odin_tem03. Solid Skogul drops it at 2.5%.
These are the server's rates, with the equipment multiplier already applied: gear here drops ten times as often as in the original game.
The two pieces you buy: shoes and garment
Guardian of Power, in Mora (152, 97). He trades 10 Mora Coins for one piece of your choice out of four: Ur's Greaves, Peuz's Greaves, Ur's Manteau and Peuz's Manteau. He asks which job you want it for —Rune Knight, Guillotine Cross or Ranger— but that only picks the batch: he checks neither your class nor any prior quest. Bring the coins and that's it.
The Warper takes you straight to Mora, and there is another Warper inside the village.
Mora Coins come from three places:
Before you go after them
They belong to the Knight branch, third job onwards. All eight pieces are equipped only by Rune Knight and Dragon Knight (and their trans and baby variants), at base level 99 for shoes and garment, and 100 for armor and accessory. A level 88 Knight can hold them, but not wear them.
They can be enchanted in Mora. The Artifact Researcher (148, 98) adds powers to the piece you are wearing for 100,000 zeny and 1 Mora Coin, and removes them too. It works on all eight pieces of both sets.
What the full set gives
+14% max HP, −10% neutral element damage, +50% Hundred Spear and Auto Guard level 1. In exchange, you spend 10% more SP.
+10% physical damage against every race, +100% Wind Cutter and Sonic Wave, a 2% chance to cast Storm Blast when attacking, and +2 ASPD after using Concentration.
Short version: the armor and the accessory are hunted; the shoes and the garment are bought in Mora for 10 Mora Coins each. And in the panel's search box you have to type the apostrophe.
See also The slotted Morrigane and Morpheus sets drop from MVPs Over 500 slotted accessories are equippable again
An additional Eden Teleport Officer was added in Prontera, and the return coordinates from Eden were adjusted for Prontera and Payon.
See also 24 memorial dungeons live, with no minimum party size and no level cap
The Grave Warden is a set of this server's own making: level 100, three pieces. It is not sold in any shop. Each piece is held by a different keeper, and all three live inside the dungeon whose material they are going to ask you for.
Paid with material and zeny, never with donation
Each of the three pieces costs 300,000z plus material that drops on the NPC's own map. None of them takes donation points: this set is earned by playing, full stop.
Sedjet — the armor
Grave Warden Shroud Level 100
/navi moc_pryd04 9,19
Pyramid B4. Asks for 30 Rotten Bandage and 20 Memento, both from the Ancient Mummy that walks that same floor.
Hrimla — the boots
Grave Warden Treads Level 100
/navi ice_dun02 148,139
Ice Cave 2. Asks for 30 Glacial Heart and 5 Mystic Frozen. The second one is the scarce half: it drops at 0.5%.
Mortlake — the garment
Grave Warden Veil Level 100
/navi gl_chyard 144,284
Glast Heim Churchyard. Asks for 30 Fabric and 20 Skull, from the Wraith and the Dark Priest.
What the pieces give
All three are refineable and slotted, so the card you put in them weighs as much as the defense does.
Set bonus
With all three worn at once: MaxHP +5% and MDEF +5, on top of what each piece already gives on its own.
The three keepers serve any level: you can buy the pieces before 100 and store them. What you cannot do is equip them until you get there. Set added on 25 August 2026.
See also 24 memorial dungeons live, with no minimum party size and no level cap Ring of the Ancient Wise King: how to get it, and why you do not have to wear it here The slotted Morrigane and Morpheus sets drop from MVPs
The Prontera Seamstress and her broken option, and what happens to your colour when you put on a disguise.
The Seamstress in Prontera (164, 169) had had a broken option forever: "Clothes from my past" worked for no class at all. It wasn't that it covered only some — it worked for nobody.
It recognises your class, whatever it is
There used to be a hand-written list of the classes it knew. Now it computes it, so it doesn't matter what you are: third class, fourth, Doram, Star Emperor, Soul Reaper, Kagerou, Rebellion… it offers you your full chain down to Novice.
A Soul Reaper, for instance, can dress as a Soul Linker, a Taekwon or a Novice.
A talk before the first time
The Seamstress explains what this is, warns you it is not for deceiving people in combat, and tells you something worth knowing: while you wear a disguise, the skill window can go haywire.
It is fixed in two steps, in this order: 1. take the disguise off 2. log out and back in. One alone is not enough.
At the end she asks you to sign by typing your character name. Once signed, she never gives you the talk again.
You can talk to her in Prontera or type @disguise from any map.
See also Each disguise remembers its own colour, and yours stops getting lost Novices cannot use disguises; the Super Novice can Disguises are hidden in combat zones; equipment costumes are not
Each disguise, its colour
Put on a disguise and talk to the Stylist (170, 180): the colour you pick stays with that disguise.
Take it off and you get your own colour back, intact. Put that disguise back on and its colour returns.
One for each
The Christmas one can be red, the summer one blue, and your character keeps its own. They are independent.
You can also pick the colour from the Seamstress herself, without going to the Stylist.
It did not work this way before: changing colour with the disguise on overwrote your real colour by accident, with no way to get it back.
See also "Clothes from my past" works, and for every class Novices cannot use disguises; the Super Novice can
Novices cannot use disguises. Not Novice, not High Novice, not Baby Novice. You need a chosen job.
The Super Novice can: it is a complete class.
See also "Clothes from my past" works, and for every class Disguises are hidden in combat zones; equipment costumes are not
In PvP, GvG, WoE and battlegrounds everyone fights with their own face. Seamstress disguises are not visible in there.
Your equipment costumes are: you earned those.
The disguise is not lost: on leaving the zone it comes back on its own, with whatever colour you gave it.
See also "Clothes from my past" works, and for every class Pets, mercenaries, autoplay and helpme are out of the combat zones
Real full screen on big monitors, a setup tool that can no longer strand you, and an interface with no dead buttons.
The client uses a 1999 graphics technology that on Windows 10 and 11 no longer knows how to change the resolution. That is why, on a big monitor, the game drew itself at its own size in the top-left corner and left the rest black.
The client now ships with dgVoodoo already configured, translating that old technology into Direct3D 11 and stretching the picture to the whole screen while keeping the aspect ratio. No distortion, and nothing for you to configure.
Free extras
Instant Alt+Tab, no colour flicker on entering and leaving, and no crashes when changing resolution.
If you ever want to fine-tune it, dgVoodooCpl.exe is in the game folder.
How to get it
Open the updater and let it finish. Then run opensetup.exe once, pick your resolution and press OK even if you change nothing: that is needed for the fix to apply properly.
See also On a 4K monitor the game plays better at 1920x1080 or 2560x1440 than at native 4K The new setup tool no longer offers DirectX 9, the option that generated the most tickets
On a 4K monitor the game plays better at 1920x1080 or 2560x1440 than at native 4K: the game menus are fixed-size and at 4K they end up tiny.
dgVoodoo takes care of scaling the picture up. You gain screen without losing legibility.
See also The client stretches the picture to the whole screen on QHD and 4K, without distorting it The new setup tool no longer offers DirectX 9, the option that generated the most tickets
The setup tool moves to a far more modern version, and with it goes the trap that generated the most tickets: the DirectX 9 option.
Our client has no DirectX 9 inside, so picking it made the game close on launch without any error at all. That option no longer even appears, and there is no resolution cap in the list any more.
See also The client stretches the picture to the whole screen on QHD and 4K, without distorting it On a 4K monitor the game plays better at 1920x1080 or 2560x1440 than at native 4K
Buttons removed for leading nowhere or being redundant:
Tipbox Cash Shop Attendance Adventurer's Agency Reputation Status
And on the minimap side, the Cash Shop and the roulette go too.
The map name banner that appeared every time you entered a zone is also gone.
The login screen has new artwork, and the main menu has a new musical theme.
See also Interface buttons that led nowhere have been removed
Client changes are published through the updater, with no full reinstall. That is how, for example, all the companion AI changes reached players.
The updater's internal operation was also hardened to avoid hardlink errors, wrong baselines and empty diffs when publishing new patches.
See also The client stretches the picture to the whole screen on QHD and 4K, without distorting it Homunculus, mercenary and pet run the same AI, rewritten from scratch
Work that, done right, you never notice: the server coming back on its own, us finding out instantly, and your progress still being there whatever happens.
Until now, an outage could sit there until somebody noticed. You could find the game not letting you in with nobody watching.
That's over. The server now brings itself back up within seconds, with nobody having to be at the keyboard. And if the failure is one of the rare ones, a second system is watching and steps in to fix it.
We won't promise this never goes down, because that would be a lie: every server in the world goes down sometimes. What we do promise is that when it happens it lasts as little as possible.
See also Every minute it is checked that the game is really playable, not just switched on When intervention is needed it always starts with the least disruptive option Any failure raises an immediate alert to the team, whatever the hour
Every minute it is verified that the game actually responds, not just that the process is running. Those are two different things: a server can look up and still let nobody in.
That case, the maddening one because everything looks fine, is now detected too.
See also If the server goes down, it brings itself back up within seconds When intervention is needed it always starts with the least disruptive option
When intervention is needed, it always starts with the least disruptive option: if recovering one part is enough, the rest is left alone.
Only if that doesn't work does it escalate. The idea is that a failure costs you as little as possible.
See also If the server goes down, it brings itself back up within seconds Every minute it is checked that the game is really playable, not just switched on
Every day a full backup of the database is taken, and it is stored off the game machine. If the server burned down entirely, your characters, your inventory and your storage would still exist somewhere else.
There is also a second, lighter daily copy, to further reduce what could be lost in the worst case.
See also The daily restart does not run if that day's backup did not complete
The server restarts once a day in the small hours to stay nimble. That restart does not run if the day's backup has not completed correctly: if something failed with the backup, the restart cancels itself and we wait.
We would rather have a slightly heavier server than a restart with no net underneath.
See also A full daily database backup, stored off the game machine If the server goes down, it brings itself back up within seconds
Any failure raises an immediate alert to the team, with everything needed to understand it. Whatever the hour.
And when a problem fixes itself, the alert still arrives: an automatic fix covers the symptom, but we still go and look at the cause.
See also If the server goes down, it brings itself back up within seconds Every minute it is checked that the game is really playable, not just switched on
All 47 pet evolutions on the server, with their materials and what each one turns into.
Evolving swaps your pet for a different creature: a different egg, a different look and different stats. It is not an upgrade of the one you have, it is a replacement.
Three things are needed at once, and the server checks them in this order:
Requirements
What carries over
It keeps the name you gave it. It does not keep the look, the stats or the egg.
Intimacy and hunger start over, like any freshly hatched pet.
Of the 47 evolutions, 18 were switched off in the original emulator: the recipe was written but the target creature did not exist. Those 18 creatures were created, copying the matching monster's characteristics and stripping every MVP value.
See also All 47 evolutions, one by one
Ordered the way the game orders them: by creature number. The amounts are the official ones, none of them have been softened.
Several ask for ten cards of the monster itself, so they are long-term goals rather than an afternoon's work.
 Poring
 Mastering
 Yggdrasil Leaf×10
 Unripe Apple×3
 Hornet
 Giant Hornet
 Honey×80
 Royal Jelly×50
 Honey Pot×200
 Hard Feeler×300
 Hornet Card×10
Hornet
Hornet Card×10
Hornet
 Mistress
 Driller Card×10
 Mantis Card×10
 Sidewinder Card×10
 Powerful Soul Essence×30
 Familiar
 Dark Lord
 Dark Illusion Card×10
 Evil Druid Card×10
 Dark Priest Card×10
Powerful Soul Essence×30
Familiar
Dark Priest Card×10
Powerful Soul Essence×30
Familiar
 Eddga
Eddga
 Leaf Cat Card×10
 Wild Rose Card×10
 Jaguar Card×10
Powerful Soul Essence×30
Jaguar Card×10
Powerful Soul Essence×30
 Peco Peco
 Grand Peco
 Pet Food×10
 Fatty Chubby Earthworm×3
 Peco Peco Feather×300
 Peco Peco Card×1
 Mastela Fruit×10
 Orc Warrior
 High Orc
 Orc Trophy×3
 Orcish Sword×1
 Orcish Voucher×500
 Cigarette×1
 Orc Warrior Card×1
 Isis
Isis
 Little Isis
 Armlet of Obedience×3
 Queen's Hair Ornament×1
 Shining Scale×300
 3carat Diamond×6
 Golem
Golem
 Fire Golem
 Stone Heart×500
 Magical Lithography×3
 Fire Golem Card×1
 Red Blood×20
 Mummy
Mummy
 Ancient Mummy
 Elixir Bandages×3
 Rune of Darkness×200
 Gold×30
 Ancient Mummy Card×1
 Rocker
 Metaller
 Singing Plant×3
 Grasshopper's Leg×777
 Yellow Herb×200
 Metaller Card×1
 Yoyo
Yoyo
 Choco
Choco
 Tropical Banana×3
 Yoyo Doll×2
 Cacao×300
 Yoyo Card×1
 Lunatic
 Leaf Lunatic
 Huge Leaf×100
 Clover×250
 Four Leaf Clover×30
 Leaf Lunatic Card×1
Mastering
Leaf Lunatic Card×1
Mastering
 Angeling
 Yellow Potion×20
 Halo×1
 White Herb×50
 Jellopy×200
 Baphomet Jr.
Illusion Baphomet Jr.
Baphomet Jr.
Illusion Baphomet Jr.
 Chaotic Baphomet Junior Card×1
 Evil Horn×300
 Brigan×300
Yellow Herb×100
Brigan×300
Yellow Herb×100
 Desert Wolf
 Baphomet
 Bapho Jr. Card×15
Chaotic Baphomet Junior Card×15
Powerful Soul Essence×30
Bapho Jr. Card×15
Chaotic Baphomet Junior Card×15
Powerful Soul Essence×30
 Baby Desert Wolf
Desert Wolf
Baby Desert Wolf
Desert Wolf
 Well-Dried Bone×3
 Desert Wolf Card×1
 Claw of Desert Wolf×300
 Animal Skin×20
 Deviruchi
 Diabolic2
 Contract in Shadow×3
 Little Evil Wing×250
 Hand of God×30
 Deviruchi Card×1
 Dokebi
 Am Mut
 Old Broom×3
 Violet Dyestuffs×3
 Dokebi Horn×300
Gold×3
Dokebi Horn×300
Gold×3
 Drops
Drops
 Eggring
 Piece of Egg Shell×20
 Old Frying Pan×10
 Apple Juice×3
 Eggring Card×1
Drops
Eggring Card×1
Drops
 Sweets Drops
 Sweets Festival Coin×500
 Candy×50
 Candy Cane×50
 Drops Card×1
 Petite
 Deleter 2
 Shining Stone×3
 Petite's Tail×100
 Aloevera×150
 Earth Deleter Card×1
 Savage Babe
 Savage
Pet Food×10
Savage
Pet Food×10
 Sweet Milk×3
 Meat×100
 Feather×50
 Nine Tail
 Cat o' Nine Tails
 Sap Liquid×3
 Nine Tails×999
 Punisher×1
 Nine Tail Card×1
 Bongun
 Yao Jun
 Hyegun Hat×1
 Munak Doll×100
 Old Portrait×50
 Yao Jun Card×1
 Orc Lord
 Time Holder
 Big Ben Card×10
 Big Bell Card×10
 Neo Punk Card×10
Powerful Soul Essence×30
Neo Punk Card×10
Powerful Soul Essence×30
 Dark Priest
 Dark Illusion
 Skull×500
 Rosary×1
Hand of God×5
Dark Priest Card×10
Rosary×1
Hand of God×5
Dark Priest Card×10
 Wanderer
 Corrupted Wanderer
Skull×500
Hand of God×50
Corrupted Wanderer
Skull×500
Hand of God×50
 Fabric×100
 Wanderer Card×1
High Orc
Wanderer Card×1
High Orc
 Orc Hero
Powerful Soul Essence×30
Orc Warrior Card×10
Orc Hero
Powerful Soul Essence×30
Orc Warrior Card×10
 Orc Baby Card×10
 Heroic Emblem×10
 Clock
Clock
 Clock Tower Manager
 Burnt Part×100
 Needle of Alarm×200
 Rusty Screw×300
 Clock Card×10
 Alice
Alice
 Aliza
Aliza
 Alice's Apron×500
 Green Herb×200
 Elunium×30
 Alice Card×1
Cat o' Nine Tails
Alice Card×1
Cat o' Nine Tails
 Moonlight Flower
Powerful Soul Essence×30
Nine Tail Card×10
Moonlight Flower
Powerful Soul Essence×30
Nine Tail Card×10
 Sohee Card×10
 Munak Card×10
 Nightmare Terror
 Rigid Nightmare Terror
 Burning Horseshoe×500
 Blue Herb×100
 Shell×100
 Nightmare Terror Card×1
 Evil Nymph
 White Lady
Powerful Soul Essence×30
White Lady
Powerful Soul Essence×30
 Mao Guai Card×10
 Jing Guai Card×10
 Zhu Po Long Card×10
 Loli Ruri
 Blue Moon Loli Ruri
 Bat Cage×500
Blue Herb×50
Bat Cage×500
Blue Herb×50
 Loki's Whispers×1
 Loli Ruri Card×10
 Leaf Cat
 Wild Rose
Huge Leaf×500
Wild Rose
Huge Leaf×500
 Black Cat Doll×200
 Fish Tail×200
Leaf Cat Card×10
Fish Tail×200
Leaf Cat Card×10
 Teddy Bear
 Abandoned Teddy Bear
 Small Needle Kit×3
 Cursed Seal×300
 Cursed Ruby×50
 Teddy Bear Card×1
Teddy Bear
Teddy Bear Card×1
Teddy Bear
 Aliot
Rusty Screw×500
Honey×100
Aliot
Rusty Screw×500
Honey×100
 Opal×10
Teddy Bear Card×1
Teddy Bear
Opal×10
Teddy Bear Card×1
Teddy Bear
 Alicel
Rusty Screw×500
Honey×100
Alicel
Rusty Screw×500
Honey×100
 Bloody Page×50
Teddy Bear Card×1
Bloody Page×50
Teddy Bear Card×1
 Gremlin
 Hodremlin
 Unprocessed Parts×3
 Damp Darkness×50
 Will of the Darkness×200
 Hodremlin Card×1
Aliot
Hodremlin Card×1
Aliot
 Kiel D-01
 Alicel Card×10
 Aliza Card×10
 Aliot Card×10
Powerful Soul Essence×30
Aliot Card×10
Powerful Soul Essence×30
 Skeggiold
Angelgolt
Skeggiold
Angelgolt
 Angel's Dream×50
 Soft Feather×100
Rune of Darkness×100
Soft Feather×100
Rune of Darkness×100
 Skeggiold Card×10
Hodremlin
Skeggiold Card×10
Hodremlin
 Gloom Under Night
Hodremlin Card×10
Gloom Under Night
Hodremlin Card×10
 Isilla Card×10
 Agav Card×10
Powerful Soul Essence×30
Fire Golem
Agav Card×10
Powerful Soul Essence×30
Fire Golem
 Abysmal Knight
 Dark Piece×100
Rune of Darkness×100
Dark Piece×100
Rune of Darkness×100
 Piece of Sin×200
 Abysmal Knight Card×5
 Scatleton
 Skelion
 Memories of Gyoll×2
 Delicious Meat×100
 Cookie Bat×100
 Child Admin Beta
 Child Admin Alpha
 Barmil Ticket×500
 Metal Fragment×50
 Fragment×10
Child Admin Alpha
Skelion
Memories of Gyoll×2
Delicious Meat×100
Cookie Bat×100
Fragment×10
Child Admin Alpha
Skelion
Memories of Gyoll×2
Delicious Meat×100
Cookie Bat×100
Creatures that did not exist in the emulator are shown with the image of the monster whose look they copy, which is literally the one they wear in game.
See also A loyal pet, with no accessory and the materials in your bag, evolves from its own menu
All 127 pets on the server: what their stats are made of, what each one can do and what happens when they go down.
A pet's stats do not depend on your level. They come from its own species, at the natural level that monster has in the field, plus two flat bonuses:
What it inherits
Level, health, attack, defence and element of the wild monster. A Poring pet is a Poring; a Baphomet is a Baphomet.
What is added
+50% attack, physical and magic.
And health goes through a curve: it raises the weak creatures and lowers the huge ones. A Poring ends up at 100 and Blue Moon Loli Ruri, the biggest in the game, at 200,000. No pet goes above that.
The curve has a fixed point at 50,000 health: creatures around that figure keep exactly what they had. Below it they rise, above it they are compressed.
Without the curve the spread would run from 110 to 92 million, and the 1 HP rest would never trigger on the big ones.
They get attacked now. The monster your pet hits fights back against the pet, not against you. And buffs work: Blessing or Increase AGI cast on it actually apply.
But it cannot die. Its health never drops below 1. On reaching it the pet withdraws: for 2 minutes it does not attack, does not cast and cannot be touched. It comes back at full health when the time is up, or earlier if somebody heals it.
Since pets have no health bar in the client, the server shows their health percentage next to their name. Hover over them.
See also All 127 pets, with their numbers and the skill each one knows A loyal pet, with no accessory and the materials in your bag, evolves from its own menu
The numbers are the final ones: the +50% attack and the health curve are already applied. The +50% raises both attacks, physical and magic. Ordered the way the game orders them, by creature number.
On top of this own skill, every pet also uses its species' skills — the ones the wild monster has — except the banned ones: hiding, teleporting, summoning slaves and switching combat mode.
| Pet | Lv | HP | ATK | MATK | Element | Own skill | |
|---|---|---|---|---|---|---|---|
|
|
Poring | 1 | 100 | 1 | 1 | Water | First Aid |
|
|
Hornet | 11 | 149 | 3 | 4 | Wind | Sand Attack |
|
|
Familiar | 24 | 513 | 25 | 13 | Dark | Sight |

|
Willow | 8 | 138 | 1 | 7 | Earth | Throw Stone |

|
Chonchon | 5 | 88 | 1 | 4 | Wind | Sand Attack |

|
Spore | 18 | 359 | 12 | 12 | Water | Detoxify |
|
|
Peco Peco | 25 | 547 | 34 | 10 | Fire | Bash |
|
|
Orc Warrior | 44 | 1,470 | 126 | 49 | Earth | Bash |

|
Munak | 58 | 2,655 | 211 | 45 | Undead | Soul Strike |
|
|
Isis | 59 | 2,956 | 219 | 55 | Dark | Soul Strike |

|
Poporing | 30 | 734 | 46 | 30 | Poison | Detoxify |

|
Hunter Fly | 63 | 2,534 | 229 | 30 | Wind | Sand Attack |
|
|
Golem | 61 | 3,042 | 258 | 37 | Neutral | Throw Stone |
|
|
Mummy | 55 | 2,530 | 189 | 31 | Undead | Provoke |

|
Steel Chonchon | 48 | 1,390 | 126 | 52 | Wind | Sand Attack |

|
Picky | 9 | 125 | 1 | 1 | Fire | Throw Stone |
|
|
Rocker | 15 | 257 | 9 | 7 | Earth | Throw Stone |

|
Smokie | 29 | 631 | 43 | 16 | Earth | Sand Attack |
|
|
Yoyo | 38 | 1,010 | 82 | 16 | Earth | Throw Stone |
|
|
Metaller | 55 | 2,024 | 189 | 61 | Fire | Throw Stone |
|
|
Lunatic | 3 | 88 | 1 | 1 | Neutral | First Aid |

|
Poison Spore | 26 | 582 | 34 | 22 | Poison | Detoxify |
|
|
Orc Hero | 50 | 74,719 | 993 | 661 | Earth | Bash |
|
|
Mastering | 42 | 1,740 | 120 | 60 | Water | First Aid |
|
|
Angeling | 77 | 21,477 | 586 | 217 | Holy | Angelus |
|
|
Baphomet Jr. | 57 | 2,364 | 165 | 49 | Dark | Fire Bolt |
|
|
Desert Wolf | 103 | 11,773 | 766 | 88 | Fire | Provoke |
|
|
Baby Desert Wolf | 14 | 193 | 7 | 12 | Fire | Provoke |
|
|
Deviruchi | 93 | 8,497 | 468 | 273 | Dark | Fire Bolt |
|
|
Dokebi | 68 | 3,324 | 241 | 45 | Dark | Lightning Bolt |
|
|
Drops | 2 | 85 | 1 | 1 | Fire | First Aid |

|
Goblin | 48 | 1,547 | 139 | 51 | Wind | Lightning Bolt |

|
Goblin | 44 | 1,336 | 115 | 42 | Fire | Fire Bolt |

|
Goblin | 49 | 1,762 | 159 | 33 | Earth | Throw Stone |

|
Marionette | 90 | 5,094 | 487 | 285 | Ghost | Napalm Beat |

|
Medusa | 102 | 12,855 | 736 | 169 | Neutral | Soul Strike |
|
|
Moonlight Flower | 79 | 73,056 | 3348 | 1876 | Fire | Sight |
|
|
Petite | 86 | 6,666 | 541 | 99 | Earth | Throw Stone |
|
|
Savage | 59 | 2,843 | 271 | 34 | Earth | Bash |
|
|
Savage Babe | 14 | 215 | 7 | 9 | Earth | Bash |

|
Sohee | 64 | 3,285 | 210 | 45 | Water | Increase AGI |

|
Whisper | 46 | 1,145 | 115 | 82 | Ghost | Sight |
|
|
Nine Tail | 72 | 3,159 | 337 | 75 | Fire | Sight |
|
|
Bongun | 59 | 2,731 | 219 | 43 | Undead | Soul Strike |
|
|
Orc Lord | 55 | 81,397 | 1170 | 972 | Earth | Provoke |
|
|
Dark Priest | 98 | 12,399 | 649 | 388 | Undead | Cure |

|
Zealotus | 105 | 52,119 | 1489 | 375 | Neutral | Bash |
|
|
Wanderer | 120 | 22,470 | 1321 | 157 | Wind | Lightning Bolt |
|
|
High Orc | 81 | 5,080 | 475 | 75 | Fire | Bash |
|
|
Choco | 48 | 1,390 | 126 | 70 | Fire | Throw Stone |

|
Marin | 37 | 1,208 | 63 | 21 | Water | Freezing Trap cada 90s |

|
Christmas Goblin | 25 | 1,634 | 177 | 33 | Wind | Lightning Bolt |
|
|
Clock | 81 | 5,564 | 498 | 79 | Earth | Skid Trap |
|
|
Alice | 100 | 10,708 | 676 | 147 | Neutral | Cure |
|
|
Ancient Mummy | 114 | 22,597 | 1116 | 300 | Undead | Provoke |

|
Goblin Leader | 55 | 23,341 | 259 | 73 | Wind | Lightning Bolt |
|
|
Am Mut | 141 | 64,950 | 2122 | 2445 | Dark | Lightning Bolt |
|
|
Cat o' Nine Tails | 79 | 25,207 | 700 | 120 | Fire | Sight |
|
|
Grand Peco | 75 | 3,938 | 405 | 84 | Fire | Bash |

|
Succubus | 119 | 26,856 | 1159 | 591 | Dark | Soul Strike |

|
Incubus | 120 | 26,983 | 1189 | 562 | Dark | Soul Strike |
|
|
Nightmare Terror | 107 | 18,767 | 889 | 339 | Dark | Soul Strike |

|
Diabolic | 104 | 13,068 | 637 | 300 | Dark | Soul Strike |

|
Deleter | 105 | 11,360 | 826 | 316 | Fire | Fire Bolt |

|
Shinobi | 95 | 9,489 | 549 | 76 | Dark | Soul Strike |

|
Miyabi Doll | 85 | 6,212 | 433 | 99 | Dark | Soul Strike |
|
|
Evil Nymph | 97 | 11,340 | 573 | 192 | Dark | Cold Bolt |

|
Stone Shooter | 64 | 2,459 | 262 | 79 | Fire | Fire Bolt |

|
Dullahan | 108 | 18,177 | 921 | 262 | Undead | Ruwach |
|
|
Loli Ruri | 109 | 19,025 | 952 | 420 | Dark | Cold Bolt |
|
|
Yao Jun | 87 | 7,679 | 505 | 72 | Undead | Soul Strike |

|
Mao Guai | 89 | 6,637 | 529 | 91 | Wind | Lightning Bolt |

|
Green Maiden | 49 | 25,499 | 690 | 885 | Neutral | Bash |
|
|
Leaf Cat | 64 | 2,737 | 262 | 61 | Earth | Sand Attack |
|
|
Teddy Bear | 91 | 7,538 | 499 | 93 | Neutral | First Aid |

|
White Lady | 97 | 85,919 | 2121 | 3054 | Wind | Lightning Bolt |

|
Green Maiden | 82 | 5,168 | 445 | 94 | Wind | Lightning Bolt |
|
|
Gremlin | 118 | 28,939 | 1252 | 207 | Dark | Flasher |
|
|
Alicel | 115 | 20,006 | 1149 | 597 | Neutral | Lightning Bolt |
|
|
Aliot | 112 | 19,668 | 1050 | 133 | Neutral | Lightning Bolt |
|
|
Aliza | 112 | 19,668 | 1050 | 595 | Neutral | Cure |
|
|
Skeggiold | 131 | 50,651 | 1650 | 487 | Holy | Angelus |
|
|
Hodremlin | 122 | 33,085 | 1255 | 231 | Dark | Flasher |

|
Roween | 95 | 7,902 | 609 | 52 | Wind | Lightning Bolt |

|
Rice Cake | 1 | 29 | 10 | 10 | Neutral | Napalm Beat |

|
Imp | 129 | 27,508 | 1486 | 609 | Fire | Fire Bolt |

|
Eclipse | 6 | 2,410 | 30 | 9 | Neutral | Bash |

|
New Year Doll | 49 | 25,499 | 690 | 885 | Neutral | Bash |

|
Strange Mouse | 1 | 5,806 | 1 | 1 | Poison | Detoxify |

|
Strange Hydra | 34 | 1,221 | 1 | 1 | Water | Cold Bolt |

|
Taini | 1 | 3 | 0 | 0 | Neutral | Napalm Beat |

|
Christmas Snow Rabbit | 1 | 173 | 1 | 1 | Neutral | First Aid |

|
Tikbalang | 115 | 21,823 | 1263 | 172 | Wind | Lightning Bolt |

|
Domovoi | 38 | 1,010 | 96 | 16 | Earth | Throw Stone |

|
Little Poring | 1 | 75 | 1 | 1 | Water | Cold Bolt |
|
|
Abandoned Teddy Bear | 148 | 64,842 | 2166 | 2166 | Undead | First Aid |
|
|
Fire Golem | 148 | 64,857 | 2217 | 1981 | Fire | Blast Mine cada 60s |
|
|
Eggring | 1 | 92 | 1 | 1 | Earth | First Aid |
|
|
Leaf Lunatic | 3 | 82 | 1 | 1 | Neutral | First Aid |
|
|
Little Isis | 59 | 2,764 | 303 | 55 | Dark | Soul Strike |
|
|
Diabolic2 | 104 | 12,116 | 1060 | 300 | Dark | Fire Bolt |
|
|
Deleter 2 | 105 | 11,517 | 994 | 316 | Fire | Throw Stone |
|
|
Scatleton | 1 | 173 | 1 | 1 | Dark | Soul Strike |
|
|
Sweets Drops | 1 | 40 | 0 | 0 | Fire | First Aid |
|
|
Skelion | 1 | 173 | 1 | 1 | Dark | Soul Strike |
|
|
Rigid Nightmare Terror | 179 | 95,589 | 2718 | 3330 | Dark | Soul Strike |
|
|
Corrupted Wanderer | 187 | 109,565 | 6171 | 1252 | Wind | Lightning Bolt |
|
|
White Lady | 97 | 85,919 | 2121 | 3054 | Wind | Cold Bolt |
|
|
Moonlight Flower | 79 | 73,056 | 3348 | 1876 | Fire | Sight |
|
|
Illusion Baphomet Jr. | 57 | 2,364 | 165 | 49 | Dark | Fire Bolt |
|
|
Orc Hero | 50 | 74,719 | 993 | 661 | Earth | Bash |
|
|
Gloom Under Night | 139 | 114,800 | 9888 | 4177 | Ghost | Soul Strike |
|
|
Child Admin Beta | 130 | 219 | 15 | 15 | Neutral | Napalm Beat |
|
|
Child Admin Alpha | 180 | 295 | 15 | 15 | Neutral | Napalm Beat |
|
|
Kiel D-01 | 125 | 110,611 | 6168 | 5370 | Dark | Lightning Bolt |
|
|
Baphomet | 81 | 84,610 | 4725 | 2976 | Dark | Fire Bolt |
|
|
Wild Rose | 70 | 2,846 | 285 | 67 | Wind | Sand Attack |
|
|
Blue Moon Loli Ruri | 255 | 200,000 | 22074 | 4192 | Water | Cold Bolt |
|
|
Abysmal Knight | 122 | 35,817 | 1393 | 288 | Dark | Provoke |
|
|
Eddga | 65 | 90,829 | 2263 | 1164 | Fire | Blast Mine cada 60s |
|
|
Dark Lord | 96 | 95,142 | 5902 | 3877 | Undead | Soul Strike |
|
|
Mistress | 78 | 75,377 | 1477 | 2950 | Wind | Sand Attack |
|
|
Giant Hornet | 120 | 20,182 | 1189 | 198 | Wind | Sand Attack |
|
|
Clock Tower Manager | 90 | 7,693 | 595 | 105 | Neutral | Skid Trap |
|
|
Angelgolt | 131 | 50,651 | 1650 | 487 | Holy | Angelus |
|
|
Time Holder | 170 | 176,460 | 7875 | 3150 | Neutral | Provoke |
|
|
Dark Illusion | 96 | 46,572 | 1749 | 540 | Undead | Cure |
The four traps are Hunter skills, second job, and they are the only exception to the "first job skills only" rule. The two strong ones have a minimum wait between uses, shown next to their name.
See also A pet hits and takes hits like the wild monster of its species, with 50% more attack and double the health All 47 evolutions, one by one
Prepare Potion has 21 formulas, spends a Medicine Bowl on every cast whether it works or not, and only lists what you can make in full. How it works, what every recipe asks for, and where to buy all of it.
The Medicine Bowl is not a recipe material: it is the cost of the skill itself, same as the 5 SP. It is taken the moment you cast Prepare Potion, before the creation window shows up and before the server knows whether you can make anything at all.
The mistake that catches everybody
Potions ask for an Empty Potion Bottle, not an Empty Bottle. They are two different items: the second one is for grenades, acids and coats. Buy 200 of the wrong bottle and the window comes up empty every single time, one bowl per try.
What shows up in the window
Only the recipes whose materials you hold in full. Miss one out of three and that formula is simply not drawn: no greyed-out entry, no hint about what is missing.
Miss them all and the window is empty. The bowl is already gone.
What happens when the roll fails
The materials are spent anyway. They are taken before the dice is rolled, so a failure eats the herb, the bottle and the bowl, and hands nothing back.
A failure shows as the smoke effect and the window message.
How the success rate is worked out
These points are added up, and the total is divided by 100 to read it as a percentage:
On top of that comes the per-product modifier, noted on every formula. Baby classes keep 70% of the result.
A worked example
Alchemist at job level 50, INT 60, DEX 70, LUK 40, with Prepare Potion 10 and Learning Potion 10: 3,000 + 500 + 1,000 + 300 + 700 + 400 = 5,900, that is 59%. A Red Potion adds between +20.1 and +30 percentage points, so it lands between 79% and 89%. A Blue Potion adds nothing and stays at that 59%.
Two details almost nobody knows
Potions carry your name. Everything Prepare Potion produces is signed by the character that made it, and the name travels with the item even if you sell it.
Condensed potions grant fame. Three in a row without failing is worth 1 point, five is worth 3, seven is worth 10 and ten is worth 50, at which point the counter resets. Only the three condensed potions count, and any failure breaks the streak.
None of this is announced in game chat. If you suspect you are burning bowls without brewing anything, the quick check is the window itself: if it is empty, it is the materials, not your luck.
See also The 21 Prepare Potion formulas, one by one The Prontera Alchemist Supplier now stocks every material
There are 21 formulas. Every card shows what comes out on top and what goes in below: first the guide, which you only need to be carrying because it is never consumed, then the materials that are actually spent.
The names are the in-game ones and they open the item page in a new tab, so you can check where each material drops without losing your place. The "success modifier" only appears on the products that have one; the rest add and subtract nothing.
Healing potions
 Potion Creation Guidecarry it
 Red Herb×1
 Empty Potion Bottle×1
Success modifier +20.1% to +30%
Potion Creation Guidecarry it
Yellow Herb×1
Empty Potion Bottle×1
Success modifier +20.1% to +30%
Potion Creation Guidecarry it
White Herb×1
Empty Potion Bottle×1
Success modifier +20.1% to +30%
Potion Creation Guidecarry it
Blue Herb×1
 Scell×1
Empty Potion Bottle×1
Scell×1
Empty Potion Bottle×1
Condensed potions
Success modifier −0.1% to −5%
Success modifier −0.1% to −10%
Combat bottles
 Bottle Grenade Creation Guidecarry it
 Alcohol×1
Fabric×1
Alcohol×1
Fabric×1
 Empty Bottle×1
Success modifier +0.1% to +10%
 Acid Bottle Creation Guidecarry it
Empty Bottle×1
Acid Bottle Creation Guidecarry it
Empty Bottle×1
 Immortal Heart×1
Success modifier +0.1% to +10%
 Plant Bottle Creation Guidecarry it
Empty Bottle×1
Plant Bottle Creation Guidecarry it
Empty Bottle×1
 Maneater Blossom×2
Success modifier +0.1% to +10%
 Marine Sphere Creation Guidecarry it
Empty Bottle×1
Marine Sphere Creation Guidecarry it
Empty Bottle×1
 Tendon×1
 Detonator×1
Success modifier +0.1% to +10%
 Glistening Coat Creation Guidecarry it
Alcohol×1
Glistening Coat Creation Guidecarry it
Alcohol×1
 Heart of Mermaid×1
 Zenorc's Fang×1
Empty Bottle×1
Zenorc's Fang×1
Empty Bottle×1
Success modifier −0.1% to −10%
Elemental resist potions
 Elemental Potion Creation Guidecarry it
 Frill×2
 Red Gemstone×1
Empty Potion Bottle×1
Red Gemstone×1
Empty Potion Bottle×1
Reagents and extras
 Alcohol Creation Guidecarry it
Empty Bottle×1
Alcohol Creation Guidecarry it
Empty Bottle×1
 Poison Spore×5
 Stem×5
 Empty Test Tube×1
Success modifier +10.1% to +20%
Potion Creation Guidecarry it
 Ment×1
Alcohol×1
Empty Bottle×1
Potion Creation Guidecarry it
Ment×1
Alcohol×1
Empty Bottle×1
Potion Creation Guidecarry it
 Aloe×1
Honey×1
Empty Bottle×1
Aloe×1
Honey×1
Empty Bottle×1
Homunculus
 Homunculus Nutritional Supplement
Potion Creation Guidecarry it
 Seed of Life×1
Yellow Herb×1
Empty Bottle×1
Seed of Life×1
Yellow Herb×1
Empty Bottle×1
The Homunculus Nutritional Supplement is the only one on the list that also demands Bioethics — Prepare Potion alone is not enough. And the four elemental resist potions want their own book, the Elemental Potion Creation Guide, which is not the same one the ordinary potions use.
See also Prepare Potion spends the bowl before knowing whether you can make anything The Prontera Alchemist Supplier now stocks every material
She stands at prt_in, 127 64, inside Prontera, and since 10 August 2026 she sells the 56 items any of the 21 formulas can ask for. Before that she only had bowls and ready-made bottles: you could buy the tool but not the material, and the Empty Potion Bottle meant a trip to Geffen.
The menu is split into categories because fifty-six entries in a row do not fit in a client menu list. Everything is bought through dialogue, up to 1,000 units per order, and the price is worked out on the server.
Creation guides
Potion Creation Guide100,000z
 Condensed Potion Creation Guide240,000z
Alcohol Creation Guide100,000z
Bottle Grenade Creation Guide100,000z
Acid Bottle Creation Guide100,000z
Plant Bottle Creation Guide100,000z
Marine Sphere Creation Guide100,000z
Glistening Coat Creation Guide100,000z
Elemental Potion Creation Guide100,000z
Condensed Potion Creation Guide240,000z
Alcohol Creation Guide100,000z
Bottle Grenade Creation Guide100,000z
Acid Bottle Creation Guide100,000z
Plant Bottle Creation Guide100,000z
Marine Sphere Creation Guide100,000z
Glistening Coat Creation Guide100,000z
Elemental Potion Creation Guide100,000z
Bottles and containers
 Medicine Bowl8z
Empty Potion Bottle10z
Empty Test Tube3z
Empty Bottle400z
Medicine Bowl8z
Empty Potion Bottle10z
Empty Test Tube3z
Empty Bottle400z
 Glass Tube5,000z
Herbs and base potions
Red Herb18z
Yellow Herb40z
White Herb120z
Blue Herb60z
 Red Potion10z
Yellow Potion180z
Red Potion10z
Yellow Potion180z
 White Potion1,200z
Monster materials
Scell120z
 Cactus Needle82z
 Mole Whiskers106z
 Witched Starsand484z
Fabric306z
Immortal Heart374z
Maneater Blossom196z
Tendon220z
Detonator450z
Heart of Mermaid264z
Zenorc's Fang264z
Poison Spore114z
Stem46z
Frill250z
Witched Starsand484z
Fabric306z
Immortal Heart374z
Maneater Blossom196z
Tendon220z
Detonator450z
Heart of Mermaid264z
Zenorc's Fang264z
Poison Spore114z
Stem46z
Frill250z
 Large Jellopy840z
 Moth Dust138z
Gemstones
 Yellow Gemstone450z
Red Gemstone450z
Yellow Gemstone450z
Red Gemstone450z
 Blue Gemstone450z
Reagents and extras
Homunculus supplies
Seed of Life60,000z
 Morning Dew of Yggdrasil20,000z
 Embryo440,000z
Ready-made bottles and syrups
 Red Syrup800z
 Yellow Syrup1,200z
 White Syrup1,500z
 Blue Syrup7,000z
 Bottle Grenade12,000z
 Acid Bottle3,700z
 Plant Bottle3,800z
 Marine Sphere Bottle5,100z
 Glistening Coat15,000z
How each price is set
Materials and guides keep their usual shop value. Anything Prepare Potion can craft is sold at three times what making it costs.
And "what making it costs" includes the failures: since a failure eats the materials and the bowl, the real cost of one finished unit is the recipe divided by the success rate.
What changed on 10 August
The five combat bottles sat at 200z, far below the 780 to 2,600z their own materials cost. Buying them finished was cheaper than crafting them, which made the whole branch pointless.
They now range from 3,700 to 15,000z, and the Embryo went from 100,000 to 440,000z.
The one exception
Red Potion, Yellow Potion and White Potion keep their town price: 10, 180 and 1,200z. Every Tool Dealer in the game sells them at that price, so charging more here would make nothing more expensive — it would only make this NPC look broken. They are stocked as material for the condensed potions, not as a shortcut.
Crafting pays off on all 21 formulas. Buying finished is a convenience you pay for, not a cheaper alternative.
See also The 21 Prepare Potion formulas, one by one Prepare Potion spends the bowl before knowing whether you can make anything
Fifty-nine recipes across weapons and metals, three optional slots that improve the weapon and sink the odds, and a ranking won by refining what you forged yourself.
First things first, because almost nobody has this straight: the seven forging skills are not cast. There is nothing to click. They are knowledge — they decide what you can make, not when.
What opens the window is an item, and it is spent on every attempt:
The hammer is the smith's Medicine Bowl
It vanishes the moment the list opens, whatever you forge and whether it works or not. It belongs in the cost of every attempt exactly like the bowl does in alchemy — and with an Oridecon Hammer that is 5,000z a roll, hit or miss.
The anvil is a different thing entirely: it is neither spent nor required. Carrying it in your bag is enough, and all it does is add to the success rate.
What shows up in the list
The hammer sets the maximum level, and everything below it comes too: an Oridecon Hammer brings all three levels at once.
And, as in alchemy, only what you can make in full is drawn: complete materials and enough skill level.
What happens on a failure
The materials are lost. They are taken before the roll, including any Star Crumb and elemental stone you put in the slots.
There is no consolation prize and no partial refund.
The three optional slots
Any weapon takes up to three extras at forging time. They are optional, they improve the weapon and they lower the success rate:
Slots are filled while forging. They cannot be added later to a weapon that already exists.
How the success rate is worked out
These points are added up, and the total is divided by 100 to read it as a percentage:
Baby classes keep 70% of the result. Oridecon Research adds nothing here: its forging bonus is optional in the emulator and it is switched off on this server — the skill still does its actual job, which is refining.
A worked example
Blacksmith at job level 50, DEX 80 and LUK 50, with Smith Sword 3, Weaponry Research 10 and a Golden Anvil in the bag, forging a level 3 weapon:
1,000 + 800 + 500 + 505 average roll + 100 for the weapon level... which lands on 68% bare. With all three slots filled (three Star Crumbs, −45) it drops to 23%.
That is the price of +40 ATK: three out of four attempts go in the bin with their materials inside.
What the smith gets out of it
The weapon carries your name, and it carries it forever, even if you sell it or give it away.
Fame: forging a level 3 weapon with all three slots filled grants +10 points of blacksmith fame.
And there is a prize that never expires: a weapon forged by someone in the blacksmith top 10 gives +10 extra ATK to whoever wields it, whether they forged it or not.
It is checked when the weapon is equipped, so an old weapon starts hitting harder the day its maker enters the ranking.
Refining to +10 a weapon you forged yourself is the fast lane to the ranking: +1 point if it was level 1, +25 if it was level 2 and +1,000 if it was level 3. That is done with Upgrade Weapon, which is a Whitesmith skill.
See also The 52 forgeable weapons, one by one Iron, steel and the five stones: the seven metal recipes A Whitesmith forges the same things: what it gains is Upgrade Weapon and the ranking
Fifty-two weapons across seven skills, one per family. Every card states the weapon level and the skill level it wants, because those two decide whether it shows up in your list at all.
The names are the in-game ones and they open the weapon page in a new tab. No recipe includes Star Crumbs or an elemental stone: those go in the optional slots and are picked while forging.
One-handed swords
Daggers
Two-handed swords
Axes
Maces
Knuckles
Spears
Notice the pattern: level 1 weapons are plain iron, level 2 are steel, and level 3 want Oridecon plus a gem. And that the weapon-level bonus runs opposite to how hard the material is to get: the cheap stuff is what succeeds most often.
See also Forging costs nothing, but the three slots eat the success rate Iron, steel and the five stones: the seven metal recipes
Before forging anything you have to make the metal. Seven recipes across three skills, none of which takes slots or has a weapon level: it either works or it does not.
Iron Ore and the four coloured minerals come from mining and from monsters; Steel Tempering eats five Iron per Steel, so the full chain for one level 2 weapon starts at twenty-five raw ores.
Iron
Steel
Enchanted stones
What each stone is for
The four elemental stones and the Star Crumb are not a material in any weapon recipe: they are what goes into the three optional slots while forging. That is their only use, and that is where you pay for them in success rate.
The success rate for these seven comes from the same sum as the weapons, minus the weapon-level part: job level, DEX, LUK, the skill level and the random roll.
See also The 52 forgeable weapons, one by one Forging costs nothing, but the three slots eat the success rate
The short answer: a Whitesmith forges exactly what a Blacksmith forges. The seven forging skills and the three metal ones are learned as a Blacksmith and kept on transcending; not one recipe is reserved for the second job.
Three other things do change.
1. It forges better by plain arithmetic
Job level adds 20 points per level, and the counter starts over on transcending. A Whitesmith at job 70 brings 1,400 points where a job 50 Blacksmith brought 1,000: fourteen percentage points for free, with nothing else changed.
2. Upgrade Weapon
Refines its own weapons without visiting the town blacksmith and without paying zeny, spending 30 SP and the matching ore: Phracon for level 1 weapons, Emveretarcon for level 2 and Oridecon from level 3 up.
The skill level is the ceiling it can reach: Upgrade Weapon 7 stops at +7.
3. And the only serious way up the ranking
Refining to +10 a weapon you forged yourself grants blacksmith fame, and the scale is not linear:
It has to be genuinely yours: the game compares the name engraved on the weapon with your own. Buying a forged level 3 weapon and refining it does not count.
Two crafting skills that show up in job listings, Create Coin and Create Nugget, are disabled in this server's skill tree: they cannot be learned and they do nothing. Do not go looking for them.
See also Forging costs nothing, but the three slots eat the success rate The 52 forgeable weapons, one by one
Two hundred and ninety-three recipes across eleven jobs. Who makes what, what opens each list, and why weapons belong to the smith alone.
Every job makes its own things and nobody inherits another job's recipes. Here is the whole list, so nobody has to ask.
| Job | Skill | What it makes | No. | How it opens |
|---|---|---|---|---|
| Blacksmith → Meister | The 7 forging skills | Weapons | 52 | A hammer (consumed) |
| Blacksmith → Meister | Iron / Steel Tempering, Enchanted Stone Craft | Iron, steel and the 5 stones | 7 | Mini Furnace (consumed) |
| Meister | Manufacture Machine | Device Capsule and Auto Battle Capsule | 2 | The skill |
| Alchemist → Biolo | Prepare Potion | Potions, bottles and the Embryo | 21 | The skill |
| Genetic | Change Material | Item conversions (one yields a weapon) | 75 | The skill |
| Genetic | Special Pharmacy | Advanced potions and bombs | 19 | The skill |
| Genetic | Mix Cooking | Battle food | 6 | The skill |
| Genetic | Create Bomb | Nothing: there are no recipes | — | Cannot be learned |
| Biolo | Bionic Pharmacy | Fourth-job acids and potions | 14 | The skill |
| Archer onwards | Arrow Crafting | Arrows, from 136 different items | 136 | The skill |
| Acolyte onwards | Aqua Benedicta | Holy Water | 1 | The skill |
| Arch Bishop | Ancilla | Ancilla | 1 | The skill |
| Sage onwards | Create Elemental Converter | The 4 converters | 4 | The skill |
| Assassin Cross | Create Deadly Poison | Deadly Poison Bottle | 1 | The skill |
| Guillotine Cross | Research New Poison | The 9 new poisons | 9 | The skill |
| Rune Knight | Rune Mastery | The 10 runes | 10 | The skill |
| Novice, base < 20 | — | Novice recipes (one yields a weapon) | 11 | Combination Kit |
| Anyone | — | Cooking dishes | 60 | A cooking kit, which sets the level |
What almost everybody asks
Weapons belong to the smith alone
The 52 forgeable weapons never grow. They are the same for Blacksmith, Whitesmith, Mechanic and Meister: the recipes hang off the seven forging skills, learned as a Blacksmith and kept to the end of the branch.
Neither the third job nor the fourth adds a single weapon. What they add is something else: capsules, acids and potions.
And the two exceptions that do exist
There are exactly two weapons craftable without forging, and neither belongs to the smith:
The numbers come from the server's own recipe database: 293 recipes in total, of which 53 yield a weapon — the smith's 52 and the Genetic's Bone Wand. The Novice Cutter sits apart because no skill opens it.
See also The 52 forgeable weapons, one by one A Whitesmith forges the same things: what it gains is Upgrade Weapon and the ranking The 21 Prepare Potion formulas, one by one Three skills nobody can learn, and the rung cooking was missing
Taking the inventory of all 293 recipes turned up three crafting skills that lead nowhere, and one glaring cooking bug that is now fixed.
Three skills switched off on purpose
Create Coin and Create Nugget, from the Whitesmith, and Create Bomb, from the Genetic, cannot be learned: they are commented out of the emulator's skill tree.
And it is not an oversight: all three have neither recipes nor code behind them. They are switched off precisely so nobody spends points on something that would do nothing.
If they are ever implemented, they get implemented properly. Until then they do not show up, and that is the right call.
Cooking was missing a rung
There are 60 dishes across ten levels and six cooking kits, from 40z to 10,000z. Until now all six opened exactly the same list: the check deciding what appears only asked "is this food?", never what level it was.
And the list was lying to you
Because the success rate did depend on the kit — every kit rung adds, every dish level subtracts — so a cheap kit offered you level 10 dishes you were going to fail almost every time, burning the materials on each attempt. It showed you a door you could not walk through.
Each kit now covers two dish levels, cumulatively: the good one opens everything the cheap one does, plus its own.
| Kit | Price | Dish levels |
|---|---|---|
| Combination Kit | 40z | 1 and 2 |
| Outdoor Cooking Kit | 500z | 1 and 2 |
| Home Cooking Kit | 1,000z | up to 4 |
| Professional Cooking Kit | 2,000z | up to 6 |
| Royal Cooking Kit | 5,000z | up to 8 |
| Fantastic Cooking Kit | 10,000z | all ten |
The Combination Kit counts as the outdoor one for anyone past base level 20; below that it still opens its own novice recipe list. And the Fantastic Cooking Kit keeps what it always had: a 100% success rate on everything it makes.
No dish has disappeared: all sixty can still be cooked. What changes is that the kit in your bag finally means something, and that the list no longer offers what you cannot make.
See also Who makes what: the full map of all 293 recipes A Whitesmith forges the same things: what it gains is Upgrade Weapon and the ranking
All eighteen skills of the Creator's third job, one by one: what each does, the exact formula behind it, and how it actually plays on this server.
The Genetic is the third job of the Alchemist and Creator line, and the step before the Biolo, which is the fourth. It inherits everything Merchant and Alchemist have, and adds eighteen skills of its own: two passives, eight damage skills, five support and control skills, and three crafting skills.
Everything on this page comes from the emulator running right now, not from a wiki. When a formula here disagrees with what the client tooltip says, this page is the one that is right.
The two roots of the tree
Almost everything hangs off two skills that need no prerequisites: Cart Remodeling opens the three cart skills, and Special Pharmacy opens the whole plant, fire and poison branch.
If you are planning your points, those two decide which half of the class you can reach at all.
Two that do not exist
Sling Item and Create Bomb are commented out of the emulator's skill tree: it is not that they open an empty list — they cannot be learned at all.
Create Bomb would have nothing to make anyway: there is not a single recipe for it in the database.
The full tree
| Skill | Max. | Requires | What it is |
|---|---|---|---|
| Sword Training | 5 | — | Passive |
| Cart Remodeling | 5 | — | Passive |
| Cart Tornado | 10 | Cart Remodeling 1 | Damage around you |
| Cart Cannon | 5 | Cart Remodeling 2 | Ranged damage |
| Cart Boost | 5 | Cart Remodeling 3 | Self buff |
| Special Pharmacy | 10 | — | Crafting |
| Illusion Doping | 5 | Special Pharmacy 1 | Damage and blind |
| Mix Cooking | 2 | Special Pharmacy 1 | Crafting |
| Thorn Trap | 5 | Special Pharmacy 2 | Trap |
| Blood Sucker | 5 | Special Pharmacy 3 | Self lifesteal |
| Spore Explosion | 10 | Special Pharmacy 4 | Area damage |
| Wall of Thorns | 5 | Thorn Trap 3 | Wall |
| Crazy Weed | 10 | Wall of Thorns 3 | Area damage |
| Demonic Fire | 5 | Spore Explosion 3 | Magic bonfire |
| Fire Expansion | 5 | Demonic Fire 3 | Transforms the bonfire |
| Hell's Plant | 5 | Blood Sucker 3 | Damage aura |
| Howling of Mandragora | 5 | Hell's Plant 3 | Control (PvP only) |
| Change Material | 1 | — | Crafting |
On top of those eighteen there is Full Throttle, which is not a Genetic skill: every third job has it.
The two passives, which almost nobody reads
Sword Training
Only counts with a one-handed sword or a dagger equipped. Each level gives +10 mastery attack and +3 hit; at level 5, +50 attack and +15 HIT.
It is mastery attack, so it carries no element and no size modifier: it goes into the damage raw. With a mace, an axe or a book it does absolutely nothing.
Cart Remodeling
Each level adds +500 cart capacity (from 8,000 to 10,500 at level 5) and +4 hit to Cart Revolution, Cart Tornado and Cart Cannon.
And it sits inside both damage formulas: Cart Tornado gains 50 % ratio per level, and in Cart Cannon it multiplies. This is not a convenience passive, it is half the class.
All three cart skills require the cart to be equipped. Take it off or store it and they simply stop casting: no SP error, no material error, they just do not come out.
See also Where everything the Genetic burns actually comes from Cart Tornado hits with the weight of your cart and your STR, not your INT Special Pharmacy never fails: what varies is how many units come out Who makes what: the full map of all 293 recipes
Cart Tornado spins the cart around you: 3 physical hits in a 5×5 centred on yourself, using your weapon's element, knocking everything it touches back 2 cells. No cast time, a flat 30 SP at every level, and the cart must be equipped.
The whole formula
200 % × skill level + (cart weight ÷ (150 − STR)) + 50 % × Cart Remodeling level, and that percentage applies to each of the three hits.
STR is capped at 120, so the divisor never drops below 30. The weight is the one shown in your cart window.
A full cart is damage
With a maxed cart (10,500 with Cart Remodeling 5) and STR 120, the weight term is worth +350 %: almost two full skill levels, handed to you for carrying stuff.
At STR 50 that same cart only gives +105 %. STR here is not about hitting harder with the weapon: it is about dividing by less.
Cart Remodeling counts twice
It adds +50 % ratio per level (+250 % at level 5) and it is also what raises cart capacity, which feeds the other term.
It also gives +4 hit per level, which matters because this skill can miss: it does not ignore flee.
A worked example
Level 10, cart at 10,500, STR 120, Cart Remodeling 5:
2,000 % + (10,500 ÷ 30 = 350 %) + 250 % = 2,600 % per hit, three times.
Unlike almost every other third-job skill, it does not scale with your base level: those 2,600 % are the same at level 99 and at 200.
There is 1 second of after-cast delay and 2 seconds of cooldown before you can repeat it. It is the cheapest damage skill the class has in SP, and the only one that consumes no item at all.
See also Cart Cannon never misses, and its element comes from the ammo Cart Boost doubles your speed, but it does not stack with Agility The Genetic skill tree: eighteen skills, two of them passive and two you cannot learn
Cart Cannon fires the cart like a gun: ranged physical splash damage, 1 hit, which ignores the target's flee and applies defence in the simplified way. It burns 1 Cannon Ball per shot and needs the cart equipped.
The whole formula
[(250 + 20 × Cart Remodeling) × skill level + 2 × INT ÷ (6 − Cart Remodeling)] × base level ÷ 100
Look at that divisor: with Cart Remodeling at 5 it becomes 1, so INT enters whole and doubled. Without the passive it enters divided by 6.
Cart Remodeling multiplies two terms
Going from 0 to 5 in the passive takes the ratio per level from 250 % to 350 %, and multiplies the INT contribution sixfold.
At INT 120: from +40 % to +240 %. This is the only cart skill where INT does anything at all.
The element comes from the ammo
Load elemental ammo and the whole shot changes element, not just part of it. There is holy, shadow, ghost, water, wind, earth, fire and poison ammo.
Plain Cannon Ball and Iron Cannon Ball stay neutral. Swapping ammo is the fastest answer this class has to an awkward element.
What each level gives
| Level | Range | Area | Cast | SP |
|---|---|---|---|---|
| 1 | 7 | 3×3 | 1.0 s | 40 |
| 2 | 8 | 3×3 | 1.5 s | 42 |
| 3 | 9 | 5×5 | 2.0 s | 46 |
| 4 | 10 | 5×5 | 2.5 s | 48 |
| 5 | 11 | 7×7 | 3.0 s | 50 |
It has no cooldown of its own: once the half-second after-cast delay passes you can fire again. All of the cast time is reducible with DEX and with cast reduction gear.
A worked example
Level 5, Cart Remodeling 5, INT 120, base level 175:
(350 × 5) + (2 × 120 ÷ 1) = 1,990 % → × 175 ÷ 100 = 3,482 % in a single hit with 7×7 splash.
One detail that only matters if you play with traps: a fire Cart Cannon does not free an enemy held by your Thorn Trap. It is the only exception hand-written into the engine, and it is there precisely so the combination works.
See also Cart Tornado hits with the weight of your cart and your STR, not your INT Cart Boost doubles your speed, but it does not stack with Agility Where everything the Genetic burns actually comes from
Cart Boost is a self buff lasting 90 seconds at every level, costing 20 to 36 SP, with 1.5 s of cast time and the cart equipped.
| Level | Speed | SP |
|---|---|---|
| 1 | +50 % | 20 |
| 2 | +50 % | 24 |
| 3 | +75 % | 28 |
| 4 | +75 % | 32 |
| 5 | +100 % | 36 |
What to understand before spending points
Movement speed bonuses do not add up: the highest one wins. Cart Boost, Increase Agility, Full Throttle and speed gear all compete for the same slot, and only one counts.
That is why levels 2 and 4 give nothing new: they are stepping stones. If you are investing, the levels that change something are 1, 3 and 5.
At level 5 you move at double speed, which is faster than any other movement buff in the game. For a class that plants traps, bonfires and walls on the ground, being able to position and then run is half the job.
It is banned on the Turbo Track in Aldebaran and its courses: those are racing maps and the game blocks anything that alters speed there. Everywhere else on the server, towns and castles included, it works normally.
See also Cart Tornado hits with the weight of your cart and your STR, not your INT Cart Cannon never misses, and its element comes from the ammo
Spore Explosion bursts a spore on the target: 2 physical hits with splash, range 11, using your weapon's element. It costs 48 to 84 SP and 1 Bomb Mushroom Spore per cast.
The whole formula
(300 + 200 × level) % × base level ÷ 100, applied to each of the two hits.
At level 10 and base level 175 that is 2,300 % × 1.75 = 4,025 % per hit, so 8,050 % in total.
Area and cost per level
| Level | Ratio per hit | Area | SP |
|---|---|---|---|
| 1 | 500 % | 3×3 | 48 |
| 2 | 700 % | 3×3 | 52 |
| 3 | 900 % | 5×5 | 56 |
| 4 | 1,100 % | 5×5 | 60 |
| 5 | 1,300 % | 7×7 | 64 |
| 6 | 1,500 % | 7×7 | 68 |
| 7 | 1,700 % | 9×9 | 72 |
| 8 | 1,900 % | 9×9 | 76 |
| 9 | 2,100 % | 11×11 | 80 |
| 10 | 2,300 % | 11×11 | 84 |
The ratios in the table are before multiplying by your base level. Cast 1.5 s, after-cast delay 0.5 s and a 5 second cooldown: it is the longest cooldown of any damage skill in the class.
The spore mark
Anything caught by the hit is marked for 5 seconds. While it lasts, that target takes 10 % more damage from any ranged attack — from anyone — and 5 % more if it is a boss.
It does not chain-explode and it does no damage when it expires, whatever the name and the animation suggest: all the power is in the opening hit.
How to use it
It is the natural opener for the class: you mark the pack, and whatever comes next — your own Cart Cannon, an archer in your party, anything ranged — hits 10 % harder.
With a 5 second mark and a 5 second cooldown, chaining it keeps the pack marked almost continuously.
For anyone who reaches Biolo, the fourth job: the Bionic Wooden Fairy summon doubles this skill's ratio while it is active.
See also Crazy Weed drops up to eight random smashes and sweeps the ground clean Demonic Fire is the only magic skill the Genetic has Where everything the Genetic burns actually comes from
Thorn Trap plants a trap on the ground up to 9 cells away. It costs 22 to 38 SP and 1 Seed Of Thorny Plant. You can have up to 3 traps out at once.
The damage formula
100 + 200 × level + your INT damage, once per second for as long as the enemy stays caught.
This is "misc" damage: it does not come from your attack or your MATK, the target's defence does not reduce it, and the weapon does not scale it. At INT 120 and level 5 that is 1,220 per second, the same against anything.
How long it stays out
Untriggered, the trap waits 10, 12, 14, 16 or 18 seconds depending on level and then dissolves. The moment someone steps on it the clock resets: the trap now lasts exactly 20 seconds.
It catches one target only. The rest of the pack walks over it without consequence while someone is held.
FIRE breaks it
Any fire element attack on the trapped target frees it instantly. Hitting it with a neutral melee swing, or with ice, or with poison, does not release it.
Watch your own Demonic Fire: drop it on your trap and you are opening it yourself. The one exception is Cart Cannon, which does not break the trap even loaded with fire ammo.
Cost and duration per level
| Level | Damage per second | Untriggered life | SP |
|---|---|---|---|
| 1 | 300 + INT | 10 s | 22 |
| 2 | 500 + INT | 12 s | 26 |
| 3 | 700 + INT | 14 s | 30 |
| 4 | 900 + INT | 16 s | 34 |
| 5 | 1,100 + INT | 18 s | 38 |
Cast 1.5 s and an after-cast delay of 0.5 s, with no cooldown: you can plant all three back to back. At level 3 it unlocks Wall of Thorns, which is the door to the whole plant branch.
See also Wall of Thorns raises 16 cells of thorns, and fire turns them into a wall of flame Crazy Weed drops up to eight random smashes and sweeps the ground clean Cart Cannon never misses, and its element comes from the ammo Where everything the Genetic burns actually comes from
Wall of Thorns plants a ring of thorns up to 11 cells away: 16 cells forming the border of a 5×5 square, hollow in the middle. It costs 40 to 80 SP and 1 Seed Of Thorny Plant. You can only have one wall at a time.
What it does on contact
Any enemy touching a cell is knocked back 1 cell and takes a physical hit for (100 + 10 × level) % of your attack.
That hit does not get your attack card bonuses, so the damage is token: the wall is for blocking, not for killing.
How much it takes
Each of the 16 cells has 2,000 + 2,000 × level HP and a cap of 20 hits. They break one at a time: the wall opens up wherever it is being hit.
At level 5 that is 12,000 HP per cell. It lasts 10, 11, 12, 13 or 14 seconds by level, with a 5 second cooldown.
Two limits to know before you rely on it
Bosses ignore it. Anything with status immunity — MVPs and mini-bosses — walks straight through, no knockback and no damage.
Fire transforms it. Hit it with a fire element attack and the whole wall becomes a Fire Wall that lasts only 3 seconds and then disappears. It stops being a block and becomes a curtain of flame.
How it is actually used
It is banned in all 30 towns on the server — Prontera, Geffen, Payon, Aldebaran, Morroc, Juno, Rachel, Veins, Niflheim and the rest — as every wall in the game is. Outside town, castles included, it works without restriction.
See also Thorn Trap holds one enemy for 20 seconds and stabs it once a second Crazy Weed drops up to eight random smashes and sweeps the ground clean Where everything the Genetic burns actually comes from
Crazy Weed is the class's big area skill. It is cast on the ground up to 11 cells away, costs 24 to 60 SP and 1 Seed Of Thorny Plant.
How it works under the hood
It does not deal one big hit: it drops 3 + (level ÷ 2) smashes — from 3 to 8 — on random positions within ±2 cells of the point you marked, one every 0.15 seconds.
Each smash deals 2 physical hits in a 5×5 with your weapon's element and a ratio of (600 + 100 × level) % × base level ÷ 100 per hit.
Random positions have a practical consequence: against a single enemy some smashes land beside it and miss entirely. Against a tight pack, all eight overlap and everyone takes several. It is a crowd skill, not a single-target one.
What each level gives
| Level | Smashes | Ratio per hit | Cast | SP |
|---|---|---|---|---|
| 1 | 3 | 700 % | 3.0 s | 24 |
| 2 | 4 | 800 % | 3.5 s | 28 |
| 3 | 4 | 900 % | 4.0 s | 32 |
| 4 | 5 | 1,000 % | 4.5 s | 36 |
| 5 | 5 | 1,100 % | 5.0 s | 40 |
| 6 | 6 | 1,200 % | 5.5 s | 44 |
| 7 | 6 | 1,300 % | 6.0 s | 48 |
| 8 | 7 | 1,400 % | 6.5 s | 52 |
| 9 | 7 | 1,500 % | 7.0 s | 56 |
| 10 | 8 | 1,600 % | 7.5 s | 60 |
Ratios are before multiplying by your base level. At level 10, base level 175 and eight two-hit smashes, that is 2,800 % per hit spread across the area, with a 5 second cooldown before you can repeat it.
It ignores Land Protector
It is one of the very few skills in the game that can be cast inside a Land Protector and still works. In castle war that makes it the direct answer to the Sage sealing the entrance.
It sweeps the ground
The smashes destroy enemy traps and ground units. This is field clearing: Ankle Snare, mines, walls and the rest all go down in the same pass.
The cast time is the real price. At level 10 that is 7.5 seconds before the first smash lands: without heavy DEX or cast reduction, this is a skill to cast from behind while the party holds, not one to open a fight with.
See also Wall of Thorns raises 16 cells of thorns, and fire turns them into a wall of flame Spore Explosion hits twice and leaves the target marked Where everything the Genetic burns actually comes from
Of every Genetic skill, Blood Sucker is the one most people read wrong. The name and the animation make it look like a debuff you put on an enemy to drain its life. It is not.
What it actually does
It is cast on yourself or on a party member (range 11, up to 3 targets at once), and while it lasts, every weapon hit the bearer lands has a (2 × level − 1) % chance to heal them (level) % of the damage dealt.
At level 5: 9 % of your hits return 5 % of the damage done. The engine reads it from the attacker's side, not the victim's.
| Level | Chance | Heal | Duration | SP |
|---|---|---|---|---|
| 1 | 1 % | 1 % | 40 s | 50 |
| 2 | 3 % | 2 % | 1 min 40 s | 55 |
| 3 | 5 % | 3 % | 2 min 40 s | 60 |
| 4 | 7 % | 4 % | 3 min 40 s | 65 |
| 5 | 9 % | 5 % | 4 min 40 s | 70 |
Weapon damage only
The condition is that the damage be weapon damage: normal hits and physical skills. Magic and misc damage heal nothing, however hard they hit.
Which is why it fits a melee party member far better than the Genetic itself, whose best skills are magical or special-typed.
It costs five seeds
Every cast burns 5 Bloodsuck Plant Seed, not one. It is by far the most expensive consumable in the class.
With nearly 5 minutes of duration at level 5, the sensible play is to put it on your hardest hitter once at the start of a session, not to re-cast it constantly.
3 seconds of cast and 1 second of cooldown. At level 3 it unlocks Hell's Plant, which is the main reason anyone puts points here.
See also Hell's Plant is an aura on you that attacks three times a second Where everything the Genetic burns actually comes from The Genetic skill tree: eighteen skills, two of them passive and two you cannot learn
Hell's Plant is by far the best sustained damage the Genetic has. And it does not work the way it looks: it plants nothing on the ground. It is an aura that switches on around you.
How it works under the hood
A single cast lights a status that, every 333 milliseconds — three times a second — attacks every enemy in a 5×5 around you. Physical damage, using your weapon's element.
Ratio = (100 × level + INT × Summon Flora level) × base level ÷ 100
Summon Flora is mandatory
The multiplier on your INT is your Summon Flora level, the Alchemist skill. With no points there, your INT contributes absolutely nothing to this formula.
At Summon Flora 5 and INT 200 that term alone is worth 1,000 %. It is the best return per skill point in the entire class, and it is hidden inside a second-job skill.
It stuns and bleeds
Every hit carries a (20 + 10 × level) % chance to stun and a (5 + 5 × level) % chance to cause bleeding, both with a 20 second base duration.
At three hits a second, against anything that does not resist status well, the stun lands within a couple of seconds.
Duration and cost per level
| Level | Base ratio | Duration | Total hits | Cast | SP |
|---|---|---|---|---|---|
| 1 | 100 % + INT×SF | 1 min | ~180 | 3.0 s | 40 |
| 2 | 200 % + INT×SF | 1 min 30 s | ~270 | 3.5 s | 45 |
| 3 | 300 % + INT×SF | 2 min | ~360 | 4.0 s | 50 |
| 4 | 400 % + INT×SF | 2 min 30 s | ~450 | 4.5 s | 55 |
| 5 | 500 % + INT×SF | 3 min | ~540 | 5.0 s | 60 |
"INT×SF" is your intelligence multiplied by your Summon Flora level. All of that is then multiplied by your base level divided by 100. It costs 1 Plant Bottle per cast and has no cooldown: you can refresh it the moment the cast ends.
Because the aura travels with you, the way to use it is to walk into the middle and stay there. A single Plant Bottle at level 5 buys three minutes of automatic attacks: no other skill in the class comes close on cost versus output.
See also Blood Sucker is not a debuff: it is a lifesteal buff you put on yourself Howling of Mandragora does absolutely nothing to a monster Where everything the Genetic burns actually comes from
Demonic Fire leaves a bonfire on the ground up to 9 cells away. It is the only magic damage skill in the class: it is calculated from your MATK, not your attack, and it is fire element. It costs 24 to 40 SP and 1 Bottle Grenade.
The whole formula
(110 + 20 × level) % of your MATK, applied to every enemy inside the 5×5 once every 2 seconds while the fire burns.
At level 5 that is 210 % per tick. It does not scale with base level: what makes it worth casting is the number of ticks, not the ratio.
What each level gives
| Level | Ratio per tick | Duration | Ticks | Burning | Cast | SP |
|---|---|---|---|---|---|---|
| 1 | 130 % | 10 s | 5 | 8 % / 8 s | 3.0 s | 24 |
| 2 | 150 % | 12 s | 6 | 12 % / 16 s | 3.5 s | 28 |
| 3 | 170 % | 14 s | 7 | 16 % / 24 s | 4.0 s | 32 |
| 4 | 190 % | 16 s | 8 | 20 % / 32 s | 4.5 s | 36 |
| 5 | 210 % | 18 s | 9 | 24 % / 40 s | 5.0 s | 40 |
The "burning" column is the chance to apply Burning on each tick and how long it lasts. At level 5 that is nine rolls at 24 %: it is rare for anything to leave the fire without catching alight.
One bonfire at a time
The skill allows a single active instance. Cast another and the first goes out on its own. You cannot carpet three or four spots.
It also has a 5 second cooldown, which with the level 5 cast time puts it on a roughly ten second cycle.
Careful with your own traps
It is a fire element attack, and fire frees whatever you have caught in a Thorn Trap.
Dropping the bonfire on the trap means opening it yourself. Place them apart.
At level 3 it unlocks Fire Expansion, which turns this bonfire into five different things. From then on Demonic Fire stops being just damage and becomes ammunition.
See also Fire Expansion is five different skills, and every one of them eats a bonfire of yours Thorn Trap holds one enemy for 20 seconds and stabs it once a second Where everything the Genetic burns actually comes from
Fire Expansion deals no damage by itself. What it does is find one of your own Demonic Fire bonfires within 4 cells of the marked point and transform it. And the skill level is not "more power": each level does something completely different and burns a different item.
The rule to memorise
If there is no bonfire of yours nearby, the skill casts in full, charges you the SP and the item, and nothing happens. There is no error message. Bonfire first, expansion second.
Since Demonic Fire only allows one instance, the cycle is always: bonfire → expansion → new bonfire.
What each level does
| Level | Burns | Effect | SP |
|---|---|---|---|
| 1 | Oil Bottle | Moves the bonfire to the marked point and adds 10 seconds | 30 |
| 2 | Explosive Powder | Detonates it: magic fire hit in a 5×5 | 35 |
| 3 | Smoke Powder | Turns it into a defensive smoke cloud | 40 |
| 4 | Tear Gas | Turns it into tear gas | 45 |
| 5 | Acid Bottle | Casts an Acid Demonstration in a 5×5 | 50 |
2 second cast, range 9, no cooldown. Since each level burns a different item, the level you stop at is a decision about what you want to be able to do, not about how much power you want.
Level by level, with the small print
Level 1 — Relocate
Puts out the bonfire and relights it wherever you mark, with its remaining duration plus 10 seconds.
The catch: it recreates it at level 1, whatever level you originally cast it at. You gain time and position, but the damage per tick drops to the minimum.
Level 2 — Detonate
An immediate magic fire hit in a 5×5 around the bonfire, ratio 150 % + 10 × your INT. At INT 120 that is 1,350 %.
It is the biggest single hit the class has for a high-INT Genetic, and it consumes the bonfire. INT enters multiplied by ten: here it really pays.
Level 3 — Smoke
A 5×5 cloud lasting 4 seconds × (Demonic Fire level + 1) — up to 24 seconds with Demonic Fire 5. Anyone inside gains +20 % flee, −15 % melee physical damage taken and −50 % ranged physical damage taken.
One of the best defensive bubbles in the game. It affects everyone, allies and enemies alike: drop it under an enemy archer and you have handed them the reduction.
Level 4 — Gas
A 5×5 cloud lasting 5 seconds × (Demonic Fire level + 1). Anyone inside suffers −50 % hit, −50 % flee and loses 5 % of their max HP every 2 seconds.
It only works on PvP, castle war or battleground maps. On a normal hunting map the gas is placed, the item is spent, and it does nothing to anyone.
Level 5 — Acid
Casts an Acid Demonstration in a 5×5 around the bonfire, at level 5 — or at your learned level if it is higher than 5. It also has a 1 % per level chance to break the target's weapon and armour.
Note: this version does NOT use this server's Acid Demonstration formula. It uses the official renewal one: 7 × ((ATK ÷ level + MATK ÷ level) × target VIT ÷ 100). It ignores defence and flee, and the final damage counts as neutral even if your weapon has an element.
In other words: two skills with the same name and two different formulas. The Creator's is the one that was changed here; this one kept rAthena's.
A note on ordering: since the expansion consumes the bonfire, in a real rotation it always goes before recasting Demonic Fire, never after.
See also Demonic Fire is the only magic skill the Genetic has Where everything the Genetic burns actually comes from The Genetic skill tree: eighteen skills, two of them passive and two you cannot learn
Howling of Mandragora lets out a scream around you reaching from 11×11 to 15×15 depending on level. It costs 40 to 60 SP and 1 Mandragora Flowerpot.
First things first, because it changes whether it is worth levelling
It does not affect monsters. The skill's code checks whether the target is a monster and, if it is, returns without doing anything — it does not even roll.
On a hunting map it is one flowerpot burnt every ten seconds for nothing at all. Against players it is a different skill.
The formula, against players
Chance = 25 + 10 × level − (target's VIT + LUK) ÷ 5, with a floor of 10 %: however tanky the target, it never drops below that.
On a hit: it drains (25 + 5 × level) % of their max SP instantly, and for the duration it removes 4 × level INT and adds 500 ms × level of fixed cast time.
| Level | Area | Base chance | SP drained | INT − | Cast + | Duration | SP |
|---|---|---|---|---|---|---|---|
| 1 | 11×11 | 35 % | 30 % | 4 | 0.5 s | 10 s | 40 |
| 2 | 13×13 | 45 % | 35 % | 8 | 1.0 s | 15 s | 45 |
| 3 | 13×13 | 55 % | 40 % | 12 | 1.5 s | 20 s | 50 |
| 4 | 15×15 | 65 % | 45 % | 16 | 2.0 s | 25 s | 55 |
| 5 | 15×15 | 75 % | 50 % | 20 | 2.5 s | 30 s | 60 |
"Base chance" is before subtracting the target's VIT and LUK. Against someone with VIT 100 and LUK 50 that is 30 points off: level 5 lands at 45 %.
Who it is good against
Against casters. Half an SP bar and two and a half extra seconds of fixed cast time cannot be reduced with DEX: fixed cast is its own thing.
It is one of the few tools in the game that punishes a Wizard or a Sorcerer without ever having to touch them.
It does not stack
If the target already has it, the skill skips them: no second SP drain and no refreshed duration. Re-casting it on the same group every few seconds achieves nothing.
With a 10 second cooldown and 1 second cast, the sensible rhythm is to fire it on contact and come back to it once the first one has expired.
If your character hunts and never sets foot in PvP, this is the one skill in the class you can leave at 1 point without regret — the minimum to reach whatever comes after it.
See also Hell's Plant is an aura on you that attacks three times a second Fire Expansion is five different skills, and every one of them eats a bonfire of yours Where everything the Genetic burns actually comes from
Illusion Doping is the strangest skill in the tree. It deals physical splash damage with your weapon's element up to 7 cells away, but it has no ratio of its own: it hits for 100 % of your attack, no more and no less. It is not a damage skill.
What it does do
With a chance of (100 − 10 × level) %, it applies −50 hit and hallucination for 10 seconds.
Yes, you read that right: at level 1 it lands 90 % of the time and at level 5 only 50 %. That is what the code says; it is not a typo.
What each level gives
| Level | Chance | Area | Fixed cast | Cooldown | SP |
|---|---|---|---|---|---|
| 1 | 90 % | 9×9 | 1.0 s | 5 s | 60 |
| 2 | 80 % | 11×11 | 1.0 s | 4 s | 70 |
| 3 | 70 % | 13×13 | 1.0 s | 3 s | 80 |
| 4 | 60 % | 15×15 | 1.0 s | 2 s | 140 |
| 5 | 50 % | whole screen | instant | 1 s | 180 |
Level 5 is a different skill
It loses 40 points of chance, but gains full-screen area, instant cast and a 1 second cooldown. Cast once a second on a crowd, the 50 % stops mattering: it lands on nearly everyone anyway.
Low levels are for precision
With 9×9 and a 90 % chance, level 1 is what you want when you need to blind one specific target. And it costs 60 SP instead of 180.
There is no useful middle: levels 2, 3 and 4 lose reliability without yet gaining what level 5 has.
The −50 hit is a flat number, not a percentage: against something with low HIT it misses almost everything, and against something with enormous HIT it barely shows. This is crowd control, and its natural home is castle war.
See also Spore Explosion hits twice and leaves the target marked Howling of Mandragora does absolutely nothing to a monster The Genetic skill tree: eighteen skills, two of them passive and two you cannot learn
Special Pharmacy is the Genetic's big crafting skill: 19 formulas, 12 SP per use, and no chance of failure at all. What is at stake in each batch is the number of units.
The whole formula
Score = INT + (DEX ÷ 2) + LUK + job level + base level + a random number between 31 and 150 + 5 × (Potion Research − 20) + Full Chemical Protection × a random number between 7 and 10
Difficulty = 620 − 20 × Special Pharmacy level + the product's adjustment
Difficulty is subtracted from the score, and the result decides how much the batch is trimmed.
Base batch, by level
| Level | Units |
|---|---|
| 1 and 2 | 7 and 8 |
| 3 and 4 | 8 and 9 |
| 5 and 6 | 9 and 10 |
| 7 and 8 | 10 and 11 |
| 9 and 10 | 11 and 12 |
The trim, by the maths
| Score − difficulty | Subtract |
|---|---|
| 400 or more | nothing |
| 300 to 399 | −3 |
| 100 to 299 | −4 |
| 1 to 99 | −5 |
| 0 or less | −6 |
Two surprises in the maths
Potion Research subtracts. The term is 5 × (level − 20) and that skill caps at 10, so it is always negative: at level 10 it costs you a flat 50 points, and without it, 100. Levelling it removes a penalty, it does not add a bonus.
Full Chemical Protection adds, and nothing tells you. Each level contributes a random 6 to 10 points; at level 5 that is 35 to 50 free points per batch. It is a hidden crafting requirement.
How much each product raises the difficulty
| Adjustment | Products |
|---|---|
| +10 | HP Increase Potion (Small), SP Increase Potion (Small), Concentrated White Potion Z |
| +15 | Bomb Mushroom Spore, SP Increase Potion (Medium) |
| +20 | HP Increase Potion (Medium), SP Increase Potion (Large), Vitata 500 |
| +30 | Seed Of Thorny Plant, Bloodsuck Plant Seed, Concentrated Ceromain Soup |
| +40 | HP Increase Potion (Large), Cure Free |
| 0 | Everything else |
A worked example
A Genetic with INT 120, DEX 100, LUK 50, job level 70, base level 175, Potion Research 10 and Full Chemical Protection 5, making Seed Of Thorny Plant with the skill at 10:
120 + 50 + 50 + 70 + 175 + 90 (average roll) − 50 + 42 = 547 → difficulty 620 − 200 + 30 = 450 → 547 − 450 = 97
Between 1 and 99 → subtract 5: the batch of 12 comes out as 7 seeds.
With the roll at its best (150 instead of 90) the sum reaches 157 and you get 8. That is the deal: you never fail, but the count moves.
The nineteen formulas
Each card shows what comes out on top and what it takes below: first the guide, which you only need to carry because it is never consumed, then the materials that are. The names open the item page in a new tab.
Combat seeds and spores
HP potions
 Increase Stamina Studycarry it
White Herb×10
Increase Stamina Studycarry it
White Herb×10
 Monster's Feed×5
Empty Bottle×10
Monster's Feed×5
Empty Bottle×10
 Spicy Sauce×1
Increase Stamina Studycarry it
Yellow Herb×10
White Herb×10
Empty Bottle×10
Spicy Sauce×1
Increase Stamina Studycarry it
White Herb×15
Mastela Fruit×3
Spicy Sauce×1
Increase Stamina Studycarry it
Yellow Herb×10
White Herb×10
Empty Bottle×10
Spicy Sauce×1
Increase Stamina Studycarry it
White Herb×15
Mastela Fruit×3
 Holy Water×1
Empty Bottle×10
Spicy Sauce×1
Holy Water×1
Empty Bottle×10
Spicy Sauce×1
SP potions
 Vital Drink CBcarry it
 Grape×10
 Lemon×10
Empty Bottle×10
Lemon×10
Empty Bottle×10
 Sweet Sauce×1
Vital Drink CBcarry it
Blue Herb×10
Honey×10
Empty Bottle×10
Sweet Sauce×1
Vital Drink CBcarry it
Blue Herb×15
Royal Jelly×10
Empty Bottle×10
Sweet Sauce×1
Sweet Sauce×1
Vital Drink CBcarry it
Blue Herb×10
Honey×10
Empty Bottle×10
Sweet Sauce×1
Vital Drink CBcarry it
Blue Herb×15
Royal Jelly×10
Empty Bottle×10
Sweet Sauce×1
High-quality potions
 Manual: How To Make High Quality Potioncarry it
White Potion×20
White Herb×10
Alcohol×1
Empty Test Tube×10
Manual: How To Make High Quality Potioncarry it
Blue Herb×10
Grape×10
Honey×10
Empty Test Tube×10
Manual: How To Make High Quality Potioncarry it
Green Herb×20
Mastela Fruit×1
Manual: How To Make High Quality Potioncarry it
White Potion×20
White Herb×10
Alcohol×1
Empty Test Tube×10
Manual: How To Make High Quality Potioncarry it
Blue Herb×10
Grape×10
Honey×10
Empty Test Tube×10
Manual: How To Make High Quality Potioncarry it
Green Herb×20
Mastela Fruit×1
 Panacea×5
Yggdrasil Leaf×1
Empty Test Tube×10
Panacea×5
Yggdrasil Leaf×1
Empty Test Tube×10
No guide needed: just test tubes
Empty Test Tube×10
 Yggdrasil Berry×10
Gold×5
Yggdrasil Berry×10
Gold×5
The five guides are sold by the Craft Book Merchant in the Aldebaran alchemist guild for 100,000z each — they are listed in the materials page. Without the guide in your bag those formulas do not even appear in the window.
See also Mix Cooking does fail, and level 1 takes everything with it Change Material turns junk into materials, and the amounts have to be exact Where everything the Genetic burns actually comes from The 21 Prepare Potion formulas, one by one
Mix Cooking prepares six combat dishes that no other skill can make. It only has two levels, and they are two very different skills.
Level 1 — 5 SP
Makes one unit. If the maths do not work out, you get nothing and the materials are gone anyway.
Level 2 — 40 SP
Makes a batch of up to 11. If the maths go badly enough, the batch can still come out as zero.
The whole formula
Score = (job level ÷ 4) + (LUK ÷ 2) + (DEX ÷ 3)
Difficulty = a random number between 31 and 150, plus 15 — all six dishes carry that +15.
Notice what is not there: no INT, no base level, no skill level. What matters here is LUK, and then DEX.
What comes out, by the maths (level 2)
| Score − difficulty | Units |
|---|---|
| 30 or more | 10 or 11 |
| 10 to 29 | 10 |
| −10 to 9 | 8 |
| −30 to −11 | 5 |
| below −30 | none |
At level 1 the rule is simpler: if the score does not reach the difficulty, the dish does not happen. With job level 70, LUK 50 and DEX 100 the score is 75, and the difficulty runs from 46 to 165: the dice decide more than your stats do.
The six dishes
All six need the Mix Cook Book in your bag, which is never consumed, and one Melange Pot per unit, which is.
 Mix Cook Bookcarry it
 Melange Pot×1
 Savage Meat×1
 Cooking Skewer×1
 Black Charcoal×1
Mix Cook Bookcarry it
Melange Pot×1
Black Charcoal×1
Mix Cook Bookcarry it
Melange Pot×1
 Blood Of Wolf×3
 Cold Ice×2
Mix Cook Bookcarry it
Melange Pot×1
Cold Ice×2
Mix Cook Bookcarry it
Melange Pot×1
 Beef Head×2
 Large Cookpot×1
Mix Cook Bookcarry it
Melange Pot×1
Large Cookpot×1
Mix Cook Bookcarry it
Melange Pot×1
 Ice Piece×3
 Ice Crystal×2
 Comodo Tropical Fruit×1
Mix Cook Bookcarry it
Red Herb×3
White Herb×3
Blue Herb×3
Melange Pot×1
Large Cookpot×1
Comodo Tropical Fruit×1
Mix Cook Bookcarry it
Red Herb×3
White Herb×3
Blue Herb×3
Melange Pot×1
Large Cookpot×1
 Drosera Tentacle×3
Mix Cook Bookcarry it
Melange Pot×1
Petite's Tail×2
Drosera Tentacle×3
Mix Cook Bookcarry it
Melange Pot×1
Petite's Tail×2
 Fine Noodles×1
 Cool Gravy×1
The practical conclusion: do not cook at level 1 if you can avoid it. At level 2 the worst case leaves you five units and the best eleven, while at level 1 the worst case is losing the materials and seeing nothing.
See also Special Pharmacy never fails: what varies is how many units come out Change Material turns junk into materials, and the amounts have to be exact Three skills nobody can learn, and the rung cooking was missing
Change Material has a single level and costs 5 SP. It opens a window where you put materials in and the server swaps them for others, following 75 fixed conversions. No guide is needed.
The three rules that make it fail
How the amounts come out
Each conversion has one or two output lots, each with its own chance, and they are rolled separately. With two lots you can walk away with both, one, or neither.
Example: Ancient Tooth has 6 at 80 % and 9 at 20 %. Usually you get 6, sometimes 15, sometimes 9 and sometimes nothing.
In batches
Put in double the material and the server counts two batches and doubles whatever lots come out. Feeding it a lot at once is faster than going one at a time.
It is the only Genetic skill that crafts a weapon: the Evil Bone Wand, from 100 Clattering Skull and 100 Broken Farming Utensil.
The 75 conversions
The "batch" column says how many units come out and with what chance; where there are two numbers, those are two independent rolls. The "you hand in" column is the exact amount per batch.
Two products have two different recipes — Cigarette and Witched Starsand — so the list has 75 rows for 73 distinct items. Both recipes work; one is cheaper than the other.
See also Special Pharmacy never fails: what varies is how many units come out Mix Cooking does fail, and level 1 takes everything with it Who makes what: the full map of all 293 recipes
Almost every Genetic skill burns an item on top of the SP. This is the full list of what each one takes and where to get it on this server.
What each skill consumes
| Skill | Consumes | Per cast |
|---|---|---|
| Cart Tornado | Nothing | — |
| Cart Boost | Nothing | — |
| Cart Cannon | Cannon Ball (or elemental) | 1 |
| Thorn Trap | Seed Of Thorny Plant | 1 |
| Wall of Thorns | Seed Of Thorny Plant | 1 |
| Crazy Weed | Seed Of Thorny Plant | 1 |
| Blood Sucker | Bloodsuck Plant Seed | 5 |
| Spore Explosion | Bomb Mushroom Spore | 1 |
| Demonic Fire | Bottle Grenade | 1 |
| Hell's Plant | Plant Bottle | 1 |
| Howling of Mandragora | Mandragora Flowerpot | 1 |
| Fire Expansion 1 | Oil Bottle | 1 |
| Fire Expansion 2 | Explosive Powder | 1 |
| Fire Expansion 3 | Smoke Powder | 1 |
| Fire Expansion 4 | Tear Gas | 1 |
| Fire Expansion 5 | Acid Bottle | 1 |
| Illusion Doping | Nothing | — |
Where to get it
Bought
Crafted
The five guides: Craft Book Merchant, Aldebaran alchemist guild
The five guides that open the crafting lists are sold by a single NPC at 100,000z each. You carry them and they are never consumed: buy once and you are done.
| Guide | Opens |
|---|---|
| How To Grow Plant Genes | The three combat seeds and spores |
| Increase Stamina Study | The three HP Increase Potions |
| Vital Drink CB | The three SP Increase Potions |
| Manual: How To Make High Quality Potion | Concentrated White Potion Z, Vitata 500, Concentrated Ceromain Soup and Cure Free |
| Mix Cook Book | The six Mix Cooking dishes |
The remaining six Special Pharmacy formulas — Golden X, the two herb activators and the three concentrated potions — need no guide: test tubes are enough.
Hunted
The four Fire Expansion consumables and the Mandragora flowerpot are sold in no shop: they drop from monsters.
| Item | Best sources |
|---|---|
| Explosive Powder | Sweety, Elusive Sting, Furious Noxious, Venomous Ringleader, Sting, Step |
| Smoke Powder | Furious Shinobi, Assaulter Ringleader, Furious Alicel, Shinobi, Gaster |
| Tear Gas | Venomous Ringleader, Furious Noxious, Venomous, Gaster, Old Stove |
| Oil Bottle | Phendark, Furious Venatu, Swift Dimik, Rybio, Venatu, Dimik |
| Mandragora Flowerpot | Elusive Muscipular, Solid Drosera, Hermit Plant, Muscipular, Drosera |
| Bloodsuck Plant Seed | Bomi (the only monster that drops it) |
Each item's page — the link on its name — carries the full monster list with exact rates.
The short version for anyone building the character: 100,000z for one guide plus levels in Special Pharmacy makes you self-sufficient in seeds and spores, which feed six of the eight combat skills. The rest is alchemist bottles and hunting.
See also Special Pharmacy never fails: what varies is how many units come out The Genetic skill tree: eighteen skills, two of them passive and two you cannot learn The Prontera Alchemist Supplier now stocks every material Thorn Trap holds one enemy for 20 seconds and stabs it once a second
All seventeen skills of the Alchemist line's fourth job: the four acidified zones, the four bionics, and the report that rewrites half the class at once.
The Biolo is the fourth job of the Alchemist line: it comes from the Genetic and inherits everything it has. On top it adds seventeen skills of its own, and unlike the previous jobs they do not split into independent branches: almost everything runs through two skills that are never cast at anyone.
Bionics Mastery
A 10-level passive whose only effect anywhere in the emulator is computing the stats of the four bionics. With none summoned, it does absolutely nothing.
And it is the root of nine of the seventeen: the four acidified zones, the four bionics and Explosive Powder all hang off it.
Research Report
A 150-second buff that rewrites five skills at once: it raises their ratios, adds hits, and halves the bottle cost of the acidified zones.
It costs 100 AP. This is the skill that decides whether the Biolo runs at half power or at full.
The full tree
| Skill | Max. | Requires | What it is |
|---|---|---|---|
| Bionics Mastery | 10 | — | Bionic passive |
| Bionic Pharmacy | 5 | Special Pharmacy 5 | Crafting |
| The Whole Protection | 5 | Bionic Pharmacy 5 | Party protection |
| Advance Protection | 4 | Bionic Pharmacy 5 | Shadow gear protection |
| Acidified Zone Ground | 5 | Bionics Mastery 3 + Bionic Pharmacy 5 | Earth damage |
| Acidified Zone Wind | 5 | Bionics Mastery 3 + Bionic Pharmacy 5 | Wind damage |
| Acidified Zone Fire | 5 | Acidified Zone Ground 1 | Fire damage |
| Acidified Zone Water | 5 | Acidified Zone Wind 1 | Water damage |
| Research Report | 1 | Acidified Zone Fire 3 + Acidified Zone Water 3 | Self buff |
| Creeper | 5 | Bionics Mastery 5 | Summon |
| Wooden Warrior | 5 | Creeper 3 | Summon |
| Wooden Fairy | 5 | Creeper 3 | Summon |
| Hell Tree | 5 | Wooden Warrior 3 + Wooden Fairy 3 | Summon |
| Explosive Powder | 5 | Bionics Mastery 3 | Damage around you |
| Mayhemic Thorns | 10 | Bionics Mastery 5 + Explosive Powder 3 | Ranged damage |
| Mystery Powder | 5 | Explosive Powder 5 | Damage and key |
| Dust Explosion | 5 | Mystery Powder 3 | Follow-up damage |
What changes from the earlier jobs
Damage no longer comes from INT. Every offensive Biolo skill carries a POW (Power) term, the fourth-job stat, and every one of them is multiplied by your base level over 100. INT still rules only over what you inherit from the Genetic.
AP appears. It is a third resource alongside HP and SP. Most Biolo skills give it to you when used (2 to 20 per cast), and only two spend it: Research Report (100) and Hell Tree (100 down to 60 by level).
No BO_ skill is modified on this server: they are rAthena's as they come. What has been touched is The Whole Protection, and that is covered in its own page.
See also Bionics Mastery is a ten-level passive that does nothing until you summon Research Report rewrites five skills for 150 seconds The Genetic skill tree: eighteen skills, two of them passive and two you cannot learn Where everything the Biolo burns actually comes from
Bionics Mastery is a 10-level passive and the root of nine skills in the tree. If you go looking for what it does, the short answer is awkward: it appears in exactly one place in the whole server codebase, and that is the formula computing bionic stats.
What it does NOT do
It does not raise your attack, your MATK, your HP, or the damage of any of your skills. It does not improve the acidified zones or the powders. With no bionic summoned, having it at level 10 or at level 0 is exactly the same thing.
What it does do: every level, applied to the summon
| Bionic stat | Formula | What level 10 adds |
|---|---|---|
| Max HP | (5,000 + 40,000 × level) × your VIT ÷ 100 | +400,000 before VIT |
| Max attack | 2 × your base attack + 600 × level | +6,000 |
| Min attack | 70 % of the max | +4,200 |
| Defence | your DEF + 20 × level | +200 |
| Magic defence | your MDEF + 4 × level | +40 |
| Hit | your HIT + 2.5 × level | +25 |
| Flee | your FLEE + 10 × level | +100 |
| Speed | yours, with no bonus | — |
The practical consequence: VIT is a summoning stat
The bionic's HP is multiplied by your VIT divided by 100. At Bionics Mastery 10 and VIT 100, the bionic comes out with 405,000 HP. At VIT 50, half that. At VIT 20, 81,000.
No other stat of yours multiplies like this. A Biolo who plans to summon has a solid reason not to leave VIT at the minimum, however little it does for them personally.
The passive being written as "stats similar to an elemental's" is literal: it is commented that way in the emulator source, pending word on how the official server does it. If the real formula ever surfaces, this is what changes.
See also The four bionics come out carrying YOUR HP, YOUR attack and YOUR defence The Biolo tree revolves around two skills that on their own do nothing
Acidified Zone Water, Ground, Wind and Fire are four exact copies of the same skill. They share formula, area, range, cast time, cooldown, SP cost and hit count. The only things that differ are the element and which bottle they burn.
The whole formula
(400 % × level + 5 × POW) × base level ÷ 100, applied to each of the 7 hits.
It is physical damage, and the element is fixed by the version: neither your weapon nor an endow changes it.
The difference nobody mentions: against players they leave a zone, against monsters they do not
Everyone takes the seven hits. But the lingering zone — 10 seconds hitting every half second at the same ratio — is only placed if the target of the shot is a player. The code checks for it explicitly before planting it.
Against a monster it is 7 hits and done. Against a player it is 7 hits plus twenty more for as long as they stay put. In PvE it is a burst skill; in PvP it is one of the most brutal things in the game.
The four versions
| Skill | Element | Burns (×2) | Requires |
|---|---|---|---|
| Acidified Zone Ground | Earth | Earth Acid Bottle | Bionics Mastery 3 + Bionic Pharmacy 5 |
| Acidified Zone Wind | Wind | Gale Acid Bottle | Bionics Mastery 3 + Bionic Pharmacy 5 |
| Acidified Zone Fire | Fire | Flame Acid Bottle | Acidified Zone Ground 1 |
| Acidified Zone Water | Water | Icicle Acid Bottle | Acidified Zone Wind 1 |
Having all four means having an answer to every element in the game without swapping weapons or cards: that is the whole point of the branch.
What each level gives (identical across all four)
| Level | Ratio per hit | Area | Cast | SP | AP gained |
|---|---|---|---|---|---|
| 1 | 400 % + 5·POW | 3×3 | 2.0 s | 51 | 4 |
| 2 | 800 % + 5·POW | 3×3 | 2.0 s | 54 | 4 |
| 3 | 1,200 % + 5·POW | 5×5 | 1.0 s | 57 | 4 |
| 4 | 1,600 % + 5·POW | 5×5 | 1.0 s | 60 | 5 |
| 5 | 2,000 % + 5·POW | 7×7 | 1.0 s | 63 | 5 |
Ratios are before multiplying by your base level. Add half a second of fixed cast to the cast column, which DEX does not reduce. After that there is 0.15 s of after-cast delay and half a second of cooldown: these are among the fastest skills to chain in the game.
A worked example
Level 5, POW 110, base level 200, no Research Report:
2,000 + (5 × 110) = 2,550 % → × 200 ÷ 100 = 5,100 % per hit × 7 hits = 35,700 % per cast.
With Research Report running that becomes 7,650 % per hit, and 11,475 % if the target is Formless or Plant race.
Each cast burns 2 bottles of the matching element — just 1 with Research Report active. The bottles are made only by the class itself with Bionic Pharmacy.
See also Research Report rewrites five skills for 150 seconds Where everything the Biolo burns actually comes from Bionic Pharmacy never fails and yields 11 to 15 units, but right now it cannot make anything
Research Report is a self buff lasting 150 seconds with a 60 second cooldown. It costs 60 SP and 100 AP, with 2 seconds of cast plus half a second of fixed cast.
It deals no damage and raises none of your stats. What it does is change how five different skills are calculated while it lasts — and not all of them the same way.
| Skill | To the ratio | To the hits | To the cost |
|---|---|---|---|
| All four acidified zones | ×1.5 — and ×2.25 against Formless or Plant | — | From 2 bottles to 1 |
| Explosive Powder | +100 % × level | 3 to 5 | — |
| Mayhemic Thorns | +200 % flat | 3 to 4 | — |
| Dust Explosion | +(50 + 210 % × level) | — | — |
| Mystery Powder | nothing | — | — |
The hidden bonus: Formless and Plant
Against Formless or Plant race targets, the acidified zones' 50 % is applied twice: a general 50 % first, then another 50 % on top of the result. ×2.25 in total.
No client description mentions it. It is why a Biolo with Research Report clears certain maps at twice the speed of others.
Adding hits beats raising ratio
Explosive Powder goes from 3 hits to 5, and the ratio applies to each hit. That alone is +67 % damage, before counting the ratio increase.
Mayhemic Thorns goes from 3 to 4: +33 %.
How to use it
150 seconds of duration against a 60 second cooldown means it can be up permanently: recast whenever you like and you will never be without it. The only reason not to have it running is not having the 100 AP.
And that is the class loop: almost every other Biolo skill gives AP on use (2 to 20), so you fight to pay for the report, and the report makes fighting pay more.
The bottle saving is half its real value. The acidified zones burn 2 bottles a cast and you are the only source of bottles: with Research Report running, every Bionic Pharmacy batch lasts twice as long.
See also The four acidified zones are one skill with four elements, and they only leave a pool on a player Explosive Powder is the only Biolo skill that burns no item at all Mayhemic Thorns always lands as a critical, from nine cells away Dust Explosion does multiply its five hits, but will not cast without Mystery Powder
Explosive Powder detonates around you: 3 physical hits in a 7×7 centred on yourself, using your weapon's element. No cast time, no item consumed, and it hands you back 2 AP per use.
The whole formula
(500 % + 650 % × level + 5 × POW) × base level ÷ 100, applied to each of the 3 hits.
With Research Report: +100 % × level to the ratio, and the hits go from 3 to 5.
| Level | Ratio per hit | With Research Report | SP |
|---|---|---|---|
| 1 | 1,150 % + 5·POW | 1,250 % × 5 hits | 69 |
| 2 | 1,800 % + 5·POW | 2,000 % × 5 hits | 76 |
| 3 | 2,450 % + 5·POW | 2,750 % × 5 hits | 83 |
| 4 | 3,100 % + 5·POW | 3,500 % × 5 hits | 90 |
| 5 | 3,750 % + 5·POW | 4,250 % × 5 hits | 97 |
Ratios are before the POW term and before multiplying by your base level. The Research Report column already includes the ratio bonus, but not POW or base level either.
No cast, almost no cooldown
0.25 s after-cast delay and a 0.7 s cooldown. This is the skill that chains itself while you move, and the one that keeps the AP flowing to pay for Research Report.
You have to be inside
The 7×7 is centred on you, not on a target. For all three hits to land you have to be standing in the pack, with everything that implies.
If you would rather hit from outside, the one in this branch that reaches 9 cells is Mayhemic Thorns.
At level 3 it unlocks Mayhemic Thorns and at level 5 Mystery Powder: whether or not you use it, you are levelling it.
See also Mayhemic Thorns always lands as a critical, from nine cells away Research Report rewrites five skills for 150 seconds Mystery Powder splits its damage across five hits, and its real effect is unlocking Dust Explosion
Mayhemic Thorns is the Biolo's ranged damage skill: range 9, splash, 3 physical hits with your weapon's element, and the important part — it carries the critical flag in the database, so it resolves as a critical hit and cannot be dodged or blunted by ordinary defence.
The whole formula
(200 % + 340 % × level + 5 × POW) × base level ÷ 100, applied to each of the 3 hits.
With Research Report: +200 % flat, and the hits go from 3 to 4.
| Level | Ratio per hit | Area | SP |
|---|---|---|---|
| 1 | 540 % + 5·POW | 7×7 | 68 |
| 2 | 880 % + 5·POW | 7×7 | 70 |
| 3 | 1,220 % + 5·POW | 7×7 | 72 |
| 4 | 1,560 % + 5·POW | 7×7 | 74 |
| 5 | 1,900 % + 5·POW | 7×7 | 76 |
| 6 | 2,240 % + 5·POW | 9×9 | 78 |
| 7 | 2,580 % + 5·POW | 9×9 | 80 |
| 8 | 2,920 % + 5·POW | 9×9 | 82 |
| 9 | 3,260 % + 5·POW | 9×9 | 84 |
| 10 | 3,600 % + 5·POW | 9×9 | 86 |
1 second of cast plus half a second of fixed cast, 0.15 s after-cast delay and a 0.7 s cooldown. It gives 2 AP per use and consumes no item. The area jump is at level 6.
A worked example
Level 10, POW 110, base level 200, with Research Report:
3,600 + 200 + (5 × 110) = 4,350 % → × 200 ÷ 100 = 8,700 % per hit × 4 hits = 34,800 %, from nine cells and across a 9×9.
It is the only one in the powder branch you can cast without walking into the pack. Paired with the acidified zones the split is natural: the zones for whichever element is called for, Mayhemic Thorns for everything else.
See also Explosive Powder is the only Biolo skill that burns no item at all Research Report rewrites five skills for 150 seconds The four acidified zones are one skill with four elements, and they only leave a pool on a player
Mystery Powder has by far the highest ratio in the class, and it has to be read carefully because its five hits SPLIT the total, they do not multiply it. The hit count is written as a negative number in the database, and in this engine that means exactly that: it divides.
The whole formula
(1,400 % + 4,000 % × level + 5 × POW) × base level ÷ 100 — and that total is split across the 5 hits.
So at level 5 it is 21,400 % in total, not 21,400 % five times. It is still the Biolo's biggest single strike, but not by the margin the figure suggests.
| Level | TOTAL ratio | Area | Range | SP |
|---|---|---|---|---|
| 1 | 5,400 % + 5·POW | 5×5 | 3 | 82 |
| 2 | 9,400 % + 5·POW | 5×5 | 3 | 82 |
| 3 | 13,400 % + 5·POW | 5×5 | 3 | 82 |
| 4 | 17,400 % + 5·POW | 7×7 | 3 | 82 |
| 5 | 21,400 % + 5·POW | 7×7 | 3 | 82 |
SP is flat: 82 at every level. No cast time, half a second of after-cast delay and a 1.5 second cooldown, the longest in the powder branch. Research Report does not touch it: it is the only one of the five that the report leaves alone.
The status it leaves does nothing… except the one thing that matters
Casting it puts a 60 second status on yourself. That status raises none of your stats and lowers none; it appears in no damage or defence formula anywhere.
Its job is to be a requirement: Dust Explosion cannot be cast without it, and fails silently if you try.
The rotation is fixed and has no alternative: Mystery Powder first, then Dust Explosion as many times as you like over the next 60 seconds. With a 1.5 s cooldown and a 60 second window, one comfortably feeds the other.
See also Dust Explosion does multiply its five hits, but will not cast without Mystery Powder Explosive Powder is the only Biolo skill that burns no item at all Research Report rewrites five skills for 150 seconds
Dust Explosion is the other half of the powder combo, and it is the half that does the damage. Range 3, splash, 5 hits that multiply — here the hit count is positive, the opposite of Mystery Powder — using your weapon's element.
The whole formula
(400 % + 620 % × level + 5 × POW) × base level ÷ 100, applied to each of the 5 hits.
With Research Report: +(50 + 210 % × level) to the ratio.
| Level | Ratio per hit | With Research Report | Area | SP |
|---|---|---|---|---|
| 1 | 1,020 % + 5·POW | 1,280 % | 5×5 | 64 |
| 2 | 1,640 % + 5·POW | 2,110 % | 5×5 | 67 |
| 3 | 2,260 % + 5·POW | 2,940 % | 5×5 | 70 |
| 4 | 2,880 % + 5·POW | 3,770 % | 7×7 | 73 |
| 5 | 3,500 % + 5·POW | 4,600 % | 7×7 | 76 |
No cast time, half a second of after-cast delay and half a second of cooldown. It gives 2 AP per use and consumes no item. Ratios are before the POW term and the base-level multiplier.
A worked example
Level 5, POW 110, base level 200, with Research Report:
4,600 + (5 × 110) = 5,150 % → × 200 ÷ 100 = 10,300 % per hit × 5 hits = 51,500 % every half second.
It is by a wide margin the most damage per second the class can produce — for as long as the 60 second window Mystery Powder opens.
The catch
The status requirement is checked by the engine before it charges you, so trying to cast it without the powder up costs you no SP — but you get no clear warning either: the skill simply does not come out. If it feels like it "sometimes does not work", check your status bar: the powder has run out.
Range 3 means long melee, not ranged. Like Explosive Powder, this is a skill for standing inside the pack.
See also Mystery Powder splits its damage across five hits, and its real effect is unlocking Dust Explosion Research Report rewrites five skills for 150 seconds Mayhemic Thorns always lands as a critical, from nine cells away
The Biolo can have all four bionics out at once — one of each, not several of the same — and they all work the same way: cast on yourself, lasting 2 to 6 minutes by level, computed from Bionics Mastery and your own stats.
| Bionic | SP | AP | Bottles | Cooldown | Duration | Range | Element |
|---|---|---|---|---|---|---|---|
| Creeper | 80–144 | gives 10 | 1 | 15 s | 2–6 min | 5 | Earth 4 |
| Wooden Warrior | 100–180 | gives 20 | 2 | 30 s | 2–6 min | 3 | Earth 4 |
| Wooden Fairy | 120–230 | gives 20 | 2 | 30 s | 2–6 min | 5 | Earth 4 |
| Hell Tree | 100 | costs 100–60 | 3 | 60 s | 1–3 min | 5 | Neutral 4 |
All of them burn High Plant Bottle, with 1 second of cast plus 1 of fixed cast. The Hell Tree is the only one that costs AP instead of giving it, and the only one whose AP cost drops as you level it: 100 at level 1 and 60 at level 5.
The stats they come out with
Writing BM for your Bionics Mastery level:
The Hell Tree carries +20,000 HP and +2,000 max attack on top of all that: it is the only one that is not a copy of the other three.
Two of them change your Genetic skills
If you come from a cart build, the Wooden Warrior is not a summon: it is a damage buff that also fights.
They know nothing but hitting
The server's monster skill database has not a single line for any of the four bionics. The skills bearing their names — Wooden Attack, Wooden Throw Rock, Hell Howling, Hell Dusty, Fairy Dusty — exist in the emulator but are not assigned to any bionic.
So: they punch, using the attack from the formula above, and nothing else. What decides their output is your base attack and your Bionics Mastery, not any special skill.
A worked example
A Biolo with Bionics Mastery 10, VIT 100 and 1,500 base attack, summoning a Hell Tree:
HP = (5,000 + 400,000) × 100 ÷ 100 = 405,000, and with the tree's own bonus 425,000.
Max attack = (2 × 1,500) + 6,000 = 9,000, plus the tree's 2,000 = 11,000; minimum 8,300.
At VIT 30 instead of 100, that same tree comes out with 141,500 HP. VIT is literally triple or a third of your summon.
Bionics teleport to you if you get more than 19 cells away, so they never get lost on the map. (The emulator's comment says 15, but the number comes from this server's configuration and here it is 19.) And since each allows a single instance, recasting one does not stack: it replaces the one you had.
See also Bionics Mastery is a ten-level passive that does nothing until you summon Where everything the Biolo burns actually comes from Cart Tornado hits with the weight of your cart and your STR, not your INT Spore Explosion hits twice and leaves the target marked
Both hang off Bionic Pharmacy at level 5 and both burn High Coating Bottle. The similarities end there.
The Whole Protection
Cast on yourself, it covers your whole party inside the area, applying all four chemical protections at once — weapon, shield, armour and helm — which until now had to be cast one at a time.
| Level | Area | Duration | SP |
|---|---|---|---|
| 1 | 15×15 | 1 min | 220 |
| 2 | 15×15 | 1 min 30 s | 260 |
| 3 | 15×15 | 2 min | 300 |
| 4 | 31×31 | 2 min 30 s | 340 |
| 5 | 31×31 | 3 min | 380 |
1 second of cast plus 1 of fixed cast, a 10 second cooldown, 3 High Coating Bottle per cast, and it gives you 20 AP. The area jump at level 4 is deliberately steep: from there on it covers practically the whole screen.
It only protects what is actually worn
For each of the four pieces, the skill checks that the target has it equipped. If a party member fights without a shield, they get no shield protection — and there is no warning.
It is a detail that matters when counting: "I covered all six" does not mean all six have all four.
Advance Protection
Cast on a single ally, and you have to be right next to them: range 1. It protects shadow gear from being broken or stripped, which is the one thing the four classic chemical protections do not cover.
| Level | Duration | SP | AP gained |
|---|---|---|---|
| 1 | 1 min 30 s | 120 | 2 |
| 2 | 2 min | 130 | 2 |
| 3 | 2 min 30 s | 140 | 3 |
| 4 | 3 min | 150 | 3 |
If the target wears no shadow gear it fails — and that is good news
The skill first checks that the ally has something equipped in the shadow slots. If not, it fails with a message and does not consume the bottle: the code explicitly marks the requirements as not to be charged.
It is one of the very few skills in the game that gives the material back when it cannot do anything. Use that: there is no cost to trying.
With only 4 levels and 1 cell of range, Advance Protection is a castle-war and coordinated-instance skill, not a hunting one. Out hunting, the one worth keeping handy is The Whole Protection.
See also Bionic Pharmacy never fails and yields 11 to 15 units, but right now it cannot make anything Where everything the Biolo burns actually comes from The Biolo tree revolves around two skills that on their own do nothing
Bionic Pharmacy is the fourth job's crafting skill: 5 levels, 30 SP per use, 14 formulas and no chance of failure.
The formula, which here is the simplest of the lot
Units per batch = 10 + skill level, so 11 to 15. That is all.
Unlike Special Pharmacy, INT, DEX, LUK, job level and random rolls play no part. The emulator leaves it at a 100 % success rate because the official difficulty is not known.
The problem: the Beaker
All fourteen formulas require a Beaker, and it is consumed. And the Beaker is sold by no NPC, dropped by no monster, found in no box and given by no quest on this server.
While that stands, the skill opens its window normally but there is nothing you can actually make. It is noted for review.
What it makes, once it can
The four acid bottles are what feed the acidified zones; the High Plant Bottle is for the bionics and the High Coating Bottle for the protections. The remaining eight are support consumables.
 Beaker×1
Empty Bottle×10
Holy Water×5
White Herb×3
Green Herb×3
Beaker×1
Empty Bottle×10
Holy Water×5
Blue Herb×2
Green Herb×3
Beaker×1
Empty Bottle×10
Holy Water×5
Yggdrasil Berry×2
Royal Jelly×3
Beaker×1
Empty Bottle×10
Holy Water×5
Beaker×1
Empty Bottle×10
Holy Water×5
White Herb×3
Green Herb×3
Beaker×1
Empty Bottle×10
Holy Water×5
Blue Herb×2
Green Herb×3
Beaker×1
Empty Bottle×10
Holy Water×5
Yggdrasil Berry×2
Royal Jelly×3
Beaker×1
Empty Bottle×10
Holy Water×5
 Crystal Blue×5
 Iron×3
Beaker×1
Empty Bottle×10
Holy Water×5
Clover×10
Green Herb×3
Beaker×1
Empty Bottle×10
Holy Water×5
Iron×3
Beaker×1
Empty Bottle×10
Holy Water×5
Clover×10
Green Herb×3
Beaker×1
Empty Bottle×10
Holy Water×5
 Poison Bottle×3
Green Herb×10
Poison Bottle×3
Green Herb×10
The four crystals, at 200z
The acid bottles each take 2 units of a coloured crystal: Scarlet Point (fire), Indigo Point (water), Yellow Wish Point (wind) and Lime Green Point (earth).
The Point Merchants sell them at 200z each, and they are spread across almost every town: inside Prontera, Geffen, Aldebaran, Alberta, Comodo, Izlude and Geffen Tower, among others.
The rest comes from the branch below
The High Plant Bottle is made from Genetic material: 2 Seed Of Thorny Plant, 2 Bloodsuck Plant Seed, 5 Mandragora Flowerpot and 10 Plant Bottle.
And each of the four acid bottles needs a Bottle Grenade and an Acid Bottle, which come from Prepare Potion. The Biolo does not outgrow the Alchemist: it leans on it.
The batch of 11 to 15 units refers to the product: a single acid-bottle craft gives you 11 to 15, so 5 to 7 acidified zone casts — twice that with Research Report running.
See also The four acidified zones are one skill with four elements, and they only leave a pool on a player The four bionics come out carrying YOUR HP, YOUR attack and YOUR defence Where everything the Biolo burns actually comes from Special Pharmacy never fails: what varies is how many units come out
The Biolo is the most self-sufficient class in the game and, for that same reason, the most fragile: everything it burns it makes itself with Bionic Pharmacy. No shop sells it a finished bottle.
What each skill consumes
| Skill | Consumes | Per cast |
|---|---|---|
| Acidified Zone Fire | Flame Acid Bottle | 2 — 1 with Research Report |
| Acidified Zone Ground | Earth Acid Bottle | 2 — 1 with Research Report |
| Acidified Zone Wind | Gale Acid Bottle | 2 — 1 with Research Report |
| Acidified Zone Water | Icicle Acid Bottle | 2 — 1 with Research Report |
| The Whole Protection | High Coating Bottle | 3 |
| Advance Protection | High Coating Bottle | 1 |
| Creeper | High Plant Bottle | 1 |
| Wooden Warrior | High Plant Bottle | 2 |
| Wooden Fairy | High Plant Bottle | 2 |
| Hell Tree | High Plant Bottle | 3 |
| Explosive Powder | Nothing | — |
| Mayhemic Thorns | Nothing | — |
| Mystery Powder | Nothing | — |
| Dust Explosion | Nothing | — |
| Research Report | Nothing — but 100 AP | — |
The entire powder branch — Explosive Powder, Mayhemic Thorns, Mystery Powder and Dust Explosion — is free. It is what you fall back on when the bottles run out, and it is not a small fallback.
The supply chain, top to bottom
| Piece | Where it comes from |
|---|---|
| Beaker | No known source — nobody sells, drops or gives it |
| Scarlet Point, Indigo Point, Yellow Wish Point, Lime Green Point | Point Merchant, 200z, in almost every town |
| Glistening Coat | Alchemist Supplier, inside Prontera |
| Bottle Grenade, Acid Bottle, Plant Bottle | Alchemist Supplier, or Prepare Potion |
| Seed Of Thorny Plant, Bloodsuck Plant Seed | The Genetic's Special Pharmacy — see its materials |
| Mandragora Flowerpot | Hunted: Muscipular, Drosera, Hermit Plant |
Look at the shape of that chain: one High Plant Bottle takes 10 Plant Bottle, 5 Mandragora Flowerpot and four Genetic seeds. A Biolo who wants to live off summons needs a Genetic behind them first — or to be one, with Special Pharmacy at 10.
See also Bionic Pharmacy never fails and yields 11 to 15 units, but right now it cannot make anything The four acidified zones are one skill with four elements, and they only leave a pool on a player Where everything the Genetic burns actually comes from
The twelve skills of the first trading class, one by one: the exact formula the server uses, what each level really gives you, and the engine traps no tooltip mentions.
Merchant is the first class of a very long branch: Blacksmith and Alchemist come out of it, then Whitesmith and Creator, then Mechanic and Genetic, and finally Meister and Biolo. All twelve skills of this tree are inherited whole all the way to fourth class, so what you decide here follows you to the end.
Everything on this page comes from the emulator that is running right now, not from a wiki. When a formula disagrees with what the client says, the one here wins.
The complete tree
| Skill | Max | Requires | How you learn it | What it is |
|---|---|---|---|---|
| Enlarge Weight Limit | 10 | — | Skill points | Weight passive |
| Discount | 10 | Enlarge Weight Limit 3 | Skill points | Buying passive |
| Overcharge | 10 | Discount 3 | Skill points | Selling passive |
| Pushcart | 10 | Enlarge Weight Limit 5 | Skill points | Cart passive |
| Item Appraisal | 1 | — | Skill points | Identify |
| Vending | 10 | Pushcart 3 | Skill points | Selling shop |
| Mammonite | 10 | — | Skill points | Damage for zeny |
| Cart Revolution | 1 | — | NPC | Splash damage |
| Change Cart | 1 | — | NPC | Cart design |
| Crazy Uproar | 1 | — | NPC | Party buff |
| Pushcart Decoration | 1 | — | NPC | Cart design |
| Open Buying Store | 1 | Vending 1 | NPC | Buying shop |
Five of them cannot be bought with points, and that is not a bug
Cart Revolution, Change Cart, Crazy Uproar, Pushcart Decoration and Open Buying Store are flagged as quest skills in the database, and this server has point-learning for that kind of skill switched off. They show up in the tree, but the level-up button does nothing.
You learn them by talking to an NPC. And the first four are handed over in one go, with no materials and no job level required, by the Platinum Skill NPC in Prontera (158, 193).
Where each quest skill is taught
| Skill | NPC | Where | What it asks for |
|---|---|---|---|
| Crazy Uproar | Necko | Alberta 83, 96 | Job level 15, 7 Pearl, 1 Banana Juice, 50 Mushroom Spore |
| Change Cart | Charlron | Alberta 119, 221 | Job level 30, 50 Trunk, 10 Iron, 20 Animal Skin |
| Cart Revolution | Gershaun | Alberta | Job level 35, 2 Grape Juice, 20 Iron, 30 Sticky Mucus, 20 Fly Wing, 5 Tentacle |
| Pushcart Decoration | Jason | Alberta 47, 37 | 1 Cute Cart Remodel Coupon |
| Open Buying Store | Mr. Hugh | alberta_in 58, 52 | Vending 1 and a 10,000 z registration fee |
The first three also accept «already being a Blacksmith or an Alchemist» instead of the job level. The buying shop is the one the Platinum NPC does not hand out: for that one you have to go through Mr. Hugh.
They do not all fit
The seven skills you actually buy with points add up to 61 levels. A Merchant reaches job level 50 at most, which is 49 points.
Twelve short. The books balance when you change class: second-class points can be spent downwards, in the Merchant tree, with no penalty at all.
What hangs off this tree higher up
In other words: if you plan to reach Whitesmith, Mammonite at 10 and the two cart quest skills are not optional.
The Super Novice gets eight of the twelve: the four passives, Item Appraisal, Vending, Mammonite, Pushcart Decoration and the buying shop. Cart Revolution, Change Cart and Crazy Uproar are the ones it misses.
See also Enlarge Weight Limit gives +200 weight per level, and the number you see is a tenth of the one the engine uses Discount 10 takes off 24 %, not 25, and on cheap items it takes off far more Vending opens 2 + level shop slots, and at twelve you have hit the server ceiling Crazy Uproar gives +4 STR and +30 attack to the whole party, and here to their homunculi and mercenaries too The Genetic skill tree: eighteen skills, two of them passive and two you cannot learn
Enlarge Weight Limit is the root of the tree: without it there is no Discount (which wants level 3) and no Pushcart (which wants level 5). It has no prerequisites of its own, so it is the first point every Merchant spends.
The whole formula
max weight = class base + STR × 300 + 2,000 × level, all in internal units.
The engine counts weight multiplied by ten. The game window divides by ten to show it to you, so what you read is +200 per level and +30 per point of STR. Items work the same way: a Red Potion weighs 70 inside and 7 on screen.
What each level adds
| Level | Extra weight (internal) | Extra weight (what you see) | Total for a Merchant with STR 1 |
|---|---|---|---|
| 0 | — | — | 2,830 |
| 1 | 2,000 | 200 | 3,030 |
| 2 | 4,000 | 400 | 3,230 |
| 3 | 6,000 | 600 | 3,430 |
| 4 | 8,000 | 800 | 3,630 |
| 5 | 10,000 | 1,000 | 3,830 |
| 6 | 12,000 | 1,200 | 4,030 |
| 7 | 14,000 | 1,400 | 4,230 |
| 8 | 16,000 | 1,600 | 4,430 |
| 9 | 18,000 | 1,800 | 4,630 |
| 10 | 20,000 | 2,000 | 4,830 |
The Merchant class base is 28,000 internal, which is 2,800 on screen, and it is the same for Merchant High and Baby Merchant. It carries over untouched to fourth class.
A worked example
A Merchant with STR 40 and the passive at 10: 28,000 + 12,000 + 20,000 = 60,000 internal, or 6,000 on screen.
That is exactly 857 Red Potions. Without the passive it would be 571.
What it stacks with
All of that is added after the passive, on top of the same total.
The two thresholds that matter
Past 50 % of your weight limit, natural HP and SP regeneration stops. Past 90 % you enter major overweight: you cannot attack, use skills or regenerate.
That 90 % is also what decides whether you are allowed to open a buying shop: if what you want to buy would push you past it, the shop refuses to open.
Cart weight is a separate count and never enters this formula. Walking around with a full cart does not slow you down or stop you attacking; all it does is stop more going in.
See also The Merchant tree: twelve skills, five of which no amount of skill points will buy Pushcart removes 5 % of the movement penalty per level, and at 10 there is none left Discount 10 takes off 24 %, not 25, and on cheap items it takes off far more
Discount is a passive: you never cast it, it costs nothing, and it works on its own the moment you open an NPC buying window. It requires Enlarge Weight Limit 3 and unlocks Overcharge from its own level 3.
The whole formula
discount = 5 + 2 × level, and at level 10 one is subtracted. The final price is the integer part of (price × (100 − discount) ÷ 100), with a floor of 1 zeny.
That «minus one» at level 10 is not a typo on our side: it is written that way in the engine. The maximum discount is 24 %.
Level by level, and what you actually pay
| Level | Discount | Red Potion (10 z) | White Potion (1,200 z) | 1,000 Red Potions |
|---|---|---|---|---|
| 0 | — | 10 z | 1,200 z | 10,000 z |
| 1 | 7 % | 9 z | 1,116 z | 9,000 z |
| 2 | 9 % | 9 z | 1,092 z | 9,000 z |
| 3 | 11 % | 8 z | 1,068 z | 8,000 z |
| 4 | 13 % | 8 z | 1,044 z | 8,000 z |
| 5 | 15 % | 8 z | 1,020 z | 8,000 z |
| 6 | 17 % | 8 z | 996 z | 8,000 z |
| 7 | 19 % | 8 z | 972 z | 8,000 z |
| 8 | 21 % | 7 z | 948 z | 7,000 z |
| 9 | 23 % | 7 z | 924 z | 7,000 z |
| 10 | 24 % | 7 z | 912 z | 7,000 z |
A thousand red potions: you save 30 %, not 24
The discount is applied to the price of one unit, and the decimals are cut off there, before multiplying by the quantity. With Discount 10 a 10 z Red Potion comes to 7.6 and the engine charges 7.
A thousand potions: 7,000 z instead of 10,000. You save 3,000, which is 30 %.
And on expensive items, not one zeny extra
With the 1,200 z White Potion the cut lands on a round number: 912 z. A thousand of them cost 912,000 instead of 1,200,000, exactly 24 %.
The cheaper the item, the more the rounding gives you for free. The dearer it is, the closer you get to the clean percentage.
Levels 4, 5, 6 and 7 do nothing at all if you buy red potions
Look at the table: from Discount 3 to Discount 7 a Red Potion costs 8 z throughout. Four whole levels, four skill points, and not one zeny of difference.
On expensive goods it does not happen: there every level shows. If you are spending points with one particular consumable in mind, work out its real price before you commit.
Where it works
Where it does NOT work
If you are also a Rogue, Compulsion Discount takes off 5 + 4 × level, up to 25 %. The engine keeps the larger of the two and never adds them together. And one surprise: using Discount gives no job experience here; that emulator option is switched off.
See also Overcharge 10 raises what you are paid by 24 %, but on cheap items it raises nothing until level 8 The Merchant tree: twelve skills, five of which no amount of skill points will buy The agent tops up your travel kit before every trip
Overcharge is the twin passive of Discount: same arithmetic, same rounding, opposite sign. It requires Discount 3 and unlocks nothing further.
The whole formula
markup = 5 + 2 × level, and at level 10 one is subtracted. What you are paid is the integer part of (sell price × (100 + markup) ÷ 100).
The «sell price» is a property of the item itself. When the database does not spell it out, the engine derives it as half the buying price.
Level by level, with two items that behave in opposite ways
| Level | Markup | Red Potion (base 5 z) | Real gain | White Potion (base 600 z) | Real gain |
|---|---|---|---|---|---|
| 0 | — | 5 z | — | 600 z | — |
| 1 | 7 % | 5 z | 0 % | 642 z | 7 % |
| 2 | 9 % | 5 z | 0 % | 654 z | 9 % |
| 3 | 11 % | 5 z | 0 % | 666 z | 11 % |
| 4 | 13 % | 5 z | 0 % | 678 z | 13 % |
| 5 | 15 % | 5 z | 0 % | 690 z | 15 % |
| 6 | 17 % | 5 z | 0 % | 702 z | 17 % |
| 7 | 19 % | 5 z | 0 % | 714 z | 19 % |
| 8 | 21 % | 6 z | 20 % | 726 z | 21 % |
| 9 | 23 % | 6 z | 20 % | 738 z | 23 % |
| 10 | 24 % | 6 z | 20 % | 744 z | 24 % |
Seven levels that pay you nothing
With the Red Potion, whose sell price is 5 z, Overcharge changes nothing until level 8. From 1 to 7 the arithmetic lands between 5.35 and 5.95, and the engine keeps 5.
The general rule: the cheaper the item, the more levels the rounding eats whole. From three-figure prices upwards every level shows.
A worked example
Selling 1,000 White Potions to an NPC: 600,000 z without the passive. With Overcharge 10, 744,000 z. A difference of 144,000.
With 1,000 Red Potions: 5,000 without it, and 6,000 with it from level 8 onwards. One thousand zeny.
Selling to an NPC destroys nothing here
What you sell to an NPC goes into your custody, and the unit price recorded is exactly what Overcharge just paid you. The same goes for whatever you send to the incinerator.
So a Merchant not only earns more for selling: they also earn more for incinerating, and it costs them more to buy back later what they sold.
The engine has an anti-fraud guard almost nobody has seen
While loading the item database, the emulator checks whether buying price ÷ 124 is smaller than selling price ÷ 75. If it is, it forces that item selling price down to 1 zeny and logs a warning.
The numbers are not arbitrary: 124 is the Overcharge ceiling and 75 is the Discount margin. It is the lock that stops you buying cheap with one passive and reselling dear with the other. Today, out of the 29,364 items on the server, not one trips it.
Overcharge does not touch other players buying shops or your own selling shop: it only applies when the payer is an NPC. And, like Discount, using it gives no job experience on this server.
See also Discount 10 takes off 24 %, not 25, and on cheap items it takes off far more The Merchant tree: twelve skills, five of which no amount of skill points will buy Vending opens 2 + level shop slots, and at twelve you have hit the server ceiling
Pushcart requires Enlarge Weight Limit 5 and is the key to half the class: without it there is no cart, and without a cart there is no Vending, no Cart Revolution, and none of the Whitesmith, Genetic or Mechanic cart skills.
The whole formula
While the cart is out, your time per cell is stretched like this: time += time × (50 − 5 × level) ÷ 100.
At level 10 the bracket is zero and there is no penalty at all. The sum is worked out before Increase Agility and speed potions are applied, so the penalty multiplies with them instead of adding to them.
What walking with the cart costs
| Level | Penalty | Time per cell | Compared with no cart |
|---|---|---|---|
| 1 | 45 % | 217 ms | 31 % slower |
| 2 | 40 % | 210 ms | 29 % slower |
| 3 | 35 % | 202 ms | 26 % slower |
| 4 | 30 % | 195 ms | 23 % slower |
| 5 | 25 % | 187 ms | 20 % slower |
| 6 | 20 % | 180 ms | 17 % slower |
| 7 | 15 % | 172 ms | 13 % slower |
| 8 | 10 % | 165 ms | 9 % slower |
| 9 | 5 % | 157 ms | 4 % slower |
| 10 | 0 % | 150 ms | the same |
150 ms per cell is the base walking speed of any character. The right-hand column is what you actually feel: the penalty is counted on time, not on speed, which is why 45 % more time is 31 % fewer cells per second.
Cart capacity, and why 8,000 is not what it looks like
The configuration file says 8,000, but the engine multiplies it by ten at start-up: internally it is 80,000. Since the cart window also divides by ten to draw it, the number you end up seeing is 8,000 again.
This matters when you read the code or add up bonuses: the Genetic Cart Remodeling adds 5,000 internal per level, which on screen is +500. At level 5 the cart goes from 8,000 to 10,500, not to 33,000.
How you get the cart
Once you know the skill, any Kafra employee will rent you one. The base fee is 800 z and your player-level discount applies to it; if you carry a Free Ticket for the Cart Service it is spent instead.
And if the discount has already brought the rental down to zero, the ticket is not consumed.
What the cart really is
The traps
Level 10 is not just about comfort: Pushcart 5 is a prerequisite of Cart Boost in Whitesmith, and level 10 is what decides whether you can move around a castle without being the last one there.
See also Enlarge Weight Limit gives +200 weight per level, and the number you see is a tenth of the one the engine uses Vending opens 2 + level shop slots, and at twelve you have hit the server ceiling Cart Revolution hits for between 150 and 250 %, and cart weight is what makes the difference Cart Tornado hits with the weight of your cart and your STR, not your INT What levelling up gives you: more automation quota and a cheaper warper
Vending requires Pushcart 3, costs 30 SP and demands that you have the cart out. What goes on sale comes from the cart, not from your inventory.
The whole formula
slots = 2 + level, with a hard ceiling of 12 written into the server. Since the maximum level is 10, formula and ceiling meet exactly at the top.
Each slot is one distinct item, not one unit. A slot holds as many units as you have of that item in the cart.
Level by level
| Level | Slots | SP | Requirements |
|---|---|---|---|
| 1 | 3 | 30 | Cart out |
| 2 | 4 | 30 | Cart out |
| 3 | 5 | 30 | Cart out |
| 4 | 6 | 30 | Cart out |
| 5 | 7 | 30 | Cart out |
| 6 | 8 | 30 | Cart out |
| 7 | 9 | 30 | Cart out |
| 8 | 10 | 30 | Cart out |
| 9 | 11 | 30 | Cart out |
| 10 | 12 | 30 | Cart out |
The price ceilings
What cannot be put on sale
The big trap: it is all or nothing
If a single one of the items you listed fails a check, the server does not open the shop. It does not open it without that item: it does not open it at all. You get a «some of your items cannot be vended» message and are left exactly where you were.
By far the commonest cause is a piece of unidentified equipment that found its way into the cart. Identify it first, or take it out.
And a pause that is not a fault
If the cart holds anything that has not been written to the database yet, the server saves the cart first and opens the shop window afterwards. It feels like half a second of nothing between pressing the skill and seeing the dialog.
It is deliberate: without that save, a crash at exactly that instant could leave the cart and the shop counting different things.
When it refuses to cast
What is handled elsewhere
Where you may plant the stall has rules of its own, and they are ours: see where you can set up a shop.
And leaving the shop trading with the game closed is @autotrade, which has its own section.
The @autoplay intelligence can set up a shop too, and it goes through exactly the same gates: cart, skill, location and slots. The one thing it will not do is set its own prices: it uses the item shop price, which sits above what people normally ask, so it cannot undercut the market while you sleep.
See also Here you can set up a shop on any map and any cell, as long as you leave room Pushcart removes 5 % of the movement penalty per level, and at 10 there is none left Open Buying Store is five fixed slots, one permit per opening and a licence you have to buy Your shop keeps selling with the game closed, and your account is freed instantly The shop survives server restarts, and every sale is saved the moment it happens
In stock Ragnarok there are maps where you cannot vend, hand-painted cells where you cannot either, and an NPC distance rule nobody understands. All of that has been thrown out here and replaced with a single gate, the same one for the selling shop and the buying shop.
The four rules, and there are no others
@autotrade stalls included.
Distance is measured in whole cells and a diagonal counts as 1, which is how you count it yourself looking at the tiles.
«Three cells» means three IS allowed
You are refused at 0, 1 and 2. From 3 onwards, go ahead. The original emulator rule used the same number as a rejection radius, so a 3 there demanded 4.
With the same number written down, this is one cell more permissive than the usual game.
Portals are measured from the edge
A portal is not a point: it is a trigger rectangle, sometimes a fairly large one. The four cells are counted from the edge of that area, not from its centre.
Which is the fair way round, because what a player steps on when passing is the whole area, not the centre.
Three details that save arguments
@autotrade stalls restored by the server at boot do not come through here again, on purpose: if they were judged again, whichever one was restored a second later would vanish through no fault of its owner.
Chat rooms still use the old rule with their own setting, also 3 cells. They are the only thing this rework left alone.
See also Vending opens 2 + level shop slots, and at twelve you have hit the server ceiling Open Buying Store is five fixed slots, one permit per opening and a licence you have to buy Your shop keeps selling with the game closed, and your account is freed instantly
Mammonite is an ordinary physical hit with your weapon element, at your weapon range, with no cast time, no cooldown and no delay afterwards. The only strange thing about it is how you pay for it.
The whole formula
(100 + 50 × level) % of your attack, in a single hit.
Cost: a flat 5 SP at every level, plus 100 zeny per level. The zeny is charged on every use, hit or miss.
What each level hits for and what it costs
| Level | Damage | Zeny per hit | SP | Percent per 100 z |
|---|---|---|---|---|
| 1 | 150 % | 100 z | 5 | 150 % |
| 2 | 200 % | 200 z | 5 | 100 % |
| 3 | 250 % | 300 z | 5 | 83 % |
| 4 | 300 % | 400 z | 5 | 75 % |
| 5 | 350 % | 500 z | 5 | 70 % |
| 6 | 400 % | 600 z | 5 | 67 % |
| 7 | 450 % | 700 z | 5 | 64 % |
| 8 | 500 % | 800 z | 5 | 63 % |
| 9 | 550 % | 900 z | 5 | 61 % |
| 10 | 600 % | 1,000 z | 5 | 60 % |
Low levels are cheaper per point of damage
Look at the last column: level 1 gives 150 % per 100 zeny and level 10 gives 60 %. Two and a half times more efficient.
What high levels buy is not efficiency: it is damage per swing. And since every swing is capped by your attack speed, if what you have to spare is zeny and what you lack is time, level 10 wins anyway.
A worked example
A hundred swings of Mammonite 10 cost 100,000 zeny and add up to 60,000 % of attack. The same 100,000 zeny spent at level 1 buy a thousand swings and 150,000 %.
But those thousand swings take ten times as long to land. Pick according to what you have to spare.
The traps
Mammonite 10 is a prerequisite of Cart Termination in Whitesmith, the direct heir to this idea of hitting people with your wallet. If that is where you are heading, those ten points are decided in advance.
See also Cart Revolution hits for between 150 and 250 %, and cart weight is what makes the difference The Merchant tree: twelve skills, five of which no amount of skill points will buy Overcharge 10 raises what you are paid by 24 %, but on cheap items it raises nothing until level 8
Cart Revolution throws the cart at an enemy: one physical hit in a 3×3 area with your weapon element, which knocks back 2 cells everything it touches. Range 1, 12 SP, and you need the cart out.
The whole formula
150 % + (100 × cart weight ÷ cart capacity).
In other words: 1 % more damage for every 1 % of cart filled. Empty it hits for 150 %; packed to the brim, 250 %. The fill percentage is the one you can read in the cart window.
What it hits for depending on how full the cart is
| Cart | Weight (what you see) | Damage | Against going empty |
|---|---|---|---|
| Empty | 0 | 150 % | — |
| 25 % full | 2,000 | 175 % | +17 % |
| 50 % full | 4,000 | 200 % | +33 % |
| 75 % full | 6,000 | 225 % | +50 % |
| Full | 8,000 | 250 % | +67 % |
With the Genetic Cart Remodeling the capacity goes up, and what counts is the percentage filled, not the absolute weight: a full 10,500 cart hits exactly as hard as a full 8,000 one. What that passive does give this skill is +4 hit rate per level, up to +20.
A worked example
With 2,000 effective attack: empty cart, a 3,000 base hit. Full cart, 5,000. Same points, same weapon, two thousand of difference for remembering to load the cart before setting out.
Details of the hit
The traps
Together with Change Cart and Pushcart 5, it is a prerequisite of Cart Boost in Whitesmith, and the whole cart branch up to fourth class grows out of that.
See also Pushcart removes 5 % of the movement penalty per level, and at 10 there is none left Mammonite hits 50 % harder per level, and level 1 gives two and a half times more damage per zeny than level 10 Cart Tornado hits with the weight of your cart and your STR, not your INT The Merchant tree: twelve skills, five of which no amount of skill points will buy
Item Appraisal has no prerequisites in the tree, has a single level, and costs 10 SP. It opens the list of unidentified items you are carrying and lets you pick one.
What really happens
When you cast it, the server walks your inventory and builds the list. If there is not one single unidentified item, the list is never sent, the window never appears and the skill is cancelled without spending the SP.
No error message is shown. From the outside it looks as if the skill did not respond; what actually happened is that there was nothing to do.
One per cast
The window shows everything unidentified you own, but you pick one and the window closes. For the second one you cast it again, for another 10 SP.
If you hit cancel, or pick something that was already identified, the window simply closes.
While the window is open you are frozen
The server marks you as busy: you cannot use items or other skills until you pick or cancel.
It is the same marker used by the crafting window and the shop window.
Against the Magnifier
The Magnifier costs 40 zeny, weighs 5 and takes an inventory slot. And internally it does nothing special: its effect is, literally, to cast this very skill at level 1.
So a Merchant does not identify «better»: they identify in exactly the same way, for free and without carrying weight. One skill point, and you never buy a magnifier again.
It is also a practical prerequisite of setting up a shop: one unidentified item in the cart kills the opening of the entire shop.
See also The Merchant tree: twelve skills, five of which no amount of skill points will buy Vending opens 2 + level shop slots, and at twelve you have hit the server ceiling
Crazy Uproar is one of the Merchant quest skills, has a single level and costs 8 SP. It is by a wide margin the best cost-to-value ratio in the whole first class.
Exactly what it gives
+4 STR and +30 base attack, for 5 minutes.
The +30 attack is a renewal figure and it is flat: it is added to base attack before any percentages, so it is worth the same to a small character as to a big one, and proportionally far more to the small one.
The numbers of the skill
| Value | Amount |
|---|---|
| SP | 8 |
| Cast time | 1.0 s variable + 0.3 s fixed |
| After-cast delay | 1.0 s |
| Cooldown | 30 s |
| Duration | 5 min |
| Radius | 18 cells |
That 1.0 s of cast is the part DEX and INT can shorten; the final 0.3 s cannot be cut by anything. The 30-second cooldown is the only thing stopping you spamming it, and since it lasts 5 minutes there is time to spare.
Here it reaches the companions too
In the stock game the buff is shared with the party members on your map and within 18 cells. On this server it is also shared with the homunculus and the mercenary of each of them.
It is not a special case built for this skill: it is the same distribution every party skill on the server uses. A mercenary with +4 STR and +30 attack for five minutes at a cost of 8 SP is a hard bargain to beat.
Without a party, only you
If you are not in a party the skill applies to you alone. There is no error and no warning: the distribution simply has nobody to distribute to.
With a party the radius is counted from you, and anyone on another map does not receive it.
When it drops
How you learn it
From Necko, in Alberta 83, 96: job level 15 —or already being a Blacksmith or an Alchemist—, 7 Pearl, 1 Banana Juice and 50 Mushroom Spore.
Or free and with no materials from the Platinum Skill NPC in Prontera (158, 193), which hands over all four Merchant quest skills at once.
The @autoplay intelligence keeps it up on its own: it is on the list of self-buffs that are recast without you configuring anything, which is why it shows up in the panel even though it has no row in the skill catalogue.
See also The Merchant tree: twelve skills, five of which no amount of skill points will buy Which skills the AI knows how to use, and which are left out on purpose Mammonite hits 50 % harder per level, and level 1 gives two and a half times more damage per zeny than level 10
Change Cart is a single-level quest skill that costs 40 SP and requires the cart to be out. It changes how the cart looks and nothing else: not capacity, not speed, not the damage of anything.
What the server does when you cast it
The animation, and only the animation. The design change arrives in a separate message sent by the client, and that message is checked against exactly one thing: that you have learned the skill.
Which is why the client own cart menu works without spending the 40 SP. The NPC who teaches the skill already says so: it explains how to open that menu, not how to press the icon.
The designs and the base level they need
| Design | Base level needed |
|---|---|
| 1 | any |
| 2 | 41 |
| 3 | 66 |
| 4 | 81 |
| 5 | 91 |
| 6 | 101 |
| 7 | 111 |
| 8 | 121 |
| 9 | 131 |
| 13 | 101 |
Watch out for the round numbers
The check is strictly greater than, not «greater or equal». The emulator says «base level > 40», so design 2 appears at level 41, not at level 40. The same goes for all the rest.
If you have just reached the round number and the new cart does not show up, nothing is broken: you are one level short.
Design 13 exists because the client is new
The thirteenth is only available on clients from November 2019 onwards. Ours is from November 2021, so it is there, and with the same bar as design 6: base level 101.
Designs 10, 11 and 12 do not belong here
This skill never offers them. They are the three from Pushcart Decoration, which is a different skill taught by a different NPC.
When it will not let you
It is taught by Charlron, in Alberta 119, 221: job level 30 —or already being a Blacksmith or an Alchemist—, 50 Trunk, 10 Iron and 20 Animal Skin. The Platinum Skill NPC in Prontera hands it over too. And it is a prerequisite of Cart Boost in Whitesmith, so it is not purely cosmetic.
See also Pushcart Decoration is exactly three designs, with no level requirement whatsoever Pushcart removes 5 % of the movement penalty per level, and at 10 there is none left The Merchant tree: twelve skills, five of which no amount of skill points will buy
Pushcart Decoration is the other cart appearance skill. One level, 40 SP, and you need the cart out.
Three designs, not one more
When you cast it, the server sends you a list containing designs 10, 11 and 12. And when you choose, it checks that the number is between 10 and 12: anything else is discarded silently.
There is no base level requirement at all. Unlike Change Cart, all three are available from the very first moment.
How you learn it
From Jason, the cart remodelling expert, in Alberta 47, 37. He asks for exactly one thing: a Cute Cart Remodel Coupon. No job level, no base level.
The Platinum Skill NPC in Prontera hands it over too, along with the other three quest skills.
It needs a modern client
The message that opens the selector only exists on clients from August 2015 onwards. Ours is from November 2021, so it works.
On an old client the skill would fire, spend the SP and do nothing.
The two skills do not compete: they add up
Between Change Cart (designs 1 to 9, plus 13) and Pushcart Decoration (10, 11 and 12) you have thirteen distinct cart looks. Neither skill ever offers the other designs.
And neither of them changes anything but the picture: capacity, speed and cart skill damage are identical with any design.
It is the only one of the four quest skills that the Super Novice also has in its tree.
See also Change Cart unlocks nine designs by base level, and the server only ever checks that you know the skill Pushcart removes 5 % of the movement penalty per level, and at 10 there is none left The Merchant tree: twelve skills, five of which no amount of skill points will buy
The buying shop is the opposite of the selling one: you put up a sign saying what you want to buy and at what price, and people sell it to you without you being there. It is the only skill in the Merchant tree that is neither bought with points nor handed out by the Platinum NPC.
What each opening costs
30 SP and one Buy Market Permit, which is consumed. Without the licence in your inventory the skill does not go off.
The licences are sold by the same NPC who teaches the skill, at 200 zeny each and up to 50 at a time.
How you get it
From Mr. Hugh, of the purchasing team, in alberta_in 58, 52. He asks that you be a Merchant, that you have Vending at level 1 or better, and a 10,000 zeny registration fee paid once.
On registering he gives you the skill and five licences to get started.
And there is a route without the skill
The Black Marketeer, in que_job01 68, 84, sells the Shabby Purchase Street Stall License for 500 zeny, and it opens a two-slot buying shop with no skill and no Merchant class needed.
Five slots against two, and 200 zeny against 500. For anyone who buys seriously, the skill pays for itself.
The shop ceilings
| Value | Amount |
|---|---|
| Slots | 5, fixed |
| Maximum price per unit | 99,990,000 z |
| Maximum units per slot | 9,999 |
| Items buyable this way on the server | 3,551 of 29,364 |
| Weight ceiling on opening | 90 % of yours |
The five slots do not depend on the level of anything: the skill has one level and the number is fixed in the server. And those 9,999 units count the ones you are already carrying of that item.
The five traps
The location is judged by exactly the same rules as the selling shop, and it accepts @autotrade too: you can leave the stall buying with the game closed.
See also Vending opens 2 + level shop slots, and at twelve you have hit the server ceiling Here you can set up a shop on any map and any cell, as long as you leave room Your shop keeps selling with the game closed, and your account is freed instantly The Merchant tree: twelve skills, five of which no amount of skill points will buy
The nineteen skills that belong to the Alchemist and the Creator, one by one: what each one really does, the exact formula behind it, and the engine traps nobody tells you about. Acid Demonstration on this server runs a custom formula built around the target VIT.
The Alchemist brings sixteen skills and the Creator adds three on top. That is all: everything after that belongs to the Genetic and lives in its own section.
The first thing to know
Almost the whole tree hangs off Prepare Potion. Without points there you unlock no acid, no bombs, no plants and no chemical protections. And Prepare Potion itself requires Potion Research level 5.
What unlocks what
| Skill | Levels | Requirement |
|---|---|---|
| Axe Mastery | 10 | none |
| Potion Research | 10 | none |
| Prepare Potion | 10 | Potion Research 5 |
| Bomb | 5 | Prepare Potion 4 |
| Acid Terror | 5 | Prepare Potion 5 |
| Aid Potion | 5 | Prepare Potion 3 |
| Summon Flora | 5 | Prepare Potion 6 |
| Summon Marine Sphere | 5 | Prepare Potion 2 |
| Biochemical Helm | 5 | Prepare Potion 2 |
| Synthesized Shield | 5 | Biochemical Helm 3 |
| Synthetic Armor | 5 | Synthesized Shield 3 |
| Alchemical Weapon | 5 | Synthetic Armor 3 |
| Bioethics | 1 | quest skill |
| Vaporize | 1 | Bioethics 1 |
| Call Homunculus | 1 | Vaporize 1 |
| Homunculus Resurrection | 5 | Call Homunculus 1 |
| Aid Condensed Potion | 10 | Aid Potion 5 (Creator) |
| Full Chemical Protection | 5 | all four protections at 5 (Creator) |
| Acid Demonstration | 10 | Bomb 5 + Acid Terror 5 (Creator) |
The four chemical protections chain in an order that catches people out: the helm comes first, not the weapon. Helm 3 opens the shield, shield 3 opens the armor and armor 3 opens the weapon.
The four that never appear in the skill list
Twilight Alchemy 1, 2 and 3 and Aid Berserk Potion are flagged as spirit skills. The engine will not let you spend points on them: they appear on their own, already at level 1, while you carry the Alchemist Spirit from a Soul Linker, and they vanish when the link ends.
They are never saved on your character. Log out with the link up and they are gone when you come back.
The three that do not exist here
Cultivation, Alchemy and Synthesis Potion sit outside this server tree. The Cultivation code is still compiled, and it does plant mushrooms and herbs, but no job owns it, so there is no way to learn it. Twilight Alchemy 4 does not exist either.
Bioethics is not bought with points
Bioethics is flagged as a quest skill. You do not learn it by spending skill points: the matching quest script grants it. Without it you cannot create a homunculus, and it is also the hidden requirement for crafting the Homunculus Nutritional Supplement: Prepare Potion silently skips that recipe if you do not have it.
Prepare Potion, its 21 formulas and where to buy every material have their own section: how it works, the formulas and the Prontera supplier.
See also Acid Demonstration runs a custom formula on this server: the target VIT is what matters Full Chemical Protection shields all four slots at once, and quietly improves the Genetic pharmacy The Genetic skill tree: eighteen skills, two of them passive and two you cannot learn Prepare Potion spends the bowl before knowing whether you can make anything
The two Alchemist passives do considerably more than the client tooltip claims, and each one has an effect that appears in no tooltip at all.
Axe Mastery
+3 mastery attack per level (up to +30) with one-handed and two-handed axes and, in renewal, with one-handed swords too. On a one-handed sword it stacks on top of the Swordman Sword Mastery: both count.
Mastery attack is part of the base damage, so the skill percentage multiplies it just like everything else: +30 of mastery becomes +5,520 inside an 18,400% Acid Demonstration. The one thing it does not receive is the element modifier, which is applied to the other components.
| Weapon | Axe Mastery | Stacks with |
|---|---|---|
| One-handed axe | +3 / level | Mechanic Training Axe |
| Two-handed axe | +3 / level | Mechanic Training Axe |
| One-handed sword | +3 / level | Sword Mastery, Training Sword |
| Dagger | nothing | — |
| Two-handed sword | nothing | — |
Potion Research
Three effects at once, all per level:
And a fourth effect that is documented nowhere
Having Potion Research learned at any level, one single point is enough, grants a flat +100% ratio to Acid Terror. It does not scale: one point does exactly the same as ten.
A worked example
You drink a White Potion (325 – 405 base healing) with VIT 80 and Potion Research 10: the multiplier is 100 + 160 + 50 = 310%, so you heal between 1,007 and 1,255. Without the passive it would be between 845 and 1,053.
If the potion was also brewed by a Fame Top 10 alchemist, another 50% is added on top of that total.
Neither passive shows up in the status window. The quick way to check the mastery is to compare a normal hit with the axe equipped and without it.
See also The Creator tree: nineteen skills, four that only show up with the Soul Link and three that do not exist Acid Terror always strikes as neutral, even with an enchanted weapon Prepare Potion spends the bowl before knowing whether you can make anything
The Acid Demonstration on this server is not the rAthena one. It was rewritten on 12 August 2026 and carries three further changes in the skill database. Any guide you find out there is describing a different skill.
The formula in force
total ratio = level × (14 × INTcaster + 20 × VITtarget) ÷ 2
Damage is your ATK multiplied by that ratio divided by 100. Since there are as many hits as the skill level and the split is a division, every hit is always worth the same:
ratio per hit = 7 × INTcaster + 10 × VITtarget
Against players the total is halved. That is the long-standing PvP modifier and it was kept on purpose.
Why the sign of the hit count matters so much
In the database the hit count is written negative (−1 to −10). To the engine that means "split the damage across those hits", not "multiply it". The ten numbers you see on screen at level 10 are one single hit sliced into ten, not ten hits. With a positive sign the level was charged twice and the skill dealt ten times the intended damage.
Level by level
With a caster at INT 120 and ATK 3,000 against a target with VIT 100. The ratio per hit is always 1,840%; the only thing the level changes is how many slices it is cut into and how many times it is charged.
| Level | Hits | Total ratio | Total damage | Equipment break | SP |
|---|---|---|---|---|---|
| 1 | 1 | 1,840% | 55,200 | 1% | 50 |
| 2 | 2 | 3,680% | 110,400 | 2% | 50 |
| 3 | 3 | 5,520% | 165,600 | 3% | 50 |
| 4 | 4 | 7,360% | 220,800 | 4% | 50 |
| 5 | 5 | 9,200% | 276,000 | 5% | 50 |
| 6 | 6 | 11,040% | 331,200 | 6% | 50 |
| 7 | 7 | 12,880% | 386,400 | 7% | 50 |
| 8 | 8 | 14,720% | 441,600 | 8% | 50 |
| 9 | 9 | 16,560% | 496,800 | 9% | 50 |
| 10 | 10 | 18,400% | 552,000 | 10% | 50 |
Range 9 cells, 1 second of fixed cast (DEX does not shorten it), 1 second of after-cast delay and a 0.15 s cooldown. It consumes Bottle Grenade ×1 and Acid Bottle ×1 on every cast, at any level.
The same Creator against three different targets
INT 120, ATK 3,000, level 10:
Yes: a field mob takes almost five times what Ifrit takes. That follows directly from the formula and it is known. A VIT 100 cap was tried for a few hours on 14 August and then removed: it flattened every big boss to the exact same number and erased the differences between them, which were worth keeping.
The three gates that were removed by hand
Defense does not reduce it. The formula rewards the target VIT, and VIT is exactly the stat that provides soft defense: without this change, every point added on one side and subtracted on the other.
It cannot be dodged. It is a weapon skill, so until 12 August it went through the hit check and a high-AGI target avoided it entirely. Perfect dodge does not save you either: the engine only checks it on normal attacks, never on skills.
And a fourth one, the strangest of them all
Acid Demonstration ignores the monster damage_taken field. That field cuts the damage a specific monster receives, and the practice dummies sit at 1%. It applies to everything else in the game exactly as before. This skill, and only this skill, was excluded on purpose: against a dummy at 1% it deals full damage while anything else deals a hundredth.
What does affect it
The damage carries your weapon element, so endows, spirit charms and arrows change it, and the full element table applies. Attack cards count as well. On hit it tries to break the weapon and the armor of the target at 1% per skill level, but that part only works against players: the server has monster equipment breaking disabled, so against a mob it does nothing.
Watch out for a common mix-up: the Genetic Fire Expansion level 5 fires an area acid that does not use this formula. It is a separate skill running the official rAthena maths, even though its level scales off your Acid Demonstration. It is explained in its own section.
See also Acid Terror always strikes as neutral, even with an enchanted weapon The five combat bottles are sold ready-made in Prontera, and they cost more than crafting them The Creator tree: nineteen skills, four that only show up with the Soul Link and three that do not exist Fire Expansion is five different skills, and every one of them eats a bonfire of yours
Acid Terror is the attack skill that opens the acid branch: a single ranged hit that consumes an Acid Bottle, cannot be dodged and leaves the target bleeding.
The formula
ratio = 200% × level, plus a flat +100% if you have Potion Research learned at any level.
Bleeding chance: 3% × level, lasting 108 seconds.
Armor break chance: (1,000 × level − 500) out of 10,000, that is 5% to 45%.
| Level | Ratio | With Potion Research | Bleeding | Armor break | SP |
|---|---|---|---|---|---|
| 1 | 200% | 300% | 3% | 5% | 15 |
| 2 | 400% | 500% | 6% | 15% | 15 |
| 3 | 600% | 700% | 9% | 25% | 15 |
| 4 | 800% | 900% | 12% | 35% | 15 |
| 5 | 1,000% | 1,100% | 15% | 45% | 15 |
Range 9 cells. Cast time of 0.5 s variable plus 0.5 s fixed, and half a second of after-cast delay. One Acid Bottle per cast.
Always neutral
Even though it is a weapon skill, its element is pinned to neutral in the database. Your weapon element, an endow or an element card change nothing: against an enemy that resists neutral, Acid Terror performs just as poorly whatever you are carrying.
That is the exact opposite of its bigger sibling, Acid Demonstration, which does use the weapon element.
Armor break: players only
That 5 – 45% is real, but the server has monster equipment breaking disabled. Against a mob the function returns before the roll is even made. Against a player it works, and you get the sour face emote on screen.
A worked example
A Creator with ATK 3,000, Acid Terror 5 and Potion Research 10: ratio 1,100% → 33,000 neutral base damage before defense, element and cards. Without the passive it would be 30,000. Bleeding would land 15% of the time.
Bleeding is one of the statuses big bosses resist by design: against an MVP it will never land, no matter how high you push the skill level.
See also Acid Demonstration runs a custom formula on this server: the target VIT is what matters Axe Mastery also raises the damage of one-handed swords The five combat bottles are sold ready-made in Prontera, and they cost more than crafting them
Bomb, named Demonstration internally, is cast on the ground, not on a target. It leaves a 3×3 fire trap that hits any enemy inside every half second until the timer runs out.
The formula
ratio per hit = 100% + 20% × level of your ATK, always in fire element.
It is charged every 500 ms while the target remains inside the square, for the whole life of the fire.
| Level | Ratio per hit | Duration | Maximum hits | Weapon break | SP |
|---|---|---|---|---|---|
| 1 | 120% | 40 s | 80 | 3% | 10 |
| 2 | 140% | 45 s | 90 | 6% | 10 |
| 3 | 160% | 50 s | 100 | 9% | 10 |
| 4 | 180% | 55 s | 110 | 12% | 10 |
| 5 | 200% | 60 s | 120 | 15% | 10 |
The "maximum hits" column is the theoretical ceiling: duration divided by the half-second tick. Nobody stands still that long, but against something immobile the count is exact.
How it is placed
Range 9 cells, cast time of 0.8 s variable plus 0.2 s fixed, half a second of after-cast delay. It consumes one Bottle Grenade per cast and 10 SP.
There is no cap on how many bombs you can have out. The only restriction is that two cannot overlap on the same cell, so you can carpet the floor with them.
The traps
A worked example
With ATK 3,000 and Bomb 5, every tick is 6,000 fire damage before defense and element. A target that sits through the full 60 seconds inside the square eats 720,000 in total, spread over 120 hits.
It is the cheap half of the pair that unlocks Acid Demonstration: Bomb 5 and Acid Terror 5 are its two requirements.
See also Acid Terror always strikes as neutral, even with an enchanted weapon The five combat bottles are sold ready-made in Prontera, and they cost more than crafting them Demonic Fire is the only magic skill the Genetic has
Summon Flora plants a creature on the ground that attacks anything coming near on its own. In stock rAthena, casting when you are already at the cap fails. Not here: the engine removes the oldest one and places the new one. You will never see a rejection for being over the cap.
How the budget works
You have 60 budget points. Each plant takes a different amount, so the maximum depends on what you summon:
Mandragora 12 · Hydra 15 · Flora 20 · Parasite 30 · Geographer 60
On cast, the engine checks whether the points the new plant needs are free. If they are not, it deletes yours in order of age until they fit.
| Level | Plant | Budget | Maximum | Level / HP / ATK | Range | Element |
|---|---|---|---|---|---|---|
| 1 | Mandragora | 12 | 5 | 13 / 140 / 4 | 4 | Earth 3 |
| 2 | Hydra | 15 | 4 | 34 / 661 / 31 | 7 | Water 2 |
| 3 | Flora | 20 | 3 | 59 / 2,065 / 174 | 3 | Earth 1 |
| 4 | Parasite | 30 | 2 | 76 / 3,155 / 253 | 8 | Wind 2 |
| 5 | Geographer | 60 | 1 | 73 / 3,408 / 278 | 3 | Earth 3 |
All of them last 5 minutes, at every level. In stock rAthena the duration drops as you level up (300, 240, 180, 120 and 60 seconds); here it was flattened to 300 on purpose, so that level 5 would not be a punishment. Cost: 20 SP and one Plant Bottle, range 4 cells, cast time of 1.6 s variable plus 0.4 s fixed.
The budget in action
You have two Parasites out (30 + 30 = 60 points, budget full). You summon a Mandragora, which needs 12: the engine deletes the older Parasite, 30 points come free, and the Mandragora is planted. You end up with one Parasite and one Mandragora, 42 points in use.
If instead you summon a Geographer, which needs all 60 at once, both Parasites are gone: a Geographer shares the field with nothing.
What they actually do
They attack on their own and they do not move. All five are aggressive and can strike, but none of them can walk: they stay nailed where you put them and hit whatever enters their reach. That is why the Hydra (range 7) and the Parasite (range 8) are worth far more than their stats suggest.
The Mandragora is level 13 with 140 hit points: past mid-game it is purely decorative.
They give no experience and no drops. Whatever they kill is credited to you in the damage log, but the plants themselves drop nothing when they die and give experience to nobody. Another player cannot kill them either outside versus maps.
Where it cannot be used
It is banned in the thirty towns of the game: Prontera, Geffen, Payon, Morocc, Aldebaran, Izlude, Alberta, Comodo, Juno, Amatsu, Gonryun, Louyang, Ayothaya, Einbroch, Einbech, Lighthalzen, Hugel, Rachel, Veins, Umbala, Niflheim, Moscovia, Brasilis, Manuk, Splendide, Jawaii, Xmas, the Morocc ruins, the Payon archive and the Midgard camp. The same applies to Summon Marine Sphere.
The rejection is silent: the skill simply does not go off.
The budget belongs to you and travels with you: plants left behind when you change maps keep occupying their slots until their five minutes run out.
See also Summon Marine Sphere explodes for whatever HP it has left, and levels 2 to 5 change nothing The five combat bottles are sold ready-made in Prontera, and they cost more than crafting them The Creator tree: nineteen skills, four that only show up with the Soul Link and three that do not exist
Summon Marine Sphere places a Marine Sphere right next to you. The sphere is a complete non-entity while nobody touches it: it cannot move, it cannot attack and it is not aggressive. The only thing it knows how to do is explode.
The formula, if you can call it that
When the sphere takes any amount of damage, the self-destruct condition fires and it detonates immediately, at 100%.
damage = the HP the sphere has left at that moment, up to 1,831 if it was untouched.
Area of 11×11 cells (radius 5), fire element, ignores defense and dodge, and knocks back 3 cells.
| Level | Spheres at once | Duration | Explosion damage | Area | SP |
|---|---|---|---|---|---|
| 1 | 3 | 30 s | up to 1,831 | 11×11 | 10 |
| 2 | 3 | 30 s | up to 1,831 | 11×11 | 10 |
| 3 | 3 | 30 s | up to 1,831 | 11×11 | 10 |
| 4 | 3 | 30 s | up to 1,831 | 11×11 | 10 |
| 5 | 3 | 30 s | up to 1,831 | 11×11 | 10 |
The table is not a copy-paste mistake
The skill level changes absolutely nothing. The code always summons the same creature, with the same HP, and the lifetime is written flat at 30 seconds. The four points from level 2 to level 5 buy nothing: they are wasted points unless you need them as a prerequisite for something else, and they are a prerequisite for nothing.
How it is actually used
Range 1 cell: the sphere can only be planted right beside you, never at a distance. Cast time of 1.6 s variable plus 0.4 s fixed, 10 SP and one Marine Sphere Bottle.
Since nothing attacks it on its own, the way to use it is to hit it yourself, or leave it in the path of something that strikes in an area.
One sphere chains into the next
An explosion counts as damage for the other spheres, so three spheres together blow up in a chain. That is the only way to get serious numbers out of it: up to 5,493 fire damage in an 11×11 square.
The trap that kills your own homunculus
Outside versus maps, the explosion is configured to reach enemies and your own minions. Your homunculus, your mercenary, your floras and your other spheres take the full blast, and that is 1,831 fire damage with no defense to speak of. You are safe; everything of yours is not.
And one piece of good news
The Marine Sphere does drop items when it dies, the only alchemist summon that does, floras do not. It still gives experience to nobody.
Just like Summon Flora, it is banned in the thirty towns of the game. The rejection says nothing: the skill simply does not go off.
See also Summon Flora no longer fails for having too many: it kills the oldest and plants the new one The five combat bottles are sold ready-made in Prontera, and they cost more than crafting them The Creator tree: nineteen skills, four that only show up with the Soul Link and three that do not exist
Aid Potion throws a potion from your inventory at someone else. What almost nobody knows is that the potion is not chosen: the engine derives it from the level you cast at, and if you are not carrying that exact one, the cast fails.
| Level | Potion consumed | Base healing | SP |
|---|---|---|---|
| 1 | Red Potion | 45 – 65 | 1 |
| 2 | Orange Potion | 105 – 145 | 1 |
| 3 | Yellow Potion | 175 – 235 | 1 |
| 4 | White Potion | 325 – 405 | 1 |
| 5 | Blue Potion | 40 – 60 SP | 1 |
Level 5 does not heal HP: the Blue Potion restores SP, and only on players. If what you want is healing, the good level is 4, not the maximum.
The full formula
healing = base × (100 + Aid Potion×10 + Potion Research×5) ÷ 100 × bonus ÷ 100 × (100 + VITtarget × 2) ÷ 100
where base is what the potion heals on its own and bonus is 100 normally, or 100 + your base level while you carry the Alchemist Spirit from a Soul Linker.
If the target is a player, their own Increase HP Recovery (+10% per level) or Increase SP Recovery is added on top, as appropriate.
A worked example
Aid Potion 4 (White Potion, 365 on average), with Aid Potion 5 and Potion Research 10 learned, on a party member with VIT 80:
365 × 2.00 × 2.60 = 1,898 HP. On a homunculus it is multiplied by three on top of that: 5,694.
With the Alchemist Spirit up at base level 150, that same cast rises to 4,745.
The traps
The orange and blue potions are not sold by the Prontera alchemy supplier. The orange one is in any tool dealer; the blue one only comes out of Prepare Potion.
See also Aid Condensed Potion heals the whole party in 7x7, and the level decides which condensed potion it burns Aid Berserk Potion only appears with the Soul Link, and fails if the target is below level 85 Axe Mastery also raises the damage of one-handed swords The 21 Prepare Potion formulas, one by one
Aid Condensed Potion is cast on the ground, not on a person, and heals every member of your party or guild, yourself included, standing inside a 7×7 square centred there.
The formula
healing = base × (100 + Aid Condensed×10 + Aid Potion×10 + Potion Research×5) ÷ 100 × (100 + VITtarget × 2) ÷ 100
The first part is computed once from your skills; the second is applied per recipient using their own VIT.
The Alchemist Spirit bonus does not apply here, unlike in Aid Potion. Neither does the triple healing on homunculi.
| Level | Potion consumed | Base healing | Area | SP |
|---|---|---|---|---|
| 1 – 5 | Condensed Red Potion | 45 – 65 | 7×7 | 30 |
| 6 – 9 | Condensed Yellow Potion | 175 – 235 | 7×7 | 30 |
| 10 | Condensed White Potion | 325 – 405 | 7×7 | 30 |
The area and the SP cost never change. All that levelling up does is switch potion and add 10% to the multiplier per point. Placement range: 3 cells. Cast time of 1 s variable plus 1 s fixed, and 1 second of after-cast delay, the longest pause in the whole branch.
A worked example
A Creator with Aid Condensed 10, Aid Potion 5 and Potion Research 10. The personal multiplier is 100 + 100 + 50 + 50 = 300%. With a Condensed White Potion averaging 365, that is 1,095 before the recipient VIT.
On a party member with VIT 90: 1,095 × 2.80 = 3,066 HP. And everyone in the party inside the square gets it, from a single potion.
The traps
The three condensed potions are sold nowhere: they come only from Prepare Potion, and they are the three that award fame points when brewed in a streak.
See also Aid Potion does not let you pick the potion: the cast level picks it for you Aid Berserk Potion only appears with the Soul Link, and fails if the target is below level 85 The 21 Prepare Potion formulas, one by one The five combat bottles are sold ready-made in Prontera, and they cost more than crafting them
Aid Berserk Potion throws a Berserk Potion at a party member and leaves them with the attack speed bonus for 30 minutes. It heals nothing: the potion has no healing, only the status.
First things first: it cannot be learned
It is flagged as a spirit skill. It accepts no skill points. It appears on its own in your tree, at level 1, while you carry the Alchemist Spirit from a Soul Linker, and it leaves with it.
The cost
2 × Berserk Potion + 10 SP + 8% of your current SP
The percentage is taken from the SP you have at that moment, not from your maximum. The fuller you are, the more it costs.
| Level | Effect on the target | Duration | Items | SP | Cast time |
|---|---|---|---|---|---|
| 1 | Attack speed bonus | 30 min | 2 potions | 10 + 8% current | 1 s fixed |
A worked example
A Creator with a full 1,200 SP casts the skill: they pay 10 + 96 = 106 SP plus two potions worth 4,500z each. The party member gets half an hour of attack speed. With 300 SP at that moment, the very same cast costs 34.
The traps
Berserk Potions are sold by the extended tool dealers, at 4,500z. The Prontera one is at prt_in 126 76, ten steps from the alchemy supplier.
See also Aid Potion does not let you pick the potion: the cast level picks it for you The three Twilight Alchemy skills craft 200 units in one go, and the roll happens 200 times The Creator tree: nineteen skills, four that only show up with the Soul Link and three that do not exist
The four chemical protections, Alchemical Weapon, Synthesized Shield, Synthetic Armor and Biochemical Helm, do exactly one thing, and it is not what people expect.
What they actually do
They shield one equipment slot against two things and nothing else:
They add no defense, no resistance, nothing at all. With the protection up, the attempt is discarded before the dice are rolled: the chance is not lowered, there is simply no roll.
| Skill | Slot protected | SP | Item | Cast time |
|---|---|---|---|---|
| Alchemical Weapon | Weapon | 30 | 1 coat | 2 s fixed |
| Synthesized Shield | Shield | 25 | 1 coat | 2 s fixed |
| Synthetic Armor | Armor | 25 | 1 coat | 2 s fixed |
| Biochemical Helm | Upper headgear | 20 | 1 coat | 2 s fixed |
The duration, identical across all four
| Level | 1 | 2 | 3 | 4 | 5 |
|---|---|---|---|---|---|
| Duration | 2 min | 4 min | 6 min | 8 min | 10 min |
The item is always one Glistening Coat, one per cast, at any level. Range 1 cell: you have to be adjacent.
The two silent rejections
The skill fails, without spending the coat, if:
When it really matters
In the field it is of little use: the server has monster equipment breaking disabled, and very few mobs strip. Where it earns its weight in gold is in PvP and guild war, where an enemy Creator lands 1 – 10% breakage per Acid Demonstration and a Stalker undresses you in two skills.
What removes them
These are among the few buffs that Dispell, Clearance and Banishing Buster cannot clear. Two things remove them: the dedicated remove-chemical-protection skill, and Hermode, which wipes them as you enter its area.
They are learned in a chain and starting from the helm: Prepare Potion 2 opens Biochemical Helm, level 3 of that opens the shield, level 3 of the shield opens the armor and level 3 of the armor opens the weapon.
See also Full Chemical Protection shields all four slots at once, and quietly improves the Genetic pharmacy Acid Terror always strikes as neutral, even with an enchanted weapon The Creator tree: nineteen skills, four that only show up with the Soul Link and three that do not exist
Full Chemical Protection is the Creator version of the four chemical protections: it applies all four at once with a single cast, a single coat and half the cast time.
What it does exactly
It walks the four slots, weapon, shield, armor and upper headgear, and applies the matching protection to each one the target has equipped. Slots that are empty are simply skipped.
It only fails if not a single one could be applied. With one slot equipped the cast counts as a success and the coat is spent anyway.
| Level | Duration | Slots | SP | Item | Cast time |
|---|---|---|---|---|---|
| 1 | 2 min | all 4 | 40 | 1 coat | 1 s fixed |
| 2 | 4 min | all 4 | 40 | 1 coat | 1 s fixed |
| 3 | 6 min | all 4 | 40 | 1 coat | 1 s fixed |
| 4 | 8 min | all 4 | 40 | 1 coat | 1 s fixed |
| 5 | 10 min | all 4 | 40 | 1 coat | 1 s fixed |
How much it saves
Shielding a party member with the four separate skills costs 100 SP, four Glistening Coat and 8 seconds of casting. With Full Chemical Protection: 40 SP, one coat and 1 second. Shielding a party of six goes from 24 coats to 6.
The side effect that appears in no tooltip
The level of Full Chemical Protection feeds into the success formula of the Genetic Special Pharmacy, which is what decides how many units come out of each batch:
+ Full Chemical Protection level × (a random number between 7 and 10)
At level 5 that is between 35 and 50 points of difficulty cleared, free and without casting anything. A Genetic who left this skill at zero is crafting fewer units without knowing it.
The traps, the same as the four separate ones
It is the most expensive skill to unlock in the whole branch: it demands the four protections at level 5, which is 20 points, plus the 2 in Prepare Potion that open the chain.
See also The four chemical protections give no defense: they only stop the piece being broken or stripped Special Pharmacy never fails: what varies is how many units come out The Creator tree: nineteen skills, four that only show up with the Soul Link and three that do not exist
The Alchemist has four skills devoted to the homunculus, and all four carry a hidden condition that makes them fail without telling you why.
| Skill | Levels | SP | Cooldown | Hidden gate |
|---|---|---|---|---|
| Bioethics | 1 | — | — | Not bought with points: it is a quest skill |
| Call Homunculus | 1 | 10 | — | Fails if it is already out |
| Vaporize | 1 | 50 | 20 s | Requires 80% HP or more |
| Homunculus Resurrection | 5 | 74 → 50 | 140 → 20 s | Only on a homunculus that is dead and out |
Vaporize: the 80% gate
Putting the homunculus away requires it to be at 80% HP or above. Below that, the skill burns your turn, throws a generic failure and the creature stays out. A dead homunculus cannot be put away either.
It is precisely the opposite of what you would want: exactly when you most need to pull it out of the fight is when the engine refuses.
Homunculus Resurrection: the formula
HP on revival = 20% × level of the homunculus maximum.
And it has to be cast on a ground cell: that is where it comes back.
| Level | HP on revival | SP | Cooldown | Cast time |
|---|---|---|---|---|
| 1 | 20% | 74 | 140 s | 2 s + 1 s fixed |
| 2 | 40% | 68 | 110 s | 2 s + 1 s fixed |
| 3 | 60% | 62 | 80 s | 2 s + 1 s fixed |
| 4 | 80% | 56 | 50 s | 2 s + 1 s fixed |
| 5 | 100% | 50 | 20 s | 2 s + 1 s fixed |
Levelling it is one of the best investments in the tree: level 5 costs less SP than level 1, revives at 100% instead of 20% and cuts the cooldown from 140 seconds to 20.
Call Homunculus: the item
Creating your first homunculus consumes an Embryo and gives you one of the four types at random: you do not choose. Bringing back the one you already have resting costs no item at all on this server; stock rAthena asks for a Seed of Life and that was removed here.
The three rejections
Feeding, growth and how the daycare works have their own sections: feeding and daycare.
See also Call Homunculus needs no Seed of Life or any other item Feeding it can never backfire, and every meal pays twice the usual The Homunculus Daycare: leave homunculi, breed more, swap whenever you like The Creator tree: nineteen skills, four that only show up with the Soul Link and three that do not exist
The three Twilight Alchemy skills are the alchemist industrial line: a single cast attempts to produce 200 units. Like Aid Berserk Potion, they are not learned with points: they appear while you carry the Alchemist Spirit from a Soul Linker.
| Skill | What it produces | Materials per unit | Guide required |
|---|---|---|---|
| Twilight Alchemy 1 | 200 × White Potion | White Herb ×1 + Empty Potion Bottle ×1 | Potion Creation Guide |
| Twilight Alchemy 2 | 200 × Condensed White Potion | White Potion ×1 + Empty Test Tube ×1 + Witched Starsand ×1 | Condensed Potion Creation Guide |
| Twilight Alchemy 3 | 100 Alcohol + 50 Acid Bottle + 50 Bottle Grenade | the materials of all three recipes, plus 200 Empty Bottle in total | the three matching guides |
The fixed cost, identical in all three
200 SP + 200 × Medicine Bowl, and 3 seconds of cast time that DEX does not shorten. The bowls and the SP go on cast, before anyone knows whether anything will come out.
The roll: 200 dice, not one
The success chance is exactly the Prepare Potion one, and it is rolled once per unit. At 59% you get around 118 out of the 200, never all 200 and never zero. The materials, on the other hand, are consumed all 200 at once whether they succeed or not.
A worked example
An alchemist with job level 50, INT 60, DEX 70, LUK 40, Prepare Potion 10 and Potion Research 10: base chance 59%. They cast Twilight Alchemy 1 with 200 White Herb, 200 Empty Potion Bottle and 200 Medicine Bowl.
Expected result: about 118 White Potions. Everything is gone: 200 herbs, 200 bottles, 200 bowls and 200 SP.
Twilight Alchemy 2 is a fame machine
The condensed-potion fame streak counts each unit separately, and here there are 200 consecutive rolls in one cast. Every ten successes in a row is 50 fame points and the counter resets; the milestones at three, five and seven award 1, 3 and 10. A failure resets the streak, so the higher your success chance, the vastly more fame per batch.
The traps
Twilight Alchemy 4 does not exist on this server: it is outside the tree and there is no way for it to appear, link or no link.
See also Aid Berserk Potion only appears with the Soul Link, and fails if the target is below level 85 Prepare Potion spends the bowl before knowing whether you can make anything The 21 Prepare Potion formulas, one by one The five combat bottles are sold ready-made in Prontera, and they cost more than crafting them
Every combat and support skill the Creator has consumes one of five bottles. All five come out of Prepare Potion, and all five are sold ready-made by the Alchemist Supplier in Prontera, at prt_in 127 64.
What each skill consumes
| Bottle | Used by | Prontera price |
|---|---|---|
| Bottle Grenade | Bomb, Acid Demonstration | 12,000z |
| Acid Bottle | Acid Terror, Acid Demonstration | 3,700z |
| Plant Bottle | Summon Flora | 3,800z |
| Marine Sphere Bottle | Summon Marine Sphere | 5,100z |
| Glistening Coat | the four protections and Full Chemical Protection | 15,000z |
A single Acid Demonstration burns one Bottle Grenade and one Acid Bottle: 15,700z per cast if you buy them ready-made. Crafting them is far cheaper, and that is exactly the point: the shop price is set at three times their real crafting cost, failures and wasted bowls included.
If you would rather craft them
Bottle Grenade Creation Guidecarry it
Alcohol×1
Fabric×1
Empty Bottle×1
Glistening Coat Creation Guidecarry it
Alcohol×1
Heart of Mermaid×1
Zenorc's Fang×1
Empty Bottle×1
The monster materials for all five recipes, Fabric, Immortal Heart, Maneater Blossom, Tendon, Detonator, Heart of Mermaid and Zenorc's Fang, are sold by the same supplier at shop price. They are listed in its own section.
Everything else these skills consume
Embryo — to create your first homunculus440,000z
Medicine Bowl — 200 per Twilight cast8z
 Berserk Potion — 2 per Aid Berserk Potion4,500z
What is sold nowhere
All four come only from Prepare Potion. A Creator who wants to use their area healing has to brew the ammunition themselves; there is no shortcut.
The Berserk Potion is stocked by the extended tool dealers, not by the alchemy supplier. The Prontera one is at prt_in 126 76, ten steps away.
See also The Prontera Alchemist Supplier now stocks every material The 21 Prepare Potion formulas, one by one Acid Demonstration runs a custom formula on this server: the target VIT is what matters Summon Flora no longer fails for having too many: it kills the oldest and plants the new one
Twenty-four Blacksmith skills and five Whitesmith ones: which cannot be learned, which weapon each one demands, which cost zeny, and the exact formulas the server uses to work out the hit.
The Blacksmith tree holds 24 entries and the Whitesmith one another 5. Eleven of the Blacksmith entries are pure forging and live in Forging; everything else is here — the things you cast, and the things that change your numbers.
First things first, because this is what makes people waste points: three of those entries cannot be learned by spending skill points, and a fourth does not even exist.
What cannot be learned
WS_CREATECOIN, WS_CREATENUGGET) are commented out of the tree on this server. They cannot be learned, they never show up and they do nothing. Auto Attack System (WS_SYSTEMCREATE) does not exist either.
What each skill requires
| Skill | Max | Requirements |
|---|---|---|
| Hilt Binding | 1 | — |
| Skin Tempering | 5 | — |
| Hammer Fall | 5 | — |
| Ore Discovery | 1 | Steel Tempering 1 + Hilt Binding 1 |
| Weaponry Research | 10 | Hilt Binding 1 |
| Weapon Repair | 1 | Weaponry Research 1 |
| Adrenaline Rush | 5 | Hammer Fall 2 |
| Weapon Perfection | 5 | Weaponry Research 2 + Adrenaline Rush 2 |
| Power-Thrust | 5 | Adrenaline Rush 3 |
| Maximize Power | 5 | Weapon Perfection 3 + Power-Thrust 2 |
| Advanced Adrenaline Rush | 1 | Adrenaline Rush 5 (and an active Soul Link) |
| Unfair Trick / Greed | 1 | platinum NPC |
| Shattering Strike | 10 | Skin Tempering 3 + Hilt Binding 1 + Weaponry Research 5 + Power-Thrust 3 |
| Cart Boost | 1 | Pushcart 5 + Cart Revolution 1 + Change Cart 1 + Hilt Binding 1 |
| Upgrade Weapon | 10 | Weaponry Research 10 |
| Cart Termination | 10 | Mammonite 10 + Hammer Fall 5 + Cart Boost 1 |
| Maximum Power Thrust | 5 | Power-Thrust 5 |
The last five are Whitesmith skills. Note the long chain: reaching Cart Termination means going through Mammonite 10 and Hammer Fall 5 — two skills almost nobody maxes for fun — and having Cart Boost on top.
What the third job inherits
A Mechanic who came from Whitesmith keeps the five Whitesmith skills and all the Blacksmith ones. So does the Meister.
A Mechanic who did not go through rebirth never had the Whitesmith skills, simply because Whitesmith is a transcendent job. Nothing is lost: nothing was ever gained.
What it inherits downwards
Blacksmith inherits the whole Merchant tree and the Novice one; Whitesmith inherits the entire Blacksmith tree as well.
That is why Cart Termination can ask for Mammonite and Cart Revolution, which are Merchant skills.
Six of these skills are handled by @autoplay: Adrenaline Rush, Advanced Adrenaline Rush, Power-Thrust, Weapon Perfection, Cart Boost and Shattering Strike are kept up automatically, Hammer Fall joins the area rotation, and Cart Termination is the only one that never turns itself on — it costs zeny per cast, so you have to build its card in the control panel.
See also Unfair Trick takes 20 % off the zeny bill of Mammonite and Cart Termination Adrenaline Rush gives ASPD based on your AGI, and the "advanced" version gives less Forging costs nothing, but the three slots eat the success rate The Merchant tree: twelve skills, five of which no amount of skill points will buy
Three skills in the tree are never cast and open no window: Hilt Binding, Weaponry Research and Skin Tempering. They are among the best value per point in the job, and all three come with fine print.
The three formulas
Hilt Binding → +1 STR and +4 attack, plus +10 % duration on the job's four party buffs when you are the one casting them.
Weaponry Research → +2 attack per level, accuracy × (1 + 0.02 × level) and +1 percentage point per level to your forging odds.
Skin Tempering → +1 % neutral resistance per level and +5 % fire resistance per level.
| Level |
Weaponry Research attack |
Weaponry Research accuracy |
Skin Tempering neutral |
Skin Tempering fire |
|---|---|---|---|---|
| 1 | +2 | +2 % | +1 % | +5 % |
| 2 | +4 | +4 % | +2 % | +10 % |
| 3 | +6 | +6 % | +3 % | +15 % |
| 4 | +8 | +8 % | +4 % | +20 % |
| 5 | +10 | +10 % | +5 % | +25 % |
| 6 | +12 | +12 % | — | — |
| 7 | +14 | +14 % | — | — |
| 8 | +16 | +16 % | — | — |
| 9 | +18 | +18 % | — | — |
| 10 | +20 | +20 % | — | — |
The accuracy bonus is multiplicative, not additive
This is the part that misleads people. The Weaponry Research accuracy bonus is not added to your HIT: it is applied on top of the already computed chance to hit, after the target's flee has been subtracted.
A worked example
A swing that, with your HIT and the flee of the monster in front of you, lands at a 60 % chance to hit. With Weaponry Research 10 that becomes 60 × 1.20 = 72 %.
And the other way round: against something you were already missing a lot, a 20 % chance becomes 24 %. The bonus scales what you already have, so it pays off far more against targets you almost hit than against hopeless ones.
That is why you will never see it in the status window: only HIT points are drawn there, and this bonus is not HIT. In renewal the +2 HIT per level that old guides mention does not exist; what exists is this multiplier.
The +4 attack from Hilt Binding has one hand-written exception in the engine: it is not applied to Cart Revolution. Everything else gets it, skills and normal attacks alike. The +1 STR is a real stat point and counts towards anything that scales with STR. The forging bonus from Weaponry Research is detailed in Forging.
See also Three of the job's skills cannot be learned with points, and one only exists while you are soul-linked The job's four buffs reach 18 cells, and here the party's homunculi and mercenaries get them too Forging costs nothing, but the three slots eat the success rate
Ore Discovery (BS_FINDINGORE) is a single-level skill and is never cast. It is checked every time a monster dies and adds one extra ore roll to its loot.
How the engine decides
1. It picks one of the 20 ores on the list, at random and with equal odds for all of them (5 % each). Rarity does not matter at this step.
2. It rolls that specific ore against its own rate. If the roll fails, nothing drops — and there is no second attempt.
Final chance for a given ore = rate ÷ 20 ÷ 10,000.
Adding all twenty up, the chance of getting anything per monster killed is 0.1325 %: roughly one monster in 755.
| Ore | Rate | Real chance | 1 in |
|---|---|---|---|
| Iron Ore | 30 | 0.0150 % | 6,667 |
| Iron | 28 | 0.0140 % | 7,143 |
| Green Live | 26 | 0.0130 % | 7,692 |
| Coal | 24 | 0.0120 % | 8,333 |
| Wind of Verdure | 22 | 0.0110 % | 9,091 |
| Phracon | 20 | 0.0100 % | 10,000 |
| Crystal Blue | 18 | 0.0090 % | 11,111 |
| Red Blood | 16 | 0.0080 % | 12,500 |
| Steel | 14 | 0.0070 % | 14,286 |
| Emveretarcon | 12 | 0.0060 % | 16,667 |
| Rough Elunium | 10 | 0.0050 % | 20,000 |
| Rough Oridecon | 9 | 0.0045 % | 22,222 |
| Great Nature | 8 | 0.0040 % | 25,000 |
| Rough Wind | 7 | 0.0035 % | 28,571 |
| Mystic Frozen | 6 | 0.0030 % | 33,333 |
| Flame Heart | 5 | 0.0025 % | 40,000 |
| Elunium | 4 | 0.0020 % | 50,000 |
| Oridecon | 3 | 0.0015 % | 66,667 |
| Gold | 2 | 0.0010 % | 100,000 |
| Emperium | 1 | 0.0005 % | 200,000 |
No killing blow needed
The check runs on whoever holds loot priority, not on whoever landed the last hit. If the monster is yours by damage, the roll is yours even if somebody else finishes it.
It works the same for anything your homunculus or mercenary kills.
What does NOT change the number
Yes, Emperium is on the list. One monster in 200,000. This is not a way to get one: it is a statistical curiosity worth knowing before you start counting.
See also Three of the job's skills cannot be learned with points, and one only exists while you are soul-linked Weaponry Research raises your accuracy by 2 % per level, and that percentage never shows in the status window Iron, steel and the five stones: the seven metal recipes
Both are platinum skills: they cost no points and cannot be learned with them. You ask the platinum skill NPC for them free of charge, and on this server that NPC stands at Prontera 158,193.
Unfair Trick — the one that pays for the trip
The formula
zeny cost × 0.80, applied to Mammonite and to Cart Termination.
It is passive and single-level. There is nothing to switch on.
| Skill | Level | Without Unfair Trick | With Unfair Trick | Saved |
|---|---|---|---|---|
| Mammonite | 10 | 1,000z | 800z | 200z |
| Cart Termination | 1 | 600z | 480z | 120z |
| Cart Termination | 5 | 1,000z | 800z | 200z |
| Cart Termination | 10 | 1,500z | 1,200z | 300z |
The 20 % is the renewal value, which is the one running here; older guides say 10 % because they describe classic mode. And watch out: Maximum Power Thrust also costs zeny and Unfair Trick does not touch it. Only those two.
Greed — picking up a 5×5 area at once
What it actually does
It picks up every item on the ground inside a 5×5 cell box centred on you. It costs 10 SP, has no cast time and is single-level.
What it does respect
Items are taken one by one under the normal rules: the loot protection of whoever dropped them, your weight limit, a full inventory and any item filters you have configured. Greed is not an exploit for stealing other people's floor.
Where it works
It can be used while riding a warg and while in Madogear, which is exactly where it is most welcome: those are the two states in which picking things up by hand is most awkward.
If your inventory is full, whatever does not fit simply stays on the ground. No warning is shown.
Greed is a Blacksmith skill, so it carries over to Whitesmith, Mechanic and Meister. So does Unfair Trick — and it keeps taking 20 % off Cart Termination once you are a Mechanic.
See also Three of the job's skills cannot be learned with points, and one only exists while you are soul-linked Cart Termination is your cart weight divided by 16 minus the skill level
Hammer Fall (BS_HAMMERFALL) is the Blacksmith's only area skill and it deals not a single point of damage: all it does is try to stun.
The stun formula
Chance = 20 + 10 × level percent, capped at 50 + 5 × level.
Up to level 5 the first half wins, so in practice it is 30 / 40 / 50 / 60 / 70 %. The stun lasts 4.5 seconds at every level.
| Level | Stun | Duration | Area | Range | SP |
|---|---|---|---|---|---|
| 1 | 30 % | 4.5 s | 5×5 | 1 | 10 |
| 2 | 40 % | 4.5 s | 5×5 | 1 | 10 |
| 3 | 50 % | 4.5 s | 5×5 | 1 | 10 |
| 4 | 60 % | 4.5 s | 5×5 | 1 | 10 |
| 5 | 70 % | 4.5 s | 5×5 | 1 | 10 |
No cast time, no cooldown and a flat 10 SP at any level. Levelling it is cheap and the only thing that changes is the percentage.
The one-second delay
The engine does not apply the stun on cast: it schedules the effect for one second later. What you see on screen is the hammer blow; the stun arrives with the target list captured at that moment.
Practical consequence: anything that walks away during that second escapes, and anything that walks in also escapes, because targets are locked at cast time.
Range 1, area 5×5
You aim at a cell, but that cell has to be right next to you: the range is 1. The area is generous, 2 cells in every direction around the chosen point.
In other words: it is a melee skill with an area, not a ranged area skill.
Three ways for nothing to happen
Maxing it is not optional if you want Cart Termination: that skill requires Hammer Fall 5. And @autoplay uses it as an area skill with one extra gate — it will not cast it if the target is already stunned.
See also Three of the job's skills cannot be learned with points, and one only exists while you are soul-linked Cart Termination is your cart weight divided by 16 minus the skill level
Four of the job's skills are party buffs even though the client draws them as self-targeted: Adrenaline Rush, Advanced Adrenaline Rush, Power-Thrust and Weapon Perfection. All four are distributed in exactly the same way, so it is worth explaining once.
How the sharing works
No party → only you.
In a party → every member who is on your map and inside a box of 18 cells radius around you — which is essentially the whole screen.
There is no cap on the number of recipients and no extra SP per person.
What this server adds
In the stock engine the sharing only looks at the players in the party. That was changed here: each member's active homunculus and mercenary are part of the distribution, just like another member.
Each one by its own spot
The companion is measured by its own position, not its master's. A homunculus that lagged behind and fell outside the 18 cells does not get the buff, exactly as would happen to a party member who lagged behind.
And no weapon filter
The weapon check is only run on players. Homunculi and mercenaries receive all four buffs always, Adrenaline Rush included — the one that would demand an axe or a mace from a player.
You get more than they do
This is the trap no guide mentions: a single cast does not give the caster and the others the same thing. The engine records whether the buff was self-cast or received and works out the effect from that flag.
| Buff | On you (self-cast) | On the rest of the party |
|---|---|---|
| Power-Thrust 5 | +25 % damage | +15 % damage |
| Power-Thrust 3 | +15 % damage | +10 % damage |
| Power-Thrust 1 | +5 % damage | +5 % damage |
| Adrenaline Rush | Same effect for players. It only differs for companions. | |
And there is an overwrite rule that works in your favour: a self-cast buff is never overwritten by someone else's. If you cast Power-Thrust 5 on yourself (+25 %), a party member casting theirs will not drop you to 15 %. The reverse does work: if you had the received version and then cast your own, it improves.
What removes all four
If you have Hilt Binding, all four last 10 % longer — but only when you are the one casting. What counts is the caster's Hilt Binding, not the recipient's.
See also Adrenaline Rush gives ASPD based on your AGI, and the "advanced" version gives less Power-Thrust does NOT break your weapon on this server Weapon Perfection doubles an axe's attack against small monsters Weaponry Research raises your accuracy by 2 % per level, and that percentage never shows in the status window
Both Adrenaline skills raise attack speed, but not by a fixed percentage: the bonus is multiplied by your AGI before it is applied.
The ASPD formula
ASPD points = buff value × AGI ÷ 200
The buff value is 7 for Adrenaline Rush and 6 for Advanced Adrenaline Rush, at any level.
At AGI 100 that is +3.5 and +3 ASPD points. At AGI 200, +7 and +6. At AGI 50, +1.75 and +1.5. The skill is worth twice as much on a character with twice the AGI.
They do not stack with each other or with the other "quicken" buffs: Two-Hand Quicken, One-Hand Quicken, Spear Quicken and both Adrenaline skills share one slot and the highest value wins. Having both Adrenaline buffs up at once gives exactly the same as having only the normal one.
| Level | Duration | SP | Accuracy | ASPD (AGI 120) |
|---|---|---|---|---|
| 1 | 30 s | 20 | +8 | +4.2 |
| 2 | 60 s | 23 | +11 | +4.2 |
| 3 | 90 s | 26 | +14 | +4.2 |
| 4 | 120 s | 29 | +17 | +4.2 |
| 5 | 150 s | 32 | +20 | +4.2 |
| Advanced | 150 s | 64 | — | +3.6 |
Look at the ASPD column: levelling up gives no extra speed. The only things that grow with level are the duration and the accuracy, +3 HIT per level plus a base of 5.
The uncomfortable conclusion
For a player, Advanced Adrenaline Rush is worse than Adrenaline Rush 5 on every measurable count: less ASPD (6 against 7), no accuracy at all (+0 against +20) and twice the SP (64 against 32). The duration is identical, 150 seconds.
The only thing it wins on is which weapons it accepts. And for a mixed party, that changes everything.
Which weapon each one demands
Adrenaline Rush
One-handed axes, two-handed axes and one-handed maces only.
The two-handed mace does not qualify. No swords, no spears, no katars, nothing else. And in the party distribution, only members carrying one of those three receive it.
Advanced Adrenaline Rush
Bare hands, daggers, one- and two-handed swords, one- and two-handed spears, one- and two-handed axes, one- and two-handed maces, rods, knuckles, instruments, whips, books and katars.
What is not included: bows, the five firearms, huuma shuriken and two-handed rods.
How you get the advanced version
You do not learn it. It carries the Soul Link skill flag: it shows up in your window at level 1 and without being saved while a Soul Linker keeps Blacksmith Spirit on you, and it disappears when the link ends. The Adrenaline Rush 5 requirement still stands: without it you are not granted the skill even while linked.
Both fail while you are under Quagmire or Decrease AGI: the engine rejects the buff silently, it does not apply a reduced version. And both fall off the instant you switch to a weapon outside their list. The party and companion sharing is covered in the four party buffs.
See also The job's four buffs reach 18 cells, and here the party's homunculi and mercenaries get them too Three of the job's skills cannot be learned with points, and one only exists while you are soul-linked Weaponry Research raises your accuracy by 2 % per level, and that percentage never shows in the status window
Weapon Perfection (BS_WEAPONPERFECT) does exactly one thing, and it does it completely: it cancels your weapon's size penalty. While it lasts, your weapon hits every size as if the modifier were 100 %.
The formula
Weapon attack normally = ATK × size modifier ÷ 100.
With Weapon Perfection = just ATK. The modifier is skipped entirely.
It only affects the weapon attack portion of the hit, which in renewal is the part the size modifier multiplies. It does not touch stat attack or mastery attack.
The penalty table it removes
| Weapon | Small | Medium | Large |
|---|---|---|---|
| Axe, 1H and 2H | 50 % | 75 % | 100 % |
| Dagger | 100 % | 75 % | 50 % |
| Book | 100 % | 100 % | 50 % |
| Sword, 1H | 75 % | 100 % | 75 % |
| Sword, 2H | 75 % | 75 % | 100 % |
| Spear, 1H and 2H | 75 % | 75 % | 100 % |
| Mace, 1H | 75 % | 100 % | 100 % |
| Katar | 75 % | 100 % | 75 % |
| Instrument and whip | 75 % | 100 % | 75 % |
| Bow | 100 % | 100 % | 75 % |
| Knuckles | 100 % | 100 % | 75 % |
| Mace 2H, rods, firearms, huuma, bare hands | 100 % | 100 % | 100 % |
A worked example
A Whitesmith with a 200 attack axe hitting a Poring (small size): the weapon portion of the hit is worth 200 × 50 ÷ 100 = 100.
With Weapon Perfection up, that same portion is worth 200. Double.
Against a large target, that same axe was already at 100 %: Weapon Perfection gives it nothing. That is why this buff is worth a fortune or worth zero depending on what stands in front of you.
| Level | Duration | SP |
|---|---|---|
| 1 | 10 s | 18 |
| 2 | 20 s | 16 |
| 3 | 30 s | 14 |
| 4 | 40 s | 12 |
| 5 | 50 s | 10 |
It is one of the few skills in the game where the SP cost drops as the level rises: level 5 lasts five times longer and costs almost half. There is no reason to leave it at an intermediate level.
No weapon requirement
Unlike Adrenaline Rush or Power-Thrust, Weapon Perfection demands no particular weapon to cast, and in the party distribution everyone receives it, no filter.
Fifty seconds is short
It is the shortest of the four buffs. With Hilt Binding it reaches 55 s, which is still short: it has to be recast often, and that is why @autoplay puts it ahead of the other self-buffs.
Be careful who you cast it on: a party member with a two-handed mace, a rod, a firearm or a huuma shuriken gets absolutely nothing, because those weapons have no penalty to remove. And the sharing follows the rules in the four party buffs.
See also The job's four buffs reach 18 cells, and here the party's homunculi and mercenaries get them too Maximize Power costs 1 SP every few seconds and leaves you with no regeneration Three of the job's skills cannot be learned with points, and one only exists while you are soul-linked
Power-Thrust (BS_OVERTHRUST, "Over Thrust" in many guides) raises the damage ratio of all your hits. First things first, because this is what keeps people from using it:
The breaking legend
On this server Power-Thrust does not break your weapon. Ever.
Self weapon breaking from Over Thrust only exists in the emulator's classic mode, and this server runs renewal. And even if it ran classic, the base natural equipment breaking rate is set to 0 in the configuration: the engine never even rolls the die.
What it actually does
The formula
It adds a flat percentage to the damage ratio of all your attacks, normal hits and skills alike.
If you cast it on yourself: +5 × level percent. If somebody else casts it on you: +5 % at levels 1-2, +10 % at levels 3-4 and +15 % at level 5.
| Level | Duration | SP | Damage (self) | Damage (received) |
|---|---|---|---|---|
| 1 | 20 s | 18 | +5 % | +5 % |
| 2 | 40 s | 16 | +10 % | +5 % |
| 3 | 60 s | 14 | +15 % | +10 % |
| 4 | 80 s | 12 | +20 % | +10 % |
| 5 | 100 s | 10 | +25 % | +15 % |
A worked example
A Cart Termination hit that was going to deal 40,000 damage. With Power-Thrust 5 cast by you, the ratio rises 25 percentage points over whatever it already had. If the ratio was 1,333 %, it becomes 1,358 % — that is, roughly 40,750.
That is the detail that disappoints a lot of people: the +25 % is added to the ratio, it does not multiply your damage by 1.25. On a normal attack (ratio 100 %) it really is a +25 % increase; on a skill with a huge ratio, the relative contribution is small.
Which weapon it requires
Any weapon except bare hands. Bows and two-handed rods qualify. If you are unarmed, the cast fails.
In the party distribution, a member with empty hands does not receive it; everybody else does, whatever they carry.
It clashes with Maximum Power Thrust
You cannot cast Power-Thrust while Maximum Power Thrust is active: the engine rejects it. And casting Maximum Power Thrust switches off whatever Power-Thrust you had.
They are mutually exclusive in both directions, and the Whitesmith one wins.
With Hilt Binding, level 5 lasts 110 seconds instead of 100. And @autoplay keeps it up on its own, precisely because it was verified that nothing gets broken.
See also Maximum Power Thrust costs up to 5,000z per cast and it does not break your weapon either The job's four buffs reach 18 cells, and here the party's homunculi and mercenaries get them too Three of the job's skills cannot be learned with points, and one only exists while you are soul-linked
Maximize Power (BS_MAXIMIZE) is a toggle: you switch it on, it stays on indefinitely, and you switch it off by pressing it again. The client shows infinite duration on purpose.
What it does exactly
A weapon's attack is not a fixed number: every hit is rolled between a minimum and a maximum. The spread is ± 5 % × weapon level of the weapon's ATK.
Maximize Power forces the maximum every time.
Average gain = the width of that spread, i.e. weapon ATK × 5 % × weapon level.
A worked example
A level 4 weapon with 200 ATK: the spread is ±40, so every hit rolls between 160 and 240 weapon attack.
With Maximize Power it is always 240: +40 on average compared to going without.
On a level 1 weapon with 50 ATK, the spread is ±2.5. The gain is two and a half points. The skill pays off in proportion to the weapon's ATK and level, not to yours.
What it costs
| Level | SP to switch on | Drain | SP per minute |
|---|---|---|---|
| 1 | 10 | 1 SP every 1 s | 60 |
| 2 | 10 | 1 SP every 2 s | 30 |
| 3 | 10 | 1 SP every 3 s | 20 |
| 4 | 10 | 1 SP every 4 s | 15 |
| 5 | 10 | 1 SP every 5 s | 12 |
Here the level does not improve the effect: the effect is identical at level 1 and at level 5. All that levelling buys is spending five times less SP. At level 1 it is practically unusable; at level 5, sustainable.
And the part almost nobody sees coming
While Maximize Power is on, your natural SP regeneration is switched off. It is not that you spend 12 SP per minute: you spend 12 and on top of that you recover none on your own.
When you run out of SP, the toggle switches itself off.
It does nothing on criticals
A critical hit already uses the weapon's maximum attack by definition. If your character lives off criticals, Maximize Power adds nothing on those hits.
No weapon and no map requirement
It demands no weapon type, has no cast time, no cooldown and is not banned on any map. It does switch off when you board a Madogear.
It pairs well with Weapon Perfection because both act on the same part of the hit — the weapon attack — and neither overrides the other: one removes the randomness, the other removes the size penalty.
See also Weapon Perfection doubles an axe's attack against small monsters Three of the job's skills cannot be learned with points, and one only exists while you are soul-linked
Weapon Repair (BS_REPAIRWEAPON) fixes broken equipment — the kind that shows up crossed out and cannot be worn. It is single-level, costs 30 SP, has a 2.5 second fixed cast and reaches 2 cells.
It can be cast on another player or on yourself. On yourself the distance is not checked; on somebody else, it is.
Which material each item consumes
The material is decided by the level of the broken item, not by yours, and the repairer supplies it, not the owner.
| Broken item | Material | Amount |
|---|---|---|
| Level 1 weapon | Iron Ore | 1 |
| Level 2 weapon | Iron | 1 |
| Level 3 weapon | Steel | 1 |
| Level 4 weapon | Rough Oridecon | 1 |
| Level 5 weapon | cannot be repaired | — |
| Level 1 armour | Steel | 1 |
| Level 2 armour | cannot be repaired | — |
The silent failure
The repair window lists everything the target has broken, unfiltered. Level 5 weapons and level 2 armour are in there too.
Pick one of those and the engine looks for its material, finds none assigned and returns a generic "it failed". Nothing is consumed, nothing is repaired and no reason is given. It looks like bad luck and it is not: it is impossible.
It never fails (when it can work)
If the item is repairable and you have the material, the repair is 100 %. There is no roll. The material is consumed and the item comes back as new, with its refine level and cards intact.
What it does not repair
Already hatched pet eggs are explicitly excluded. And it only acts on items flagged as broken: intact gear never appears on the list.
If the target has nothing broken, the skill fails on opening instead of opening an empty window. That is the quickest way to check whether somebody's gear broke without having to ask them.
See also Upgrade Weapon refines for free, but destroys the weapon when it fails Three of the job's skills cannot be learned with points, and one only exists while you are soul-linked Iron, steel and the five stones: the seven metal recipes
Cart Boost (WS_CARTBOOST) is single-level and does one thing only: move faster with the cart out. But it is the mandatory gateway to Cart Termination, so every combat Whitesmith carries it.
The numbers
+20 movement speed for 60 seconds, for 20 SP.
No cast time, no cooldown and no item cost. It requires the cart to be out.
The +20 does not stack with other speed bonuses: it competes with Increase AGI (+25), Wind Walk and the rest, and the highest wins. With Increase AGI up, Cart Boost contributes no speed at all — only the status, which is what Cart Termination asks for.
It is one of the sticky ones
Cart Boost is flagged to survive your own death, and on top of that it is immune to Dispell, Clearance and Banishing Buster.
What does remove it: boarding a Madogear.
Decrease AGI switches it off
If somebody casts Decrease AGI on you while Cart Boost is up, the engine ends your Cart Boost and the Decrease AGI never lands. You lose the buff, but you avoid the debuff.
And under Quagmire it cannot be cast at all: it fails silently.
Banned in the Turbo Track
Cart Boost is on the list of skills forbidden on restricted zone 1 maps: the Turbo Track courses (turbo_n_1, turbo_n_4, turbo_n_8, turbo_n_16, turbo_e_4, turbo_e_8, turbo_e_16) and alde_tt02.
It is the only map ban in the whole Blacksmith and Whitesmith tree. Everything else can be used anywhere, PvP, GvG and battlegrounds included.
Without Cart Boost up Cart Termination cannot be cast, and the status it demands is this one specifically: the Genetic's Cart Boost is a different status and does not count. The details are in Cart Termination.
See also Cart Termination is your cart weight divided by 16 minus the skill level Three of the job's skills cannot be learned with points, and one only exists while you are soul-linked The Merchant tree: twelve skills, five of which no amount of skill points will buy
Cart Termination (WS_CARTTERMINATION) is the job's big hit, and its damage does not depend on your stats beyond what your normal attack already provides: the ratio comes from the weight of your cart.
The exact formula
ratio % = internal cart weight ÷ (10 × (16 − level))
The internal weight is the figure you see in the cart window multiplied by 10. With the cart cap at 8,000, the internal maximum is 80,000.
Put in the units you actually see, it gets much simpler: ratio % = displayed cart weight ÷ (16 − level).
| Level | Divisor | Ratio with a full cart (8,000) | Ratio at 4,000 | Zeny | Stun |
|---|---|---|---|---|---|
| 1 | 15 | 533 % | 266 % | 600z | 5 % |
| 2 | 14 | 571 % | 285 % | 700z | 10 % |
| 3 | 13 | 615 % | 307 % | 800z | 15 % |
| 4 | 12 | 666 % | 333 % | 900z | 20 % |
| 5 | 11 | 727 % | 363 % | 1,000z | 25 % |
| 6 | 10 | 800 % | 400 % | 1,100z | 30 % |
| 7 | 9 | 888 % | 444 % | 1,200z | 35 % |
| 8 | 8 | 1,000 % | 500 % | 1,300z | 40 % |
| 9 | 7 | 1,142 % | 571 % | 1,400z | 45 % |
| 10 | 6 | 1,333 % | 666 % | 1,500z | 50 % |
It costs 15 SP at any level, reaches 2 cells and its stun lasts 4.5 seconds. The zeny is deducted on cast, and with Unfair Trick you pay 80 %: from 480z to 1,200z.
A worked example
A Whitesmith with level 10 in the skill and a cart at 6,500 weight: ratio = 6,500 ÷ 6 = 1,083 %. If his normal attack against that target would deal 3,000 damage, the hit lands for about 32,500.
Filling the cart to 8,000 raises the ratio to 1,333 % and the same hit becomes roughly 40,000. 1,500 units of weight are worth 7,500 damage.
That is why Whitesmiths carry a cart full of cheap stones: what is inside makes no difference, only what it weighs.
The five traps
@autoplay treats it as an expensive finisher: it is the only skill in the catalogue that never turns itself on. You have to build its card in the control panel, and even then it is reserved for high-HP targets. Rightly so: at 1,500z per hit, an afternoon of automated farming eats the profit.
See also Cart Boost survives your own death, but it is banned inside the Turbo Track Unfair Trick takes 20 % off the zeny bill of Mammonite and Cart Termination Power-Thrust does NOT break your weapon on this server Three of the job's skills cannot be learned with points, and one only exists while you are soul-linked
Shattering Strike (WS_MELTDOWN, "Meltdown" in older guides) is a self-buff that gives your weapon hits a chance to break the equipment of whoever takes them.
The two formulas
Breaking the target's weapon: 1 % × level per hit.
Breaking the target's armour: 0.7 % × level per hit.
The two rolls are independent and happen on every hit: both can break at once.
| Level | Duration | SP | Break weapon | Break armour |
|---|---|---|---|---|
| 1 | 15 s | 50 | 1.0 % | 0.7 % |
| 2 | 20 s | 50 | 2.0 % | 1.4 % |
| 3 | 25 s | 60 | 3.0 % | 2.1 % |
| 4 | 30 s | 60 | 4.0 % | 2.8 % |
| 5 | 35 s | 70 | 5.0 % | 3.5 % |
| 6 | 40 s | 70 | 6.0 % | 4.2 % |
| 7 | 45 s | 80 | 7.0 % | 4.9 % |
| 8 | 50 s | 80 | 8.0 % | 5.6 % |
| 9 | 55 s | 90 | 9.0 % | 6.3 % |
| 10 | 60 s | 90 | 10.0 % | 7.0 % |
It is a self-buff: it is not shared with the party and it demands no weapon. The cast time is so short it is instant for all practical purposes.
The exception that makes it special
On this server breaking monster equipment is disabled in the configuration. And the engine carries one exception written with a name on it: Shattering Strike ignores that ban.
It is the only skill in the game that does.
What happens when a monster's equipment "breaks"
A monster has no inventory, so the engine translates the break into a status:
Broken weapon
−25 % attack for 75 seconds.
Broken armour
−40 VIT for 75 seconds, with everything that drags along in defence and status resistance.
A worked example
Level 10, attacking at 150 hits per minute: 15 weapon rolls and 10.5 armour rolls per minute. In a long fight against an ordinary monster, dropping it to −25 % attack is a matter of seconds.
Against players it is a different story: there the equipment really breaks and has to be repaired. With Weapon Repair, for instance.
What it does not work on
It is one of the few buffs that survives your own death, and it is also immune to Dispell, Clearance and Banishing Buster. @autoplay keeps it up on its own and it is adjustable from the control panel.
See also Cart Termination is your cart weight divided by 16 minus the skill level Three of the job's skills cannot be learned with points, and one only exists while you are soul-linked
Maximum Power Thrust (WS_OVERTHRUSTMAX) is the Whitesmith version of Power-Thrust: more damage, far more expensive and for you alone — unlike the Blacksmith one, this is not shared with the party.
The formula
+20 × level percent to the damage ratio of all your attacks.
The duration is 180 seconds at every level. Only the percentage and the bill change.
| Level | Damage | Duration | SP | Zeny | Zeny per minute |
|---|---|---|---|---|---|
| 1 | +20 % | 180 s | 15 | 3,000z | 1,000z |
| 2 | +40 % | 180 s | 15 | 3,500z | 1,167z |
| 3 | +60 % | 180 s | 15 | 4,000z | 1,333z |
| 4 | +80 % | 180 s | 15 | 4,500z | 1,500z |
| 5 | +100 % | 180 s | 15 | 5,000z | 1,667z |
The breaking does not exist here either
Same as Power-Thrust: Maximum Power Thrust does not break your weapon on this server. The code that broke it is exclusive to classic mode, and on top of that the base self-equipment breaking rate is set to 0 in the configuration. The die is never rolled.
This is the most important correction on this page: for years the skill has been left unlevelled over a risk that this engine does not carry.
A worked example
A level 10 Cart Termination with a full cart has a ratio of 1,333 %. With Maximum Power Thrust 5 it becomes 1,433 % — 7.5 % more damage.
On a normal attack (ratio 100 %), however, the same buff takes it to 200 %: double.
The conclusion is counter-intuitive and worth repeating: this buff pays off far more while swinging normally than while finishing with Cart Termination. The percentages are added to the ratio, and adding 100 to a ratio of 100 is not the same as adding it to a ratio of 1,333.
The three clashes
Which weapons qualify
The same list as Cart Termination: everything except bows and two-handed rods. Bare hands do qualify.
Exactly the reverse of Power-Thrust, which accepts bows and refuses bare hands.
Unfair Trick does not discount it
The 20 % discount from Unfair Trick only applies to Mammonite and Cart Termination. Here you pay the full 5,000z.
@autoplay does not use it, and that is a decision, not an oversight: 5,000z every three minutes is far above the automatic spending cap the AI works with. If you want the buff, you put it up by hand.
See also Power-Thrust does NOT break your weapon on this server Cart Termination is your cart weight divided by 16 minus the skill level Three of the job's skills cannot be learned with points, and one only exists while you are soul-linked
Upgrade Weapon (WS_WEAPONREFINE) opens your own refining window. It costs 30 SP, has no cast time and charges no zeny: only the ore. Against the 20,000z per attempt the town refiner asks for a level 4 weapon, the difference is enormous.
The success formula
chance = weapon base chance + job bonus
The job bonus is (job level − 50) ÷ 2 for a Whitesmith, and a flat +10 for a Mechanic or a Meister.
In other words: a Whitesmith at job level 50 adds nothing, one at job 60 adds +5, and one at job 70 adds +10 — the same as a third job.
The base odds, refine by refine
| Reaching | Level 1 weapon | Level 2 weapon | Level 3 weapon | Level 4 weapon |
|---|---|---|---|---|
| +1 to +4 | 100 % | 100 % | 100 % | 100 % |
| +5 | 100 % | 100 % | 100 % | 60 % |
| +6 | 100 % | 100 % | 60 % | 40 % |
| +7 | 100 % | 60 % | 50 % | 40 % |
| +8 | 60 % | 40 % | 20 % | 20 % |
| +9 | 40 % | 20 % | 20 % | 20 % |
| +10 | 19 % | 19 % | 19 % | 9 % |
The job bonus has to be added to those numbers. A job 70 Whitesmith refining a level 4 weapon to +10 has 9 + 10 = 19 %, not 9 %.
If it fails, the weapon is gone
There is no downgrade and no broken item: on failure the weapon is deleted from your inventory. The ore is consumed either way.
That is exactly what the town refiner does in these brackets; what changes is that here you do not pay the 20,000z on top.
Which ore each weapon level needs
| Weapon level | Ore | Possible? |
|---|---|---|
| 1 | Phracon | Yes |
| 2 | Emveretarcon | Yes |
| 3 | Oridecon | Yes |
| 4 | Oridecon | Yes |
| 5 | — | No |
Four reasons a weapon will not show up on the list
A worked example
Job 70 Whitesmith, Upgrade Weapon 10, a level 3 weapon he wants to take from +7 to +10:
Chaining all three works out to 0.30 × 0.30 × 0.29 = 2.6 %. One attempt in 38, and every failure takes the whole weapon with it.
If you forged the weapon yourself and manage to take it to +10, there is blacksmith fame waiting: +1 point if it was level 1, +25 if it was level 2 and +1,000 if it was level 3. The ranking details are in Whitesmith and the ranking.
See also Weapon Repair cannot fix level 5 weapons or level 2 armour, even though it lists them A Whitesmith forges the same things: what it gains is Upgrade Weapon and the ranking Three of the job's skills cannot be learned with points, and one only exists while you are soul-linked
All twenty-nine skills of the Blacksmith's third job, one by one: the half that rides the Magic Gear and the half that builds things, with the exact formula for each and the engine traps no guide mentions.
The Mechanic is the third job of the Blacksmith and Whitesmith line, and the step before the Meister, which is the fourth. It inherits everything Merchant and Blacksmith have, and adds twenty-nine skills of its own: four passives and twenty-five active skills.
The first thing to understand is not what each one does, but where you can use it. The class is split into two halves that barely touch:
The Magic Gear half — 22 skills
They carry Requires: State: Mado in the emulator's table. Without the Magic Gear mounted they simply will not cast: the engine refuses them with the "can only be used while riding the Magic Gear" message.
And nearly all of them also burn Magic Gear Fuel, while several demand a specific device in your bag.
The inventor half — 7 skills
Axe Boomerang, Power Swing, Axe Tornado, Magma Eruption, Silver Sniper, Magic Decoy and FAW Removal. These work on foot, and mounted too.
They are the only ones a Mechanic can use without ever spending a single point on Mado License.
The full tree
| Skill | Max. | Requires | Magic Gear | What it is |
|---|---|---|---|---|
| Mado License | 5 | — | — | Passive |
| Axe Training | 10 | — | — | Passive |
| Research Fire/Earth | 5 | — | — | Passive |
| Mainframe Restructure | 4 | Mado License 4 | — | Passive |
| Boost Knuckle | 5 | Mado License 1 | Yes | Ranged damage |
| Pile Bunker | 3 | Boost Knuckle 2 | Yes | Damage and buff strip |
| Vulcan Arm | 3 | Boost Knuckle 2 | Yes | Splash damage |
| Flame Launcher | 3 | Vulcan Arm 1 | Yes | Fire cone |
| Cold Slower | 3 | Vulcan Arm 3 | Yes | Water area |
| Arm Cannon | 5 | Flame Launcher 2 + Cold Slower 2 | Yes | Splash damage |
| Acceleration | 3 | Mado License 1 | Yes | Movement speed |
| Hovering | 1 | Acceleration 1 | Yes | Ground immunity |
| Front-Side Slide | 1 | Hovering 1 | Yes | Displacement |
| Back-Side Slide | 1 | Hovering 1 | Yes | Displacement |
| Self Destruction | 3 | Mainframe Restructure 2 | Yes | Explosion |
| Shape Shift | 4 | Mainframe Restructure 2 | Yes | Element change |
| Emergency Cool | 1 | Self Destruction 2 | Yes | Cooling |
| Infrared Scan | 1 | Shape Shift 2 | Yes | Detection |
| Analyze | 3 | Infrared Scan 1 | Yes | Defense debuff |
| Magnetic Field | 3 | Emergency Cool 1 | Yes | Root |
| Neutral Barrier | 3 | Magnetic Field 2 | Yes | Barrier |
| Stealth Field | 3 | Analyze 3 + Neutral Barrier 2 | Yes | Concealment |
| Repair | 5 | Mado License 2 | Yes | Healing |
| Axe Boomerang | 5 | Axe Training 1 | No | Ranged damage |
| Power Swing | 10 | Axe Boomerang 3 | No | Melee damage |
| Axe Tornado | 5 | Axe Training 1 | No | Damage around you |
| Magma Eruption | 5 | Research Fire/Earth 1 | No | Fire zone |
| FAW — Silver Sniper | 5 | Research Fire/Earth 2 | No | Turret |
| FAW — Magic Decoy | 5 | Silver Sniper 2 | No | Caster turret |
| FAW Removal | 1 | Silver Sniper 1 | No | Destroys turrets |
On top of those twenty-nine there is Full Throttle, which is not a Mechanic skill: every third job has it equally.
Only 62 skills in the entire game work while mounted
The engine keeps a per-skill flag, AllowOnMado, and checks it once for the whole catalogue: while riding the Magic Gear, any skill without that flag is refused. In the entire database there are 62 skills carrying it.
They are the Mechanic's 25 active skills, the Meister's 13, and a short list from Merchant, Blacksmith and Whitesmith: Mammonite, Vending, Identify, Greed, Cart Revolution, Change Cart, Loud Exclamation, Weapon Repair, Hammerfall, Adrenaline Rush, Weapon Perfection, Over Thrust, Maximize Power, Melt Down, Cart Boost, Cart Termination, Weapon Refine, Maximum Over Thrust, Adrenaline Rush 2 and Teleport. Nothing else.
The inherited skills are not on this page: the merchant ones are in the Merchant tree; the BS_ and WS_ ones in the Blacksmith tree; and forging in Forging weapons and the smith's recipes. For what the AI does with this class, see the @autoplay repertoire.
See also The Magic Gear wipes your smith buffs when you mount, and at License 1 you move slower than on foot The Magic Gear heats up when you GET HIT, not when you shoot The four passives: two work always and two only while mounted Three of the job's skills cannot be learned with points, and one only exists while you are soul-linked The Merchant tree: twelve skills, five of which no amount of skill points will buy
The Magic Gear — the Madogear — is neither an item nor a rental mount: it is a state that toggles on and off and is saved with your character. It survives logging out and it survives dying.
How to mount it
The Mado Gear Armorer
He stands in ten towns: Prontera (163,178), Geffen (103,55), Payon (166,106), Aldebaran (133,112), Juno (167,187), Rachel (106,134), El Dicastes (187,207), Manuk (273,212), Splendide (180,174) and the Midgard camp (242,243).
He mounts it for free. He also rents the cart and sells the Emergency Mado Gear for 1,000,000 z.
The three conditions
Mado License at level 1 or higher.
Movement speed: the whole formula
While the Magic Gear is on, the engine ignores every other speed modifier and uses only these two:
penalty = 50 − 10 × Mado License level, and if the license is at 5, penalty = −25.
With Acceleration active, another 25 points are subtracted.
A positive value slows you down and a negative one speeds you up: speed = speed + speed × penalty ÷ 100, applied to the 150 ms per cell a character walks on foot.
| Mado License | Penalty | ms per cell | Versus walking | With Acceleration |
|---|---|---|---|---|
| 1 | +40 | 210 | 40% slower | 172 ms |
| 2 | +30 | 195 | 30% slower | 157 ms |
| 3 | +20 | 180 | 20% slower | 142 ms |
| 4 | +10 | 165 | 10% slower | 127 ms |
| 5 | −25 | 112 | 25% faster | 75 ms |
The jump sits between 4 and 5, and it is not gradual: level 4 is still a penalty, and level 5 is twice as fast as walking once you pair it with Acceleration. Mounting with License 1 is worse than not mounting at all if all you want is to get somewhere.
What it wipes when you get on
The instant the Magic Gear appears, the engine walks the list of statuses flagged MadoCancel and ends every one of them. There are exactly nine, and they are the Blacksmith and Whitesmith buffs:
Adrenaline Rush, Adrenaline Rush 2, Weapon Perfection, Over Thrust, Maximum Over Thrust, Maximize Power, Melt Down, Loud Exclamation and Cart Boost.
The good news is that you can cast them again once mounted: all nine carry the AllowOnMado flag. What you cannot do is get on with them already up. The correct order is mount first, buff second — never the other way round.
What it wipes when you get off
Dismounting ends the statuses flagged MadoEndCancel: Acceleration, Hovering, Shape Shift, Magnetic Field and both halves of overheating. On top of that, the master status of Neutral Barrier and Stealth Field falls with it, and when it falls it deletes the field you had planted.
What it gives you while you wear it
Weight and regeneration
Moving HP Recovery. The two do not stack: it is one or the other.
Mainframe Restructure, +20 DEF per level plus another 20. That bonus only counts while mounted.
Cannon ammunition
A Mechanic cannot equip a Cannon Ball while not mounted. The client answers "this item can only be used with the Magic Gear mounted" and the equip is rejected.
It is the only equipment restriction the Magic Gear imposes, and it only affects Arm Cannon.
The fuel
Magic Gear Fuel (id 6146) is sold by the Black Marketeer at 375 z a unit, in Einbroch (122,250), Lighthalzen (lhz_in03 181,17), Prontera (prt_in 175,137), Rachel (ra_in01 257,266) and the Midgard camp (184,263). It weighs 1 per unit.
| Skill | Fuel | Cost per cast |
|---|---|---|
| Self Destruction | 3 | 1,125 z |
| Shape Shift | 2 | 750 z + 3 points |
| Magnetic Field | 2 | 750 z |
| Stealth Field | 2 | 750 z |
| Flame Launcher | 1 | 375 z |
| Cold Slower | 1 | 375 z + 1 bullet |
| Arm Cannon | 1 | 375 z + 1 cannon ball |
| Acceleration | 1 | 375 z |
| Hovering | 1 | 375 z |
| Front-Side Slide | 1 | 375 z |
| Back-Side Slide | 1 | 375 z |
| Analyze | 1 | 375 z |
| Neutral Barrier | 1 | 375 z |
| Emergency Cool | 1 | 375 z |
| Boost Knuckle | — | SP only |
| Pile Bunker | — | SP only |
| Vulcan Arm | — | 1 Vulcan Bullet |
| Infrared Scan | — | SP only |
| Repair | — | 1 repair ampoule |
The device trap: you do not have to equip them
Seven skills declare "required equipment" and the client shows you a message saying you need that item equipped. That is a lie: the engine checks them with pc_search_inventory(), which only looks at whether the item is in your bag.
They are Acceleration, Self Destruction, Shape Shift, Emergency Cool, Magnetic Field, Neutral Barrier and Stealth Field. The one genuine exception is Pile Bunker, which really does require the weapon worn, because the weapon is the requirement.
The devices, one by one
| Item | id | Price | Used by | |
|---|---|---|---|---|

|
Accelerator | 2800 | 100,000 z | Acceleration |

|
Hovering Booster | 2801 | 100,000 z | Hovering |

|
Suicidal Device | 2802 | 500,000 z | Self Destruction |

|
Shape Shifter | 2803 | 100,000 z | Shape Shift |

|
Cooling Device | 2804 | 100,000 z | Emergency Cool (−45) |

|
High Quality Cooler | 2809 | upgrade, 2,000,000 z | Emergency Cool (−75) |

|
Special Cooler | 2810 | upgrade, 4,000,000 z | Emergency Cool (−105) |

|
Magnetic Field Generator | 2805 | 100,000 z | Magnetic Field |

|
Barrier Builder | 2806 | 150,000 z | Neutral Barrier |

|
Camouflage Generator | 2808 | 250,000 z | Stealth Field |

|
Repair Kit | 2807 | 200,000 z | Repair |

|
Flame Thrower | 2139 | 20,000 z | Flame Launcher |
The two good coolers are not for sale: they are traded up at the Mado Gear Armorer, "Upgrade Cooling Device", handing over the previous one. All these devices weigh a lot: the Barrier Builder alone is 800 weight.
Two places take it off you by force: the Turbo Track in Aldebaran shuts it down on entry — it warns you and sends you back outside if you insist — and any job change deletes it. Everything else — dying, changing maps, logging out — leaves it alone.
See also The Mechanic is two classes in one, and only seven skills work on foot The Magic Gear heats up when you GET HIT, not when you shoot The four passives: two work always and two only while mounted Acceleration, Hovering and the two slides: seven cells that work even inside a castle Adrenaline Rush gives ASPD based on your AGI, and the "advanced" version gives less
Every guide says the same thing: that using Magic Gear skills heats the engine and that is why you need to cool it. On this emulator that is false. There are exactly two places in the whole codebase that touch the heat counter, and neither of them is an attack skill.
The whole formula
Every time you take a hit that deals damage while wearing the Magic Gear:
heat += 3 if the attacker's weapon element is fire, heat += 1 in every other case.
It is checked after all reductions are applied: if the blow ends up at 0 damage, it does not heat. And it is one point per blow taken, not per hit: a seven-hit skill adds 1, exactly like a normal attack.
The counter drains on its own at 1 point per second, and it is hard-capped at 1,000. While it stays below the threshold nothing at all happens: no penalty, no warning, no danger icon.
Mainframe Restructure sets the threshold
| Mainframe Restructure | Heat threshold | Blows until it burns | Extra DEF mounted |
|---|---|---|---|
| Not learned | 150 | 151 | — |
| 1 | 200 | 201 | +40 |
| 2 | 280 | 281 | +60 |
| 3 | 360 | 361 | +80 |
| 4 | 450 | 451 | +100 |
The "blows until it burns" column is the worst case: no pauses and no fire involved. Against fire enemies the threshold arrives three times sooner.
What happens when it trips
It burns 1% of your HP per second
The overheat status subtracts max HP ÷ 100 every 975 milliseconds. It is not damage you can reduce: it is a direct subtraction from your HP.
The one good part: it cannot kill you. If the subtraction would take your last HP, the engine trims it to leave you at exactly 1 HP. It leaves you dying, not dead.
And it does not stop below the threshold
Here is the big trap. When you cross the threshold the engine sets a flag, and that flag is never cleared again. Dropping back below the threshold turns nothing off.
It keeps burning until the counter reaches zero, which at one point per second is as many seconds as you have heat stored. With 451 points that is seven and a half minutes of burning 1% per second.
A worked example
A Mechanic with Mainframe Restructure 4 (threshold 450) and 60,000 HP. A long dungeon stretch: 500 blows taken over four minutes, 60 of them fire.
Heat generated: 440 × 1 + 60 × 3 = 620. Cooled over those 240 seconds: 240. Net heat: 380. No burn.
The same 500 blows in two minutes: 620 − 120 = 500, crosses the 450 threshold and starts burning. And it keeps burning for 500 seconds: 8 minutes 20 seconds, roughly 500 ticks of 600 HP. Reaching 1 HP is a two-minute affair.
The two ways to put it out
Emergency Cool
Subtracts 45, 75 or 105 heat points in one go, depending on which cooler you carry in your bag. It costs 20 SP, 1 Magic Gear Fuel, half a second of after-cast delay and a 5 second cooldown.
And it only puts the fire out if it leaves the counter at exactly zero. Subtracting 105 from a counter of 400 leaves you at 295 and still burning. Once past the threshold you need four casts in a row to get from 400 to 0, with 5 seconds of cooldown between each.
Dismounting and mounting again
Mounting the Magic Gear ends both overheat statuses at once, flag included. The counter goes back to zero, free and instantly.
It is objectively better than Emergency Cool for putting out a big fire. The price is everything else that ends when you dismount: Acceleration, Hovering, Shape Shift, Magnetic Field, and whatever Neutral Barrier or Stealth Field you had planted.
The cheap-cooler trap
The engine walks the three coolers in order — Cooling Device, High Quality Cooler, Special Cooler — and keeps the first one it finds in your bag. Not the best one.
If you carry a Special Cooler worth 105 and also, for whatever reason, a 100,000 z Cooling Device in your pocket, your Emergency Cool subtracts 45. The Mado Gear Armorer's upgrade consumes the old one, so it normally never happens; it happens the day you buy a "spare".
Overheat cannot be dispelled by anyone: it is flagged as non-dispellable, Clearance and Banishing Buster do not touch it, and it is not saved on logout. And since it is triggered by taking hits, the build that suffers it most is not the one that shoots most but the one that tanks most — which, in a mounted Mechanic with Mainframe Restructure 4 and +100 DEF, is usually the same person.
See also The Magic Gear wipes your smith buffs when you mount, and at License 1 you move slower than on foot The four passives: two work always and two only while mounted Shape Shift changes your armour element and drops it to level 1
The Mechanic has four passives and none of the four behaves the way its description says. Two give things the skill window never mentions, and the other two gate half the tree.
Mado License — max 5
It is the key to the Magic Gear: without it you cannot mount, and its level decides how fast you move.
+15 ATK per level, and that attack applies whether you are mounted or not.
It is written into the mastery function, the same one where Axe Mastery and Weapon Research live, and it never checks the Magic Gear. At level 5 that is +75 permanent ATK for any Mechanic, even one who never plans to mount.
It is mastery attack: it goes in raw, with no element and no size or race modifier.
Mainframe Restructure — max 4
It does three different things and all three matter:
+100 DEF at level 4 is more than almost any armour in the game gives. This is the passive that turns a mounted Mechanic into a tank.
Axe Training — max 10
With an axe, one-handed or two-handed: +5 ATK and +3 HIT per level.
With a mace, one-handed or two-handed: +4 ATK and +2 HIT per level.
The mace half is nowhere in the client description, and it is what makes the Pile Bunker playable, since that is a mace-type weapon: at level 10 it is +40 ATK and +20 HIT that a Magic Gear Mechanic was throwing away for not reading the code.
| Axe Training | Axe: ATK | Axe: HIT | Mace: ATK | Mace: HIT |
|---|---|---|---|---|
| 1 | +5 | +3 | +4 | +2 |
| 3 | +15 | +9 | +12 | +6 |
| 5 | +25 | +15 | +20 | +10 |
| 7 | +35 | +21 | +28 | +14 |
| 10 | +50 | +30 | +40 | +20 |
It stacks with the Alchemist's Axe Mastery if you inherited it, which adds another +3 per level with axes only. With any other weapon — sword, book, bow — Axe Training does nothing.
Research Fire/Earth — max 5
Against fire or earth element targets, and only against them:
+10 ATK per level when you hit them, and +10 VIT-based DEF per level when they hit you.
The defensive half only counts against monsters: against players the engine never even looks at it. The offensive half works against everything, players included.
At level 5 that is +50 ATK and +50 VIT-based DEF against half of Thanatos Tower, all of Magma Dungeon, the golems and a good chunk of Einbroch. It is a niche passive that is worth a lot inside its niche.
Research Fire/Earth is also the prerequisite for both turrets and for Magma Eruption, so half the inventor branch goes through it whether or not the elemental bonus interests you.
See also The Magic Gear wipes your smith buffs when you mount, and at License 1 you move slower than on foot The Magic Gear heats up when you GET HIT, not when you shoot Axe Boomerang: the table the weight formula was missing Weaponry Research raises your accuracy by 2 % per level, and that percentage never shows in the status window
Boost Knuckle fires the Magic Gear's fist at range: 1 physical hit with your weapon's element, range 11, no splash and no side effect. It is the first skill Mado License unlocks and the most used one, because it is the only skill in the mounted half that consumes no item at all.
The whole formula
(260% × level + DEX) × base level ÷ 100
DEX goes in as percentage points, one for one: 120 DEX is +120% ratio. The base level multiplier only applies from level 100 up; below that, the ratio stays as it is.
| Level | Base ratio | At DEX 120 | Cast | SP | Fuel |
|---|---|---|---|---|---|
| 1 | 260% | 380% | 0.2 s | 5 | — |
| 2 | 520% | 640% | 0.2 s | 10 | — |
| 3 | 780% | 900% | 0.2 s | 15 | — |
| 4 | 1,040% | 1,160% | 0.2 s | 20 | — |
| 5 | 1,300% | 1,420% | 0.2 s | 25 | — |
The 200 ms cast is variable: it shrinks with DEX and with cast reduction, and there is no fixed cast component. It has no cooldown and no after-cast delay: the only limit is your attack speed. And the cast is not interrupted by taking damage.
A worked example
Level 5, DEX 120, base level 175:
(260 × 5) + 120 = 1,420% → × 175 ÷ 100 = 2,485% in one hit, at eleven cells, for 25 SP.
How you use it
It is the filler shot. No cooldown, no items and range 11 — longer than any bow — so it is what you fire between one Arm Cannon and the next while that one's cooldown runs.
Since it hits with your weapon's element, an elemental card in the weapon changes the whole shot's element.
The traps
ABR Dual Cannon status active, the engine gives it 2 hits instead of 1 — and the damage doubles, it is not split.
The code's own comment next to the DEX term says "we do not know where this bonus comes from". It comes from there, it works, and at DEX 120 it is worth more than half a skill level for free to any Mechanic with DEX — which is all of them.
See also Vulcan Arm hits a 5×5 at thirteen cells and burns a 12 z bullet Arm Cannon never misses and the cannon ball sets its element The Magic Gear wipes your smith buffs when you mount, and at License 1 you move slower than on foot
Pile Bunker is a melee blow at range 3, one hit, with your weapon's element. Its damage per second is the lowest in the class — two seconds of after-cast delay and five of cooldown — and its value is not there: it is in what it takes away from the target.
The whole formula
(300% + 100% × level + STR) × base level ÷ 100
STR goes in as percentage points, one for one, exactly like DEX in Boost Knuckle.
And the formula that matters
Chance to strip the buffs: 25% + 15% × level.
Level 1: 40%. Level 2: 55%. Level 3: 70%. The roll happens once, and if it lands, all eleven fall at once: you do not pick one.
The eleven buffs it strips
Kyrie Eleison
Assumptio
Steel Body
Guard Change (Sura)
Guard Revitalize (Sura)
Auto Guard
Reflect Damage
Defender
Prestige (Royal Guard)
Banding (Royal Guard)
Millennium Shield
That is the complete defensive kit of the Royal Guard, the Sura and the priest. No other skill in the game strips all eleven in one blow, and it is not a dispel: nothing that protects against dispel stops it, because the engine ends each status directly.
| Level | Base ratio | At STR 120 | Strip | Delay | Cooldown | SP |
|---|---|---|---|---|---|---|
| 1 | 400% | 520% | 40% | 2.0 s | 5 s | 50 |
| 2 | 500% | 620% | 55% | 2.0 s | 5 s | 50 |
| 3 | 600% | 720% | 70% | 2.0 s | 5 s | 50 |
It has no cast time: it fires instantly. SP is fixed across all three levels.
The trap: you must have the weapon equipped, and it is a mace
This is the only Mechanic skill whose equipment requirement is genuinely checked as equipment. The engine demands you have one of these four worn:
Pile Bunker (1549), Pile Bunker S (16030), Pile Bunker P (16031) or Pile Bunker T (16032).
All four are maces, not axes. That means Axe Boomerang and Axe Tornado stop being castable while you wear one — both require an axe — and that your Axe Training gives you the mace column: +4 ATK and +2 HIT per level instead of +5 and +3.
A worked example
Level 3, STR 120, base level 175, against a Royal Guard with Prestige, Banding and Auto Guard up:
Damage: (300 + 300 + 120) = 720% → × 175 ÷ 100 = 1,260%.
And a 70% chance he loses all three at once. Every five seconds.
The strip is applied after the blow and only if the blow connects: this is an ordinary weapon skill, so flee and anything that nullifies the damage nullify the whole thing, strip included. At range 3 it counts as melee — the engine marks anything beyond 3 cells as ranged — so neither Pneuma nor Neutral Barrier stops it, while Safety Wall does.
See also Boost Knuckle is the only Magic Gear skill that costs nothing but SP The four passives: two work always and two only while mounted The Magic Gear wipes your smith buffs when you mount, and at License 1 you move slower than on foot
Vulcan Arm is the Magic Gear's machine gun: 1 physical hit in a 5×5 centred on the target, with your weapon's element and range 13. Nothing in the game shoots further.
The whole formula
(230% × level + DEX) × base level ÷ 100
That ratio applies to each target inside the 5×5; it is not divided among them.
| Level | Base ratio | At DEX 120 | Area | Cast | Delay | SP | Ammo |
|---|---|---|---|---|---|---|---|
| 1 | 230% | 350% | 5×5 | 0.2 s | 0.1 s | 9 | 1 bullet |
| 2 | 460% | 580% | 5×5 | 0.2 s | 0.1 s | 12 | 1 bullet |
| 3 | 690% | 810% | 5×5 | 0.2 s | 0.1 s | 15 | 1 bullet |
The ammunition does not go in the arrow slot
It burns 1 Vulcan Bullet (id 6145) per shot, and the bullet is taken from your inventory: it is not equipped in the ammunition slot and it does not change the shot's element.
It costs 12 z at the Black Marketeer and weighs 1. It is by far the cheapest area attack in the game: three bullets cost less than one Fly Wing.
It shoots traps
It carries the TargetTrap flag: Hunter traps, Ranger traps and anyone else's are valid targets for the splash.
At range 13 with a 5×5 splash, it is the cleanest way a Mechanic has of clearing a minefield without walking into it.
A worked example
Level 3, DEX 120, base level 175, four enemies bunched together:
(230 × 3) + 120 = 810% → × 175 ÷ 100 = 1,417% to each of the four.
Cost of the shot: 15 SP and 12 z. With 0.2 s cast and 0.1 s delay, it is the area skill this class can fire most times per minute.
The traps
Pneuma or Neutral Barrier nullifies it entirely.
ABR Dual Cannon active it becomes 2 hits, doubling the damage.
Just as in Boost Knuckle, the DEX term is marked in the code with a "we do not know where this comes from". It is there, it works, and at DEX 120 it is worth more than half a skill level.
See also Boost Knuckle is the only Magic Gear skill that costs nothing but SP Arm Cannon never misses and the cannon ball sets its element The Magic Gear wipes your smith buffs when you mount, and at License 1 you move slower than on foot
Arm Cannon is the Magic Gear's big gun: 1 physical hit with splash, range 9, which ignores flee and applies defense in the simplified way. It is the highest damage skill in the class and the only one whose element you choose shot by shot.
The whole formula
(400% + 350% × level) × base level ÷ 100
No stat enters the ratio: not STR, not DEX, nothing. Everything your stats contribute enters through your attack, which is what that ratio multiplies.
| Level | Ratio | Area | Variable cast | Fixed cast | Delay | Cooldown | SP |
|---|---|---|---|---|---|---|---|
| 1 | 750% | 3×3 | 1.2 s | 0.50 s | 0.5 s | 0.35 s | 40 |
| 2 | 1,100% | 3×3 | 1.4 s | 0.40 s | 0.5 s | 0.30 s | 45 |
| 3 | 1,450% | 5×5 | 1.6 s | 0.30 s | 0.5 s | 0.25 s | 50 |
| 4 | 1,800% | 5×5 | 1.8 s | 0.20 s | 0.5 s | 0.20 s | 55 |
| 5 | 2,150% | 7×7 | 2.0 s | 0.10 s | 0.5 s | 0.15 s | 60 |
Watch the variable cast column: it grows with level, it does not shrink. The fixed cast drops from 0.5 to 0.1 s, but the variable part goes from 1.2 to 2.0 s. In exchange, the cooldown drops from 0.35 to 0.15 s, which is practically nothing. Variable cast is reduced by DEX; fixed cast only by fixed-cast reduction.
Each shot also burns 1 Magic Gear Fuel and 1 cannon ball. The cast is not interrupted by taking damage.
The element comes from the ball, and the ball is equipped
Unlike the Vulcan Bullet, the cannon ball is carried in the ammunition slot, like an arrow. And if that ball has an element, the whole shot changes element.
And there is a gate that appears in no description: a Mechanic cannot equip a cannon ball while not wearing the Magic Gear. The client answers "can only be used with the Magic Gear" and the equip is rejected.
| Ball | id | ATK | Element | Price | |
|---|---|---|---|---|---|

|
Cannon Ball | 18000 | 100 | Neutral | 30 z |

|
Iron Cannon Ball | 18004 | 250 | Neutral | 80 z |

|
Holy Cannon Ball | 18001 | 120 | Holy | 50 z |

|
Dark Cannon Ball | 18002 | 120 | Shadow | 50 z |

|
Soul Cannon Ball | 18003 | 120 | Ghost | 50 z |

|
Ice Cannon Ball | 18005 | 120 | Water | 50 z |

|
Lightning Cannon Ball | 18006 | 120 | Wind | 50 z |

|
Stone Cannon Ball | 18007 | 120 | Earth | 50 z |

|
Fire Cannon Ball | 18008 | 120 | Fire | 50 z |
All nine are in the Mechanic ammunition market; the first five are also at the Black Marketeer. The Iron Cannon Ball has the most raw attack but stays neutral: against an awkward element, a 120-attack ball with the right element hits far harder than a neutral 250.
A worked example
Level 5, base level 175, five enemies inside the 7×7:
400 + (350 × 5) = 2,150% → × 175 ÷ 100 = 3,762% to each of them, with no chance of missing.
Cost: 60 SP, 375 z of fuel and one ball. The full cycle — 2.1 s of cast, 0.5 of delay, 0.15 of cooldown — comes out to one shot every two and three quarter seconds with no cast reduction.
It is ranged weapon damage, so an enemy Neutral Barrier or Pneuma nullifies it completely despite it ignoring flee. Ignoring flee is not the same as ignoring blocks.
See also Vulcan Arm hits a 5×5 at thirteen cells and burns a 12 z bullet Boost Knuckle is the only Magic Gear skill that costs nothing but SP The Magic Gear wipes your smith buffs when you mount, and at License 1 you move slower than on foot
Flame Launcher spits a jet of flame in a straight line towards the target: it is not an area centred on anyone, it is a 3-cell-wide path running from you to wherever you aim, at range 5. It is physical damage of fire element, always, even if your weapon is a different element.
The whole formula
(300% + 300% × level) × base level ÷ 150
Note the divisor: it is 150, not 100 as in the rest of the class. And it only applies from base level 100 up.
The divisor-150 trap
At base level 99 or below, the multiplier does not apply and you keep the full ratio.
At base level 100, it applies and leaves you at ×0.67: you lose a third of your damage by levelling up.
You do not get back to your level-99 numbers until base level 150.
At skill level 3 and base level 99 the ratio is 1,200%. At base level 100 it drops to 800%. At 150 it is 1,200% again. At 175 it is 1,400%. It is a fifty-level hole and it hits Cold Slower exactly the same way.
| Level | Ratio | At base level 175 | Burning | Duration | Cast | Delay | SP |
|---|---|---|---|---|---|---|---|
| 1 | 600% | 700% | 30% | 7 s | 0.5 + 0.5 s | 1.5 s | 20 |
| 2 | 900% | 1,050% | 40% | 14 s | 1.0 + 0.5 s | 1.0 s | 20 |
| 3 | 1,200% | 1,400% | 50% | 21 s | 1.5 + 0.5 s | 0.5 s | 20 |
The first cast number is variable (reduced by DEX) and the second is fixed. SP is 20 at all three levels. Each burst burns 1 Magic Gear Fuel. The cast is not interrupted by taking damage.
The burn
Every target hit gets a 30, 40 or 50% chance of Burning, and the burn lasts as long as the skill's own duration: 7, 14 or 21 seconds.
That is the longest Burning any class can apply, and it stacks with the fire damage bonus from Research Fire/Earth if the target was already fire or earth.
Five targets maximum
The skill declares 5 instances, and that number is not a cap on planted fires: it is the cap on how many targets the line can touch.
If eight enemies stand in the path, only five take damage, and they are the first five the trace finds going from you towards the target. Aim at the one behind, not at the one on top of you.
A worked example
Level 3, base level 175, three enemies lined up four cells away:
(300 + 900) = 1,200% → × 175 ÷ 150 = 1,400% to each, with a 50% chance of leaving them burning for 21 seconds.
Cost: 20 SP and 375 z. The cycle is 2 s of cast and 0.5 of delay.
The traps
Pneuma and Neutral Barrier stop it.
It can be traced with the official eight-direction area algorithm or with the classic straight path, depending on server configuration; either way, what decides who gets hit is the line between your cell and the target's.
See also Cold Slower tries to freeze you and, if it fails, leaves you Freezing for 40 seconds Arm Cannon never misses and the cannon ball sets its element The Magic Gear wipes your smith buffs when you mount, and at License 1 you move slower than on foot
Cold Slower is Flame Launcher's twin on the other side of the tree: physical damage of water element, but aimed at the ground instead of along a line, with range 7 and an area that grows to 9×9.
The whole formula
(300% + 300% × level) × base level ÷ 150
Same divisor 150 as Flame Launcher, with the same consequence: between base level 100 and 149 the ratio sits below what you had at level 99. At 175 it is 1,400% at skill level 3.
The control: two rolls, not one
On every target hit, the engine rolls in this order:
1. Freeze at 10% × level, lasting 7, 14 or 21 seconds.
2. Only if the freeze did not land, Freezing at 20% + 10% × level, lasting a flat 40 seconds at any level.
So at level 3: a 30% chance to freeze and, out of the remaining 70%, a 50% chance of Freezing. Total chance of applying something: 65%.
| Level | Ratio | At base level 175 | Area | Freeze | Freezing | Cast | Delay | SP |
|---|---|---|---|---|---|---|---|---|
| 1 | 600% | 700% | 5×5 | 10% / 7 s | 30% / 40 s | 1.0 s | 1.0 s | 20 |
| 2 | 900% | 1,050% | 7×7 | 20% / 14 s | 40% / 40 s | 1.0 s | 2.0 s | 20 |
| 3 | 1,200% | 1,400% | 9×9 | 30% / 21 s | 50% / 40 s | 1.0 s | 3.0 s | 20 |
Careful: the after-cast delay grows with level, from 1 to 3 seconds. Taking it to 3 gives you a 9×9 and twice the control, but nails you for three seconds of doing nothing after every cast. The cast is 1 variable second at all three levels and it is not interrupted by taking damage.
A worked example
Level 3, base level 175, six enemies inside the 9×9:
Damage: 1,400% to each.
Expected control: roughly two frozen and another two with Freezing for 40 seconds. Freezing lowers movement and attack speed and raises the water damage they take; frozen targets stop moving but turn into water element level 1.
Cost: 20 SP, 1 Magic Gear Fuel and 1 Liquid Condensed Bullet (id 6147, 125 z). Total: 500 z per cast, the most expensive attack in the class short of Self Destruction.
The traps
TargetTrap flag: the splash also destroys traps on the ground.
Being a ground skill, the area is centred on the cell you marked, not on the enemy. If the target moves while you cast, the ice lands where they were, not where they are.
See also Flame Launcher hits in a straight line, and below base level 150 it hits for LESS Arm Cannon never misses and the cannon ball sets its element The Magic Gear wipes your smith buffs when you mount, and at License 1 you move slower than on foot
The Axe Boomerang formula — and why the axe's weight matters more than the skill level — is covered in full in its own page. This one covers the rest: what changes from level to level, and what the tooltip does not say.
The formula, in short
(250% + 50% × level + axe weight) × base level ÷ 100, in a single physical hit with your weapon's element.
The weight is the one shown on the item page of this site. An axe of weight 700 contributes +700 percentage points on its own; skill level 5 contributes 250.
| Level | Ratio (no weight) | Range | Knockback | Cooldown | SP |
|---|---|---|---|---|---|
| 1 | 300% | 5 | 2 cells | 5.0 s | 25 |
| 2 | 350% | 6 | 3 cells | 4.5 s | 30 |
| 3 | 400% | 7 | 4 cells | 4.0 s | 35 |
| 4 | 450% | 8 | 5 cells | 3.5 s | 40 |
| 5 | 500% | 9 | 6 cells | 3.0 s | 45 |
It has no cast time and no after-cast delay: it fires instantly and the only thing holding it back is the cooldown. With a heavy axe, the 200 percentage points separating level 1 from level 5 are noise next to the weapon's 700; what you actually buy by levelling it is four cells of range and two seconds off the cooldown.
A worked example
Level 5, Doom Slayer (weight 600), base level 175:
250 + 250 + 600 = 1,100% → × 175 ÷ 100 = 1,925% in one hit, at nine cells, every three seconds.
The traps
Pneuma stops it at level 1 and 2 just as it does at level 5.
The cooldown difference between levels 3 and 4 is negligible in practice: 4.0 s versus 3.5 s. If you are short on points, level 3 already gives you range 7 and the bulk of the discount.
See also Axe Boomerang adds the axe weight to the damage percentage Power Swing does not require an axe: it is the only skill in the branch that works with any weapon Axe Tornado splits its damage across six hits: the ratio is the total, not the per-hit figure The four passives: two work always and two only while mounted
Power Swing is a melee blow at range 1, one hit, with your weapon's element. It hangs off Axe Boomerang in the tree, but it does not inherit its weapon requirement: there is no Weapon line at all in the emulator's table for it.
The whole formula
(300% + 100% × level + (STR + DEX) ÷ 2) × base level ÷ 100
The sum of STR and DEX is halved and enters as percentage points. With STR 120 and DEX 120 that is +120; with STR 120 and DEX 60, +90.
| Level | Base ratio | At STR 120 / DEX 120 | Delay | SP |
|---|---|---|---|---|
| 1 | 400% | 520% | 1.0 s | 20 |
| 2 | 500% | 620% | 1.0 s | 22 |
| 3 | 600% | 720% | 1.0 s | 24 |
| 4 | 700% | 820% | 1.0 s | 26 |
| 5 | 800% | 920% | 1.0 s | 28 |
| 6 | 900% | 1,020% | 0.5 s | 30 |
| 7 | 1,000% | 1,120% | 0.5 s | 32 |
| 8 | 1,100% | 1,220% | 0.5 s | 34 |
| 9 | 1,200% | 1,320% | 0.5 s | 36 |
| 10 | 1,300% | 1,420% | 0.5 s | 38 |
No cast time and no cooldown: the only thing between one blow and the next is the after-cast delay, and that halves at level 6. That step, not the damage, is the real reason to go past 5.
The stun
A flat 10% chance of Stun for 2 seconds, and that chance does not scale with level: it is 10 at level 1 and 10 at level 10.
What does scale is the stun's strength for resistance purposes, since the skill level is passed as the status level.
With the Meister's ABR Battle Warrior
If you have the ABR Battle Warrior status up, the engine gives it 2 hits that split the damage and then multiplies the ratio by two.
Net: the same total damage split across two impacts... and then doubled. It is the only Mechanic skill the Meister improves this much.
A worked example
Level 10, STR 120, DEX 120, base level 175:
300 + 1,000 + 120 = 1,420% → × 175 ÷ 100 = 2,485% per blow, every half second, for 38 SP.
That is exactly the same ratio as Boost Knuckle level 5 at DEX 120, but at one cell of range and with no Magic Gear needed.
The traps
Pneuma does not stop it and neither does Neutral Barrier. Safety Wall does.
Axe Training gives you the column of whatever weapon you carry: axe (+5 ATK and +3 HIT per level), mace (+4 and +2) or nothing at all if it is something else.
On many servers this skill occasionally casts an Axe Boomerang by itself. Here it does not: there is not one line in the emulator doing that, and its whole implementation is twelve lines of formula and a stun.
See also Axe Boomerang: the table the weight formula was missing Axe Tornado splits its damage across six hits: the ratio is the total, not the per-hit figure The four passives: two work always and two only while mounted
Axe Tornado spins your axe around you: 6 impacts in an area centred on yourself, with your weapon's element. It is the area skill of the Mechanic's on-foot half, and the only skill in the class whose damage depends on VIT.
The whole formula
(200% + 180% × level + 2 × VIT) × base level ÷ 100, and with the Meister's Axe Stomp status active, +380 points before the level multiplier.
That ratio is the total for the blow. The engine divides it by 6 and then multiplies it back by 6: the six impacts you see on screen share one damage packet, they do not multiply it.
Why that matters so much
Splitting into six impacts means the target's flat defense is subtracted six times, once per impact. Against high-defense enemies Axe Tornado performs far worse than its ratio suggests; against soft, numerous enemies it performs exactly as advertised.
It is the same mechanic Triple Attack and Finger Offensive use, and it is why a split 1,500% can hit for less than a single-hit 900%.
| Level | Total ratio | At VIT 100 | Area | Cooldown | Delay | SP |
|---|---|---|---|---|---|---|
| 1 | 380% | 580% | 5×5 | 4.0 s | 0.5 s | 45 |
| 2 | 560% | 760% | 5×5 | 3.5 s | 0.5 s | 45 |
| 3 | 740% | 940% | 7×7 | 3.0 s | 0.5 s | 45 |
| 4 | 920% | 1,120% | 7×7 | 2.5 s | 0.5 s | 45 |
| 5 | 1,100% | 1,300% | 7×7 | 2.0 s | 0.5 s | 45 |
SP is 45 at all five levels and there is no cast time. The area stops growing at 7×7 from level 3 on: from 3 to 5 all you buy is one second off the cooldown and 360 percentage points.
A worked example
Level 5, VIT 100, base level 175, with Axe Stomp active:
200 + 900 + 200 + 380 = 1,680% → × 175 ÷ 100 = 2,940% split across six impacts, to everything in the 7×7, every two seconds.
Without Axe Stomp, 2,275%. The 380 points the Meister contributes are worth more than two skill levels.
The traps
TargetTrap: the spin also destroys any ground traps around you.
When the spin touches nobody, the engine still draws the effect on your own cell. That is purely visual: you do not damage yourself.
See also Axe Boomerang: the table the weight formula was missing Power Swing does not require an axe: it is the only skill in the branch that works with any weapon Magma Eruption hits 20 times with FIXED damage: 36,000 points that depend on nothing you own
Magma Eruption is two skills in one: an immediate physical slam in a 7×7 around the marked cell, and a lava zone that lands there half a second later and burns for five seconds. The two halves are calculated in completely different ways.
Half one: the slam
450% + 50% × level physical damage with your weapon's element, in a 7×7.
And here is the odd part: it carries no base level multiplier. It is the only damage skill in the class that does not scale with your level: 700% at level 5 is 700% at base level 99 and at base level 275.
On top of that, a 90% stun for 4.5 seconds on everything it touches. It does not rise or fall with level: it is 90 from level 1.
Half two: the eruption
Fixed damage, of the miscellaneous type, which ignores flee and defense cards:
800 + 200 × level points of damage per hit.
And the engine applies it twice per tick: there is one line that fires it and another right below that fires it again when the caster is a player. With one tick every 500 ms for 5 seconds, that comes to 20 hits per target.
| Level | Slam | Stun | Per hit | Eruption total | Burning | Cooldown | SP |
|---|---|---|---|---|---|---|---|
| 1 | 500% | 90% / 4.5 s | 1,000 | 20,000 | 10% / 18 s | 10 s | 60 |
| 2 | 550% | 90% / 4.5 s | 1,200 | 24,000 | 20% / 18 s | 9 s | 70 |
| 3 | 600% | 90% / 4.5 s | 1,400 | 28,000 | 30% / 18 s | 8 s | 80 |
| 4 | 650% | 90% / 4.5 s | 1,600 | 32,000 | 40% / 18 s | 7 s | 90 |
| 5 | 700% | 90% / 4.5 s | 1,800 | 36,000 | 50% / 18 s | 6 s | 100 |
The "eruption total" column is what a target standing in the lava for the full five seconds takes. The burn chance is rolled on each of the 20 hits, so at level 5 catching fire is practically guaranteed. Cast is 1 variable second, delay 0.5 s, and it is not interrupted by taking damage.
A worked example
Level 5, base level 175, against a monster with 40,000 HP and 300 defense:
The slam does a 700% that the defense cuts down heavily. The eruption does 36,000 clean points, because card defense does not count and neither does flee.
Against that monster, the "small" half of the skill does more damage than the big half, and it depends on not a single one of your stats.
The traps
The range is 1
It is a ground skill, yes, but you can only mark a cell adjacent to your own. In practice it is a melee skill with a big area, not a ranged bomb.
And since the 7×7 is centred on the marked cell and you are standing next to it, you are always inside the area. It does not matter: the lava only affects enemies.
Three eruptions maximum
The skill declares 3 instances and the server has the per-player ground-skill limit enabled. The fourth is refused.
With a 5-second duration and a 6-second cooldown at level 5, you could not have three up at once if you tried. The cap never gets in the way.
Reproduce, and when a monster uses it the eruption lands a single hit per tick instead of two.
The 36,000 fixed points of a level 5 eruption do not grow with gear, base level or STR. It is the only Mechanic damage source that performs exactly the same on the day it is learned and a thousand hours later — and it is why a freshly promoted Mechanic can already kill things it should not.
See also The four passives: two work always and two only while mounted Axe Tornado splits its damage across six hits: the ratio is the total, not the per-hit figure The turrets: Magic Decoy charges you TWO elemental points for one
FAW — Fixed Assault Weapons — are the Mechanic's three engineering skills: two that plant a machine on the ground and one that takes them apart. None of the three needs the Magic Gear, and all three hang off Research Fire/Earth.
What all three share
Two tools in your bag
Both Silver Sniper and Magic Decoy require carrying a Mini Furnace (id 612, 150 z) and an Oridecon Hammer (id 615, 5,000 z).
They are not consumed. They are declared with quantity zero: the engine only checks they are in your inventory. Buy them once and forget them.
Two per map, per Mechanic
The cap is counted per map, per owner and per family. Two Silver Snipers, and separately, two Magic Decoys.
The decoy's four elements share the same cap of two: you cannot keep one of each. And the engine refuses the third after you have already started casting it.
FAW — Silver Sniper
Plants an auto-firing turret with range 9. It is a level 100 monster with no intelligence beyond shooting whatever comes near, and with fixed stats: the skill level does not change a single point of its damage.
The turret, in numbers
4,500 HP, 390 attack, 80 defense, 10 magic defense, range 9, neutral level 1 element, formless race, medium size.
It attacks every 504 ms. With 80 defense it holds up well against weak physical hits, and with 10 magic defense it melts to any mage. It also has one scripted response: when its owner gets attacked, it retaliates.
| Level | Duration | Fixed cast | SP | Materials |
|---|---|---|---|---|
| 1 | 20 s | 1.8 s | 25 | 1 Iron + 2 Steel |
| 2 | 30 s | 1.6 s | 30 | 1 Iron + 2 Steel |
| 3 | 40 s | 1.4 s | 35 | 1 Iron + 2 Steel |
| 4 | 50 s | 1.2 s | 40 | 1 Iron + 2 Steel |
| 5 | 60 s | 1.0 s | 45 | 1 Iron + 2 Steel |
All the level buys is duration and cast time. The cast is fixed: DEX does not shorten it, only fixed-cast reduction does. The materials are Iron (100 z) and Steel (1,000 z): 2,100 z per turret, and it must be planted at most two cells from you.
FAW — Magic Decoy
The magic decoy is the same idea with a spellcaster inside. When you cast it, the client opens a list of the elemental points you are carrying, and the one you pick sets the decoy's element.
| Elemental point | id | Decoy | Spell it casts | |
|---|---|---|---|---|

|
Scarlet Point | 6360 | Fire | Fire Bolt level 10 |

|
Indigo Point | 6361 | Water | Cold Bolt level 10 |

|
Yellow Wish Point | 6362 | Wind | Lightning Bolt level 10 |

|
Lime Green Point | 6363 | Earth | Earth Spike level 10 |
The trap: the elemental point is charged TWICE
The function that plants the decoy deletes the elemental point from your bag twice: once inside the check that you have it, and again on the very next line, with the decoy already going up.
The result is that every Magic Decoy costs you 2 elemental points, not 1, whatever the description says and however much the inventory window makes it look like only one goes. This is a base emulator bug, not a change made on this server, and it bites hardest when you are running short on points.
The decoy, in numbers
2,500 HP, 195 attack, 16 defense, 60 magic defense, range 7, medium size, formless race, whatever element you gave it, at level 1.
It casts its level 10 bolt at a random nearby target, with 0.8 s of cast and 3.5 seconds between casts. It is the Silver Sniper's mirror image: less HP and less physical defense, but 60 magic defense against the turret's 10.
| Level | Duration | Fixed cast | SP | Materials |
|---|---|---|---|---|
| 1 | 20 s | 1.8 s | 40 | 2 Iron + 1 Brigan + 2 points |
| 2 | 30 s | 1.6 s | 45 | 2 Iron + 1 Brigan + 2 points |
| 3 | 40 s | 1.4 s | 50 | 2 Iron + 1 Brigan + 2 points |
| 4 | 50 s | 1.2 s | 55 | 2 Iron + 1 Brigan + 2 points |
| 5 | 60 s | 1.0 s | 60 | 2 Iron + 1 Brigan + 2 points |
Brigan (id 7054) costs 746 z. With the 2 Iron and the two elemental points, each decoy comes to about 1,150 z.
FAW Removal
What it actually does
It instantly kills any machine whose monster id falls between the Silver Sniper's and the wind Magic Decoy's. No roll, no damage, no saving throw.
And it does not check whose it is: it kills yours exactly as readily as the enemy's. It costs 15 SP, 1 Monkey Wrench (id 6186, 500 z), 2 seconds of cast, and has range 5.
The traps, for all three
FAW Removal does get interrupted: its 2 seconds are a normal cast.
The @autoplay AI runs these two behind a dedicated gate that counts the planted turrets before deciding: without it, the bot tried to plant a third one every tick for the sixty seconds the second one lasted, burning the player's iron and steel. FAW Removal, by contrast, is deliberately outside the AI catalogue: aimed at our own, it deletes them.
See also The four passives: two work always and two only while mounted Magma Eruption hits 20 times with FIXED damage: 36,000 points that depend on nothing you own The Mechanic is two classes in one, and only seven skills work on foot
Repair is the Mechanic's only healing skill, and it has one condition that puts it out of play 95% of the time: the target must be a player wearing the Magic Gear. Anything else — a party member on foot, a homunculus, a mercenary, a monster — returns "you cannot use that on that target" and heals nothing.
The whole formula
target's base max HP × percentage ÷ 100, with the percentage taken from a hand-written table.
And the HP it uses is the stored base value, not the one on the bar. That is the number produced by level, VIT, passive skills and equipment HP bonuses — but without any increase coming from temporary statuses: no VIT food, no Steel Body, no percentage HP buffs.
| Level | Heals | Range | Cast | Delay | SP | Consumes |
|---|---|---|---|---|---|---|
| 1 | 4% | 5 | 0.2 s | 1.0 s | 25 | 1 Repair A |
| 2 | 7% | 6 | 0.3 s | 1.0 s | 30 | 1 Repair A |
| 3 | 13% | 7 | 0.4 s | 1.0 s | 35 | 1 Repair B |
| 4 | 17% | 8 | 0.5 s | 1.0 s | 40 | 1 Repair B |
| 5 | 23% | 9 | 0.6 s | 1.0 s | 45 | 1 Repair C |
The big jump sits between level 2 and 3: from 7% to 13%, almost double for one point. And from 4 to 5, from 17 to 23. The curve is not linear anywhere.
The two-item trap
The skill asks for two things at once and only consumes one:
1. The Repair Kit (id 2807, 200,000 z) must be in your bag, and it is never consumed: it is declared with quantity zero. Buy it once.
2. The real consumable is the level's ampoule: Repair A (200 z) for levels 1 and 2, Repair B (500 z) for 3 and 4, and Repair C (1,375 z) for 5.
If either is missing, the message names whichever is missing, and since the kit is never consumed, the one that usually runs out is the ampoule. All three are sold by the Black Marketeer.
A worked example
Level 5 on a fellow Mechanic with 80,000 base max HP:
80,000 × 23 ÷ 100 = 18,400 HP, for 45 SP and 1,375 z.
If that ally has a buff raising their HP by 25%, their bar will read 100,000 but Repair will still heal 18,400: the percentage applies to the 80,000 base, not to the 100,000 you can see.
The traps
At level 5 it heals 23% every second or so for 1,375 z. On a Mechanic who is burning from overheat — losing 1% per second — a single Repair buys twenty-three seconds of fire.
See also The Magic Gear wipes your smith buffs when you mount, and at License 1 you move slower than on foot The Magic Gear heats up when you GET HIT, not when you shoot The four passives: two work always and two only while mounted
Analyze is the only defense debuff the class has. You aim it at an enemy 9 cells away, it deals no damage, and if it lands it cuts all four defenses at once for twenty seconds.
The two formulas
Chance to land: 30% + 12% × level.
Reduction, if it lands: 14% × level off each of these four: DEF, VIT-based DEF, MDEF and INT-based MDEF.
It is a percentage reduction, not a flat one: it removes 42% of whatever they have, be it 100 or 500. The better armoured the target, the more it takes in absolute terms.
| Level | Chance | Reduction | Duration | Fixed cast | Delay | SP | Fuel |
|---|---|---|---|---|---|---|---|
| 1 | 42% | −14% | 20 s | 1.0 s | 1.0 s | 30 | 1 |
| 2 | 54% | −28% | 20 s | 1.0 s | 1.0 s | 30 | 1 |
| 3 | 66% | −42% | 20 s | 1.0 s | 1.0 s | 30 | 1 |
SP, duration and fuel do not change: all three levels cost 30 SP and 1 Magic Gear Fuel. The cast is fixed and DEX does not shorten it: it is flagged to ignore dexterity, statuses and item bonuses.
A worked example
Level 3 against a boss with 350 defense and 200 magic defense:
If it lands — two attempts out of three — it drops to 203 defense and 116 magic defense for twenty seconds, and the same for both of its stat-derived defenses.
Real cost: 30 SP and 375 z per attempt, and at 66% you need 1.5 attempts on average. About 560 z per application.
The traps
Clearance or Banishing Buster: once applied, it is a full twenty seconds.
Because it is a percentage reduction on all four defenses, its value rises with the target's toughness: against something with 50 defense you barely notice, and against a 400-defense boss it is worth more than anything else a Mechanic can do with 30 SP.
See also Infrared Scan uncovers everything hidden in a 15×15 and strips 30% flee Arm Cannon never misses and the cannon ball sets its element The Magic Gear wipes your smith buffs when you mount, and at License 1 you move slower than on foot
Infrared Scan sweeps an area of 15×15 centred on you — seven cells in every direction — and does two things to every enemy it finds inside: it tears off their concealment and leaves them with a flee debuff.
What it does exactly
1. It ends, with no roll involved, these five statuses: Hiding, Cloaking, Cloaking Exceed, Camouflage and New Moon.
2. Against Shadow Form there is a roll: 100% − (10% × the Shadow Form's level). Against a level 5 Shadow Form it breaks it 50% of the time; against a level 1, 90%.
3. It applies the debuff at 100% chance: −30% flee for 3 seconds.
| Level | Area | Flee | Duration | Cooldown | Delay | SP | Fuel |
|---|---|---|---|---|---|---|---|
| 1 (only) | 15×15 | −30% | 3 s | 3 s | 0.5 s | 45 | — |
It has a single level, fires instantly — no cast time — and burns no fuel: together with Boost Knuckle and Pile Bunker, it is one of the three skills in the mounted half that cost SP and nothing else.
A worked example
A Guillotine Cross is circling you under Cloaking Exceed, and a level 3 Shadow Chaser has Shadow Form up on one of his allies.
One Infrared Scan: the assassin appears guaranteed, and the Shadow Form breaks at 70%. Both are also left with 30% less flee for three seconds, which is exactly how long it takes to set up an Arm Cannon.
Cost: 45 SP, repeatable every three seconds.
The traps
It is the least glamorous skill in the tree and the one that decides the most war fights: during a castle assault, a Mechanic parked at the gate casting Infrared Scan every three seconds means there is not a single hidden assassin within fifteen cells.
See also Analyze strips up to 42% of all four defenses, and it only lands two times out of three Stealth Field hides everyone except you — and costs you 3% of your SP every few seconds The Magic Gear wipes your smith buffs when you mount, and at License 1 you move slower than on foot
Magnetic Field generates a magnetic field in a 5×5 centred on you that does two things at once to every enemy inside: it stops them moving and it drains their SP. It deals no damage.
The whole formula
Root: lasts 4, 6 or 8 seconds by level, applied at 100% chance.
Drain: 50 SP per second, flat, at any level. And if the victim does not have 50 SP to pay, the engine sets their SP to zero outright.
The root is applied at cast time to whoever is inside the 5×5: it is not a persistent zone. Running out does not remove it — precisely because you cannot — but walking in afterwards does not apply it either.
| Level | Area | Root | Drain | Cooldown | SP | Fuel |
|---|---|---|---|---|---|---|
| 1 | 5×5 | 4 s | 50/s | 20 s | 60 | 2 |
| 2 | 5×5 | 6 s | 50/s | 15 s | 70 | 2 |
| 3 | 5×5 | 8 s | 50/s | 10 s | 80 | 2 |
The area does not grow with level. What you buy is double the root and half the cooldown: at level 3 that is 8 seconds of root every 10, so it is up 80% of the time. No cast time: it fires instantly.
The trap: in combat zones you apply it to yourself
The engine has a line written specifically for this: on player-versus-player maps — PvP, castle sieges, battlegrounds — the caster receives the status too. On a normal map, they do not.
The good news is that it does not root you: the movement restriction checks who cast it and lets you through. The bad news is that the drain does charge you: 50 SP per second for the 4, 6 or 8 seconds it lasts. At level 3 that is 80 SP to cast plus 400 of drain: 480 SP every 10 seconds.
Another trap: wind breaks it
Any wind element hit taken by a rooted target ends their Magnetic Field instantly. And the comment sitting next to that line in the code says "freed if it receives earth damage", which is exactly the wrong element.
In other words: if your party has someone with wind skills, they are the one setting free everyone you just rooted.
The other four gates
Manhole and Dimension Door: a rooted target cannot cast them.
A worked example
Level 3 in a castle, four enemies inside the 5×5:
All four are nailed down for 8 seconds and lose 400 SP each. You lose 80 casting it and another 400 to the drain that also hits you.
Eight seconds are two full Arm Cannon shots on targets that cannot move. And 400 SP gone is, for a mage, one missing big spell.
This is a skill designed for war and only for war: in a dungeon the monsters already come to you, they have no SP worth draining, and half the interesting ones are bosses that ignore it.
See also Neutral Barrier nullifies ALL ranged damage — including for the people standing in it with you Acceleration, Hovering and the two slides: seven cells that work even inside a castle The Magic Gear wipes your smith buffs when you mount, and at License 1 you move slower than on foot
Neutral Barrier plants a 5×5 zone where you stand that does two things to everyone inside: it raises their defense and it completely nullifies ranged physical damage.
The whole formula
Defensive bonus: +(10 + 5 × level)% to defense and magic defense. That is +15%, +20% or +25%.
Block: any attack flagged as ranged and non-magical is turned into a miss. It is not a reduction: it is an absolute zero.
The engine flags as "ranged" any skill whose range exceeds 3 cells, plus all ranged weapon attacks. Magic passes through the barrier without noticing it.
What it stops and what it does not
Nullified
Double Strafe, Arrow Storm, Aimed Bolt, Sharp Shooting…
Not nullified
| Level | Area | Defense | Duration | Cooldown | SP | Fuel |
|---|---|---|---|---|---|---|
| 1 | 5×5 | +15% | 30 s | 20 s | 80 | 1 |
| 2 | 5×5 | +20% | 45 s | 15 s | 90 | 1 |
| 3 | 5×5 | +25% | 60 s | 10 s | 100 | 1 |
At level 3 it lasts 60 seconds with a 10-second cooldown: it can be kept up permanently for 100 SP and 375 z a minute. It fires instantly, with no cast time.
The big trap: the barrier has no team
The zone does not declare who it affects, and when that happens the engine uses its default value, which is everyone. Allies, strangers and enemies.
An enemy who walks into your Neutral Barrier gets the same immunity to ranged damage and the same +25% defense you do. Defending a gate, planting it in the wrong spot protects whoever is coming through.
The second trap: recasting switches it off
If you cast it while it is already active, the engine deletes the field and charges you nothing: no SP, no fuel. It is a toggle, not a refresh.
That is exactly what you want when you realise you have been protecting the enemy, and exactly what you do not want when you meant to renew it. To move it: switch it off, walk, switch it on again — two presses.
A worked example
Level 3, defending an emperium against a group of Rangers:
Every Arrow Storm landing inside the 5×5 does zero. Not reduced: zero. The other side's mages still do full damage, and so does anyone who walks in to melee you.
And that Rune Knight who has come in to kill you is, while he stands on top of you, immune to your allies' arrows.
Everything else worth knowing
It is by a wide margin the strongest defensive skill in existence against a team of shooters, and the easiest one to hand to the enemy. The practical rule is to always plant it behind the line, never on it.
See also Stealth Field hides everyone except you — and costs you 3% of your SP every few seconds Magnetic Field nails enemies in place and drains 50 SP per second from them The Magic Gear wipes your smith buffs when you mount, and at License 1 you move slower than on foot
Stealth Field plants a 5×5 zone where you stand that hides whoever is inside it. And it has one hand-written exception in the engine that flips the whole skill on its head:
The exception
When applying the effect, the engine checks whether the character on that cell is the caster and, if so, skips the concealment. The comment right beside it reads, literally, "doesn't work on self".
You pay for the skill, you pay the drain, you have to stay put so the field does not fall… and you are the only one who stays visible. It is a support skill dressed up as an escape skill.
The two formulas
Ongoing cost: 3% of the caster's max SP every 3, 4 or 5 seconds by level (2 seconds plus 1 per level). If at any point you cannot pay, the field collapses.
Effect on those inside: concealment, and −20% movement speed.
That −20% speed does not affect anyone riding a Magic Gear: for mounted characters the engine computes speed through a separate branch that ignores every other modifier.
| Level | Area | Duration | Drain | Max SP spent | Cooldown | SP | Fuel |
|---|---|---|---|---|---|---|---|
| 1 | 5×5 | 15 s | 3% every 3 s | 15% | 20 s | 80 | 2 |
| 2 | 5×5 | 20 s | 3% every 4 s | 15% | 15 s | 100 | 2 |
| 3 | 5×5 | 25 s | 3% every 5 s | 15% | 10 s | 120 | 2 |
The "max SP spent" column is what the drain takes if you hold the field to the end: at all three levels it comes to 15% of max SP, because the number of ticks is always five. What the level buys is ten more seconds of field and half the cooldown: from 20 s down to 10 s. It fires instantly.
A worked example
Level 3 with 4,000 max SP, hiding four allies:
Cost to cast: 120 SP and 750 z of fuel. Drain across the 25 seconds: 5 ticks × 120 = 600 SP. Total: 720 SP for 25 seconds of invisibility for four people.
And you, meanwhile, in plain sight, at the exact centre of the invisible huddle.
The traps
Sight or detector uncovers them.
Understood for what it is — hiding the party, not hiding you — it is one of the best ambush tools in the game: five invisible people in a 5×5, with the visible bait in the middle being you. Understood as the tooltip describes it, it is an expensive disappointment.
See also Neutral Barrier nullifies ALL ranged damage — including for the people standing in it with you Infrared Scan uncovers everything hidden in a 15×15 and strips 30% flee The Magic Gear wipes your smith buffs when you mount, and at License 1 you move slower than on foot
Shape Shift reconfigures the Magic Gear's plating: for five minutes, your defensive element becomes whichever one matches the skill level you cast. It is not an optional per-level buff: each level is a different element.
| Level | Turns you | Material | id | Good against | |
|---|---|---|---|---|---|
| 1 | Fire |
|
Scarlet Point ×3 | 6360 | Earth, ice, poison |
| 2 | Earth |
|
Lime Green Point ×3 | 6363 | Wind |
| 3 | Wind |
|
Yellow Wish Point ×3 | 6362 | Water |
| 4 | Water |
|
Indigo Point ×3 | 6361 | Fire |
All four elemental points cost 100 z each, so the conversion comes to 300 z of materials plus the fuel.
The trap: your elemental level drops to 1
The engine does not only change your element: it also pins your elemental level at 1, no matter what.
If you were wearing an elemental armour at level 3 or 4 — which is exactly what you buy one for — Shape Shift downgrades it. The game's resistance table is graded by level: an element at level 1 resists considerably less than the same element at level 4. Putting Shape Shift on top of a good elemental armour is almost always a step backwards.
| Item | Value |
|---|---|
| Duration | 300 s (5 min), at all four levels |
| Cast | 2 s fixed |
| After-cast delay | 2 s |
| SP | 100, at all four levels |
| Fuel | 2 units (750 z) |
| Materials | 3 points of the element (300 z) |
| Equipment | Shape Shifter in your bag |
The cast is fixed and flagged to ignore DEX, statuses and item bonuses: it is always 2 seconds, and it does get interrupted by taking damage. With the 2 seconds of after-cast delay, changing element costs a full four seconds of being able to do nothing.
A worked example
You are about to enter Thanatos Tower, full of fire enemies, wearing neutral armour:
Shape Shift level 4 turns you water level 1 for five minutes. Against fire, that is meaningful resistance where you had none. Cost: 100 SP, 750 z of fuel, 300 z of points.
With a water armour at level 4 on, however, casting Shape Shift level 4 would drop you from level 4 to level 1 and you would lose resistance. Same element, worse result.
The traps
Clearance: five minutes are five minutes.
This is the skill the @autoplay AI keeps deliberately switched off: it costs three units of four different items to change element, and the bot has no basis for deciding which element it should switch to. That is a player's decision, not a machine's.
See also The Magic Gear wipes your smith buffs when you mount, and at License 1 you move slower than on foot The four passives: two work always and two only while mounted The turrets: Magic Decoy charges you TWO elemental points for one
Four skills for getting around, all hanging off Mado License and all requiring the Magic Gear. Two are statuses and two are instant shoves.
Acceleration
The whole formula
−25 points of speed penalty, subtracted from whatever you already have from your Mado License level.
With the license at 5 (already worth −25), the total is −50: your movement speed drops to half the milliseconds per cell, that is, twice as fast as walking. With the license at 1 (+40), Acceleration leaves you at +15: still slower than on foot.
| Level | Duration | SP | Fuel | SP per minute |
|---|---|---|---|---|
| 1 | 60 s | 20 | 1 | 20 |
| 2 | 90 s | 40 | 1 | 27 |
| 3 | 120 s | 60 | 1 | 30 |
The effect does not change with level: all three give exactly the same −25 points. All that grows is duration… and cost, faster than duration. Level 1 is the most SP-efficient per minute; level 3 is the most convenient on fuel: 375 z every two minutes instead of every minute. It requires the Accelerator (id 2800) in your bag.
Hovering
What it actually does
It lifts the Magic Gear off the ground for 90 seconds, which makes you completely immune to the ground skills and traps flagged for it. Those are:
The ten Hunter traps (Skid Trap, Land Mine, Ankle Snare, Shockwave Trap, Sandman, Flasher, Freezing Trap, Blast Mine, Claymore Trap and the monster versions), plus Quagmire, Volcano, Deluge, Violent Gale, Gravitation Field, Suiton, Fire Walk, Electric Walk, Vacuum Extreme, Moon Slasher and Windmill.
And one more, which is not on that list but is declared separately: Hovering makes you immune to another Mechanic's Magnetic Field.
The trap: its speed bonus does not exist
In the speed table, Hovering is listed with a +10% movement speed. That number is never applied.
The reason: the engine computes speed for Magic Gear riders through a separate branch that ignores every other modifier and only looks at Mado License and Acceleration. And since Hovering requires the Magic Gear, there is no situation in which that +10% can ever count. It is dead code.
Single level. 90 seconds, 25 SP, 1 fuel, and the Hovering Booster (id 2801, 100,000 z) in your bag. It fires instantly.
Front-Side Slide and Back-Side Slide
The whole formula
7 cells of instant displacement. Front-Side Slide towards where you are facing, Back-Side Slide backwards.
They are implemented as a knockback applied to yourself carrying the "ignore no-knockback" flag. That means they work on maps where knockback is forbidden: siege castles, battlegrounds, everywhere. It is one of the very few ways to cover seven cells at once inside a castle.
| Skill | Direction | Distance | Delay | SP | Fuel |
|---|---|---|---|---|---|
| Front-Side Slide | Forward | 7 cells | 0.5 s | 5 | 1 |
| Back-Side Slide | Backward | 7 cells | 0.5 s | 5 | 1 |
Five SP, half a second of delay and no special device at all: they are the only two skills in the mounted half that ask for no gadget. The only real cost is the fuel: 375 z per slide, which is expensive for something used every few seconds.
A worked example
Mado License 5 + Acceleration, charging down a castle corridor:
You walk at 75 ms per cell — twice as fast as anyone on foot — and on top of that you can jump 7 cells every half second for 5 SP. Seven cells at once, on a map where nobody else gets knocked anywhere.
Cost of a four-slide charge: 20 SP and 1,500 z of fuel.
The traps
Acceleration and Hovering are flagged to end the moment the Magic Gear disappears.
Acceleration and Hovering also cannot be given to anyone else: they are self-only.
If you had to pick one of the four, it is Hovering: 25 SP and 375 z buy ninety seconds of total immunity to twenty-one ground skills, the ten Hunter traps and another Mechanic's root included.
See also The Magic Gear wipes your smith buffs when you mount, and at License 1 you move slower than on foot Magnetic Field nails enemies in place and drains 50 SP per second from them The Mechanic is two classes in one, and only seven skills work on foot
Self Destruction blows up the Magic Gear around you. It is the only skill in the class whose damage is not a percentage of your attack: it is an absolute number built from your SP, your VIT and your current HP, added on top of the blow.
The whole formula
(level + 1) × (Mainframe Restructure + 8) × (current SP + VIT)
Then, if your base level is above 100: × base level ÷ 100.
And finally: + your current HP.
The result is added as weapon damage, so it also flows through the skill's ordinary attack. It ignores flee, attack cards and defense cards, Auto Guard and Cicada Skin Shed.
The SP trap: the 200 are paid FIRST
The skill costs 200 SP, and the engine charges them before computing the damage. So the "current SP" in the formula is your max SP minus 200, not your max SP.
And as soon as the calculation is done, the engine sets your SP to zero. It is not a cost: it is an emptying.
| Level | Multiplier | Area | Knockback | Cast | Cooldown | SP | Fuel |
|---|---|---|---|---|---|---|---|
| 1 | ×2 | 5×5 | 5 cells | 2.0 + 0.5 s | 5 min | 200 | 3 |
| 2 | ×3 | 7×7 | 5 cells | 1.5 + 0.5 s | 5 min | 200 | 3 |
| 3 | ×4 | 9×9 | 5 cells | 1.0 + 0.5 s | 5 min | 200 | 3 |
The cast shortens with level and the area grows from 5×5 to 9×9. The cooldown is 300 seconds at all three levels: five minutes between explosions. The cast is not interrupted by taking damage.
A worked example
Level 3, Mainframe Restructure 4, VIT 100, max SP 4,000, current HP 60,000, base level 175:
(3 + 1) × (4 + 8) × (3,800 + 100) = 4 × 12 × 3,900 = 187,200
× 175 ÷ 100 = 327,600
+ 60,000 current HP = 387,600 added damage, to everything in the 9×9.
With Mainframe Restructure not learned, the same calculation gives 4 × 8 × 3,900 = 124,800 → 218,400 + 60,000 = 278,400. That passive alone is worth over a hundred thousand points of damage.
The price
What it costs you
Acceleration, Hovering, Shape Shift, your accumulated heat and any planted field.
What does not happen: you take no damage yourself. Your HP goes into the formula, it is not spent.
How to use it
As a finisher, with SP and HP full, knowing you will be defenceless for a few seconds afterwards: you have to remount and recast every status.
And since SP enters multiplied by up to 48, a Mechanic who wants to use this seriously builds max SP, not attack.
The traps
The number it produces is enormous because it was never meant for hitting a monster: it is the last resort of a Mechanic who is going to die anyway. A five-minute cooldown is exactly the figure that says "use this once a fight, or never".
See also The four passives: two work always and two only while mounted The Magic Gear wipes your smith buffs when you mount, and at License 1 you move slower than on foot Arm Cannon never misses and the cannon ball sets its element
All seventeen skills of the blacksmith's fourth job, one by one: what each one really does, the exact formula this server uses for it, and the engine traps no tooltip mentions.
The Meister is the fourth job of the Blacksmith → Whitesmith → Mechanic branch. It inherits everything that came before it —Merchant, Blacksmith, Whitesmith, Mechanic and transcendent Mechanic— and adds seventeen skills of its own: two passives, eight damage skills, one crafting skill, two party buffs and four summons.
Everything on this page comes from the emulator running right now. Whenever a formula disagrees with the client or with a wiki, the one here is the one that applies.
The class is split down the middle
Five skills need an axe equipped and three need you riding the Madogear. And they are mutually exclusive: while mounted, the engine rejects any skill that does not carry an explicit permission flag, and two of the axe skills do not carry it.
This is not a style choice, it is a choice of which half of the tree you can use at any moment. The full picture is on the Madogear page.
And a third half, the robots
The four ABR summons need neither an axe nor the Madogear: they need capsules, which only the Meister can craft. They are creatures with a mind of their own that fight, heal and soak hits for you.
They get their own page: the ABR system.
The full tree
| Skill | Max. | Requires | What it is |
|---|---|---|---|
| Two Hand Axe Defense | 10 | — | Passive |
| Manufacture Machine | 5 | — | Crafting |
| Axe Stomp | 5 | Two Hand Axe Defense 5 | Damage around you, plus a mark |
| Mighty Smash | 10 | Axe Stomp 3 | Damage around you |
| Rush Quake | 10 | Axe Stomp 5 | Leap, damage and two marks |
| Rush Strike | 5 | Rush Quake 5 | Leap and seven hits |
| Powerful Swing | 5 | Rush Strike 3 | Five hits in an area |
| Defense Machine | 5 | Manufacture Machine 1 | Party buff |
| Attack Machine | 5 | Axe Stomp 3, Manufacture Machine 3 | Party buff that attacks on its own |
| ABR Mastery | 10 | Manufacture Machine 1 | Passive |
| Summon ABR Battle Warrior | 4 | ABR Mastery 1 | Melee summon |
| Summon ABR Dual Cannon | 4 | ABR Mastery 3, Battle Warrior 2 | Ranged summon |
| Summon ABR Mother Net | 4 | ABR Mastery 5, Battle Warrior 3, Dual Cannon 3 | Support summon |
| Summon ABR Infinity | 4 | ABR Mastery 10 and the other three at 4 | Heavy summon |
| Spark Blaster | 10 | Manufacture Machine 1 | Area damage (Madogear) |
| Triple Laser | 5 | Spark Blaster 5 | Single-target damage (Madogear) |
| Energy Cannonade | 5 | Triple Laser 3 | Area damage (Madogear) |
There are exactly two roots with no prerequisites: Two Hand Axe Defense and Manufacture Machine. All of the robot branch and all of the Madogear branch hang off Manufacture Machine, and the entire axe branch hangs off the passive.
What the Mechanic gains once you get here
Axe Tornado, a Mechanic skill, gains +380 %
The mark left by Axe Stomp does not only feed two Meister skills: it also adds +380 % ratio to the Mechanic's Axe Tornado, hard-coded in the engine.
It is the only direct bridge between the two jobs, and no description mentions it.
Rush Quake improves everything you already knew
The mark Rush Quake leaves on you adds +5 % per level to weapon damage at both short AND long range for up to five minutes. That reaches every weapon skill you inherited, not just the Meister ones.
And the mark it leaves on the target raises the weapon damage it takes by 50 % from anyone, not just from you.
The fourth-job trait stats
From base level 201 onwards the character starts earning 3 trait points per level, up to 285 in total by level 275. They are a separate budget: ordinary status points stop at 4,099 when you hit level 200 and never grow again.
| Trait | What it does | Exact conversion |
|---|---|---|
| POW | Physical damage | POW ÷ 3 P.Atk, and it also sits inside nearly every Meister formula |
| CON | Hit, flee and P.Atk | +2 HIT and +2 FLEE per point, plus CON ÷ 5 P.Atk |
| CRT | Critical | +1 H.Plus per point and CRT ÷ 3 C.Rate |
| STA | Physical resistance | STA + (STA ÷ 3) × 5 Res |
| WIS | Magical resistance | WIS + (WIS ÷ 3) × 5 M.Res |
| SPL | Magical damage | SPL ÷ 3 S.Matk — the Meister never uses it |
Two numbers on this server that are not rAthena's defaults
The per-trait cap here is 110, not 100. And P.Atk multiplies final damage: the already-computed hit is multiplied by (100 + P.Atk) ÷ 100, so POW counts twice — once inside the skill formula and again at the end.
Job levels also hand you, for free, +10 POW, +10 STA, +7 CON, +7 CRT and +6 WIS. SPL: zero. The class never touches it.
AP: a 200-point tank that never refills by itself
AP (Activity Points) is the third bar. On this server the maximum is a flat 200 for every fourth job, it does not grow with level or stats, and —this is the important part— it does not regenerate over time. Not while walking, not while sitting, not while resting: the engine has no natural AP recovery routine at all.
The only way to have AP is to generate it with skills that grant it. These are all of the Meister's:
| Skill | AP | Note |
|---|---|---|
| Summon ABR Battle Warrior | +20 | Once every 30 s cooldown |
| Summon ABR Dual Cannon | +20 | Once every 30 s cooldown |
| Summon ABR Mother Net | +20 | Once every 30 s cooldown |
| Axe Stomp | +3 | 0.7 s cooldown |
| Energy Cannonade | +3 | Madogear only |
| Spark Blaster | +2 | Madogear only |
| Rush Strike | +2 | Two-handed axe only |
| Powerful Swing | +2 | Two-handed axe only |
| Rush Quake | −150 | Three quarters of the tank |
| Summon ABR Infinity | −200 | The entire tank |
The consequence, worth seeing before you spend a point
Summoning the three cheap ABR grants +60 AP in one go for three capsules. It is by far the fastest way to fill the bar: doing the same with Axe Stomp would take twenty casts.
And since the tank is exactly 200, Rush Quake and ABR Infinity do not both fit. Picking one means the other never comes out.
AP survives death: whatever you had is still there when you get up. What does not exist is a way to recover it standing still, so a long fight is planned backwards compared to mana: generate first, spend later.
See also Climbing onto the Madogear costs you your two best axe skills, and without it three others do not exist The ABR are creatures with a mind of their own: they pick their own targets and teleport to you Axe Stomp hits three times as hard with a two-handed axe, and its mark is worth more than its damage The Mechanic is two classes in one, and only seven skills work on foot
The Madogear is not just another mount. The engine has one rule written once for the whole game: while riding the Madogear, any skill that does not carry an explicit permission flag is rejected. It is not a per-class exception list, it is a per-skill flag.
Applied to the Meister, the tally looks like this.
| Skill | On foot | On Madogear |
|---|---|---|
| Spark Blaster | Unavailable | Required |
| Triple Laser | Unavailable | Required |
| Energy Cannonade | Unavailable | Required |
| Rush Strike | Yes | Forbidden |
| Powerful Swing | Yes | Forbidden |
| Axe Stomp, Mighty Smash, Rush Quake | Yes | Yes |
| Manufacture / Attack / Defense Machine | Yes | Yes |
| All four ABR summons | Yes | Yes |
The trap: the two rejections look nothing alike
Trying Spark Blaster on foot gives a "you need the Madogear" error, which makes sense. Trying Rush Strike while mounted gives a different error, "you cannot use that on the Madogear", and the real reason is written nowhere on the skill: it comes from an internal flag that neither the client nor the tree ever shows you.
Neither one spends mana or items when it fails. They fail before charging you.
What this means in practice
A two-handed-axe Meister who climbs onto the Madogear loses their two strongest skills: Rush Strike and Powerful Swing. Axe Stomp, Mighty Smash and Rush Quake stay, because those do carry the flag.
And getting off costs what getting off costs: it is not a swap you make mid-fight.
And the part almost nobody knows
The whole inherited catalogue —Merchant, Blacksmith, Whitesmith— goes through the same gate. While mounted, the vast majority of what you used to know simply stops existing, classic weapon buffs included.
That is why the three Madogear skills are pure damage: up there, damage is all you have left.
The @autoplay artificial intelligence never mounts the Madogear, so it discards those three on its own and writes the reason in its log. It does use the five axe skills and the four ABR summons.
See also The Meister skill tree: seventeen skills, two different axes and a Madogear that locks out half of them Spark Blaster ignores defence and sweeps 9×9: the best cleaner on the Madogear Rush Strike is the job's biggest hit: seven impacts of 3,500 % per level The Mechanic is two classes in one, and only seven skills work on foot
Two Hand Axe Defense is the root passive of the whole axe branch and the only defensive skill the class has. It gives no attack, no hit and no mastery: it reduces the physical damage you take, and the amount depends on the size of whoever is hitting you.
The condition, which is the whole trap
It only applies with a two-handed axe equipped. With a one-handed axe, a mace, a sword or bare hands it is worth exactly zero, even at level 10.
And it is recomputed on every weapon change, so swapping axes mid-fight removes the reduction that very instant, with no warning.
What it reduces, level by level
| Level | Small attacker | Medium attacker | Large attacker |
|---|---|---|---|
| 1 | 1 % | 2 % | 3 % |
| 2 | 2 % | 3 % | 5 % |
| 3 | 3 % | 5 % | 7 % |
| 4 | 4 % | 6 % | 9 % |
| 5 | 5 % | 8 % | 10 % |
| 6 | 6 % | 9 % | 12 % |
| 7 | 7 % | 11 % | 13 % |
| 8 | 8 % | 12 % | 15 % |
| 9 | 9 % | 14 % | 16 % |
| 10 | 10 % | 15 % | 18 % |
It travels through the same channel as size-reduction cards, so it is added to them before the division: with a Thara Frog (−30 % versus large) and this passive at 10, a large attacker deals 52 % of its damage, not 30 % of 82 %.
It only reaches WEAPON damage
It reduces physical attacks. It does not touch magic, it does not touch the "misc" damage of traps and poisons, and it does not touch reflected damage. Against a boss that hits with spells the passive does nothing at all.
The axe branch having a defensive root rather than an offensive one is no accident: Axe Stomp requires all ten levels of this passive to unlock, so anyone who reaches the axe branch is carrying the maximum reduction whether they wanted it or not.
See also The Meister skill tree: seventeen skills, two different axes and a Madogear that locks out half of them Axe Stomp hits three times as hard with a two-handed axe, and its mark is worth more than its damage Rush Strike is the job's biggest hit: seven impacts of 3,500 % per level
Axe Stomp slams the ground around you —it is self-centred, you never aim it— and leaves a mark on yourself lasting 10 to 30 seconds. It grants +3 AP on cast. It needs a one- or two-handed axe.
The whole formula
Ratio per hit = (450 + 1,150 × level + 5 × POW) × base level ÷ 100
And the number of hits is decided by the weapon: 1 with a one-handed axe, 3 with a two-handed axe. Every hit charges the full ratio, so the big axe does not add a little: it triples.
What each level gives
| Level | Base ratio | Area | Mark | Delay | Cooldown | SP | AP |
|---|---|---|---|---|---|---|---|
| 1 | 1,600 % | 3×3 | 10 s | 0.7 s | 0.7 s | 45 | +3 |
| 2 | 2,750 % | 3×3 | 15 s | 0.7 s | 0.7 s | 55 | +3 |
| 3 | 3,900 % | 5×5 | 20 s | 0.7 s | 0.7 s | 65 | +3 |
| 4 | 5,050 % | 5×5 | 25 s | 0.7 s | 0.7 s | 75 | +3 |
| 5 | 6,200 % | 7×7 | 30 s | 0.7 s | 0.7 s | 85 | +3 |
"Base ratio" excludes POW and the base-level multiplier. There is no cast time: it fires instantly.
A worked example
Level 5, POW 110, base level 200, two-handed axe:
450 + 5,750 + 550 = 6,750 % → × 200 ÷ 100 = 13,500 % per hit, three hits, 40,500 % total on everything inside 7×7.
With a one-handed axe the same cast is 13,500 % and that is that.
The mark, which is half the skill
The status Axe Stomp leaves does absolutely nothing on its own: no attack, no defence, no healing. It has not one line of effect in the engine. It exists purely as a key to three other skills:
| Skill | What it gains while the mark is up |
|---|---|
| Mighty Smash | Goes from 5 to 7 hits, +20 ratio, and POW counts twice |
| Powerful Swing | +100 + 100 × level ratio |
| Axe Tornado (Mechanic) | +380 ratio |
The trap: refreshing it while it is up wastes your turn
The mark does not stack and recasting does not extend it beyond its duration. Since the status contributes nothing by itself, recasting Axe Stomp while you already carry it only burns 0.7 s of delay, the mana and the rotation slot.
The correct order is always: Axe Stomp first, then Mighty Smash or Powerful Swing while it lasts.
Being self-centred, it needs no target: it casts even with nothing in front of you. That makes it the most reliable AP generator the class has on foot — three points every 0.7 seconds — when there is nobody to hit.
See also Mighty Smash with the Axe Stomp mark deals 66 % more damage, not 20 % more Powerful Swing is the only axe hit with range 2, and the mark adds 12 % to it Two Hand Axe Defense grants no attack: it removes up to 18 % of the damage you take The Meister skill tree: seventeen skills, two different axes and a Madogear that locks out half of them
Mighty Smash is the Meister's cheap, repeatable axe skill: multiple self-centred hits, no cast time, half a second of cooldown. It works with a one- or two-handed axe. It grants no AP.
The whole formula, in both versions
Without the Axe Stomp mark: ratio per hit = (80 + 240 × level + 5 × POW) × base level ÷ 100, over 5 hits.
With the mark up: ratio per hit = (100 + 240 × level + 10 × POW) × base level ÷ 100, over 7 hits.
Look at the POW term: it does not simply rise, it is added a second time. It is the only skill in the game that does that with a trait stat.
What each level gives
| Level | Base ratio | Area | Hits | Delay | Cooldown | SP |
|---|---|---|---|---|---|---|
| 1 | 320 % | 3×3 | 5 / 7 | 0.7 s | 0.5 s | 68 |
| 2 | 560 % | 3×3 | 5 / 7 | 0.7 s | 0.5 s | 71 |
| 3 | 800 % | 3×3 | 5 / 7 | 0.7 s | 0.5 s | 74 |
| 4 | 1,040 % | 3×3 | 5 / 7 | 0.7 s | 0.5 s | 77 |
| 5 | 1,280 % | 5×5 | 5 / 7 | 0.7 s | 0.5 s | 80 |
| 6 | 1,520 % | 5×5 | 5 / 7 | 0.7 s | 0.5 s | 83 |
| 7 | 1,760 % | 5×5 | 5 / 7 | 0.7 s | 0.5 s | 86 |
| 8 | 2,000 % | 5×5 | 5 / 7 | 0.7 s | 0.5 s | 89 |
| 9 | 2,240 % | 7×7 | 5 / 7 | 0.7 s | 0.5 s | 92 |
| 10 | 2,480 % | 7×7 | 5 / 7 | 0.7 s | 0.5 s | 95 |
The hits column reads "5 / 7": five without the Axe Stomp mark, seven with it. Base ratios exclude POW and the base-level multiplier.
A worked example
Level 10, POW 110, base level 200:
No mark: (80 + 2,400 + 550) = 3,030 % × 2 = 6,060 % per hit × 5 = 30,300 %.
With mark: (100 + 2,400 + 1,100) = 3,600 % × 2 = 7,200 % per hit × 7 = 50,400 %.
That is 66 % more damage for having cast Axe Stomp first. The more POW you carry, the wider the gap.
How you use it
It is the filler skill: the one you repeat between big hits. With no cast time and half a second of cooldown, it is the most frequently castable skill in the class.
Since Axe Stomp lasts up to 30 s and Mighty Smash cycles in 1.2 s, a single mark covers roughly twenty casts.
The traps
It is self-centred and has range 1: you must be glued to the target. Against anything that knocks you back or runs away, the whole turn is wasted with no warning.
And it ignores neither defence nor evasion: all seven hits can be dodged individually.
The maths hardly anyone runs: per second, Mighty Smash with the mark up outperforms Powerful Swing, because its cycle is half as long. Powerful Swing wins on the single burst; Mighty Smash wins the long fight.
See also Axe Stomp hits three times as hard with a two-handed axe, and its mark is worth more than its damage Powerful Swing is the only axe hit with range 2, and the mark adds 12 % to it The Meister skill tree: seventeen skills, two different axes and a Madogear that locks out half of them
Rush Quake leaps you onto the target from 9 cells away, hits in an area and leaves two different marks: one on the victim and one on you. It costs 150 SP and 150 AP and has a 60-second cooldown.
Measured in damage per second it is by far the worst in the class. It still gets cast first, because its value is not in the hit.
The whole formula
Ratio = (3,600 × level + 10 × POW) × base level ÷ 100, in a single hit.
And against targets of the Formless or Insect race: an extra +150 × level ratio.
The POW term here is ×10, twice what almost every other skill uses. It is the class skill that rewards the trait most.
What each level gives
| Level | Base ratio | Formless / Insect bonus | Area | Your mark lasts | SP | AP |
|---|---|---|---|---|---|---|
| 1 | 3,600 % | +150 % | 3×3 | 30 s | 150 | −150 |
| 2 | 7,200 % | +300 % | 3×3 | 60 s | 150 | −150 |
| 3 | 10,800 % | +450 % | 3×3 | 90 s | 150 | −150 |
| 4 | 14,400 % | +600 % | 3×3 | 120 s | 150 | −150 |
| 5 | 18,000 % | +750 % | 5×5 | 150 s | 150 | −150 |
| 6 | 21,600 % | +900 % | 5×5 | 180 s | 150 | −150 |
| 7 | 25,200 % | +1,050 % | 5×5 | 210 s | 150 | −150 |
| 8 | 28,800 % | +1,200 % | 5×5 | 240 s | 150 | −150 |
| 9 | 32,400 % | +1,350 % | 7×7 | 270 s | 150 | −150 |
| 10 | 36,000 % | +1,500 % | 7×7 | 300 s | 150 | −150 |
Range 9, no cast time, 60 s cooldown at every level. The target's mark always lasts 30 seconds and never grows with level; the one that grows is yours.
The two marks
On the target — a flat 30 s
All weapon damage it receives is multiplied by 1.5. Not just yours: anyone's, including your ABR and your entire party.
It is the only skill in the class that makes other people hit harder.
On you — up to five minutes
It adds +5 % per level to weapon damage at short range and at long range. At level 10 that is +50 % to everything, for 300 seconds.
It reaches every weapon skill you know, Meister or inherited. It is the biggest buff the class has.
A worked example
Level 10, POW 110, base level 200, against an insect:
36,000 + 1,100 + 1,500 = 38,600 % → × 200 ÷ 100 = 77,200 % in one hit over 7×7.
And from there, five minutes of +50 % on everything else, plus thirty seconds of +50 % taken on whatever you just hit.
The traps
The leap may not happen. If the target's cell is unreachable —a wall, a gap, a unit in the way— the engine casts the skill anyway from where you stand, and if the target ends up outside the area, the hit is lost.
It costs 150 AP, which never comes back on its own. With a 200-point tank and no natural regeneration, casting it leaves you with almost no room for anything else. See how AP works.
It requires no weapon. It is the only skill in the axe branch that casts with anything, and it works while riding the Madogear.
The artificial intelligence places it first in the class and only against targets it considers "tough": spending five minutes of mark on a passing monster throws it away. And if the character knows Rush Quake, the AI gives up ABR Infinity, because the two together do not fit inside 200 AP.
See also Rush Strike is the job's biggest hit: seven impacts of 3,500 % per level The Meister skill tree: seventeen skills, two different axes and a Madogear that locks out half of them The ABR are creatures with a mind of their own: they pick their own targets and teleport to you Axe Stomp hits three times as hard with a two-handed axe, and its mark is worth more than its damage
Rush Strike leaps you onto the target from 7 cells away and unloads seven hits in an area. It is, by a wide margin, the Meister's biggest damage spike. It grants +2 AP.
The whole formula
Ratio per hit = (3,500 × level + 5 × POW) × base level ÷ 100, over 7 hits.
All seven charge the full ratio. Nothing is divided: it is straight multiplication.
What each level gives
| Level | Ratio per hit | Hits | Area | Delay | Cooldown | SP | AP |
|---|---|---|---|---|---|---|---|
| 1 | 3,500 % | 7 | 3×3 | 1.0 s | 2.00 s | 85 | +2 |
| 2 | 7,000 % | 7 | 5×5 | 1.0 s | 1.75 s | 80 | +2 |
| 3 | 10,500 % | 7 | 5×5 | 1.0 s | 1.50 s | 75 | +2 |
| 4 | 14,000 % | 7 | 7×7 | 1.0 s | 1.25 s | 70 | +2 |
| 5 | 17,500 % | 7 | 7×7 | 1.0 s | 1.00 s | 65 | +2 |
It is the only skill in the job where levelling up makes it cheaper: from 85 down to 65 SP, with the cooldown halved. Leaving it half-levelled saves you nothing.
A worked example
Level 5, POW 110, base level 200:
17,500 + 550 = 18,050 % → × 200 ÷ 100 = 36,100 % per hit × 7 = 252,700 % on everything inside 7×7.
That is more than three times what Rush Quake does at level 10, every second instead of every minute, and without spending AP.
Two conditions, and both are strict
A TWO-handed axe, mandatory. A one-handed axe does not count. With any other weapon the engine rejects the cast before charging you anything.
Forbidden on the Madogear. It does not carry the permission flag, so mounted it disappears. See the Madogear page.
How you use it
It closes the rotation: Rush Quake first to plant the two marks, then Rush Strike every second for as long as the +50 % taken lasts.
Both marks together raise it by 125 % compared to casting it cold.
The leap trap
Like Rush Quake, the leap may not happen if the destination is unreachable, and then you hit from where you stand. The 7×7 area usually saves it; at level 1, with 3×3, it does not.
And seven hits are seven accuracy rolls: it does not ignore evasion.
Seven hits are also seven chances for anything that triggers on attack —card autospells, life leech, on-hit status effects— which makes this the best skill in the class for gear built around those triggers.
See also Rush Quake is the worst damage-per-second in the class, and it is still cast first Powerful Swing is the only axe hit with range 2, and the mark adds 12 % to it Climbing onto the Madogear costs you your two best axe skills, and without it three others do not exist Two Hand Axe Defense grants no attack: it removes up to 18 % of the damage you take
Powerful Swing unloads five hits in an area onto a target you aim at, from two cells away. That range of 2 is its defining trait: it is the only Meister axe attack that neither needs you glued to the target nor makes you leap. It grants +2 AP.
The whole formula
Ratio per hit = (300 + 850 × level + 5 × POW) × base level ÷ 100, over 5 hits.
With the Axe Stomp mark up, 100 + 100 × level is added to the ratio before the base-level multiplier.
What each level gives
| Level | Base ratio | With mark | Area | Delay | Cooldown | SP | AP |
|---|---|---|---|---|---|---|---|
| 1 | 1,150 % | 1,350 % | 3×3 | 1.0 s | 0.5 s | 62 | +2 |
| 2 | 2,000 % | 2,300 % | 3×3 | 1.0 s | 0.5 s | 64 | +2 |
| 3 | 2,850 % | 3,250 % | 5×5 | 1.0 s | 0.5 s | 66 | +2 |
| 4 | 3,700 % | 4,200 % | 5×5 | 1.0 s | 0.5 s | 68 | +2 |
| 5 | 4,550 % | 5,150 % | 7×7 | 1.0 s | 0.5 s | 70 | +2 |
The ratios in the table exclude POW and the base-level multiplier. No cast time, range 2.
A worked example
Level 5, POW 110, base level 200, with the Axe Stomp mark up:
300 + 4,250 + 550 + 600 = 5,700 % → × 2 = 11,400 % per hit × 5 = 57,000 %.
Without the mark it would be 51,000 %. The mark is worth 12 % here, far less than the 66 % it gives Mighty Smash.
What it is actually for
For what Mighty Smash cannot do: hitting without standing on top. Two cells sounds like nothing, but it is the difference between being inside and outside the area of almost anything a boss does.
And unlike Rush Strike, it does not move you: there is no leap that can go wrong.
The conditions
Two-handed axe mandatory and forbidden on the Madogear, exactly like Rush Strike. The two final skills of the axe branch share both limitations.
It requires Rush Strike 3, so in practice you never have one without the other.
Compared per full cycle —delay plus cooldown— Rush Strike at level 5 takes 2 s and deals 252,700 %; Powerful Swing takes 1.5 s and deals 57,000 %. They are not competing: Powerful Swing is what you cast when Rush Strike is on cooldown or when you cannot afford to leap.
See also Rush Strike is the job's biggest hit: seven impacts of 3,500 % per level Axe Stomp hits three times as hard with a two-handed axe, and its mark is worth more than its damage Mighty Smash with the Axe Stomp mark deals 66 % more damage, not 20 % more Climbing onto the Madogear costs you your two best axe skills, and without it three others do not exist
Spark Blaster unloads two hits that ignore defence over a huge area, from 9 cells away. It requires riding the Madogear. It grants +2 AP.
The whole formula
Ratio per hit = (600 + 1,400 × level + 5 × POW) × base level ÷ 100, over 2 hits.
And both ignore the target's physical defence: hard DEF subtracts nothing. Against armoured monsters it is the most noticeable skill in the tree.
What each level gives
| Level | Ratio per hit | Area | Cast | Delay | Cooldown | SP | AP |
|---|---|---|---|---|---|---|---|
| 1 | 2,000 % | 7×7 | 1.5 + 0.5 s | 0.25 s | 0.5 s | 48 | +2 |
| 2 | 3,400 % | 7×7 | 1.5 + 0.5 s | 0.25 s | 0.5 s | 52 | +2 |
| 3 | 4,800 % | 7×7 | 1.5 + 0.5 s | 0.25 s | 0.5 s | 56 | +2 |
| 4 | 6,200 % | 7×7 | 1.5 + 0.5 s | 0.25 s | 0.5 s | 60 | +2 |
| 5 | 7,600 % | 7×7 | 1.5 + 0.5 s | 0.25 s | 0.5 s | 64 | +2 |
| 6 | 9,000 % | 9×9 | 1.5 + 0.5 s | 0.25 s | 0.5 s | 68 | +2 |
| 7 | 10,400 % | 9×9 | 1.5 + 0.5 s | 0.25 s | 0.5 s | 72 | +2 |
| 8 | 11,800 % | 9×9 | 1.5 + 0.5 s | 0.25 s | 0.5 s | 76 | +2 |
| 9 | 13,200 % | 9×9 | 1.5 + 0.5 s | 0.25 s | 0.5 s | 80 | +2 |
| 10 | 14,600 % | 9×9 | 1.5 + 0.5 s | 0.25 s | 0.5 s | 84 | +2 |
The cast is written "1.5 + 0.5 s": 1.5 s reducible by DEX and INT, plus 0.5 s fixed that nothing lowers. With DEX 130 and INT 130 the real total lands around 0.7 s.
A worked example
Level 10, POW 110, base level 200:
600 + 14,000 + 550 = 15,150 % → × 2 = 30,300 % per hit × 2 hits = 60,600 % on each enemy inside a 9×9, with DEF subtracting nothing.
Against eight monsters that is 484,800 % spread across them. No other skill in the job covers that much ground.
How you use it
It is the clearing skill. The area jump from level 5 to level 6 —7×7 to 9×9— is the best value step in the whole tree: nearly twice the cells for four points of mana.
And it unlocks Triple Laser at level 5, so you have to climb past that step anyway.
The traps
"Ignores defence" means DEF, not evasion: both hits can miss. And the cast is interrupted if you get hit.
Off the Madogear it does not appear, and the artificial intelligence never uses it because it never mounts.
One detail about splitting: since the ratio is applied per target and is never divided between them, Spark Blaster loses nothing by hitting many. It is the skill that makes the Madogear worth using for farming.
See also Triple Laser is the only Meister skill that can land a critical hit Energy Cannonade is seven area hits that defence cannot reduce either Climbing onto the Madogear costs you your two best axe skills, and without it three others do not exist The Meister skill tree: seventeen skills, two different axes and a Madogear that locks out half of them
Triple Laser fires three beams at a single target from 11 cells away, the longest range in the class. It requires riding the Madogear. It grants no AP.
The whole formula
Ratio per hit = (650 + 1,150 × level + 12 × POW) × base level ÷ 100, over 3 hits.
The POW term is ×12: more than double any other skill in the job, Rush Quake included. With POW 110 that is 1,320 % handed to you before the base-level multiplier.
And what no description says: it can crit
It is the only Meister skill flagged as critical-capable in the engine. The three hits roll for critical separately; the ones that crit ignore the target's defence and multiply the damage.
That turns the CRT trait —dead money everywhere else in the tree— into a legitimate stat for a Madogear Meister: every 3 CRT is +1 C.Rate, and C.Rate raises the damage of every critical.
What each level gives
| Level | Ratio per hit | Hits | Range | Cast | Delay | Cooldown | SP |
|---|---|---|---|---|---|---|---|
| 1 | 1,800 % | 3 | 11 | 1.0 + 0.5 s | 0.25 s | 0.35 s | 40 |
| 2 | 2,950 % | 3 | 11 | 1.0 + 0.5 s | 0.25 s | 0.35 s | 45 |
| 3 | 4,100 % | 3 | 11 | 1.0 + 0.5 s | 0.25 s | 0.35 s | 50 |
| 4 | 5,250 % | 3 | 11 | 1.0 + 0.5 s | 0.25 s | 0.35 s | 55 |
| 5 | 6,400 % | 3 | 11 | 1.0 + 0.5 s | 0.25 s | 0.35 s | 60 |
Ratios exclude POW and the base-level multiplier. It has no area: it is the only one of the three Madogear skills that hits a single target.
A worked example
Level 5, POW 110, base level 200:
650 + 5,750 + 1,320 = 7,720 % → × 2 = 15,440 % per hit × 3 = 46,320 % on one target, and that is before any critical lands.
With 0.6 s of delay plus cooldown, it is the most repeatable of the three Madogear skills.
How you use it
It is the Madogear's single-target attack. Eleven cells let you hit from outside the reach of almost anything, and the short cycle makes it the steadiest.
With Spark Blaster for packs and this for the big target, the Madogear half of the class is covered with two buttons.
The traps
It does not ignore defence, unlike its two siblings. Against high-DEF targets it performs worse than the ratio suggests, unless a critical solves it.
And like everything Madogear: off the machine it does not exist, and the variable cast is interrupted when you get hit.
The stat-allocation conclusion: a Meister who plays mounted wants POW above everything —worth twelve times here and five everywhere else— and, if leaning on Triple Laser, CRT second. An axe Meister has no reason to touch CRT at all.
See also Spark Blaster ignores defence and sweeps 9×9: the best cleaner on the Madogear Energy Cannonade is seven area hits that defence cannot reduce either Climbing onto the Madogear costs you your two best axe skills, and without it three others do not exist The Meister skill tree: seventeen skills, two different axes and a Madogear that locks out half of them
Energy Cannonade is the last skill of the Madogear branch: seven area hits that ignore defence, from 9 cells. It grants +3 AP, the largest generation in the class alongside Axe Stomp.
The whole formula
Ratio per hit = (250 + 750 × level + 5 × POW) × base level ÷ 100, over 7 hits.
The per-hit ratio is the lowest in the job. The skill does not live off that: it lives off multiplying it by seven and off DEF not subtracting.
What each level gives
| Level | Ratio per hit | Total (7 hits) | Area | Cast | Delay | Cooldown | SP | AP |
|---|---|---|---|---|---|---|---|---|
| 1 | 1,000 % | 7,000 % | 5×5 | 1.5 + 0.5 s | 0.5 s | 1.25 s | 58 | +3 |
| 2 | 1,750 % | 12,250 % | 5×5 | 1.5 + 0.5 s | 0.5 s | 1.25 s | 64 | +3 |
| 3 | 2,500 % | 17,500 % | 7×7 | 1.5 + 0.5 s | 0.5 s | 1.25 s | 70 | +3 |
| 4 | 3,250 % | 22,750 % | 7×7 | 1.5 + 0.5 s | 0.5 s | 1.25 s | 76 | +3 |
| 5 | 4,000 % | 28,000 % | 9×9 | 1.5 + 0.5 s | 0.5 s | 1.25 s | 82 | +3 |
Ratios exclude POW and the base-level multiplier. As with Spark Blaster, the cast is 1.5 s reducible plus 0.5 s fixed.
A worked example
Level 5, POW 110, base level 200:
250 + 3,750 + 550 = 4,550 % → × 2 = 9,100 % per hit × 7 = 63,700 % on every enemy inside 9×9, with DEF subtracting nothing.
That is 5 % more than Spark Blaster at level 10 over the same footprint, but with a cycle more than twice as long.
When this one and when Spark Blaster
Cycle for cycle, Spark Blaster is clearly ahead: same area at max level, almost the same total, and 0.75 s of cycle against 1.75 s.
Energy Cannonade wins on two other counts: it grants +3 AP instead of +2, and its seven hits fire everything that triggers on attack seven times.
The traps
It requires Triple Laser at 3, which in turn requires Spark Blaster at 5: reaching it means eight points already invested in the branch.
And like the other two: Madogear only, interruptible cast, and evasion still works against all seven hits.
This is how a mounted Meister refills AP while farming: three points every second or so, without dismounting and without stopping area damage.
See also Spark Blaster ignores defence and sweeps 9×9: the best cleaner on the Madogear Triple Laser is the only Meister skill that can land a critical hit Climbing onto the Madogear costs you your two best axe skills, and without it three others do not exist The Meister skill tree: seventeen skills, two different axes and a Madogear that locks out half of them
Manufacture Machine is the Meister's only crafting skill and the one holding up the entire mechanical half of the class: both party machines and all four summons consume capsules, and capsules only come from here.
There are two recipes, with 100 % success: a batch cannot fail.
For the two party machines
 Device Creation Guidenot consumed
 Mini Furnace×5
 Oridecon Hammer×5
 Magic Gear Fuel×50
For the four ABR summons
Device Creation Guidenot consumed
Mini Furnace×5
Oridecon Hammer×5
Magic Gear Fuel×75
The quantity formula, which appears in no description
Each batch consumes a single set of materials and delivers 7 + skill level units.
Eight at level 1 and twelve at level 5. The amount is neither asked for nor chosen: it always comes out at that.
What each level gives
| Level | Capsules per batch | Success | SP | Materials |
|---|---|---|---|---|
| 1 | 8 | 100 % | 30 | 1 set |
| 2 | 9 | 100 % | 40 | 1 set |
| 3 | 10 | 100 % | 50 | 1 set |
| 4 | 11 | 100 % | 60 | 1 set |
| 5 | 12 | 100 % | 70 | 1 set |
A worked example
Level 5, one batch of Auto Battle Capsule: 5 Mini Furnace + 5 Oridecon Hammer + 75 Magic Gear Fuel → 12 capsules.
Twelve capsules are three complete rounds of all four ABR, or twelve single summons. At 6.25 units of fuel per capsule, fuel is the real bottleneck of the class, not the hammers.
The big trap: the manual
Both recipes require you to carry a Device Creation Guide. It is not consumed —simply holding it is enough— but without it the skill cannot even be cast: the engine rejects it before charging mana, with a message asking for "0" units of the item that explains nothing.
And as of today that manual has no source on the server: no NPC sells it, no monster drops it, no quest hands it out and no other recipe produces it. It exists in the item database and nowhere else.
While that holds, the skill is switched off in practice, and with it the capsules, both party machines and all four ABR.
A detail hardly anyone catches: if you try to open the list without the manual —or with a full inventory— the client does not show an empty list, it shows an inventory warning that has nothing to do with the real problem. See also the empty lists in the other jobs.
See also Attack Machine hits with the stats of whoever carries it, not with yours Defense Machine grants +450 flat defence and +100 Res, with no level requirement The ABR are creatures with a mind of their own: they pick their own targets and teleport to you Who makes what: the full map of all 293 recipes
Attack Machine straps a machine onto an ally. While it lasts, every second the machine unloads an area hit around whoever is carrying it. You cast it on yourself or on a party member one cell away, and it consumes one Device Capsule.
The whole formula — and whose numbers go into it
Hit ratio = (200 × level + 5 × POW) × base level ÷ 100, one hit per second.
And here is the part nobody mentions: the POW, the base level and the weapon attack are the CARRIER's, not yours. You provide the skill and the capsule; the damage is provided by whoever wears it.
Placed on a hard-hitting companion it outperforms placing it on yourself. Placed on a mage, it barely does anything.
What each level gives
| Level | Ratio per hit | Area | Duration | Total hits | SP | Item |
|---|---|---|---|---|---|---|
| 1 | 200 % | 3×3 | 80 s | 80 | 43 | 1 Device Capsule |
| 2 | 400 % | 3×3 | 120 s | 120 | 46 | 1 Device Capsule |
| 3 | 600 % | 5×5 | 160 s | 160 | 49 | 1 Device Capsule |
| 4 | 800 % | 5×5 | 200 s | 200 | 52 | 1 Device Capsule |
| 5 | 1,000 % | 7×7 | 240 s | 240 | 55 | 1 Device Capsule |
Ratios exclude POW and the base-level multiplier. No cast time and no cooldown: you place it and that is it.
A worked example
Level 5, on a companion with POW 110 and base level 200:
1,000 + 550 = 1,550 % → × 2 = 3,100 % per second, in 7×7, for 240 seconds.
That is 744,000 % accumulated from a single capsule, spread over 240 hits on anything that comes near that person.
Three engine traps
1. The level gap. On another player it can only be placed if the base-level difference between you is 15 or less. Sixteen levels apart and the cast fails; it does not consume the capsule, but it does not explain itself either.
2. It pulls the carrier off the ground. On every tick, before hitting, the machine stands the carrier up if they are sitting. There is no resting with it on: you have to remove it first.
3. It attacks on its own and does not care what you want. It strikes every enemy in range every second, no questions asked. With it on you cannot walk past anything aggressive, hide, or negotiate a retreat.
The artificial intelligence keeps it up only on the character itself, and drops it when sitting down to rest. It never places it on a companion: another player's resting is not something it manages, and the machine would break it once per second.
See also Defense Machine grants +450 flat defence and +100 Res, with no level requirement Manufacture Machine yields twelve capsules per batch, and does not work without a manual that does not exist yet The Meister skill tree: seventeen skills, two different axes and a Madogear that locks out half of them Songs and support skills reach as many characters as they can, and never work against you
Defense Machine is the quiet sister of Attack Machine: placed the same way —on yourself or a party member, one cell away, for one Device Capsule— but it does nothing on its own. It only adds two numbers, and both are very large.
The two effects, exactly
DEF = +200 + 50 × level — flat defence, the kind that subtracts physical damage directly.
Res = +20 × level — resistance, the fourth-job stat that trims physical damage from everything, including skills that ignore defence.
What each level gives
| Level | DEF | Res | Duration | SP | Item |
|---|---|---|---|---|---|
| 1 | +250 | +20 | 80 s | 43 | 1 Device Capsule |
| 2 | +300 | +40 | 120 s | 46 | 1 Device Capsule |
| 3 | +350 | +60 | 160 s | 49 | 1 Device Capsule |
| 4 | +400 | +80 | 200 s | 52 | 1 Device Capsule |
| 5 | +450 | +100 | 240 s | 55 | 1 Device Capsule |
No cast time, no cooldown and range 1: you stand next to the companion and there is nothing to wait for.
A worked example
Level 5 on a companion with 300 DEF and 50 Res of their own: they go to 750 DEF and 150 Res for four minutes.
Those +100 Res are half of what a maxed STA trait provides, handed over for one capsule. And they are the only defence that exists against skills which ignore DEF.
The difference from Attack Machine
It does not check the level gap. It can be placed on any party member, whatever their level. Attack Machine does check, and refuses past 15 levels of difference.
And it has no tick: it lifts nobody off the ground and attacks nothing. You can rest with it on.
The traps
You have to be adjacent to the companion: range 1. And it does not work on someone outside your party, even a guild ally.
The duration does not stack: recasting before it expires resets the clock, it does not extend it.
Four minutes per capsule and a party of five works out to five capsules every four minutes to keep everyone covered. That is the consumption to plan before entering an instance, and the reason Manufacture Machine is worth having at level 5 rather than 1.
See also Attack Machine hits with the stats of whoever carries it, not with yours Manufacture Machine yields twelve capsules per batch, and does not work without a manual that does not exist yet The Meister skill tree: seventeen skills, two different axes and a Madogear that locks out half of them
The ABR are the heart of the Meister: four robots summoned one at a time, appearing on your own cell, and from then on deciding for themselves what to do. They are not pets or ordinary companions: they are creatures with an intelligence of their own written into the engine, and that intelligence has rules worth knowing before you spend the first capsule.
What each one costs and how long it lasts
| Level | Duration | SP | AP | Capsules | Cooldown |
|---|---|---|---|---|---|
| 1 | 120 s | 30 | +20 | 1 | 30 s |
| 2 | 180 s | 40 | +20 | 1 | 30 s |
| 3 | 240 s | 50 | +20 | 1 | 30 s |
| 4 | 300 s | 60 | +20 | 1 | 30 s |
This covers Battle Warrior, Dual Cannon and Mother Net. ABR Infinity is the exception: same durations and same mana, but 5 capsules, 200 AP and a 60 s cooldown, and it grants no AP at all.
The economics, in one line
The three cheap ones grant +20 AP each. Summoning them is the fastest way the class has to fill the bar: +60 AP for three capsules. The fourth, Infinity, takes the entire tank —all 200— and returns nothing.
With a 200 AP ceiling and no natural regeneration, Infinity and Rush Quake do not both fit. See how AP works.
The cast is 1 reducible second plus 1 fixed second. They can be summoned while riding the Madogear.
The six engine rules
1. One of each type, and all four at once
The cap is one unit per model. You can have all four deployed simultaneously, but never two Battle Warriors.
Attempting the second one fails and does not consume the capsule.
2. They teleport to you
If an ABR strays more than 19 cells from you, or if you change maps, it appears at your side instantly. It does not run: it teleports.
That means they follow you through portals and are never lost. The 19 cells come from the area size configured on this server, which is 18.
3. Three of the four are aggressive
Battle Warrior, Dual Cannon and Infinity choose targets on their own and attack anything that comes close, without waiting for you to strike first. Mother Net never attacks: it does not even have the capability.
None of the four "assists" your target: they do not go after what you are hitting. They go after what they see.
4. Monsters treat them as enemies
To an ordinary monster an ABR is a legitimate enemy: it attacks it, chases it and hits it. That makes them a real shield, and at the same time something that can die before its timer runs out.
It also makes them a magnet: an aggressive ABR can start a fight you did not want.
5. They do not trigger your cards
Unlike nearly every other summon in the game, an ABR's hits are not credited to the master. Your card autospells, your on-attack effects and your on-hit status procs never fire from what they hit.
It is written that way on purpose in the engine, with the ABR and the Bionic named one by one as the exception.
6. They give nothing when they die
Killing an ABR grants no experience and no items to anyone. They have their own visible health bar, and the client is told they are a separate kind of creature, not a monster.
They also cannot be transformed, stolen or converted by anything.
The most misleading trap: the icon is not the robot
Summoning gives you a status icon lasting exactly as long as the summon. But they are two separate things: if the ABR dies, the icon stays until its timer expires, and it summons nothing back.
You can resummon as soon as the 30 s cooldown is over —the cap counts live robots, not icons— but the artificial intelligence goes by the icon: while it is still lit, it will not replace a dead ABR.
They move at exactly your speed —the engine copies yours onto them— so they never fall behind while you walk. What loses them is leaps and teleports, and that is what the 19-cell rule is for. What each one does, with its numbers, is in the catalogue of the four.
See also The four ABR and their numbers: 405,000 health and a cannon at 50,000 % Manufacture Machine yields twelve capsules per batch, and does not work without a manual that does not exist yet The Meister skill tree: seventeen skills, two different axes and a Madogear that locks out half of them Songs and support skills reach as many characters as they can, and never work against you
ABR Mastery is a passive that does absolutely nothing while you have no robot deployed. No attack, no defence, no extra capsules. All it does is build the ABR's stats, and it builds all of them: without it, the four robots are made of paper.
Every stat formula
Maximum health = (5,000 + 40,000 × Mastery) × master's VIT ÷ 100
Maximum attack = 2 × master's status attack + 200 + 600 × Mastery — minimum attack = 70 % of that
DEF = master's DEF + 20 × Mastery MDEF = master's MDEF + 4 × Mastery
Hit = master's hit + 2 per level Flee = master's flee + 10 × Mastery
Movement speed = exactly yours
And ABR Infinity adds on top: +20,000 health and +2,000 maximum attack over all of the above.
What this actually means
The ABR do not inherit your weapon: they inherit your status attack, the one that comes from STR and level. An expensive weapon improves them by nothing.
What does improve them, a great deal, is your VIT —it multiplies their entire health pool— and your DEF, MDEF, hit and flee, which are added to theirs one for one. Gearing yourself defensively is gearing them.
A worked example
ABR Mastery 10, master with VIT 100, status attack 350, DEF 100 and flee 300:
Health: (5,000 + 400,000) × 100 ÷ 100 = 405,000 (Infinity, 425,000)
Attack: 700 + 200 + 6,000 = 6,900 maximum, 4,830 minimum (Infinity, 8,900 and 6,230)
DEF 300, MDEF +40, hit +20, flee 400.
With ABR Mastery at 1 instead of 10, that same health pool would be 45,000: nine times less. The passive is not optional.
The four models
| Model | Size | Range | Behaviour | What it casts | Ratio |
|---|---|---|---|---|---|
| ABR Battle Warrior | Medium | 3 | Aggressive | Battle Buster | 8,000 % |
| ABR Dual Cannon | Medium | 5 | Aggressive | Dual Cannon Fire | 8,000 % |
| ABR Mother Net | Small | 5 | Never attacks | Net Repair and Net Support | Healing |
| ABR Infinity | Large | 5 | Aggressive | Infinity Buster | 50,000 % |
All four are level 200, Formless race and Neutral 1 element. Each casts its skill every 5 seconds, with half a second of cast time and a 100 % chance: they never fail the roll and never skip it.
The three fighters
Battle Buster and Dual Cannon Fire deal 8,000 % of the robot's own attack, in one hit, every 5 s. The difference between them is range: 3 cells against 5.
Infinity Buster deals 50,000 %: more than six times what its siblings do, off the highest attack of the four. That is why it costs the whole AP tank.
None of them applies the base-level multiplier: the ratio is exactly what it says.
And the one that does not fight
Mother Net is an area healer with a radius that has no equal in the game: 25×25 cells. Every 5 seconds it casts one of its two skills on every ally inside that square:
It is percentage healing, so the more health your companions have, the more it heals. And it works standing still, with no target and outside combat.
The conclusion that changes your summoning order
Mother Net is the most underrated ABR in the tree: it deals no damage, so it never shows up in a comparison, but 10 % of health every five seconds to the whole party across 25×25 is more sustained healing than most support classes provide.
It needs ABR Mastery 5 and the first two at level 3, so it arrives late. It is worth arriving.
All four are summoned the same way, last the same time and share every behavioural rule —the 19-cell teleport, the monster aggro, the fact that they do not fire your cards— which are laid out on the ABR system page.
See also The ABR are creatures with a mind of their own: they pick their own targets and teleport to you The Meister skill tree: seventeen skills, two different axes and a Madogear that locks out half of them Manufacture Machine yields twelve capsules per batch, and does not work without a manual that does not exist yet
Fourteen skills, three bolts that hold up half the magic branch, and two walls that are measured in hits rather than seconds. This is also where the two calculations that govern every mage on the server live: how magic damage is worked out, and how cast time is worked out.
The Mage is the first job of the magic branch and its tree has fourteen entries. Thirteen are learned by spending skill points; the fourteenth, Energy Coat, is not.
Energy Coat is not bought with points
It carries the quest skill flag in the database, and learning quest skills with points is switched off in the server configuration. It is handed out for free by the Platinum Skill NPC (Prontera 158,193), and the Job Master gives it to you automatically when you change job — at Prontera 153,193, in Niflheim (nif_in 150,14) and in Lasagna (322,231).
If you have an old Mage without Energy Coat, go and see the platinum NPC: there is no quest to do.
The whole tree
| Skill | Max | Prerequisites | What it is |
|---|---|---|---|
| Increase SP Recovery | 10 | — | Passive |
| Sight | 1 | — | Detection |
| Napalm Beat | 10 | — | Damage, 3×3 area |
| Soul Strike | 10 | Napalm Beat 4 | Damage, single target |
| Safety Wall | 10 | Napalm Beat 7 + Soul Strike 5 | Ground unit |
| Cold Bolt | 10 | — | Damage, water |
| Frost Diver | 10 | Cold Bolt 5 | Damage + freeze |
| Stone Curse | 10 | — | Petrify |
| Fire Bolt | 10 | — | Damage, fire |
| Fire Ball | 10 | Fire Bolt 4 | Damage, 5×5 area |
| Fire Wall | 10 | Fire Ball 5 + Sight 1 | Ground unit |
| Lightning Bolt | 10 | — | Damage, wind |
| Thunder Storm | 10 | Lightning Bolt 4 | 5×5 ground damage |
| Energy Coat | 1 | Platinum NPC | Defence |
Look at the odd link in that chain: Fire Wall requires Sight 1. It is the only place in the tree where a detection skill acts as a key, and plenty of people end up one point short of the wall because they never picked it up.
The three bolts are the backbone, and not because of their damage
Cold Bolt, Fire Bolt and Lightning Bolt require nothing and unlock almost nothing, yet they are the most reused skills in the entire branch:
@autoplay picks between the three by the target's element: they are the skills an automated mage casts most.
Where the Mage leads
Two second jobs branch off the Mage:
And from there, third and fourth
All four inherit the entire Mage tree. Cold Bolt is still sitting there at level 200.
Before you level anything, read these two
The two calculations that decide whether a mage hits or not do not belong to any single skill:
How magic damage is calculated — where MATK comes from, in what order MDEF and the elemental table apply, and what skips what.
How cast time is calculated — the half that DEX and INT cut down, the half that they do not, and what interrupts you.
Downward inheritance: the Mage inherits the Novice tree. Upward, Wizard and Sage inherit the complete Novice and Mage trees, which is why a Wizard can require Cold Bolt 1 for Water Ball or Stone Curse 1 for Ice Wall.
See also The elemental table is applied AFTER MDEF, which is why a 0 % match leaves everything at 1 damage Half your cast time is untouched by DEX and INT, and Energy Coat is all of that half A bolt does not hit harder when you level it: it hits more times Energy Coat reduces more the more SP you have left, and it is paid for with that same SP The Wizard skill tree: fourteen spells, six more when you transcend, and an amplification that is NOT spent here The mage who studies instead of shouting: what a Sage is and what Professor adds
Every spell in the magic branch runs through the same chain. It is worth understanding once, because it explains things that look like bugs: why you sometimes deal 1 damage, why flat MATK gear does not benefit from Mystical Amplification, and why your Soul Strike does nothing at all to a ghost-property monster.
Step 1 — MATK
A player's MATK is built from three pieces, added in this order:
Status MATK = INT + (INT ÷ 2) + (DEX ÷ 5) + (LUK ÷ 3) + (base level ÷ 4)
All divisions are integer: the decimals are thrown away. Fourth jobs also add 5 × SPL, but SPL is 0 until you get there.
Weapon MATK = weapon MATK ± (weapon MATK × weapon level ÷ 10)
That ± is all the variance a spell has. Status MATK does not vary: its minimum and maximum come out of the same formula. Without a MATK weapon, your spells always hit for the same number.
Extra MATK = flat MATK from gear + consumables + buffs that grant flat MATK.
And pay attention to the internal order, because that is where the big trap is:
| Order | What is applied |
|---|---|
| 1 | Status MATK + 3 per soul sphere |
| 2 | + weapon MATK (with its variance) |
| 3 | × Mystical Amplification |
| 4 | + flat MATK from gear, consumables and buffs |
| 5 | × the MATK percentages from gear |
Mystical Amplification does not amplify your gear
It applies at step 3, before flat gear MATK is added. So a staff with a flat "+120 MATK" is not multiplied by Mystical Amplification. What does get multiplied is your INT, your level and the weapon's base MATK.
Practical consequence: the more flat MATK you carry, the smaller the percentage gain Mystical Amplification gives you on your final damage.
Step 2 — from MATK to damage
| Order | Operation | Note |
|---|---|---|
| 1 | A random number between minimum and maximum MATK | No randomness without a MATK weapon |
| 2 | ÷ number of targets | Only for split skills (Napalm Beat) |
| 3 | + race / element / size cards | The magic damage ones |
| 4 | × S.MATK | Fourth jobs and modern gear only |
| 5 | × the skill percentage | Cold Bolt 100 %, Fire Ball level 10 340 %… |
| 6 | − MRes | Modern magic resistance |
| 7 | − MDEF | damage × (1000 + MDEF) ÷ (1000 + 10 × MDEF) − soft MDEF |
| 8 | × the elemental table | From 0 % to 200 % |
| 9 | × number of hits | Cold Bolt level 10 = 10 hits |
| 10 | Target's reductions | Energy Coat, Safety Wall, Pneuma… |
| 11 | × 20 % in GvG, castles and PvP maps; × 30 % in battlegrounds | Applies to every kind of damage, not only magic. In PvP, only between players and their creatures |
The element comes AFTER MDEF, and that matters
If your spell lands on 0 % in the elemental table, it does not matter how much MATK you carry or whether the monster has 0 MDEF: the multiplier is applied at the end and the result settles at 1 damage (the engine never lets damage drop below 1).
And the other way round: against a weak element, the ×2 applies to damage that has already been cut by MDEF, so a high MDEF takes its share before the elemental advantage does anything.
MDEF in renewal does not subtract points, it divides
A target's MDEF has two halves: hard MDEF (from gear and the creature's own stats) and soft MDEF (from INT). The hard half goes into a division and the soft half is subtracted at the end:
damage = damage × (1000 + hard MDEF) ÷ (1000 + 10 × hard MDEF) − soft MDEF
With 30 hard MDEF the damage drops to 79 %; with 100, to half; with 200, to a third. Negative MDEF is treated as 0 — pushing an enemy's MDEF below zero gains you nothing.
Gear that "ignores MDEF" by race, class or element skips that division entirely, soft MDEF included. It is not a percentage: either the subtraction happens or it does not.
And where does base level come in?
In two places, and neither is a global multiplier:
That is why a level 99 Mage and a level 200 Arch Mage casting the same Cold Bolt 10 differ in MATK, not in the skill's percentage.
Against plants and other "infinite defence" targets the engine does not even do the maths: every hit deals exactly 1. A Cold Bolt 10 deals 10, because that is ten hits of 1. The complete table of elemental multipliers is in the elemental table.
See also Fourteen skills, and one of them cannot be bought with skill points A level 4 ghost target takes 0 % from ghost damage, and your Soul Strike deals 1 Half your cast time is untouched by DEX and INT, and Energy Coat is all of that half A bolt does not hit harder when you level it: it hits more times
Every creature has a defensive element and an elemental level from 1 to 4. The level is not decorative: it changes the multiplier completely. The same Fire Bolt against two "water" monsters can deal 90 % or 60 %, depending on each one's elemental level.
The three bolts, against all four levels
| Attacks as | Defends as | Lv 1 | Lv 2 | Lv 3 | Lv 4 |
|---|---|---|---|---|---|
|
Water Cold Bolt, Frost Diver |
Fire | 150 % | 175 % | 200 % | 200 % |
| Poison | 150 % | 150 % | 125 % | 125 % | |
| Neutral | 100 % | 100 % | 100 % | 100 % | |
| Wind | 90 % | 80 % | 70 % | 60 % | |
| Water | 25 % | 0 % | 0 % | 0 % | |
|
Fire Fire Bolt, Fire Ball, Fire Wall |
Earth | 150 % | 175 % | 200 % | 200 % |
| Undead | 125 % | 150 % | 175 % | 200 % | |
| Poison | 150 % | 150 % | 125 % | 125 % | |
| Neutral | 100 % | 100 % | 100 % | 100 % | |
| Water | 90 % | 80 % | 70 % | 60 % | |
| Fire | 25 % | 0 % | 0 % | 0 % | |
|
Wind Lightning Bolt, Thunder Storm |
Water | 150 % | 175 % | 200 % | 200 % |
| Poison | 150 % | 150 % | 125 % | 125 % | |
| Neutral | 100 % | 100 % | 100 % | 100 % | |
| Earth | 90 % | 80 % | 70 % | 60 % | |
| Wind | 25 % | 0 % | 0 % | 0 % |
Against Holy, Shadow and Ghost the three bolts always deal 100 %, at any elemental level. Those are the "neutral" elements for the bolt branch: neither good nor bad.
The Ghost element is a different story
Napalm Beat and Soul Strike are Ghost property, and that row of the table looks like nothing else:
| Ghost against… | Lv 1 | Lv 2 | Lv 3 | Lv 4 |
|---|---|---|---|---|
| Ghost | 125 % | 150 % | 175 % | 200 % |
| Undead | 100 % | 125 % | 150 % | 175 % |
| Water / Earth / Fire / Wind | 100 % | 100 % | 100 % | 100 % |
| Holy / Shadow | 90 % | 80 % | 70 % | 60 % |
| Poison | 75 % | 75 % | 50 % | 50 % |
| Neutral | 90 % | 70 % | 50 % | 0 % |
That 0 % in the corner is the costliest mistake in the job
Neutral level 4 is completely immune to the Ghost element. And neutral is by far the most common defensive element in the game. A Soul Strike 10 against a level 4 neutral target deals 1 damage per hit, no matter what you do.
Even at level 3 you are losing half your damage. Soul Strike and Napalm Beat shine against ghosts and against high-level undead, and are mediocre against almost everything else.
Changing the target's element counts too
Two of your own skills change the enemy's defensive element while they last, and that can be exploited:
Frozen (Frost Diver) → the target becomes Water level 1.
Against Water 1, Wind deals 150 %. Freeze and finish with Lightning Bolt is the classic combination of the job.
And that same hit breaks the freeze, so you only get the bonus once.
Petrified (Stone Curse) → the target becomes Earth level 1.
Against Earth 1, Fire deals 150 %. Petrify and burn is the other half of the same idea.
Both states also halve DEF and raise MDEF by 25 %.
Your weapon's element can be changed (converters, the Sage's Endows, Frost Weapon…), but that does not touch spells: a magic skill's element is fixed in the database and the engine never looks at your weapon to work it out. A fire-enchanted staff does not turn your Cold Bolt into fire.
See also The elemental table is applied AFTER MDEF, which is why a 0 % match leaves everything at 1 damage A bolt does not hit harder when you level it: it hits more times Soul Strike gains a hit every two levels, and only the Undead element grants the bonus Frost Diver misses more than a third of the time even at level 10, and the target MDEF makes it worse
The time it takes to cast a spell is two numbers added together, and they behave completely differently:
Total cast = variable cast + fixed cast
Variable: this is what DEX and INT cut down. It can reach zero.
Fixed: no stat touches it. Only bonuses that specifically say "fixed cast" reduce it.
The variable cast formula
final variable = base variable × ( 1 − √( (DEX × 2 + INT) ÷ 530 ) )
When DEX × 2 + INT reaches 530, the root equals 1 and the variable cast drops to zero. That is "instant cast" — but only of the variable half.
Because it is a square root, the first points are worth far more than the last ones. And since DEX counts double, one point of DEX is worth exactly two of INT here:
| DEX×2 + INT | Example | Variable cut |
|---|---|---|
| 100 | DEX 30 / INT 40 | −43 % |
| 200 | DEX 60 / INT 80 | −61 % |
| 300 | DEX 90 / INT 120 | −75 % |
| 400 | DEX 130 / INT 140 | −87 % |
| 530 | DEX 165 / INT 200 | −100 % |
An example with Cold Bolt 10
Cold Bolt level 10 has 3200 ms variable + 1200 ms fixed. With DEX 90 and INT 99 (DEX×2+INT = 279, a 72.6 % cut):
3200 × 0.274 = 877 ms of variable, plus 1200 ms of fixed → 2077 ms in total.
Even if you reached 530 points, that Cold Bolt would still take 1200 ms. The fixed half is the half you cannot negotiate with stats.
Fixed cast for every Mage skill
| Skill | Variable | Fixed | After-cast delay |
|---|---|---|---|
| Sight | — | — | — |
| Napalm Beat | 400 | 100 | 500 |
| Soul Strike | 400 | 100 | 1400 |
| The three bolts (lv 1 → 10) | 500 → 3200 | 300 → 1200 | 1400 |
| Frost Diver | 640 | 160 | 500 |
| Stone Curse | 800 | 200 | — |
| Fire Ball | 800 | 200 | 700 |
| Fire Wall (lv 1 → 10) | 1600 → 560 | 400 → 140 | — |
| Thunder Storm (lv 1 → 10) | 2700 → 4500 | 1500 | 2000 |
| Safety Wall (lv 1 → 10) | 3200 → 320 | 800 → 80 | — |
| Energy Coat | — | 5000 | — |
Energy Coat is five seconds, full stop
It is the only skill in the job whose cast is entirely fixed. Not even DEX 200 and INT 200 bring it below 5 seconds. You put it on before the fight, never during it.
What actually reduces cast time
Reduce the VARIABLE half
Reduce the FIXED half
Fixed-cast percentages do not stack: the largest one wins.
What breaks your cast
What the tooltip does not tell you about uninterruptible casting
Cards and gear that grant uninterruptible cast (Phen, Bloody Butterfly, Orleans's Gown, All In One Ring…) do not work in GvG, in castles or in battlegrounds. There you get interrupted like everybody else.
What this server does do is waive the toll on those maps: the cast-speed penalty those pieces carry is refunded, because paying the price of a gift that does not apply would be a double punishment. It is covered in full in Cast penalty in war zones.
Server extra: if the target dies mid-cast, the spell is not wasted
By default, killing your target halfway through your cast throws the spell away. Here the engine looks for another valid target and casts at it instead: same range (with some slack, which grows with your player level), same line of sight, and respecting kill-steal protection.
Among all candidates, one that is already wounded or already fighting always wins, and only between equals does distance decide. This only affects offensive spells aimed at a unit: support never switches target.
The after-cast delay (the right-hand column of the table) is the window in which you cannot cast another skill. On this server it is not reduced by DEX or AGI, and it does not block normal attacks. Spells that fire on their own — cards, Hindsight, the bolts from elemental buffs — are exempt from after-cast delay for players, so a proc never stalls your rotation.
See also Fourteen skills, and one of them cannot be bought with skill points The elemental table is applied AFTER MDEF, which is why a 0 % match leaves everything at 1 damage Energy Coat reduces more the more SP you have left, and it is paid for with that same SP In a war zone you no longer pay the toll of uninterruptible-cast cards
The three are identical apart from their element. What you need to know about them fits in one line: each hit deals 100 % of your MATK, and the skill level is the number of hits.
| Cold Bolt | Fire Bolt | Lightning Bolt | |
|---|---|---|---|
| Element | Water | Fire | Wind |
| Max level | 10 | 10 | 10 |
| Range | 9 | 9 | 9 |
| Hits | = level | = level | = level |
| % per hit | 100 % | 100 % | 100 % |
Cost, cast and delay by level
| Level | SP | Hits | Total damage | Variable cast | Fixed cast |
|---|---|---|---|---|---|
| 1 | 12 | 1 | 100 % | 500 | 300 |
| 2 | 14 | 2 | 200 % | 800 | 400 |
| 3 | 16 | 3 | 300 % | 1100 | 500 |
| 4 | 18 | 4 | 400 % | 1400 | 600 |
| 5 | 20 | 5 | 500 % | 1700 | 700 |
| 6 | 22 | 6 | 600 % | 2000 | 800 |
| 7 | 24 | 7 | 700 % | 2300 | 900 |
| 8 | 26 | 8 | 800 % | 2600 | 1000 |
| 9 | 28 | 9 | 900 % | 2900 | 1100 |
| 10 | 30 | 10 | 1000 % | 3200 | 1200 |
After-cast delay: 1400 ms at every level. No cooldown.
Levelling up is not always worth it
From level 1 to level 10 the damage is multiplied by ten, but the total cast goes from 800 ms to 4400 ms — a little over five times. In damage per second it does pay off… as long as you get to finish the cast.
Against something that is hitting you, a low-level bolt that actually goes off is infinitely better than a level 10 one that gets cut in half. Plenty of mages take their main bolt to 10 and leave a secondary element at 5 for exactly this reason.
MDEF applies to each hit, not to the total
The engine works out the damage of one hit (with its MDEF, its MRes and its elemental multiplier) and then multiplies by the number of hits. Since soft MDEF is a subtraction, it is subtracted ten times in a level 10 bolt.
In practice: against targets with high soft MDEF a low-level bolt loses proportionally the same as a high-level one — but against a target where your hit already lands near 1, all ten hits end up as 10 damage and the spell is useless.
Where the bolts show up again
Hindsight (Auto Spell, Sage)
When you cast Hindsight you pick one of your spells, and your character casts it on its own when you hit with your weapon. In renewal the level it fires at is half your Hindsight level, and never more than what you actually know.
With the Sage Soul Link that cap disappears for the three bolts: they fire at whatever level you have them, up to 10.
If the bot is driving, it picks for itself: it takes the bolt it knows best, and if Hindsight is below level 2 it settles for Napalm Beat. The area spells are excluded on purpose, so it does not freeze the person standing next to it.
Spell Fist (Sorcerer)
Spell Fist "loads" a bolt and turns it into melee strikes. While it is active the bolt changes nature entirely: it counts as a short-range weapon attack, with a single hit, and its percentage is recalculated from the loaded bolt level and the Spell Fist level.
It is the only situation in which a bolt is not magic.
The Sorcerer's elemental buffs fire them for free
Each of the Sorcerer's four elemental spirit buffs occasionally fires "its" bolt with the percentage multiplied by 5:
A second group of buffs (Gust, Pyrotechnic, Aqua Play) adds a small flat amount instead of multiplying: 6 + INT÷4 + (DEX−10)÷30. Not much, but it is free.
@autoplay chooses between the three bolts by the target's element, using the server's own elemental table and demanding a strict advantage. All three are configurable from the panel. And since spells that fire on their own pay no after-cast delay, an automated mage chains bolts without the 1400 ms penalty between procs.
See also Fourteen skills, and one of them cannot be bought with skill points The elemental table is applied AFTER MDEF, which is why a 0 % match leaves everything at 1 damage A level 4 ghost target takes 0 % from ghost damage, and your Soul Strike deals 1 Half your cast time is untouched by DEX and INT, and Energy Coat is all of that half Frost Diver misses more than a third of the time even at level 10, and the target MDEF makes it worse
Napalm Beat hits the target and every enemy in the 3×3 around it. What almost nobody knows is that the damage is split between all of them.
The formula
damage per target = (MATK ÷ number of targets) × (70 + 10 × level) %
The division happens on MATK, before the skill percentage is applied. If nobody else is in the area, the engine counts 1 target.
| Level | SP | Percentage | With 1 target | With 3 | With 5 |
|---|---|---|---|---|---|
| 1 | 9 | 80 % | 80 % | 27 % | 16 % |
| 4 | 12 | 110 % | 110 % | 37 % | 22 % |
| 7 | 15 | 140 % | 140 % | 47 % | 28 % |
| 10 | 18 | 170 % | 170 % | 57 % | 34 % |
Ghost property. Range 9. One hit. Cast 400 variable + 100 fixed. After-cast delay 500 ms. No cooldown.
The mistake everybody makes
Napalm Beat is not an area skill for clearing packs. Against five monsters each one takes a fifth. The total damage dealt is always the same; the only thing that changes is how many ways it is split.
Its real niche is the opposite: a single isolated target, where the level 10 figure of 170 % lands in full for 18 SP and half a second of casting. It is the cheapest and fastest spell in the job.
The element matters more than the formula
It is Ghost property, which turns it into two different skills depending on what you are fighting:
The full numbers are in the elemental table. If you are going to take Napalm Beat past level 4 (which is what Soul Strike requires), check what you are fighting first.
Napalm Beat also hits ground units — hunter traps and the like — not just creatures. And it is one of the Hindsight candidates: when the bot is driving and knows no bolt at all, this is the one it picks. It is configurable from the @autoplay panel.
See also Fourteen skills, and one of them cannot be bought with skill points A level 4 ghost target takes 0 % from ghost damage, and your Soul Strike deals 1 Soul Strike gains a hit every two levels, and only the Undead element grants the bonus Fire Ball deals 25 % less right at the edge of its area, and only when you are the caster
Soul Strike is the Mage's single-target spell that does not depend on the four classic elements. It hits several times, gains a hit every two levels, and raises its percentage against undead.
The formula
damage per hit = MATK × 100 %, plus 5 % per level if the target counts as undead.
hits = integer part of ((level + 1) ÷ 2) — one more every two levels.
| Level | SP | Hits | % per hit | % vs undead | Normal total |
|---|---|---|---|---|---|
| 1 | 18 | 1 | 100 % | 105 % | 100 % |
| 2 | 14 | 1 | 100 % | 110 % | 100 % |
| 3 | 24 | 2 | 100 % | 115 % | 200 % |
| 4 | 20 | 2 | 100 % | 120 % | 200 % |
| 5 | 30 | 3 | 100 % | 125 % | 300 % |
| 6 | 26 | 3 | 100 % | 130 % | 300 % |
| 7 | 36 | 4 | 100 % | 135 % | 400 % |
| 8 | 32 | 4 | 100 % | 140 % | 400 % |
| 9 | 42 | 5 | 100 % | 145 % | 500 % |
| 10 | 38 | 5 | 100 % | 150 % | 500 % |
Even levels cost LESS SP than odd ones
This is not a typo in the table: level 9 costs 42 and level 10 costs 38. The odd levels are the ones that add a hit, which is why they are priced so steeply. If you are going to leave Soul Strike unfinished, always stop on an even level: same number of hits as the odd level below it, and cheaper.
Ghost property. Range 9. Cast 400 variable + 100 fixed. After-cast delay 1400 ms. No cooldown.
The undead bonus checks the element, not the race
Here is the trap: the engine checks "undead" with a function that, in this server's configuration, only looks at the Undead defensive element. A skeleton of the undead race but earth property gives no bonus.
And because the bonus is elemental, it stacks with what the table already says: Ghost against Undead level 4 is 175 %, and Soul Strike 10 puts the skill percentage at 150 %. Against an Undead-property monster, Soul Strike is one of the strongest things the job owns.
And the other side of it
Against neutral level 4 it deals 0 % — five hits of 1 damage. Soul Strike is not a general-purpose spell; it is a spell against ghosts and undead that also happens to be a stepping stone towards Safety Wall.
It is required for Safety Wall (Soul Strike 5) and needs Napalm Beat 4. It sits in the @autoplay catalogue as a single-target skill used at spell range.
See also Fourteen skills, and one of them cannot be bought with skill points A level 4 ghost target takes 0 % from ghost damage, and your Soul Strike deals 1 Napalm Beat splits its damage among everyone nearby: the more targets, the less each one takes The elemental table is applied AFTER MDEF, which is why a 0 % match leaves everything at 1 damage
Fire Ball is the Mage's real area skill: it hits a 5×5 centred on the target and, unlike Napalm Beat, splits nothing. Every enemy inside takes the full hit.
The formula
percentage = 140 + 20 × level
And there is a distance cut: enemies standing exactly 2 cells from the original target — the outer ring of the 5×5 — take only three quarters of the damage.
That cut only applies when the caster is a player. A monster or a companion casting Fire Ball deals full damage across the whole area.
| Level | Percentage | At the edge (−25 %) |
|---|---|---|
| 1 | 160 % | 120 % |
| 3 | 200 % | 150 % |
| 5 | 240 % | 180 % |
| 7 | 280 % | 210 % |
| 10 | 340 % | 255 % |
Fire property. Range 9. 5×5 area. 25 SP at every level. Cast 800 variable + 200 fixed. After-cast delay 700 ms. No cooldown. One hit.
The cost never rises: 25 SP always
It is the only damage skill in the job with a flat cost. Fire Ball 1 and Fire Ball 10 cost the same, and the cast time does not change with level either. Levelling it is pure profit; there is no reason to leave it half-done other than running out of points.
How to aim it properly
The area is centred on the target, not on where you stand. And since the 25 % cut depends on distance from the original target, placing the centre on the monster in the middle of a pack keeps everyone within 1 cell and nobody loses damage.
The reverse is true too: aiming at the monster on the edge leaves half the pack in the 2-cell ring, taking 75 %.
The trap: it does nothing against fire
It is fire property. Against fire creatures of level 2 or higher the multiplier is 0 %, and against water creatures it sits between 90 % and 60 %. In fire zones — and Ragnarok has plenty — Fire Ball is literally useless, no matter how high you have it.
Fire Ball, like Napalm Beat, also reaches ground units (traps, walls of thorns…). It is required for Fire Wall (Fire Ball 5) and needs Fire Bolt 4. It is configurable from the @autoplay panel, which uses it as an area skill against packs.
See also Fourteen skills, and one of them cannot be bought with skill points A level 4 ghost target takes 0 % from ghost damage, and your Soul Strike deals 1 Napalm Beat splits its damage among everyone nearby: the more targets, the less each one takes Fire Wall is not measured in seconds: every cell carries its own hit counter
Fire Wall raises a wall of fire perpendicular to the direction you cast it in. It is not a zone that lasts X seconds and that is that: every cell of the wall carries its own hit count and vanishes once it runs out, even with time to spare.
The two limits
Hits per cell = 4 + level — from 5 to 14. Each cell is spent separately.
Duration = 5 to 14 seconds by level… × 2 on this server, so 10 to 28 seconds in practice.
The wall dies to whichever runs out first. Against a lone enemy it usually dies to hits; against nobody, to time.
Shape and number of cells
The wall is laid perpendicular to the line from you to the spot you marked:
Diagonals give you almost twice the wall for the same SP. It is not a hidden trick: it is the geometry of the engine.
| Level | Hits/cell | Base duration | Real duration (×2) | Variable cast | Fixed cast |
|---|---|---|---|---|---|
| 1 | 5 | 5 s | 10 s | 1600 | 400 |
| 3 | 7 | 7 s | 14 s | 1280 | 320 |
| 5 | 9 | 9 s | 18 s | 960 | 240 |
| 7 | 11 | 11 s | 22 s | 800 | 200 |
| 10 | 14 | 14 s | 28 s | 560 | 140 |
Fire property. Range 9. 40 SP at every level. No after-cast delay, no cooldown. Every hit deals 50 % of your MATK.
This server lets you keep SIX walls up
By default the engine allows 3 simultaneous Fire Walls per caster. Here that cap is multiplied by the same factor as the durations (×2), so the real limit is 6.
Once you go over the cap, the oldest one is deleted automatically. There is no error message.
The knockback is half the point
Every hit from the wall knocks the victim back 2 cells — in the direction it is facing, not the direction you are in. That knockback is what makes Fire Wall the best control tool the job has: an enemy trying to cross it spends its life bouncing.
Against fire and undead it behaves differently
If the target is fire property or counts as undead, the wall does not knock it back. On top of that the engine grants it 2 seconds of "cannot be stopped", so it walks straight through.
In other words: against something immune to your fire, Fire Wall does not just deal 0 damage, it does not slow it either. Against fire elementals and undead, forget about it.
It burns out fast if the enemy stands still
The interval between wall hits is 20 ms, but the engine only sweeps ground units every 100 ms. In practice an enemy standing still on a cell can take up to 5 hits at once, and a level 10 cell (14 hits) is gone in under a second.
This is why Fire Wall performs far better when the enemy is walking: it steps in, takes a hit or two, gets pushed out, comes back in. If you have it immobilised on top of the wall, the wall evaporates.
The wall is placed with a path check (you cannot put it on the other side of a map wall) and it is one of the things Fire Rain removes. It requires Fire Ball 5 + Sight 1. It is listed in the @autoplay panel but is not configurable: the AI uses it with its own placement logic.
See also Fourteen skills, and one of them cannot be bought with skill points Safety Wall has two counters, and whichever empties first takes the wall down A level 4 ghost target takes 0 % from ghost damage, and your Soul Strike deals 1 Fire Ball deals 25 % less right at the edge of its area, and only when you are the caster
Safety Wall creates a cell where melee hits do nothing to you. It is the best defensive skill in the job and it has three pieces of small print you should know before spending points on it.
The two counters
Hits blocked = level + 1 — from 2 to 11.
Health pool = 300 × level + 65 × (INT + base level) + max SP
Every blocked hit spends one of each: it takes 1 off the hit counter and subtracts the damage it would have dealt from the health pool. The wall falls when either one runs out.
With INT 99, base level 99 and 1500 max SP, a Safety Wall 10 has a pool of 17,370 points and 11 hits. Against small hits the hit counter runs out first; against an MVP, the pool does.
| Level | SP | Hits | Base duration | Real duration (×2) | Variable cast | Fixed cast |
|---|---|---|---|---|---|---|
| 1 | 30 | 2 | 5 s | 10 s | 3200 | 800 |
| 3 | 30 | 4 | 15 s | 30 s | 2560 | 640 |
| 5 | 35 | 6 | 25 s | 50 s | 1920 | 480 |
| 7 | 40 | 8 | 35 s | 70 s | 1280 | 320 |
| 10 | 40 | 11 | 50 s | 100 s | 320 | 80 |
It is the only skill in the job that casts FASTER the higher it is
From 4000 ms total at level 1 to 400 ms at level 10. And the duration multiplies by ten. A half-levelled Safety Wall is nearly useless: four seconds of casting for two blocked hits. At level 10 it is four tenths of a second for eleven hits and a hundred seconds of wall.
What exactly it blocks
It only stops things that are short-ranged and non-magical. Specifically:
It does block
It does not block
Pneuma, the Acolyte skill, is the exact opposite: it blocks long-ranged non-magical attacks. Together they cover nearly everything physical.
It costs a Blue Gemstone, with one exception
Every cast consumes 1 Blue Gemstone. This server has no VIP exemption for gemstones, so you always pay… unless you cast it on Land Protector: there the wall never comes into existence and the engine does not charge you the gem.
Blue Gemstones weigh 1 and cost 450z. A support mage carries a stack of them.
Two more ground rules
It requires Napalm Beat 7 + Soul Strike 5, the most expensive chain in the tree. It is configurable from the @autoplay panel, which keeps it up on its own for characters that know how to use it.
See also Fourteen skills, and one of them cannot be bought with skill points Fire Wall is not measured in seconds: every cell carries its own hit counter Energy Coat reduces more the more SP you have left, and it is paid for with that same SP Soul Strike gains a hit every two levels, and only the Undead element grants the bonus
Frost Diver deals water damage and tries to freeze. The damage always lands; the freeze is a roll, and that roll is much worse than people assume.
The two formulas
Damage = MATK × (100 + 10 × level) % → from 110 % to 200 %.
Base chance = the smaller of (level × 3 + 35) and (level + 60)
Up to level 12 the first term wins. At level 10 that is 65 %, and that is the ceiling: the second term only kicks in at levels that do not exist here.
| Level | SP | Damage | Base chance | Base freeze | Real freeze |
|---|---|---|---|---|---|
| 1 | 25 | 110 % | 38 % | 3 s | 12 s |
| 3 | 23 | 130 % | 44 % | 9 s | 24 s |
| 5 | 21 | 150 % | 50 % | 15 s | 36 s |
| 7 | 19 | 170 % | 56 % | 21 s | 48 s |
| 10 | 16 | 200 % | 65 % | 30 s | 66 s |
The "real freeze" column is this server's arithmetic against a target with no MDEF: the renewal engine adds a flat 3 seconds, and then the server's global status multiplier doubles the result. Water property. Range 9. One hit. Cast 640 variable + 160 fixed. After-cast delay 500 ms.
The SP cost goes DOWN with level
Frost Diver 1 costs 25 SP and Frost Diver 10 costs 16. More damage, more chance, longer freeze and less SP. There is no reason to leave it below 10 if you plan to use it.
The target's MDEF hurts you twice
The target's hard MDEF subtracts from both the chance and the duration, by the same percentage:
Working in your favour is your level difference: if you out-level the target, the engine discounts effective MDEF on a quadratic curve, so freezing monsters well below you is far more reliable.
The five things that make it fail silently
When it fails and the caster is a player, you get the "skill has failed" message. The damage has already been dealt: you do not lose the spell, only the status.
What happens to a frozen target
Good for you
Bad for you
The combination that works
Frost Diver → Lightning Bolt. The target turns Water 1, wind deals 150 %, and the first hit of the bolt breaks the freeze — but all ten hits of a Lightning Bolt 10 are calculated at once, so every one of them lands with the bonus.
What does not work is freezing and following up with Cold Bolt: you have just turned your own element into the worst possible one.
It requires Cold Bolt 5 and is required for Ice Wall and Storm Gust in the Wizard tree. @autoplay keeps it in the catalogue behind a dedicated gate that checks the target can be frozen before spending it.
See also Fourteen skills, and one of them cannot be bought with skill points A level 4 ghost target takes 0 % from ghost damage, and your Soul Strike deals 1 Stone Curse eats your gemstone even when it fails, if you keep it below level 6 A bolt does not hit harder when you level it: it hits more times Monsters cast Orc Head again, and Healers clear the annoying debuffs
Stone Curse deals no damage: it only petrifies. And it is probably the skill in the job with the most small print, starting with one detail that surprises everybody.
Its range is 2
Every other offensive Mage skill reaches 9 cells. Stone Curse reaches 2. For all practical purposes it is a melee spell: you have to be right next to whatever you want to petrify.
The formula
Chance = 20 + 4 × level → from 24 % to 60 %.
Petrology Option, the Sorcerer's earth buff, adds its own percentage on top.
| Level | SP | Chance | Gem spent on failure? |
|---|---|---|---|
| 1 | 25 | 24 % | Yes |
| 2 | 24 | 28 % | Yes |
| 3 | 23 | 32 % | Yes |
| 4 | 22 | 36 % | Yes |
| 5 | 21 | 40 % | Yes |
| 6 | 20 | 44 % | No |
| 7 | 19 | 48 % | No |
| 8 | 18 | 52 % | No |
| 9 | 17 | 56 % | No |
| 10 | 16 | 60 % | No |
That right-hand column is why you should not stop halfway
Every attempt consumes 1 Red Gemstone. From level 1 to 5 the gem is spent even when the spell fails. From 6 to 10 it is not.
With Stone Curse 5 (40 % chance) you are throwing away six gems out of every ten at 450z each. With Stone Curse 6, none. That jump from level 5 to 6 saves you more zeny than any other point in the tree.
Petrifying has two phases
Phase 1: turning to stone
5 seconds base, which this server doubles to 10. During this phase the target cannot attack or cast, but it can still move.
Phase 2: petrified
12 seconds. It cannot move, attack or cast. It loses 1 % of its health every 5 seconds, but never below 25 % of its maximum health.
A petrified target has its DEF halved, its MDEF 25 % higher, and becomes Earth level 1: Fire deals 150 % to it. Those 12 seconds are what it lasts against a monster; against another player it stretches to 17, because of how the server multiplier treats statuses with a heartbeat.
And any hit breaks it
Just like the freeze, petrification falls to any damage taken. Petrifying in order to then attack is self-defeating: the first hit undoes the status. It is for taking an enemy out of the picture while you deal with another one, not for setting it up.
When it fails without telling you
When it fails against a monster, the monster still plays the animation. Only players get the failure notice. That is deliberate.
Earth property, nothing special about its cast (800 variable + 200 fixed) and no after-cast delay. It has no prerequisites and is required for Ice Wall and Earth Spike (Wizard) and for Seismic Weapon (Sage). In @autoplay it has a dedicated gate: it checks that you own the gem and that the target is not already petrified before trying.
See also Fourteen skills, and one of them cannot be bought with skill points Frost Diver misses more than a third of the time even at level 10, and the target MDEF makes it worse A level 4 ghost target takes 0 % from ghost damage, and your Soul Strike deals 1 Monsters cast Orc Head again, and Healers clear the annoying debuffs
Thunder Storm is cast on the ground, not on a target, and hits a 5×5. Every enemy inside takes the full package: as many hits of 100 % of your MATK as the skill's level, split among nobody.
The formula
damage per enemy = MATK × 100 % × level
In renewal the percentage is a clean 100 % (in the old version it was 80 %). Wind property.
| Level | SP | Hits | Total damage | Variable cast | Fixed cast | Base total |
|---|---|---|---|---|---|---|
| 1 | 29 | 1 | 100 % | 2700 | 1500 | 4.2 s |
| 3 | 39 | 3 | 300 % | 3100 | 1500 | 4.6 s |
| 5 | 49 | 5 | 500 % | 3500 | 1500 | 5.0 s |
| 7 | 59 | 7 | 700 % | 3900 | 1500 | 5.4 s |
| 10 | 74 | 10 | 1000 % | 4500 | 1500 | 6.0 s |
Range 9. After-cast delay 2000 ms, the longest in the job. No cooldown.
Those 1500 ms of fixed cast are the problem
Not even DEX 200 and INT 200 bring Thunder Storm below a second and a half, plus the 2 seconds of after-cast delay afterwards. That is 3.5 seconds of your life in the best case, against the 1200 + 1400 of a Lightning Bolt 10 — which deals the same total damage to a single target.
Rule of thumb: Thunder Storm only pays off from two enemies upwards. Against one, Lightning Bolt always wins.
How the zone behaves
Technically it is a ground unit, but the zone lives for a tenth of a second: it strikes whoever is inside at that instant and disappears. It is not a cloud that keeps damaging people who walk under it.
Its real niche
Packs of water monsters — where wind deals 150 % to 200 % — that are already standing still or coming at you in a line. Against wind creatures it deals 0 % and against earth ones between 90 % and 60 %.
It requires Lightning Bolt 4 and is required for Meteor Storm and Lord of Vermilion in the Wizard tree. In the AI it is catalogued as a ground-aimed area skill: @autoplay uses it when there are at least two enemies inside the box, and decides by total damage rather than by head count.
See also Fourteen skills, and one of them cannot be bought with skill points A bolt does not hit harder when you level it: it hits more times A level 4 ghost target takes 0 % from ghost damage, and your Soul Strike deals 1 Half your cast time is untouched by DEX and INT, and Energy Coat is all of that half
Sight lights two fireballs around you that reveal anyone hiding within their radius for as long as they last.
The essentials
Single level. 10 SP. No cast time. No after-cast delay. No cooldown.
Duration: 10 seconds. Radius: 3 cells around you, and it follows you as you move.
What it reveals
It checks four times per tenth of a second, so there is no way to "run past" a Sight without being seen.
The curiosity: those 10 seconds really are 10 seconds
This server doubles the duration of nearly every status applied by a player. Sight is one of the exceptions, and not because of a special rule: it is a status with a heartbeat, and for those the multiplier changes the beat rate rather than the total. The result is that Sight lasts exactly what the database says.
The same happens to the petrified phase of Stone Curse. See Stone Curse.
Why you will take it anyway
Even if you never run into a hidden assassin, Sight 1 is a prerequisite for Fire Wall. It is a single skill point and it is the key to the best control tool in the job. Take it early.
The status cannot be dispelled (neither by Dispell nor by Banishing Buster) and is not saved when you log out. It is configurable from the @autoplay panel, which keeps it up on characters that know it.
See also Fourteen skills, and one of them cannot be bought with skill points Fire Wall is not measured in seconds: every cell carries its own hit counter Half your cast time is untouched by DEX and INT, and Energy Coat is all of that half
Energy Coat wraps you in a layer that turns your SP into staying power. Every hit you take is reduced by a percentage, and that percentage is paid for with SP.
The two formulas, and they are the same ladder
The engine splits your SP into 20 % bands. Call t the band you are in (0 if you have less than 20 % left, 4 if you are nearly full):
Damage reduction = 6 % × (1 + t) → from 6 % to 30 %.
Cost per hit = (1 % + 0.5 % × t) of your maximum SP → from 1 % to 3 %.
| SP remaining | Reduction | Cost per hit |
|---|---|---|
| 80 – 100 % | 30 % | 3.0 % of max SP |
| 60 – 79 % | 24 % | 2.5 % |
| 40 – 59 % | 18 % | 2.0 % |
| 20 – 39 % | 12 % | 1.5 % |
| 0 – 19 % | 6 % | 1.0 % |
It switches itself off when you cannot pay
If you do not have enough SP for the toll at the moment a hit lands, the coat falls. There is no warning beforehand.
In renewal it also stops magic
The old version of Energy Coat only reduced weapon damage. In renewal — which is what runs here — it reduces weapon damage and magic damage. It is by far the best defensive piece a mage can bring against another mage.
The one hand-written exception: Cart Termination goes straight through it. And Hell's Plant pierces it just like weapon damage.
Five seconds of casting, and they cannot be cut
Energy Coat has 0 variable cast and 5000 ms of fixed cast. Neither DEX nor INT touches fixed cast, so it is always 5 seconds. You put it on before the fight. Casting it mid-combat is five seconds of standing still handed to your enemy.
Duration
300 seconds base → 10 real minutes, because the server's buff multiplier doubles it. Casting it costs 30 SP.
Remember it is not learned with points
It is a quest skill and learning quest skills with points is switched off. It is handed out by the Platinum Skill NPC (Prontera 158,193), and the Job Master gives it to you automatically on job change.
Two incompatibilities: Psychic Stream (Elemental Master) cannot be cast while Energy Coat is up, and the coat falls to Hermode. It is configurable from the @autoplay panel, which maintains it as a self-buff.
See also Fourteen skills, and one of them cannot be bought with skill points Safety Wall has two counters, and whichever empties first takes the wall down Increase SP Recovery doubles what your SP potions restore, and that is worth more than the regeneration Half your cast time is untouched by DEX and INT, and Energy Coat is all of that half
It is the only passive in the job and the one that gives the most per point spent — but not for the reason the tooltip suggests.
Effect 1: SP regeneration while standing still
SP recovered = level × 3 + (level × max SP ÷ 500), every 10 seconds.
At level 10 with 1000 max SP that is 50 SP every 10 seconds, on top of your normal regeneration.
Effect 2: the one that actually matters
Anything that restores SP to you is boosted by +10 % per level. With Increase SP Recovery 10, an SP potion restores twice as much.
It adds to the INT bonus (+2 % per point of INT), so a mage with INT 99 and this passive at 10 gets nearly three times as much out of a blue potion as a character with neither.
| Level | SP every 10 s (at 1000 max SP) | Potion bonus |
|---|---|---|
| 1 | 5 | +10 % |
| 3 | 15 | +30 % |
| 5 | 25 | +50 % |
| 7 | 35 | +70 % |
| 10 | 50 | +100 % |
The catch: the regeneration only counts while you are NOT walking
The regeneration half is what the engine calls "skill recovery", and it switches off the moment you start walking. It also switches off if you are overweight or hidden, and it stops counting once your SP is full.
Standing still does count. Sitting counts too, and it also halves the interval of your normal regeneration.
The potion bonus, by contrast, always works: while walking, while fighting and in the middle of a castle siege.
How many points it deserves
It depends on how you play. If you lean on blue potions — which is normal in the magic branch — it is worth taking to 10: doubling the value of every potion is equivalent to carrying twice as many, and potions weigh.
If you play by sitting down and waiting, half the levels already give you the bulk of it: the regeneration grows linearly, with no thresholds.
No prerequisites, nothing to cast, cannot be dispelled and does not show up in the status window. It is almost always the first skill people level. In the @autoplay panel it is listed as a recognised passive, but it is not configurable: there is nothing to configure.
See also Fourteen skills, and one of them cannot be bought with skill points Energy Coat reduces more the more SP you have left, and it is paid for with that same SP Half your cast time is untouched by DEX and INT, and Energy Coat is all of that half
All twenty skills of the mage's second job and its transcendent version, one by one: the exact formula this server uses, the real cost, and the engine traps no tooltip ever mentions.
The Wizard is the second job of the Mage branch. It inherits the Novice and Mage trees in full and adds fourteen skills of its own: nine damage spells, two terrain controls, one debuff, one information skill and one proximity mine.
The High Wizard is its transcendent version. It inherits Novice, Mage and Wizard complete and adds six more skills. None of them replaces anything below: all six lean on what you already have.
Everything on these pages comes from the emulator that is running right now. When a formula disagrees with the client or with a wiki, the one here wins.
The Wizard tree
| Skill | Max | Requires | What it is |
|---|---|---|---|
| Sense | 1 | — | Monster information |
| Sight Blaster | 1 | — | Proximity mine |
| Fire Pillar | 10 | Fire Wall 1 | Ground trap, fire |
| Sightrasher | 10 | Lightning Bolt 1, Sight 1 | Blast around you, fire |
| Meteor Storm | 10 | Sightrasher 2, Thunderstorm 1 | Rain of impacts, fire |
| Jupitel Thunder | 10 | Napalm Beat 1, Lightning Bolt 1 | Single-target damage, wind |
| Lord of Vermilion | 10 | Thunderstorm 1, Jupitel Thunder 5 | Area carpet, wind |
| Water Ball | 5 | Cold Bolt 1, Lightning Bolt 1 | Burst fed by water |
| Ice Wall | 10 | Stone Curse 1, Frost Diver 1 | Wall that blocks movement |
| Frost Nova | 10 | Ice Wall 1 | Freeze around you |
| Storm Gust | 10 | Frost Diver 1, Jupitel Thunder 3 | Area blizzard, water |
| Earth Spike | 5 | Stone Curse 1 | Single-target damage, earth |
| Heaven's Drive | 5 | Earth Spike 3 | 5×5 area, earth |
| Quagmire | 5 | Heaven's Drive 1 | Bog that slows |
Only four roots depend on nothing inside the Wizard tree: Sense, Sight Blaster, Fire Pillar and Earth Spike. Everything else hangs off those or off the Mage tree.
The High Wizard tree
| Skill | Max | Requires | What it is |
|---|---|---|---|
| Soul Drain | 10 | Increase SP Recovery 5, Soul Strike 7 | SP passive |
| Stave Crasher (Magic Crasher) | 1 | Increase SP Recovery 1 | Physical hit fed by your MATK |
| Mystical Amplification | 10 | — | Self MATK buff |
| Napalm Vulcan | 5 | Napalm Beat 5 | Ghost damage in 3×3 |
| Ganbantein | 1 | Sense 1, Ice Wall 1 | Erases ground units |
| Gravitational Field | 5 | Stave Crasher 1, Mystical Amplification 10, Quagmire 1 | Neutral burst in 5×5 |
Transcending changes none of the formulas below it. Storm Gust, Meteor Storm and the bolts do not hit any harder for being a High Wizard. What changes is everything around them: a MATK multiplier that lasts a full minute, an SP pool that refills itself on kills, and an element (ghost) that none of the four basic elemental armours resist.
What transcending really buys you
A Wizard's problem is SP, not damage
Soul Drain attacks it from both ends: it raises your maximum SP by 2 % per level (up to +20 %) and it gives SP back every time you land the killing blow with a targeted spell. At level 10 that is 2.45 × the monster's level in SP per kill.
The catch: no ground spell counts. Storm Gust, Meteor Storm and Lord of Vermilion never trigger it.
And the multiplier everyone gets wrong
Mystical Amplification gives +5 % MATK per level for 60 seconds. On this server (renewal) it is NOT consumed by your next spell: that behaviour is pre-renewal and is compiled out. It is an ordinary one-minute buff.
What is true is the other half, which almost nobody knows: the percentage only multiplies stat MATK and weapon MATK, never the flat MATK from your gear.
How to read a formula on these pages
Every magic damage skill is computed the same way: the engine starts from a ratio of 100 % and adds whatever that skill's code says. The ratio is then applied to your MATK. After that:
| Concept | What it means here |
|---|---|
| Positive hit count | Damage is MULTIPLIED by the number of hits. Example: Jupitel Thunder 10 is twelve hits of 100 %. |
| Negative hit count | Damage is SPLIT across the hits: the total is what the formula says. Example: Lord of Vermilion is twenty hits adding up to 1,400 %, not 20 × 1,400 %. |
| × base level / 100 | Only applies above base level 99. At 99 or below it does nothing; at 175 it multiplies by 1.75. |
| Variable cast |
Reduced by 1 − √((DEX×2 + INT) / 530). At DEX×2+INT = 530 it disappears entirely.
|
| Fixed cast | DEX and INT do not touch it. Only specific gear and statuses shorten it (Sacrament, Poem of Bragi…). |
Three server rules that matter a lot to a mage
If your target dies mid-cast, the spell is NOT lost
The engine looks for another valid target and fires at it. It has to be one that would have been legal from the start: same alignment, within range plus a margin, and with line of sight. A target that is already wounded or already fighting always wins.
The margin depends on your player level and on the spell's range: at range 9 (nearly everything a Wizard casts) it applies in full.
In war zones you do not pay the uninterruptible-cast toll
Gear that grants uninterruptible casting charges for it with slower casting. In GvG, castles and battlegrounds the engine ignores the gift — so here it also ignores the toll. The whole story is on that page.
What the @autoplay AI uses from this tree
Out of the twenty, the AI knows how to use twelve: Sightrasher, Frost Nova, Heaven's Drive, Fire Pillar, Quagmire, Earth Spike and Jupitel Thunder (as bolts in the element picker), Napalm Vulcan, Stave Crasher, and the three big area spells — Meteor Storm, Storm Gust and Lord of Vermilion.
The eight it does not use, and why: Water Ball demands water cells; Ice Wall can trap the character itself; Sense only gives information; Sight Blaster is a wait; Ganbantein burns two gemstones and there is nothing to erase; Gravitational Field and Mystical Amplification are excluded for reasons that no longer hold (see their pages); and Soul Drain is passive. Everything it does use can be tuned from the panel's repertoire, except the three big area spells, which go through a path of their own.
See also Storm Gust: the third-hit freeze is gone, and freezing stops the blizzard Mystical Amplification: here it is NOT spent on your next spell, and it does not multiply gear MATK Soul Drain: +20 % maximum SP, and SP back on every kill… with TARGETED spells Fourteen skills, and one of them cannot be bought with skill points
Storm Gust lays down a 9×9 cell blizzard that strikes every 450 ms for 4.5 seconds: up to ten pulses per target. Each pulse knocks back 2 cells and can freeze.
The three-hit counter does NOT exist on this server. "The third hit freezes" is the pre-renewal rule, and the code says so itself: "the Storm Gust counter was dropped in renewal". Here every pulse rolls its own independent die, and the chance goes down as the skill level goes up.
The numbers
| Item | Value |
|---|---|
| Ratio per pulse | 70 + 50 × level % |
| … at level 1 / 5 / 10 | 120 % / 320 % / 570 % |
| Pulses per target | up to 10 (4,500 ms ÷ 450 ms) |
| Area | 9×9 cells |
| Element | Water |
| Knockback | 2 cells per pulse |
| Freeze chance | 65 − 5 × level % |
| … at level 1 / 5 / 10 | 60 % / 40 % / 15 % |
| Freeze duration | 27 s base |
| Cost | 78 SP at every level |
| Cast time | 4,300 + 200 × level ms variable + 1,500 ms fixed |
| After-cast delay / cooldown | 1,000 ms / 6,000 ms |
Yes, you read that right: level 1 freezes four times as often as level 10. That is the literal formula in stormgust.cpp. If what you want is control rather than damage, a low-level Storm Gust freezes far better.
The big trap: freezing switches the blizzard off
The engine has a hand-written rule in status_check_skilluse(): Storm Gust and Frost Nova cannot reach a target that is already frozen. And the refusal is silent.
Here is the real sequence:
| Pulse | What happens |
|---|---|
| 1…n | Hits, knocks back 2 cells and rolls the freeze die. |
| n | The die lands: the target freezes after taking that hit. |
| n+1 onwards | No more hits. The skill is refused against that target while it stays frozen, so the freeze survives its full 27 seconds. |
In other words: freezing early means less total damage but an enemy that stands still for nearly half a minute. Freezing late means more damage. Choosing the skill level is choosing between the two.
And the flip side: freeze breaks on any hit
The Frozen status carries the RemoveOnDamaged flag: it breaks on the first damage it takes, from anyone. A party member who fires an arrow at your frozen target thaws it for you — and then the blizzard starts hitting it again. In a party that is a communication problem, not a skill problem.
A frozen target turns into water
The good part
While frozen, its element becomes water level 1 and its DEF is halved. Wind deals 150 % to it: that is the whole reason to chain Storm Gust into Jupitel Thunder or Lord of Vermilion.
The bad part
Its MDEF goes up by 25 %, and fire against water only deals 90 %. Finishing a frozen target with Meteor Storm is throwing the spell away.
Everything else worth knowing
The @autoplay AI does cast Storm Gust, but through a path of its own that does not yet go through the panel's configuration: it cannot be switched off separately.
See also The Wizard skill tree: fourteen spells, six more when you transcend, and an amplification that is NOT spent here Frost Nova: 83 % freeze chance over 7×7, and it skips anyone on your own tile Lord of Vermilion: 1,400 % split across twenty sparks over 13×13 Jupitel Thunder: twelve hits of 100 %, a seven-cell knockback and 150 ms for free
Meteor Storm is not an area spell: it is a batch of independent impacts. Each meteor picks a cell at random inside a 7×7 square around the point you marked, and when it lands it strikes the 3×3 cells beneath it.
The number of meteors is not written down anywhere as such: the engine works it out by dividing the skill's duration by one second. The result is exactly the hit-count column the client shows.
| Level | Meteors | Hits per impact | SP | Cooldown |
|---|---|---|---|---|
| 1 | 2 | 2 | 20 | 2.5 s |
| 2 | 3 | 3 | 24 | 3.0 s |
| 3 | 3 | 3 | 30 | 3.5 s |
| 4 | 4 | 4 | 34 | 4.0 s |
| 5 | 4 | 4 | 40 | 4.5 s |
| 6 | 5 | 5 | 44 | 5.0 s |
| 7 | 5 | 5 | 50 | 5.5 s |
| 8 | 6 | 6 | 54 | 6.0 s |
| 9 | 6 | 6 | 60 | 6.5 s |
| 10 | 7 | 7 | 64 | 7.0 s |
The damage
The ratio is 125 % MATK per hit, and it does not scale with level. What scales is the number of hits: the engine applies as many hits per impact as the column says. One meteor at level 10 is 7 × 125 % = 875 %, and seven of them fall.
That is why levelling Meteor Storm pays so well: from level 1 to level 10 the theoretical damage multiplies by 12.25 (seven meteors instead of two, each carrying seven hits instead of two).
When it is worth it
Against stationary packs and against earth-element monsters (fire deals 150 % to them). With 6.3 seconds of variable cast plus 1.5 fixed, it is an opener, not a reaction.
The mistake everybody makes
Aiming at the exact centre of a pack. Meteors land at random across 7×7, so many are wasted on the edges. Against a single target Meteor Storm is the worst spell in the tree; against twelve bunched together, the best.
The traps
If the original target dies during the cast, the spell is not lost: it is a ground spell, so it lands exactly where you aimed it.
See also The Wizard skill tree: fourteen spells, six more when you transcend, and an amplification that is NOT spent here Lord of Vermilion: 1,400 % split across twenty sparks over 13×13 Storm Gust: the third-hit freeze is gone, and freezing stops the blizzard Fire Pillar: a trap that waits thirty seconds, ignores MDEF and roots what steps on it
Lord of Vermilion spreads a lightning carpet across 13×13 cells and unloads a single hit on every enemy inside it, made up of twenty sparks.
Those twenty hits SPLIT the damage, they do not multiply it. The hit count is written as a negative number (−20) on purpose. The total is what the formula says: you will see twenty small numbers, but together they add up to the ratio exactly once.
The numbers
| Item | Value |
|---|---|
| Total ratio (player) | 400 + 100 × level % |
| … at level 1 / 5 / 10 | 500 % / 900 % / 1,400 % |
| Hits on screen | 20 (the total is split among them) |
| Area | 13×13 cells |
| Element | Wind |
| Blind | 10 + 5 × level % for 18 s |
| Cost | 56 + 4 × level SP (60 to 96) |
| Cast time | 6,500 − 200 × level ms variable + 1,500 ms fixed |
| After-cast delay / cooldown | 1,000 ms / 5,000 ms |
Note the cast time: it is the only big spell in the tree that casts faster at higher levels. From 6.3 seconds at level 1 down to 4.5 at level 10.
One hit per target, and that is all
The carpet lives for exactly one second and its internal interval is 1.25 seconds: mathematically, every enemy takes exactly one hit. It is not sustained damage like Storm Gust; it is a discharge.
That makes it the best damage-per-second area spell in the tree: 1,400 % against one enemy or against thirty costs the same.
Monsters use a DIFFERENT formula
When a monster casts it, the engine uses the old formula: 80 + 20 × level %, which is 280 % at level 10 instead of 1,400 %. If a mob's Lord of Vermilion has ever landed on you and felt weak, that was not your imagination.
How to use it
What it pairs with
With Storm Gust: a frozen target becomes water level 1, and wind against water deals 150 %. Freeze then finish with Vermilion is the classic Wizard chain, and it works here exactly as advertised.
The mistake everybody makes
Casting it before Storm Gust because "it is faster". Freeze first. And never aim it at wind-element monsters: 25 % damage.
The traps
See also The Wizard skill tree: fourteen spells, six more when you transcend, and an amplification that is NOT spent here Storm Gust: the third-hit freeze is gone, and freezing stops the blizzard Meteor Storm: seven meteors that land where they please, not where you aim Jupitel Thunder: twelve hits of 100 %, a seven-cell knockback and 150 ms for free
Jupitel Thunder hurls a ball of wind at one target, lands a burst of hits on it and pushes it back. It is the least complicated skill a Wizard has: the engine applies no modifier at all, so the ratio stays at the starting 100 %.
| Level | Hits | Total ratio | Knockback | SP | Variable cast |
|---|---|---|---|---|---|
| 1 | 3 | 300 % | 2 | 20 | 2.0 s |
| 3 | 5 | 500 % | 3 | 26 | 2.4 s |
| 5 | 7 | 700 % | 4 | 32 | 2.8 s |
| 7 | 9 | 900 % | 5 | 38 | 3.2 s |
| 10 | 12 | 1,200 % | 7 | 47 | 3.8 s |
The hit count is positive: here damage multiplies. Twelve hits of 100 % really are 1,200 %. Fixed cast: 500 ms at every level. Range 9. No cooldown and no after-cast delay.
The 150-millisecond trick
The hit does not happen when the cast finishes: it is scheduled for 150 ms later. The engine comment says it outright: "you can cast another spell before the knockback". Since Jupitel also has no after-cast delay and no cooldown, it is the spell you chain everything else off.
How to use it
This is your single-target spell
1,200 % with no cooldown and no delay is by far the best sustained damage a Wizard has against one enemy. And against something frozen it rises to 1,800 % (wind against water, 150 %).
The knockback is a weapon and a problem
Seven cells of knockback keep the melee away from you — but they also push it out of your Storm Gust, out of your Meteor Storm and out of your party's reach. Against a target inside a carpet, use a lower Jupitel level.
The traps
The @autoplay AI treats it as one of its "bolts": it joins the element picker alongside Fire Bolt, Cold Bolt, Lightning Bolt, Napalm Beat, Fire Ball and Earth Spike, and it can be tuned from the panel.
See also The Wizard skill tree: fourteen spells, six more when you transcend, and an amplification that is NOT spent here Storm Gust: the third-hit freeze is gone, and freezing stops the blizzard Lord of Vermilion: 1,400 % split across twenty sparks over 13×13 Soul Drain: +20 % maximum SP, and SP back on every kill… with TARGETED spells
Water Ball fires one ball of water for every water cell around you. It counts them from the tile you are standing on, not from the target, and how many cells it looks at depends on the level.
| Level | Cells examined | Balls at most | Ratio per ball | SP |
|---|---|---|---|---|
| 1 | 1×1 (your cell only) | 1 | 130 % | 15 |
| 2 | 3×3 | 9 | 160 % | 20 |
| 3 | 3×3 | 9 | 190 % | 20 |
| 4 | 5×5 | 25 | 220 % | 25 |
| 5 | 5×5 | 25 | 250 % | 25 |
25 balls of 250 % is 6,250 % MATK. By far the highest single-target damage in the whole Wizard tree — which is exactly why it is chained to so many conditions.
What counts as a "water cell"
The three valid sources
Deluge and Suiton are the practical way to use Water Ball on dry land.
And they get consumed
When the spell sets up, any Deluge or Suiton cells underneath are deleted: Water Ball eats them to turn them into balls. One Deluge is worth one Water Ball, not two.
Map water is not consumed, of course.
To cast it, YOU have to be in the water
Before anything else, the engine checks a separate condition on top of the cells: either you are under the effect of Deluge/Suiton, or the exact tile you are standing on is water and is not covered by a Land Protector. Otherwise the skill fails.
That is the silent failure that baffles everybody: a friendly (or hostile) Land Protector under your feet switches Water Ball off even when you are surrounded by water.
How it fires
The traps
See also The Wizard skill tree: fourteen spells, six more when you transcend, and an amplification that is NOT spent here Storm Gust: the third-hit freeze is gone, and freezing stops the blizzard Soul Drain: +20 % maximum SP, and SP back on every kill… with TARGETED spells The mage who studies instead of shouting: what a Sage is and what Professor adds
Frost Nova releases a wave of ice around you: 7×7 cells, one hit on each enemy, and one freeze roll per head. It is the only way a Wizard can freeze a whole pack at once.
| Item | Value |
|---|---|
| Ratio | 100 + 10 × level % (200 % at level 10) |
| Hits | 1 |
| Area | 7×7 centred on you |
| Element | Water |
| Freeze chance | 33 + 5 × level % (83 % at level 10) |
| Freeze duration | 1.5 s × level (15 s at level 10) |
| Cost | 47 − 2 × level SP — 45 at level 1, 27 at level 10 |
| Cast time | 640 → 384 ms variable + 160 → 96 ms fixed |
| After-cast delay | 200 ms |
It improves in every direction as it levels: more damage, higher chance, longer freeze, less SP and shorter cast. It is one of the very few skills in the game with no downside to maxing.
The damage is not the point. 200 % MATK in one hit is nothing for a Wizard. Frost Nova is taken for the freeze, and at level 10 it lands four times out of five — three times more reliable than a Storm Gust pulse at that same level.
The three things that make it fail silently
| Situation | What happens |
|---|---|
| The enemy is on your own tile | It is not hit. This is hand-written in the engine: Frost Nova skips the caster's cell. |
| The enemy is on a Land Protector | It is not hit, even at two cells away. |
| The enemy is already frozen | It is not hit. The same rule that switches Storm Gust off against a frozen target applies here. |
That third case is the one that confuses people most: Frost Nova cannot refresh a freeze. If you have just frozen half a pack with Storm Gust and cast Frost Nova "to be safe", you only reach the ones that were not frozen.
Everything else worth knowing
The @autoplay AI uses it, paired with Sightrasher: both are cast on yourself and both require at least three enemies nearby to be worth it. Tunable from the panel.
See also The Wizard skill tree: fourteen spells, six more when you transcend, and an amplification that is NOT spent here Storm Gust: the third-hit freeze is gone, and freezing stops the blizzard Ice Wall: five cells of wall, forty-four seconds as a ceiling, and six places where it does not work Sightrasher: 300 % across fifteen cells, but it demands Sight and then eats it
Ice Wall plants five cells of wall in a line, perpendicular to the direction you cast it. It blocks players and monsters alike, and deals no damage whatsoever.
It costs almost nothing: 20 SP at every level, no cast time, range 9. What changes with the level is how long it holds.
The wall's life is measured in points
Every piece of wall is born with 200 + 200 × level points and loses 50 per second. That gives the maximum duration:
| Level | Points | Duration if nobody touches it |
|---|---|---|
| 1 | 400 | 8 s |
| 3 | 800 | 16 s |
| 5 | 1,200 | 24 s |
| 7 | 1,600 | 32 s |
| 10 | 2,200 | 44 s |
And any damage it takes is subtracted point for point. A wall is not an indestructible object on a timer: it is a bag of hit points. A monster that hits for 1,200 removes a level 5 Ice Wall in one swing. The 44 seconds at level 10 are a theoretical ceiling, not a promise.
Where it does NOT work
Ice Wall is the only one of this tree's twenty skills with map restrictions. It is forbidden in:
| Place | What that covers |
|---|---|
| GvG maps | The castles during War of Emperium. |
| Battlegrounds | All of them. |
| WoE:TE castles |
All ten, and they also carry the map's noicewall flag, which is a second lock.
|
| Memorial dungeons | The 101 instance maps marked as restricted zone 6. |
| Restricted zone 9 |
The three defence maps 1@def01 to 1@def03.
|
| While Volcano is on you | If you are carrying the Sage's Volcano, the engine refuses Ice Wall silently. That one is not a map: it is a status. |
The reason behind the bans is always the same: in a confined space, five cells of instant, cast-free wall decide the fight.
How to use it
What it is really for
For sealing a corridor while you spend six seconds casting Meteor Storm. With no cast time and for 20 SP, it is the cheapest way this class has to buy time.
Also for splitting a pack in two and fighting half of it.
The mistake everybody makes
Walling themselves in. The wall runs perpendicular to the casting direction, and if you drop it right next to yourself in a narrow corridor, the one who gets trapped is you. That is exactly why the @autoplay AI does not use it.
The traps
See also The Wizard skill tree: fourteen spells, six more when you transcend, and an amplification that is NOT spent here Frost Nova: 83 % freeze chance over 7×7, and it skips anyone on your own tile Quagmire: −25 AGI and DEX, half movement speed, and in war it slows your own side too Ganbantein: erases EVERY ground unit in the square, no exceptions — yours included
Fire Pillar is not an area spell: it is a trap. You plant a dormant pillar on the ground, it sits there for 30 seconds, and it detonates when an enemy comes within one cell.
The pillar's two states
| State | What it does |
|---|---|
| Dormant | Lives up to 30 seconds. Watches its own cell and the eight around it every 2 seconds. Deals no damage. |
| Active | The moment it detects an enemy it becomes a lit pillar and detonates immediately, covering its splash area. |
The numbers
| Item | Value |
|---|---|
| Total ratio | 40 + 20 × level % (240 % at level 10) |
| Hits on screen | 2 + level (12 at level 10) — the total is split |
| Blast area | 3×3 up to level 5, 5×5 from level 6 to 10 |
| Element | Fire |
| Cost | 75 SP at every level, + 1 Blue Gemstone from level 6 |
| Cast time | 2,112 → 240 ms total; nearly instant at level 10 |
| Simultaneous pillars | 5 |
| Roots the target for | 0.6 s at level 1, up to 2.4 s at level 10 |
It ignores MDEF completely. Fire Pillar carries the "pierces defence" flag, and on a magic skill that means the target's MDEF simply does not count. Against high-MDEF monsters it is the hardest-hitting fire skill in the tree, however low its ratio looks.
The damage is SPLIT, not multiplied
When a player casts it, the engine flips the sign of the hit count: you will see twelve numbers, but they add up to 240 % in total, not 12 × 240 %. That is 20 % MATK per hit, exactly as the code itself says.
The split is deliberate, and it is the same one the engine uses on other multi-hit skills of this kind. It is not a bug.
How to use it
It is an anchor, not a cannon
The 240 % is not the point: the point is that it roots whoever steps on it for up to 2.4 seconds. Five pillars in a row across a corridor are ten seconds of a melee that never reaches you.
And the cast time collapses
From 2.1 seconds at level 1 down to 0.24 seconds at level 10. With a high Fire Pillar you can seed five pillars almost as fast as you walk.
The price is one Blue Gemstone per pillar from level 6.
The traps
See also The Wizard skill tree: fourteen spells, six more when you transcend, and an amplification that is NOT spent here Meteor Storm: seven meteors that land where they please, not where you aim Quagmire: −25 AGI and DEX, half movement speed, and in war it slows your own side too Sightrasher: 300 % across fifteen cells, but it demands Sight and then eats it
Sightrasher turns the two Sight orbs circling you into a fire explosion. The area is the largest in the whole tree: 15×15 cells centred on you.
Without Sight active it will not cast. The requirement is written into the database, and the refusal is one of those that explains nothing. When Sightrasher "does nothing", this is almost always why: Sight ran out and you did not notice.
And casting it turns Sight off: you have to light it again for the next one.
The numbers
| Item | Value |
|---|---|
| Ratio | 100 + 20 × level % (300 % at level 10) |
| Hits | 1 |
| Area | 15×15 centred on you |
| Element | Fire |
| Knockback | 5 cells |
| Cost | 33 + 2 × level SP (35 to 53) + Sight active |
| Cast time | 320 ms variable + 80 ms fixed |
| After-cast delay | 2,000 ms |
Almost no cast time and a huge area, but two full seconds of delay afterwards. Sightrasher does not chain: it is a button you press and then wait out.
How to use it
It is the answer to "I am surrounded"
0.4 seconds of cast and a fifteen-cell radius: it is the only thing in the tree you can cast after they reach you. And the five-cell knockback buys your space back.
Sight first, always
The routine is: Sight → let them close in → Sightrasher. If you plan to use it, keep Sight up permanently: it is cheap, and it is half the spell.
The traps
The @autoplay AI uses it the same way it uses Frost Nova: it wants at least three enemies nearby before spending it. Tunable from the panel.
See also The Wizard skill tree: fourteen spells, six more when you transcend, and an amplification that is NOT spent here Frost Nova: 83 % freeze chance over 7×7, and it skips anyone on your own tile Meteor Storm: seven meteors that land where they please, not where you aim Fourteen skills, and one of them cannot be bought with skill points
These are the Wizard's two earth skills, and they work the same way: the hit count rises with the level and damage is multiplied by it. The difference is who they reach.
| Earth Spike | Heaven's Drive | |
|---|---|---|
| Target | One enemy | The ground, 5×5 area |
| Ratio per hit | 200 % | 125 % |
| Hits | = level (1 to 5) | = level (1 to 5) |
| Total ratio at level 5 | 1,000 % | 625 % |
| SP | 10 + 4 × level (14 to 30) | 24 + 4 × level (28 to 44) |
| Variable cast | 800 → 3,200 ms | 1,100 → 1,900 ms |
| Fixed cast | 400 → 1,200 ms | 800 ms |
| Delay / cooldown | 1,400 ms / — | 500 ms / 1,000 ms |
| Range | 9 | 9 |
Both are earth: 150 % against wind enemies, 90 % against fire ones, 25 % against earth ones.
Earth Spike is multiplied by nine with Summon Earth Spirit Tera. If you are carrying the Sorcerer's earth elemental in its care stance, the engine adds a further 800 % on top of Earth Spike's own ratio: it goes from 1,000 % to 9,000 % at level 5. It is written in earthspike.cpp and no description mentions it.
Earth Spike: cheap and targeted
At level 5 it is 1,000 % for 30 SP, and it is a targeted spell: it triggers Soul Drain on the kill. For a farming High Wizard it is one of the most sustainable lines available: the SP it spends comes back on its own.
The price is the cast: 3.2 + 1.2 seconds at level 5, plus 1.4 seconds of delay afterwards. It is not a fast spell.
Heaven's Drive: 5×5 and a single wave
The spikes rise once and that is it: the ground unit lives one tenth of a second. It is not sustained damage, it is an area burst.
The @autoplay AI uses both: Earth Spike joins the element picker alongside the bolts, and Heaven's Drive is treated as a small area spell with a minimum of two enemies. Both tunable from the panel.
See also The Wizard skill tree: fourteen spells, six more when you transcend, and an amplification that is NOT spent here Quagmire: −25 AGI and DEX, half movement speed, and in war it slows your own side too Soul Drain: +20 % maximum SP, and SP back on every kill… with TARGETED spells Twenty-eight skills, and the four summons are the backbone
Quagmire turns 5×5 cells into a bog. It deals no damage: what it does is strip AGI and DEX, halve movement speed, and switch off the attack-speed buffs of whoever is inside it.
The numbers
| Item | Against players | Against monsters |
|---|---|---|
| AGI and DEX removed | 5 × level (−25 at level 5) | 10 × level (−50 at level 5) |
| Movement speed | −50 % | −50 % |
| Duration | 5 s × level (25 s at level 5) | same |
| Item | Value |
|---|---|
| Area | 5×5 |
| Bog duration | 5 s × level |
| Cost | 5 × level SP (5 to 25) |
| Cast time | none |
| After-cast delay | 1,000 ms |
| Simultaneous bogs | 3 |
| Range | 9 |
What actually hurts: it disables ASPD buffs
While Quagmire is on you, the engine ignores the attack-speed bonus from Two-Hand Quicken, One-Hand Quicken, Spear Quicken, Adrenaline Rush, Adrenaline Rush 2, Fleet Move and the mercenary's Quicken. It does not remove them: it leaves them inert for as long as it lasts.
On top of that it ends a long list of speed and agility buffs on the spot: Increase Agi, Adrenaline Rush, Wind Walk, True Sight, Cart Boost, Concentration, Loud Exclamation, Spear Quicken, Two-Hand Quicken, One-Hand Quicken, Acceleration, Magnetic Field…
For 5 SP at level 1. By a wide margin, it is the best debuff per point of SP in the game.
On versus maps, Quagmire slows your allies too. The server has the "traps hit everyone" rule enabled for players: in PvP, GvG and battlegrounds the bog switches its target to everybody, allies included. Outside those maps it only affects enemies.
The traps
The @autoplay AI uses it without requiring a group: its value is slowing down whatever is chasing you, and that already pays off against a single enemy. Tunable from the panel.
See also The Wizard skill tree: fourteen spells, six more when you transcend, and an amplification that is NOT spent here Earth Spike and Heaven's Drive: the earth branch, and the ×9 multiplier almost nobody knows about Ice Wall: five cells of wall, forty-four seconds as a ceiling, and six places where it does not work Monsters cast Orc Head again, and Healers clear the annoying debuffs
Sense opens a monster's data sheet. It costs 10 SP, has no cast time, no cooldown, and reaches 9 cells.
Exactly what the server sends
| Field | What it is |
|---|---|
| Level | That individual's real level. |
| Size | Small, medium or large. |
| HP | What it has left right now, not its maximum. |
| DEF and MDEF | On this server, hard values only. The "soft" DEF and MDEF (the ones that come from VIT and INT) are not sent. |
| Race | Brute, demon, undead… |
| Element | The element and its elemental level. |
| Ten resistances | The exact percentage against water, earth, fire, wind, poison, holy, shadow, ghost, undead and neutral. |
That DEF caveat matters: the number you see is lower than the reduction you will actually meet, because the soft part is missing. A monster showing DEF 20 may be reducing considerably more.
And your whole party sees it. If you are in a party, the packet goes to every member on your map. One Wizard with Sense solves the elemental table for the entire run.
What it is really for
Those ten resistances are the single most valuable piece of information a mage can have, because his entire rotation is an elemental decision. With the sheet in front of you, choosing between Storm Gust, Meteor Storm, Lord of Vermilion and Napalm Vulcan stops being guesswork.
The traps
See also The Wizard skill tree: fourteen spells, six more when you transcend, and an amplification that is NOT spent here Ganbantein: erases EVERY ground unit in the square, no exceptions — yours included Storm Gust: the third-hit freeze is gone, and freezing stops the blizzard Napalm Vulcan: the ghost element, which none of the four basic armours resist
Sight Blaster is a proximity mine you wear. While it is active it watches the 3×3 cells around you; the first enemy that steps in takes 600 % fire MATK and a three-cell knockback — and the effect ends.
| Item | Value |
|---|---|
| Ratio | 600 % (100 + 500) |
| Watched area | 3×3 around you |
| Element | Fire |
| Knockback | 3 cells |
| Duration | 15 minutes, or until the first discharge |
| Cost | 80 SP |
| Cast time | 1,280 ms variable + 320 ms fixed |
| Scan rate | every 20 ms |
It is spent by ONE enemy. This is not an aura that hits everything that comes near for fifteen minutes: it is a stored shot. The fifteen minutes are how long you may wait before using it, not how long it keeps firing.
The exception: traps do not spend it
Sight Blaster also blows up ground traps that enter its radius — and that hit does not count: the effect stays active waiting for a real enemy. It is written that way on purpose in the engine.
How to use it
It is insurance, not a rotation
You light it before walking into somewhere, and it removes the first thing that reaches you mid-cast. 600 % instantly plus three cells of knockback is exactly the time you need to start casting again.
The mistake everybody makes
Counting it as sustained damage. One skill point, 80 SP and a single shot: if you expect it to hit the five monsters around you, you are in for a surprise.
The traps
See also The Wizard skill tree: fourteen spells, six more when you transcend, and an amplification that is NOT spent here Sightrasher: 300 % across fifteen cells, but it demands Sight and then eats it Fire Pillar: a trap that waits thirty seconds, ignores MDEF and roots what steps on it Sense: ten elemental resistances for 10 SP, and it shows them to your whole party
Mystical Amplification is the High Wizard's self buff: it raises your MATK by 5 % per level (up to +50 %) for 60 seconds.
First things first, because this is the part most often got wrong: on this server it is NOT consumed by your next spell. That behaviour — switch it on, cast one spell, watch it vanish — is pre-renewal, and it is compiled out here. It is an ordinary buff: switch it on and for a full minute everything you cast is amplified.
The numbers
| Level | MATK | SP |
|---|---|---|
| 1 | +5 % | 35 |
| 3 | +15 % | 45 |
| 5 | +25 % | 55 |
| 7 | +35 % | 65 |
| 10 | +50 % | 80 |
Duration: 60 seconds at every level. Recasting refreshes it from zero.
The second half-truth: which part of your MATK it multiplies
The engine builds your MATK in three stages and applies the percentage in the middle:
| Order | Stage | Amplified? |
|---|---|---|
| 1 | Stat MATK (INT and base level) | Yes |
| 2 | Weapon MATK (base damage, variance and refine) | Yes |
| 3 | Flat MATK from gear and cards | No |
| 4 | Flat MATK from consumables and other buffs | No |
| 5 | Percentage MATK from gear | Applied afterwards, over everything above |
In other words: the more flat MATK you carry, the less Mystical Amplification is worth in absolute terms. A character who gets half his MATK from gear does not gain 50 %, he gains half of that.
This is not a bug or a server tweak: it is simply how the renewal MATK calculation is ordered.
The cast time really is fixed
700 ms of variable cast plus 700 ms of fixed cast, and the skill carries two exceptions: neither DEX/INT nor cast reduction from gear touch it. However many points you have, it is always 1.4 seconds.
The only things that do shorten it are statuses: Poem of Bragi, Suffragium and the Arch Bishop's Sacrament.
How to use it
A minute goes a long way
Sixty seconds is four or five complete Storm Gust casts, counting cast time and cooldown. Since it is not consumed, the correct routine is to light it before each pull and then forget about it.
And it is a hard requirement
You need it at level 10 to learn Gravitational Field. There is no shortcut.
The traps
See also The Wizard skill tree: fourteen spells, six more when you transcend, and an amplification that is NOT spent here Gravitational Field: on this server it does NOT root you or drain your SP Soul Drain: +20 % maximum SP, and SP back on every kill… with TARGETED spells Storm Gust: the third-hit freeze is gone, and freezing stops the blizzard
Soul Drain does two things at once, and only one of them is in the tooltip.
1. It raises your maximum SP
+2 % maximum SP per level, up to +20 % at level 10. It is a percentage, so it stacks with gear and with Increase SP Recovery.
2. It gives SP back on kills
When you land the killing blow with a targeted spell you recover target level × (95 + 15 × level) / 100 SP.
| Level | Maximum SP | SP per kill | Example: killing a level 120 monster |
|---|---|---|---|
| 1 | +2 % | 1.10 × level | 132 SP |
| 3 | +6 % | 1.40 × level | 168 SP |
| 5 | +10 % | 1.70 × level | 204 SP |
| 7 | +14 % | 2.00 × level | 240 SP |
| 10 | +20 % | 2.45 × level | 294 SP |
A Storm Gust costs 78 SP. One level 120 kill with Soul Drain 10 pays for nearly four. That is the entire skill.
The condition is "TARGETED spell", not "bolt". The engine checks it very specifically: it has to be a magic attack, with a skill id, that is neither a ground spell nor a self-cast. Anything meeting that qualifies.
What triggers it and what does not
Yes
No
How to use it
Soul Drain changes how you farm on a High Wizard completely. The temptation is to spam nothing but big area spells; with Soul Drain at 10, the profitable routine is to open with an area spell and finish with a targeted one: the finisher is what pays for the next area spell.
The traps
See also The Wizard skill tree: fourteen spells, six more when you transcend, and an amplification that is NOT spent here Jupitel Thunder: twelve hits of 100 %, a seven-cell knockback and 150 ms for free Earth Spike and Heaven's Drive: the earth branch, and the ×9 multiplier almost nobody knows about Mystical Amplification: here it is NOT spent on your next spell, and it does not multiply gear MATK
Napalm Vulcan strikes a target and the 3×3 cells around it with the ghost element. It is the only source of ghost damage in the whole mage branch until the Warlock.
The numbers
| Level | Hits | Ratio per hit | Total ratio | SP |
|---|---|---|---|---|
| 1 | 1 | 70 % | 70 % | 30 |
| 2 | 2 | 140 % | 280 % | 40 |
| 3 | 3 | 210 % | 630 % | 50 |
| 4 | 4 | 280 % | 1,120 % | 60 |
| 5 | 5 | 350 % | 1,750 % | 70 |
And all of that is multiplied by your base level over 100, as long as you are past 99. At base level 175 the level 5 total is 3,062 %. Cast: 800 ms variable + 200 ms fixed. Delay 500 ms, cooldown 1 second. Range 9.
Why the ghost element is half the skill
| Target element | Level 1 | Level 2 | Level 3 | Level 4 |
|---|---|---|---|---|
| Water, earth, fire, wind | 100 % | 100 % | 100 % | 100 % |
| Ghost | 125 % | 150 % | 175 % | 200 % |
| Undead | 100 % | 125 % | 150 % | 175 % |
| Holy / shadow | 90 % | 80 % | 70 % | 60 % |
| Poison | 75 % | 75 % | 50 % | 50 % |
| Neutral | 90 % | 70 % | 50 % | 0 % |
Against a level 4 neutral target, Napalm Vulcan deals literally ZERO. Not a little: zero. It is the ghost element's only weakness, and it is absolute. Before spending it on something you do not know, run Sense on it.
How to use it
It is your answer to elemental armour
The rest of the tree leans on water, fire, wind and earth — and against the wrong armour it collapses to 25 %. Napalm Vulcan deals 100 % against all four, always. It is the line that never gets resisted.
And it is targeted
It triggers Soul Drain on the kill, which none of the big area spells do. As a finisher after a Meteor Storm it pays twice over.
The traps
See also The Wizard skill tree: fourteen spells, six more when you transcend, and an amplification that is NOT spent here Sense: ten elemental resistances for 10 SP, and it shows them to your whole party Soul Drain: +20 % maximum SP, and SP back on every kill… with TARGETED spells Stave Crasher: a weapon hit that adds your MATK, for 8 SP
Stave Crasher (the old Magic Crasher) is the oddity of the tree: a weapon attack cast by a mage. It costs 8 SP, reaches 9 cells and comes out almost instantly.
| Item | Value |
|---|---|
| Type | Weapon (not magic) |
| Hits | 1 |
| Bonus | Your MATK (rolled between minimum and maximum) is added to the weapon attack |
| Element | Neutral, forced |
| Cost | 8 SP |
| Cast time | 240 ms variable + 60 ms fixed |
| After-cast delay | 300 ms |
| Range | 9 |
| Maximum level | 1 |
What "weapon type" means in practice
| Consequence | Detail |
|---|---|
| It can miss | It goes through the hit check: against something with high flee, it whiffs. |
| DEF reduces it | Not MDEF. Exactly the opposite of everything else in the tree. |
| It always comes out neutral | The engine forces the element to neutral. Your endows and elemental arrows change nothing. |
| It uses your weapon | Base damage comes from the equipped weapon, so a staff with decent ATK is worth more here than anywhere else. |
And because it is neutral, the target's elemental level tears it apart: against a level 4 neutral it is left with very little, and against high elemental armour too. Stave Crasher is not a niche anti-armour spell: it is filler.
What it is really for
Eight SP
That is what it costs. When you are waiting out Storm Gust's cooldown and you are out of blue potions, Stave Crasher is what fills the gap without ruining you.
And it is a requirement
You need it to learn Gravitational Field. Even if you never plan to press it, that point is spent anyway.
The @autoplay AI keeps it last in the mage branch and requires no group for it: 8 flat SP, which makes it the filler for when nothing better is available. Tunable from the panel.
See also The Wizard skill tree: fourteen spells, six more when you transcend, and an amplification that is NOT spent here Mystical Amplification: here it is NOT spent on your next spell, and it does not multiply gear MATK Napalm Vulcan: the ghost element, which none of the four basic armours resist Gravitational Field: on this server it does NOT root you or drain your SP
Ganbantein targets a point on the ground up to 18 cells away and erases every ground unit within the surrounding 3×3 cells. Every one. With no filter of any kind.
When we say "no exceptions", we mean it literally. The code that runs it does not care whose the unit is or what type it is. It erases your own Storm Gust, your Ice Wall, your Fire Pillars, your priest's Pneuma and Safety Wall, your bard's songs, Hunter traps and, yes, the Sage's Land Protector.
The numbers
| Item | Value |
|---|---|
| Area cleared | 3×3 around the point |
| Range | 18 cells |
| Chance to work | 80 % |
| Cost | 40 SP + 1 Yellow Gemstone + 1 Blue Gemstone |
| Cast time | 3,000 ms, all fixed |
| After-cast delay | 5,000 ms |
| Maximum level | 1 |
The 20 % failure costs you NOTHING
One time in five the skill goes off, you get the "failed" message and nothing else happens. But the engine explicitly marks that case as "do not consume requirements": you lose neither the SP nor the two gemstones. All you lose are the three seconds of casting and the five of delay.
Mind you: eight seconds per failed attempt, mid-fight, is an eternity.
The three seconds are untouchable
Ganbantein's entire cast is fixed. Not DEX, not INT, not Suffragium — nothing that reduces variable cast touches it. It is always exactly 3 seconds, for everyone, everywhere.
How to use it
Its reason to exist is Land Protector
Land Protector shuts down all ground magic inside its cells, your carpets included. Ganbantein is the only way a mage has to remove it. In war, that is the play.
The mistake everybody makes
Casting it on top of the fight. With a 3×3 radius and no filter, it takes out the Pneuma that was keeping your party alive. You aim it at the enemy Land Protector, not at the middle of the melee.
The traps
See also The Wizard skill tree: fourteen spells, six more when you transcend, and an amplification that is NOT spent here Ice Wall: five cells of wall, forty-four seconds as a ceiling, and six places where it does not work Quagmire: −25 AGI and DEX, half movement speed, and in war it slows your own side too Sense: ten elemental resistances for 10 SP, and it shows them to your whole party
First things first: here Gravitational Field does not pin you to the ground. The version that leaves you immobile, unable to attack, draining SP and blocking all your other hits is the pre-renewal one, and it is compiled out of this server. In renewal it is an ordinary area spell: you cast it, it goes off, and you carry on.
Gravitational Field crushes a 5×5 cell square up to 18 cells away. It is a single burst: the ground unit lives one tenth of a second, deals its damage and disappears.
The numbers
| Level | Hits | Ratio per hit | Total ratio | SP |
|---|---|---|---|---|
| 1 | 2 | 100 % | 200 % | 60 |
| 2 | 4 | 200 % | 800 % | 70 |
| 3 | 6 | 300 % | 1,800 % | 80 |
| 4 | 8 | 400 % | 3,200 % | 90 |
| 5 | 10 | 500 % | 5,000 % | 100 |
And all of it × base level / 100 above level 99. At base level 175 the level 5 total is 8,750 %. By a very wide margin, the biggest area hit in the tree.
| Item | Value |
|---|---|
| Element | Neutral (it declares no element) |
| Area | 5×5 |
| Range | 18 cells |
| Cast time | 5,000 ms variable + 1,000 ms fixed |
| Delay / cooldown | 1,000 ms / 5,000 ms |
It hits the Emperium
It carries the flag that explicitly allows it: it is one of the very few magic area skills that can damage a castle's Emperium. With 18 cells of range, that makes it a very specific siege tool.
How to use it
It is a hammer, not a rotation
Six seconds of cast, five of cooldown and 100 SP. You cast it once, on a pack that is already standing still, and preferably with Mystical Amplification up.
Being neutral is good and bad
Good: none of the four basic elemental armours reduces it. Bad: the target's elemental level does cut it down, and against ghost it drops to 90 %.
The traps
See also The Wizard skill tree: fourteen spells, six more when you transcend, and an amplification that is NOT spent here Mystical Amplification: here it is NOT spent on your next spell, and it does not multiply gear MATK Stave Crasher: a weapon hit that adds your MATK, for 8 SP Lord of Vermilion: 1,400 % split across twenty sparks over 13×13
The mage branch that does not compete on raw damage: it decides the element, breaks the enemy's spells, and keeps the party's mana bar alive.
The Mage splits two ways. The Wizard pushes damage as high as it goes and accepts standing still while it casts. The Sage does the opposite: hardly any of its skills deal damage at all. What they do is change the conditions of the fight — the element of the weapons, the element of the ground, the element of the monster itself — and take away whatever the enemy was about to cast.
What only the Sage has
Free Cast: walking while you cast. Magic Rod and Spell Breaker: absorbing and breaking other people's spells. The four endows and the three elemental fields: handing out element. Magnetic Earth: wiping everyone's ground magic off the map.
What the Professor adds
Eight skills, only one of which deals damage. This is the mana job: giving it, stealing it, turning health into mana, and casting in half the time. Plus two ground anchors — fog and web — which are the best survival tools a caster gets.
Sage tree — 25 skills
| Skill | Lv. | Requires |
|---|---|---|
| Study | 10 | — |
| Cast Cancel | 5 | Study 2 |
| Magic Rod | 5 | Study 4 |
| Free Cast | 10 | Cast Cancel 1 |
| Spell Breaker | 5 | Magic Rod 1 |
| Hindsight | 10 | Free Cast 4 |
| Endow Blaze | 5 | Fire Bolt 1 + Study 5 |
| Endow Tsunami | 5 | Cold Bolt 1 + Study 5 |
| Endow Tornado | 5 | Lightning Bolt 1 + Study 5 |
| Endow Quake | 5 | Stone Curse 1 + Study 5 |
| Dragonology | 5 | Study 9 |
| Volcano | 5 | Endow Blaze 2 |
| Deluge | 5 | Endow Tsunami 2 |
| Whirlwind | 5 | Endow Tornado 2 |
| Magnetic Earth | 5 | Volcano 3 + Deluge 3 + Whirlwind 3 |
| Dispell | 5 | Spell Breaker 3 |
| Hocus-pocus | 10 | Hindsight 5 + Dispell 1 + Magnetic Earth 1 |
| Earth Spike | 5 | Endow Quake 1 |
| Heaven’s Drive | 5 | Earth Spike 1 |
| Sense | 1 | — |
| Create Elemental Converter | 1 | quest skill |
| Elemental Change (water, earth, fire, wind) | 1 | quest skills |
The five quest skills — the converter and the four Elemental Changes — are handed to you free by the Platinum Skill NPC in Prontera (158, 193), on top of Mishuna's official quest at the magic academy in Juno.
Professor tree — 8 skills
| Skill | Lv. | Requires |
|---|---|---|
| Indulge | 5 | Increase SP Recovery 1 + Magic Rod 1 |
| Soul Exhale | 1 | Magic Rod 3 + Spell Breaker 2 |
| Soul Siphon | 5 | Cast Cancel 5 + Magic Rod 3 + Dispell 3 |
| Mind Breaker | 5 | Increase SP Recovery 3 + Soul Siphon 2 |
| Foresight | 1 | Study 5 + Free Cast 5 + Hindsight 1 |
| Wall of Fog | 1 | Deluge 2 + Whirlwind 2 |
| Fiber Lock | 1 | Dragonology 4 |
| Double Casting | 5 | Hindsight 1 |
Study 5 is the real bottleneck. Without it there are no endows, without endows there are no elemental fields, and without all three fields there is no Magnetic Earth and no Hocus-pocus. Almost the whole tree runs through it. Study 9 also opens Dragonology, which in turn is the only requirement for Fiber Lock.
Wall of Fog shows up in the database with five levels, but the Professor tree only allows level 1. That is not a bug: its duration is fixed and does not change with level.
See also Free Cast: the skill that defines the job The four endows: putting an element on the weapon of whoever swings it Soul Exhale rewritten: allies get REFILLED, everyone else gets a literal swap Fourteen skills, and one of them cannot be bought with skill points The Wizard skill tree: fourteen spells, six more when you transcend, and an amplification that is NOT spent here
Both are passive: there is nothing to press. And both are a great deal more than a tree requirement.
Study — Advanced Book, 10 levels
It only works with a book equipped. With any other weapon both effects are worth zero.
| Level | ATK with a book | ASPD |
|---|---|---|
| 1 | +3 | +1 |
| 3 | +9 | +2 |
| 5 | +15 | +3 |
| 7 | +21 | +4 |
| 10 | +30 | +5 |
The exact formulas are ATK +3 × level and ASPD + (level−1)/2 + 1, rounding down.
Dragonology — 5 levels
| Level | INT | Physical damage to dragons | Magic damage to dragons | Resistance to dragons |
|---|---|---|---|---|
| 1 | +1 | +4% | +2% | +4% |
| 2 | +1 | +8% | +4% | +8% |
| 3 | +2 | +12% | +6% | +12% |
| 4 | +2 | +16% | +8% | +16% |
| 5 | +3 | +20% | +10% | +20% |
The magic bonus is half the physical one. This is the detail everyone gets wrong: Dragonology 5 gives +20% weapon damage against the dragon race but only +10% magic damage. Even so, that 10% plus the 20% resistance is the best anti-dragon package available outside cards — and the INT it hands you is base INT, counting towards MATK and maximum mana exactly as if you had spent the points yourself.
See also The mage who studies instead of shouting: what a Sage is and what Professor adds Earth Spike: the Sage's only pure damage spell
An ordinary caster is a statue while casting: it cannot walk, cannot attack, and any hit drops the spell. With Free Cast you can do all three — walk, swing your weapon and keep casting — in exchange for moving and attacking more slowly while the cast bar is running.
What it costs, by level
| Level | Time per cell while casting | Attack speed while casting |
|---|---|---|
| 1 | 170% | 55% |
| 3 | 160% | 65% |
| 5 | 150% | 75% |
| 7 | 140% | 85% |
| 10 | 125% | 100% |
Walking costs 175 − 5 × level percent of the normal time per cell, and attack speed drops to 5 × (level + 10) percent. Both numbers apply only during the cast; the moment the spell goes off you are back to normal.
Why level 10 and not level 5
At level 10 the attack penalty disappears entirely: 100%. That turns Free Cast into more than mobility — it is what lets you keep hitting with your weapon while you prepare a long spell instead of choosing one or the other. And from level 1 onwards you can already attack during the spell's after-cast delay, which is dead air for every other mage.
Guild skills are excluded. Free Cast lets you walk while casting anything except a guild skill: those still root you in place. And mind the obvious: Free Cast does not protect you from interruption. If you get hit and the spell is flagged cancellable, it still drops; what you gain is the ability to walk out of the danger before that happens.
The server's AI knows about this advantage and uses it: a character with Free Cast does not stop to cast, and can reposition and fire in the same turn. See how the AI plays a Sage.
See also The mage who studies instead of shouting: what a Sage is and what Professor adds Hindsight: the autocast spell, and how an AI-driven character picks it How the AI plays Sage and Professor
A spell's mana is not charged when you start casting, it is charged when you finish. So if you break the cast by hand — by walking, or because you notice the target is already dead — you normally pay nothing at all.
Cast Cancel is the opposite of what it looks like: it does not save you the spell, it charges you a fine for aborting it. What it really does is cancel the cast and bill you a percentage of the mana of the spell you threw away.
| Level | Fine, as a share of the aborted spell's mana |
|---|---|
| 1 | 90% |
| 2 | 70% |
| 3 | 50% |
| 4 | 30% |
| 5 | 10% |
It costs 2 mana, is instant, and has no cooldown.
So what is it for
For breaking a long cast without moving. A five-second Storm Gust you no longer need can be dropped by walking, but walking takes you out of position; Cast Cancel drops it from where you stand and frees you to cast something else that same instant. In a castle fight, where one bad step kills you, that difference is real.
It gates Free Cast and Soul Siphon. Free Cast only asks for Cast Cancel 1 — cheap. Soul Siphon asks for Cast Cancel 5, so any Professor who wants that skill maxes this one out of necessity, and at level 5 the fine is already token.
See also Free Cast: the skill that defines the job Spell Breaker: shattering someone's cast and pocketing their mana The mage who studies instead of shouting: what a Sage is and what Professor adds
Magic Rod raises a very short shield around you. If a spell aimed at you lands during that window, the damage is zero, none of its side effects apply, and you gain mana on top.
| Level | Lasts | Mana you keep |
|---|---|---|
| 1 | 0.4 s | 20% |
| 2 | 0.6 s | 40% |
| 3 | 0.8 s | 60% |
| 4 | 1.0 s | 80% |
| 5 | 1.2 s | 100% |
The percentage is taken from the mana cost of the absorbed spell, not from your own bar. A 60-mana Meteor Storm absorbed at level 5 gives you 60 back. It costs 2 mana, is instant, and leaves a 1 second after-cast delay.
What it absorbs and what it does not
| Yes | No |
|---|---|
| Magic spells cast at you by a monster or a player | Anything coming from a ground unit (Storm Gust, Meteor Storm, Lord of Vermilion, Heaven’s Drive…) |
| The spell's side effects: no freeze, no stun, no blind | Physical attacks, even from a caster monster |
| The whole spell, even if it would have killed you | Magic aimed at someone else that catches you in the splash |
Two traps. First: the shield drops if you get knocked back. Any knockback ends it early. Second, and the one that ruins the most attempts: most of a rival mage's dangerous magic is ground-based, and it absorbs none of that. Magic Rod shines against targeted spells — the bolts, Soul Strike, Jupitel Thunder, Napalm Beat, monster caster magic — not against carpets.
Against another Sage there is one extra, very dirty use: if an enemy player casts Spell Breaker on you while Magic Rod is up, it breaks nothing — you steal 20% of their mana instead.
See also Spell Breaker: shattering someone's cast and pocketing their mana How the AI plays Sage and Professor The mage who studies instead of shouting: what a Sage is and what Professor adds
You break the cast of somebody who is casting. Not just break it: you drain every point of mana that spell was going to cost them, and part of it ends up in your bar.
| Level | Share of the drained mana you keep | Health drain |
|---|---|---|
| 1 | 0% | — |
| 2 | 25% | — |
| 3 | 50% | — |
| 4 | 75% | — |
| 5 | 100% | 2% of their maximum health, and you heal half of it |
10 mana, 9 cells of range, 0.56 s variable cast + 0.14 s fixed. No cooldown.
The four rules you need to know
| Situation | What happens |
|---|---|
| The target was not casting | Nothing at all happens — and the mana has already been spent. No error message. |
| The target is a boss (status-immune) | Only a 10% chance of working at all. And it never drains health. |
| The level 5 health drain | Only against monsters, or against players on PvP/castle maps. Never against bosses. And never lethal: if the 2% would kill the target, it is skipped. |
| The target is a player with Magic Rod up | It backfires: you hand them 20% of your own mana. |
What actually wins fights is not the interrupt, it is the mana. A rival Wizard casting Storm Gust lv10 loses a Storm Gust's worth of mana and the spell. At level 5 you keep that exact mana. Two uses in, one bar is empty and the other is full, and that settles the duel long before damage does.
One quiet quirk: Spell Breaker does not interrupt your auto-attack. You can keep swinging while you cast it, which almost no targeted skill allows.
See also Magic Rod: eating the spell that was coming for you Cast Cancel: aborting your own spell almost for free How the AI plays Sage and Professor
Hindsight (Auto Spell) has you pick one mage spell, and while it lasts every weapon hit has a chance to fire that spell on its own, for free… almost free.
| Level | Lasts | Chance per hit | Spell level |
|---|---|---|---|
| 1 | 2 min | 2% | — |
| 2 | 2.5 min | 4% | 1 |
| 4 | 3.5 min | 8% | 2 |
| 6 | 4.5 min | 12% | 3 |
| 8 | 5.5 min | 16% | 4 |
| 10 | 6.5 min | 20% | 5 |
It costs 35 mana and 3 seconds of fixed cast. The spell level is half your Hindsight level, capped by the level you actually learned of that spell. Each autocast charges you 2/3 of the spell's normal mana; if you cannot pay, nothing fires.
Do not leave Hindsight at level 1. Since the spell level is half the Hindsight level, level 1 gives you half of 1, which is zero: the buff goes up, takes an icon slot, and the autocast produces nothing usable. The first level that genuinely works is 2. If you are going to spend a point on Hindsight, spend two.
And the level drops again when it fires
At the moment it triggers there is a second roll: 50% of the time the spell comes out at half level, 35% of the time one level lower, and only 15% of the time at full level. The only way to skip that reduction is the Sage Soul Link, which also raises the spell cap to level 10.
The new branch: when the AI is driving
Hindsight is the only skill in the whole branch that is not resolved on the server. For a player it opens a client window and waits for you to pick the spell. An AI-driven character has nobody to answer that window: the status never came into existence, the character sat there frozen and unable to act, and the AI — seeing the buff still missing — recast it over and over.
It now picks on its own, and these are the exact rules:
| Rule | What it does |
|---|---|
| Hindsight 2 or above | Takes the best of the three bolts: Cold Bolt, Fire Bolt or Lightning Bolt, whichever is learned at the highest level. |
| Hindsight 1, or no bolt at all | Takes Napalm Beat, which is the only thing the official ladder allows there. |
| Never | Fire Ball or Frost Diver, even when the level would allow them. |
| Whatever happens | The character is released. It never sits waiting on a window. |
Why the area spells are excluded. Fire Ball and Frost Diver splash, and the autocast does not choose where it points: it fires at whatever you are hitting. A bot would end up freezing the neighbour's monster or breaking its own party's Storm Gust. The decision is deliberate, not an oversight.
When the AI puts it up
Only if the character fights in melee — the only build that benefits from a spell that fires on weapon hits — and never twice within a minute. It lasts between 2 and 6.5 minutes, so it fell outside the normal short-buff throttle and needed one of its own.
The Hindsight status cannot be removed by Dispell, Clearance or Banishing Buster, and it survives death. It is one of the very few buffs in the game nobody can strip off you. See also the AI repertoire.
See also Double Casting: bolts come out twice How the AI plays Sage and Professor Which skills the AI knows how to use, and which are left out on purpose Free Cast: the skill that defines the job
All four work the same and differ only in element and in the stone they consume. They change a party member's weapon element — or your own — for a good long while.
| Skill | Element | Consumes |
|---|---|---|
| Endow Blaze | Fire | Scarlet Point |
| Endow Tsunami | Water | Indigo Point |
| Endow Tornado | Wind | Yellow Wish Point |
| Endow Quake | Earth | Lime Green Point |
| Level | 1 | 2 | 3 | 4 | 5 |
|---|---|---|---|---|---|
| Duration | 10 min | 15 min | 20 min | 25 min | 30 min |
40 mana, 1 s variable cast + 1 s fixed, 9 cells of range. On this server the success rate is 100% at every level: the level only changes the duration, and there is no risk of the target's weapon being unequipped on a failure. It can only be cast on yourself, your party or your guild.
It does not work bare-handed. If the target has empty fists the cast fails and the stone is consumed anyway. This is mistake number one with these skills: check that whoever gets the endow is actually holding something.
What it clashes with
The four are mutually exclusive and clash with almost any other weapon element: putting one up removes Aspersio, Enchant Poison, and any previous water, wind, earth, fire, shadow or ghost endow. And it drops on its own if the target unequips the weapon.
This matters far more than it looks in a party: a priest's Aspersio is worth more than any endow against undead. Overwriting it with an Endow Blaze makes your teammate worse while you think you are helping. The server's AI has that rule written down: if the weapon already carries an element — its own or someone else's — it is left alone.
How the AI picks which of the four: it measures all four elements against the reference enemy using the same table the engine will use for the actual hit, and only casts on a strict advantage. Tying with neutral does not pay for a stone. It hands them out in this order: yourself, the party, and last your mercenary or homunculus.
See also Volcano, Deluge and Whirlwind: painting the ground with an element Create Elemental Converter: making your own weapon element How the AI plays Sage and Professor The mage who studies instead of shouting: what a Sage is and what Professor adds
All three plant a 7×7 cell ring at your feet. Anyone inside hits harder with the field's element, and also gets a different flat bonus in each case.
| Field | Element boosted | Flat bonus |
|---|---|---|
| Volcano | Fire | +5 + 5×level ATK and MATK |
| Deluge | Water | +5/9/12/14/15% maximum health |
| Whirlwind | Wind | +3×level flee |
The elemental boost, identical in all three
| Level | 1 | 2 | 3 | 4 | 5 |
|---|---|---|---|---|---|
| Added to the elemental table | +10 | +14 | +17 | +19 | +20 |
| Duration | 1 min | 2 min | 3 min | 4 min | 5 min |
| Cost | 48 SP | 46 SP | 44 SP | 42 SP | 40 SP |
All three: 4 s variable cast + 1 s fixed, 2 cells of range, and 1 Blue Gemstone. Yes, the mana cost drops with level: level 5 is the cheapest.
The number is added to the table, not to the damage
It is not "+20% damage". It is added to the percentage the elemental table was already giving you. Against something that resists your element at 50%, Volcano 5 makes it 70%; against something neutral, 100% becomes 120%; against something weak to fire already taking 175%, it becomes 195%. The better the matchup already was, the more it pays.
You can only have ONE field at a time, and switching fields does NOT reset the clock. Volcano, Deluge, Whirlwind and Magnetic Earth share the same slot: planting any of them deletes the previous one. And here is the bite: the new field inherits whatever time was left on the old one. If your Volcano had 12 seconds left and you plant a Deluge, your Deluge lasts 12 seconds. The good news is that switching between the three elemental fields while the old one is still alive does not consume the gemstone.
The other three traps
| Trap | Detail |
|---|---|
| It buffs enemies too | The ring does not care about sides. A Volcano in a castle raises the ATK of whoever is coming to kill you. |
| Volcano forbids your Ice Wall | While you stand inside a Volcano you cannot cast Ice Wall. The engine refuses it silently. |
| Deluge counts as water | Standing in a Deluge satisfies the "on water" requirement: that is what lets you cast Water Ball on any map. |
All three are wiped by Fire Rain, are not saved on logout, and cannot be removed with Clearance. The status only exists while you stand on the ring: two steps out and it drops.
See also Magnetic Earth: the zone where area magic stops existing The four endows: putting an element on the weapon of whoever swings it Wall of Fog: the mist that makes three out of four skills miss How the AI plays Sage and Professor
Magnetic Earth (Land Protector) plants a zone that does two things at once: it instantly deletes the ground units already inside it, and it prevents new ones from being created for as long as it lasts.
| Level | Size | Duration | Mana |
|---|---|---|---|
| 1 | 7×7 | 2 min 45 s | 66 |
| 2 | 7×7 | 3 min 30 s | 62 |
| 3 | 9×9 | 4 min 15 s | 58 |
| 4 | 9×9 | 5 min | 54 |
| 5 | 11×11 | 5 min 45 s | 50 |
4 s variable cast + 1 s fixed, 2 cells of range. Consumes 1 Blue Gemstone and 1 Yellow Gemstone per cast.
What it kills and what it spares
| Dies | Survives |
|---|---|
| Storm Gust, Meteor Storm, Lord of Vermilion, Heaven’s Drive, Fire Wall, Sanctuary, Quagmire, Gravitation Field… | Hunter traps, all of them |
| Fire Pillar, the one trap that does get wiped — it is written in separately on purpose | Units flagged as "ignores Land Protector" |
| An enemy Magnetic Earth: if they overlap, both are destroyed | Guild auras, which are never cancelled |
What it blocks while it is up
What it does NOT block: targeted magic. A Fire Bolt, a Jupitel Thunder, a Soul Strike or an Asura hit you just the same inside a Magnetic Earth. It only shuts down what is planted on the ground. Anyone who puts down a Land Protector expecting immunity to mages is in for a very expensive surprise.
Second trap, and the one that ruins the most casts: it occupies the same slot as Volcano, Deluge and Whirlwind, and inherits whatever time was left on the previous field. Plant Magnetic Earth while one of your own Volcanoes is dying and your five-minute Land Protector may last ten seconds — with both gemstones spent all the same. Let the elemental field expire first, or plant it from scratch.
See also Volcano, Deluge and Whirlwind: painting the ground with an element Wall of Fog: the mist that makes three out of four skills miss In a war zone you no longer pay the toll of uninterruptible-cast cards
Dispell tears every status off a target at once: good and bad, their own and whatever was put on them.
| Level | 1 | 2 | 3 | 4 | 5 |
|---|---|---|---|---|---|
| Chance | 60% | 70% | 80% | 90% | 100% |
It costs 1 mana and 1 Yellow Gemstone. 1.6 s variable cast + 0.4 s fixed, 9 cells of range. It cannot be cast on yourself.
Who you can cast it on
Outside a hostile map, only your party or your guild — which is its friendly use: clearing a teammate of a curse or a status that will not come off any other way, accepting that their buffs go with it. In PvP, castles or duels, on anyone.
Who it does not work on
| Immunity | Detail |
|---|---|
| Soul Linker | The whole class is immune to Dispell. There is no roll: it always fails. |
| Rogue Soul Link | Anyone carrying it is protected. |
| Golden Thief Bug | Blocks all targeted magic, this included. |
| Songs and dances | On this server they cannot be dispelled, inside or outside their area. |
A fair number of statuses are flagged "not removable by Dispell". From the Sage branch itself, Hindsight and Fiber Lock are on that list. Assumptio on a monster does not come off either. And on a player it also clears the temporary item effects that are marked to end on Dispell.
Against a monster it has an extra effect everyone forgets: besides clearing its statuses, it makes the monster drop its target. Useful for peeling a mob off a teammate who cannot take it.
See also Spell Breaker: shattering someone's cast and pocketing their mana Mind Breaker: prying open an enemy's magic defence Monsters cast Orc Head again, and Healers clear the annoying debuffs
Hocus-pocus pulls a random spell out of a list of 155 and puts it in your hand so you can aim and cast it yourself. Whatever comes out is cast completely free: no mana, no gemstones, no arrows, no requirements of any kind.
It costs 50 mana and 2 Yellow Gemstone. Instant, no cooldown.
Where the 155 come from
| Branch | How many |
|---|---|
| Sage itself | 23 |
| Acolyte, Priest and Monk | 36 |
| Mage and Wizard | 25 |
| Archer and Hunter | 17 |
| Thief, Rogue and Assassin | 21 |
| Swordsman, Knight and Crusader | 21 |
| Merchant, Blacksmith, Bard and Dancer | 12 |
What the level changes
Two things, and neither of them is "better spells come out":
The spells that come out still obey the map. This is the trap that catches people in dungeons: even though the spell is free, it still follows the local rules. A Teleport or a Warp Portal pulled from Hocus-pocus fails just the same on a map that forbids them. What is free is the cost, not the permission.
One of the prizes on the list, Grampus Morph — the one that turned you into an orc for twenty minutes — is disabled on this server: it comes out, you see the effect, and nothing transforms.
See also The mage who studies instead of shouting: what a Sage is and what Professor adds Dispell: stripping everything somebody was wearing
It opens a crafting window with whichever of the four Elemental Converters you can make from what you are carrying. It costs 30 mana and never fails: the success rate is hard-set to 100%.
| Converter | Materials |
|---|---|
| Fire | 1 Blank Scroll + 1 Red Blood |
| Water | 1 Blank Scroll + 1 Crystal Blue |
| Earth | 1 Blank Scroll + 1 Green Live |
| Wind | 1 Blank Scroll + 1 Wind of Verdure |
What the converter is for once made
Two different things, and it is worth not mixing them up:
It is the only cheap source of weapon element for the rest of the server. A converter costs one blank scroll and one merchant stone; an endow costs 40 mana, a coloured point and a Sage standing next to you. A Sage mass-producing converters is useful even when detached from the party.
This skill and the four Elemental Changes are quest skills: they cost no tree points. The Platinum Skill NPC in Prontera (158, 193) hands them over free, as does Mishuna's official quest at the magic academy in Juno.
See also Elemental Change: rewriting a monster's element The four endows: putting an element on the weapon of whoever swings it The mage who studies instead of shouting: what a Sage is and what Professor adds
Four twin skills — water, earth, fire and wind — that change a monster's defensive element for 30 minutes. They do not change the element it attacks with: they change what hits it hardest.
30 mana, 2 s fixed cast, 1 s after-cast delay, 9 cells of range. Each one consumes 1 Elemental Converter of the matching element. The chance is 100%.
The three conditions, all of them hard
| Condition | What happens otherwise |
|---|---|
| The target must be a monster | On a player it does nothing at all, with no message. |
| It cannot be a boss (status-immune) | Same: nothing, silently. The converter is not consumed. |
| You must carry the matching converter | The skill never leaves the ground. |
On this server it does NOT fail based on level. The classic description says Elemental Change is less reliable against high-level monsters. Not here: the code was checked and there is no level test at all. The only things that block it are the target being a boss, not being a monster, or being protected by a Golden Thief Bug.
When it is worth it
Against a tough, tedious monster your magic struggles to get through. Turning it into water so the party melts it with lightning, or into wind in front of a storm Wizard, turns a two-minute fight into a twenty-second one. The half-hour duration is designed for exactly that: put it on the area boss and ride it for the whole session.
Note: the status survives the target's death and cannot be removed with Dispell or Clearance, but a respawn clears it like anything else.
See also Create Elemental Converter: making your own weapon element The four endows: putting an element on the weapon of whoever swings it The mage who studies instead of shouting: what a Sage is and what Professor adds
Earth Spike is the closest thing to a bolt the Sage gets: single target, earth element, and one extra hit per level.
| Level | Hits | Total damage | Cast | Mana |
|---|---|---|---|---|
| 1 | 1 | 200% MATK | 0.8 + 0.4 s | 14 |
| 2 | 2 | 400% MATK | 1.4 + 0.6 s | 18 |
| 3 | 3 | 600% MATK | 2.0 + 0.8 s | 22 |
| 4 | 4 | 800% MATK | 2.6 + 1.0 s | 26 |
| 5 | 5 | 1000% MATK | 3.2 + 1.2 s | 30 |
Every hit lands at 200% of MATK, and the hits multiply rather than splitting the total. 9 cells of range. 1.4 s after-cast delay. No cooldown. The two cast figures are variable + fixed: DEX and INT shorten the variable part, never the fixed one.
The hidden bonus
If you have an earth elemental in Care mode (Earth Care) out, Earth Spike deals nine times the damage. That is not a typo: the ratio is multiplied by nine. It is by far the best reason for a Sorcerer who came up through Sage to keep Earth Spike on the bar.
Double Casting does not repeat it. Double Casting only doubles the mage's three bolts — Cold, Fire and Lightning. Earth Spike is not on that list, however much it looks like one. See Double Casting.
The AI has it integrated and adjustable from the character sheet, inside the mage's element selector.
See also Heaven’s Drive: the earth carpet Double Casting: bolts come out twice The mage who studies instead of shouting: what a Sage is and what Professor adds
It is planted on the ground, covers 5×5 cells and hits every enemy inside. Earth element.
| Level | Hits | Total damage | Cast | Mana |
|---|---|---|---|---|
| 1 | 1 | 125% MATK | 1.1 + 0.8 s | 28 |
| 2 | 2 | 250% MATK | 1.3 + 0.8 s | 32 |
| 3 | 3 | 375% MATK | 1.5 + 0.8 s | 36 |
| 4 | 4 | 500% MATK | 1.7 + 0.8 s | 40 |
| 5 | 5 | 625% MATK | 1.9 + 0.8 s | 44 |
Every hit at 125% of MATK, and they multiply. 9 cells of range, 1 second cooldown, 0.5 s after-cast delay. It also reaches hidden targets.
The two uses the tooltip does not mention
It is ground magic, with everything that implies. A Magnetic Earth — yours or the enemy's — shuts it down completely, and Magic Rod does not absorb it. If the enemy is standing on a Land Protector, this spell is wasted mana.
The AI uses it as a group area — planting it on the target's cell — and requires at least two enemies nearby for it to be worth the turn. That minimum can be changed from the character sheet.
See also Earth Spike: the Sage's only pure damage spell Magnetic Earth: the zone where area magic stops existing How the AI plays Sage and Professor
Sense opens a monster's analysis window: health, element and element level, race, size, physical and magical defence, and its elemental resistances.
10 mana, 9 cells of range, instant, no cooldown, a single level.
Why a sensible Sage learns it first
Because everything else the job does depends on knowing the enemy's element. With that window open you know, without guessing:
Two limits. It does not work on players: it simply errors out. And it cannot be cast on a castle Emperium — it is excluded by hand in the engine, alongside a handful of other skills.
The AI does not use it, and that is deliberate: it only provides information, and the AI already knows the monster's data internally without spending mana to ask.
See also Elemental Change: rewriting a monster's element The four endows: putting an element on the weapon of whoever swings it The mage who studies instead of shouting: what a Sage is and what Professor adds
Soul Exhale is the Professor's signature skill: it moves mana between two people. On this server it has been completely rewritten, and what it does is decided by the target's side.
On an ALLY — you refill them
Nothing is swapped. Their mana bar is filled to the top, and you pay only what was missing. If your priest is 200 mana short, you give 200 and keep the rest of yours.
On anyone else — literal swap
Your whole bar for their whole bar. No losses: the halving renewal used to apply is gone. What they had becomes yours and the other way round, point for point.
Why it was changed
Because the swap was a bad deal between teammates. An ally who was 200 mana short got all of yours from the swap and left you with all of theirs — which is exactly the mana they did not need. The result: two half-empty bars instead of one full and one nearly untouched.
Who counts as an ally
The side is decided by the engine using the same rule it uses to work out who you can heal: same party or same guild, and allied guilds count. The party number is not read by hand, precisely because in castle sieges and battlegrounds that is not where sides come from.
The four exact rules
| Case | Result |
|---|---|
| Ally with a full bar, or you at zero | It fails and does nothing. It does not fall back to the swap: swapping bars with a full teammate would be taking mana away from them. |
| Ally who cannot receive mana — fresh out of Asura, or under a no-recovery status | It fails before charging you anything. This is the important guard in the new version: this branch charges you before it delivers, so without it a teammate in Asura would empty your bar for nothing. |
| Enemy under Asura or no-recovery | They get their own mana back instead of yours. You still take theirs. |
| On a monster | You gain 3% of your maximum mana, and that monster is flagged: a second attempt fails. Once per creature. |
It costs 5 mana and 3 seconds of fixed cast, 9 cells of range. It cannot be cast on yourself. It only reaches party, guild and enemies: never a neutral stranger.
Against an enemy player, the literal swap is brutal. Without the renewal halving, a Professor with an empty bar and a rival Wizard with a full one trade at 100%: they go dry and you go full, in a single three-second cast. In PvP and castle sieges that is no longer a support utility, it is a weapon.
How the AI uses it: only on party members from the Acolyte line (Priest, Monk, Arch Bishop…) or the Soul Linker line, only when they drop below 10% mana, and only if you are above 95% health and at least 50% mana. It always picks the one in the worst shape, not the first one it sees.
See also Indulge: trading health for mana at an excellent rate How the AI plays Sage and Professor The mage who studies instead of shouting: what a Sage is and what Professor adds Songs and support skills reach as many characters as they can, and never work against you
The cost is always the same — 10% of your maximum health — and what changes with level is how much mana that payment buys.
| Level | Health paid | Mana received | Mana cost |
|---|---|---|---|
| 1 | 10% max HP | 10% of your maximum health | 1 |
| 2 | 10% max HP | 20% of your maximum health | 2 |
| 3 | 10% max HP | 30% of your maximum health | 3 |
| 4 | 10% max HP | 40% of your maximum health | 4 |
| 5 | 10% max HP | 50% of your maximum health | 5 |
The formulas are health paid = max health / 10 and mana gained = health paid × level. Note the unit: the mana you get is measured against your maximum health, not your maximum mana. Instant, 0.5 s after-cast delay.
Why it is so strong on a Professor
Because a caster usually has far more health than mana. With 12,000 health and 3,500 mana, an Indulge 5 costs 1,200 health and returns 6,000 mana — nearly two full bars. It is comfortably the most efficient mana recovery in the game outside consumables.
If you cannot afford the health, nothing happens. The engine checks first that you can pay the 10%: if not, the skill fails and takes neither health nor mana. It cannot kill you. But it can leave you in an uncomfortable spot, so the healthy habit is to use it with your health bar high, not as a last resort.
The AI uses it with two thresholds set by the server owner: health above 95% and mana below 30%. Health is the safety condition and mana the need condition; with both met, the trade is always a good deal.
See also Soul Exhale rewritten: allies get REFILLED, everyone else gets a literal swap How the AI plays Sage and Professor The mage who studies instead of shouting: what a Sage is and what Professor adds
Soul Siphon (Soul Burn) sets the target's mana to zero. Literally: 100% of the bar, at once. And at level 5 it also deals magic damage.
| Level | Chance to land | Mana | Cooldown | Damage |
|---|---|---|---|---|
| 1 | 40% | 80 | 10 s | — |
| 2 | 50% | 90 | 10 s | — |
| 3 | 60% | 100 | 10 s | — |
| 4 | 70% | 110 | 10 s | — |
| 5 | 70% | 120 | 15 s | twice their current mana |
Instant, 9 cells of range. It ignores attack cards, defence cards and element.
The level 5 damage does not come from MATK
This is the job's odd formula, and it appears in no description: the level 5 hit is worth twice the mana the target holds at that moment. Your magic power does not enter the calculation at all. It is measured before the bar is emptied, so against a full-mana target the hit is enormous and against a dry one it is zero. The target's magic defence and magic resistance still apply, as with any spell.
When it fails, you do it to yourself. It is not that "nothing happens": the entire effect turns on the caster. Your mana goes to zero, and at level 5 you take the hit — which, being twice your current mana, is worse the better your bar was doing. With a 30% failure rate at level 5, this is the most dangerous skill in the job for the person casting it.
When to use it
Against another caster in PvP or a castle siege, and virtually nowhere else. Emptying a Wizard's or an Arch Bishop's mana takes them out of the fight as effectively as killing them, and it outlasts the cooldown. Against an ordinary monster it is 120 mana thrown away: most of them do not depend on theirs at all.
It gates Mind Breaker at level 2, so every Professor carries it at least that far whether or not they ever intend to cast it. The AI does not use it, deliberately: a 30% roll that can leave the character bone dry is not something you can automate with any judgement.
See also Mind Breaker: prying open an enemy's magic defence Soul Exhale rewritten: allies get REFILLED, everyone else gets a literal swap The mage who studies instead of shouting: what a Sage is and what Professor adds
Mind Breaker leaves the target far softer against magic for 30 seconds. It also breaks whatever cast they had running at that moment, and makes the monster turn on you.
| Level | Chance | Mana | After-cast delay |
|---|---|---|---|
| 1 | 60% | 12 | 0.8 s |
| 2 | 65% | 15 | 0.9 s |
| 3 | 70% | 18 | 1.0 s |
| 4 | 75% | 21 | 1.1 s |
| 5 | 80% | 24 | 1.2 s |
The exact chance is 55 + 5 × level percent. Instant, 9 cells of range, 30 seconds at every level.
Who it does NOT work on
It also raises their INT. That is the half of the skill the tooltip does not highlight, and the one to keep in mind: cast it on something that casts spells and you are lowering its magic defence and raising the damage of its own spells. Against a caster monster it is shooting yourself in the foot. And when it lands it removes Freeze, Stone Curse and Sleep — you can wake up a monster you had put to sleep.
The AI has both vetoes written in: no casters — it scans the monster's skill list looking for magic — and only against targets with more than 40 MDEF. The reason for the second is that the effect strips a percentage of MDEF: on 10 the cut is symbolic; on 40 or more it is the difference between spells landing and spells bouncing.
See also Soul Siphon: emptying somebody's mana, or your own How the AI plays Sage and Professor The mage who studies instead of shouting: what a Sage is and what Professor adds Monsters cast Orc Head again, and Healers clear the annoying debuffs
Foresight (Memorize) has no duration: it has five charges. While you hold them, your variable cast time is halved. The status stays up indefinitely until you spend the fifth.
It costs 1 mana and 2.5 s of fixed cast. That fixed cast is reduced by neither DEX nor any status: it is always 2.5 seconds.
The two rules to internalise
| Rule | Consequence |
|---|---|
| It only counts for learned skills | A spell granted by an item or a scroll is not accelerated and does not burn a charge. Only what is in your own tree. |
| The charge burns regardless | Even if the spell you cast is instant or has only fixed cast time, the charge is consumed. Five Foresight uses, not five accelerated spells. |
Do not stack Foresight with cheap spells. The classic mistake is putting it up and then casting three instant things "to get ready": you have eaten three of the five charges without saving a single millisecond. Foresight goes up immediately before the batch of long spells you want to accelerate.
What it combines with
Foresight's 50% reduction does not stack multiplicatively with the others: it adds to reductions from other sources such as Magic Strings. With Suffragium on top and decent DEX, a five-second Storm Gust can end up under one.
The AI keeps it up as a self-buff, adjustable from the character sheet. Being a counter rather than a clock, it avoids the usual short-buff problem: there is nothing to "refresh" until all five are gone.
See also Free Cast: the skill that defines the job Double Casting: bolts come out twice In a war zone you no longer pay the toll of uninterruptible-cast cards
Wall of Fog plants a rectangle of mist 5 cells wide by 3 tall (15 cells) centred where you aim. Everyone inside suffers four things at once.
| Effect | How much |
|---|---|
| Offensive skills miss | 75% failure rate for any targeted skill aimed at someone inside. |
| Skill damage taken | −25% |
| Damage from ranged normal attacks | −75%, plus −50 hit for the attacker |
| Blind | On everyone who enters, except the caster |
25 mana, 9 cells of range, instant. It lasts 20 seconds and the blind 10. You can have two mists up at once.
The ground interactions, which are the good part
| What you plant it on | What happens |
|---|---|
| On a Deluge or a Suiton | The mist lasts twice as long: 40 seconds. |
| On a Volcano or a Whirlwind | Those cells are not created. The mist comes out mutilated or not at all. |
| On someone carrying Deluge | They are not blinded. The water protects their eyes. |
Two traps and a trick. Trap one: bosses are immune to the mist — the status does not stick, so they neither miss nor go blind. Trap two: Dragon Breath ignores it completely, both the fire and the water versions. And the trick: while you are inside the mist the blind never expires; on leaving, a player loses it instantly and a monster keeps it for another 30 seconds.
The AI casts it on itself and only when it is being shot at from range — it checks that there are long-range monsters targeting it and already in reach. It does not repeat while the status is up: 20 seconds and a fixed zone, so insisting would pay the mana twice for the same thing.
See also Fiber Lock: pinning down whatever is coming for you Volcano, Deluge and Whirlwind: painting the ground with an element How the AI plays Sage and Professor
Fiber Lock throws a web onto a cell. Whoever lands in it cannot move, loses half their flee, and is dragged onto the web's cell if they were next to it.
| Situation | 1st web | 2nd | 3rd |
|---|---|---|---|
| Against monsters | 8 s | 16 s | immune |
| In PvP, castles or battlegrounds | 4 s | 8 s | 12 s |
30 mana and 1 Cobweb. 9 cells of range, instant. The web stays on the ground for 16 seconds even if the trapped target breaks free earlier, and you can have three out at once.
The fire combo
A fire element attack against someone caught in the web deals double damage, and burns the web away in the process — the target is freed. This is the classic combination: Fiber Lock plus Fire Bolt, or Fiber Lock plus a teammate carrying Endow Blaze.
On the third attempt they become immune (against monsters). Duration grows with the second web, but on the third the target stops being trappable and the web you just threw shuts itself down. It cannot be chained indefinitely. In PvP zones the ladder is different: three webs, with shorter but growing durations.
The status cannot be removed by Dispell, Clearance or Banishing Buster, and does not drop on death. It is one of the hardest control effects in the game to clean off.
How the AI uses it: only on something that can move — there is nothing to tie down on an immobile target — that already has you as its target, and is within range. It runs ahead of Stone Curse and Fire Wall in the decision chain: for a kiting caster, stopping whatever is closing in is the immediate problem.
See also Wall of Fog: the mist that makes three out of four skills miss How the AI plays Sage and Professor The mage who studies instead of shouting: what a Sage is and what Professor adds
While it lasts, every time you cast Cold Bolt, Fire Bolt or Lightning Bolt there is a chance it goes off a second time, on its own, with no cast time and no mana cost.
| Level | Chance to repeat | Mana |
|---|---|---|
| 1 | 40% | 40 |
| 2 | 50% | 45 |
| 3 | 60% | 50 |
| 4 | 70% | 55 |
| 5 | 80% | 60 |
The formula is 30 + 10 × level percent. It lasts 90 seconds at every level. 1.6 s variable cast + 0.4 s fixed, and the variable part is not reduced by DEX.
Only the three bolts. Not one more. It does not repeat Soul Strike, Fire Ball, Napalm Beat, Earth Spike, Jupitel Thunder or any Wizard spell. The list is hard-coded in the engine and it is exactly Cold Bolt, Fire Bolt and Lightning Bolt. Any guide that says otherwise is describing a different server.
What actually makes it good
That the repeat is free. At level 5, a mage who only casts bolts gets 80% more damage per point of mana. With 90 seconds of duration and a 60 mana cost, it pays for itself on the second bolt. Combined with Foresight to shorten the cast, a Professor with level 10 bolts out-sustains a Wizard waiting on a Storm Gust.
The second shot comes after the first one's animation delay, so it reads as two bursts in a row rather than a single double hit. The AI keeps it as a self-buff, in the same group as Energy Coat and Foresight: the three things a mage wants up before starting.
See also Hindsight: the autocast spell, and how an AI-driven character picks it Earth Spike: the Sage's only pure damage spell Foresight: five spells at half the cast time How the AI plays Sage and Professor
The Sage is one of the jobs with the most bespoke logic in the server's AI, because almost none of its skills fit into a "damage rotation". Most of them need questions no other class asks: which element suits this monster?, is something being cast at me right now?, who in the party has the least mana left?
What it does know how to use
| Skill | With what criterion |
|---|---|
| Magic Rod | It spots an enemy spell being cast at you and waits: it raises the shield just before impact, not the moment it sees the cast. While waiting it starts no other spell, so it can get there in time. |
| Spell Breaker | The only catalogue entry that picks its own victim: it sweeps its range looking for casters instead of watching the current target. It prioritises areas and ground units, then heals, then anything aimed at you. And it checks it has time to land the interrupt. |
| The four endows | It picks the element using the engine's own table, demands a strict advantage, never overwrites an element the weapon already has, and hands them out in order: you, the party, your summons. |
| The three elemental fields | Same element criterion, with a throttle of its own: since the status vanishes when you step off the ring, it records the cast and does not repeat until the previous unit would have expired. Without that, it would be a blue gemstone every two steps. |
| Hindsight | It picks the spell on its own. Only if the character fights in melee, and at most once a minute. |
| Heaven’s Drive and Earth Spike | Inside the mage's element selector; Heaven’s Drive requires two enemies nearby. |
| Fiber Lock and Mind Breaker | Both targeted, running ahead of Stone Curse and Fire Wall. Each with its own vetoes. |
| Wall of Fog, Indulge, Soul Exhale | The support chain, in order of urgency: cover from ranged fire, your own mana, and last the party's. |
| Double Casting and Foresight | Self-buffs, in the same group as Energy Coat. |
| Free Cast | Nothing to switch on or off: the AI respects it. A character with Free Cast does not stop to cast, and can reposition and fire in the same turn. |
What is left out, and why
| Skill | Reason |
|---|---|
| Sense | It only provides information, and the AI already knows that data internally. |
| Hocus-pocus | It opens a client window with a random spell. There is no way to judge whether the result is useful. |
| Create Elemental Converter | Crafting with a window, not combat. |
| Cast Cancel | Its value is changing your mind mid-cast, which is exactly what a decision chain does not do. |
| Soul Siphon | A 30% failure roll that leaves the character dry. Not automatable. |
| Dispell | It strips good and bad alike. Judging whether that pays off means reading the enemy's status bar. |
| Magnetic Earth | It also wipes your own and your party's areas, and inherits the previous field's clock. |
| Elemental Change | It burns a converter per attempt and its value depends on what the whole party is about to cast, not one character. |
None of these exclusions is an oversight. Each one is written in the code with its reason next to it, and the panel greys them out rather than offering you a switch that would do nothing. What it cannot use stays off at the source, never on and inert.
Everything that is integrated has its own switch, level cap and conditions on the character sheet. See the full AI repertoire.
See also Hindsight: the autocast spell, and how an AI-driven character picks it Soul Exhale rewritten: allies get REFILLED, everyone else gets a literal swap Magic Rod: eating the spell that was coming for you Which skills the AI knows how to use, and which are left out on purpose Songs and support skills reach as many characters as they can, and never work against you
The Wizard's third job: four elemental spheres carried around as ammunition, a spellbook that stores a spell so you can fire it without casting, and the biggest and most expensive spells in the whole Mage branch.
The Warlock inherits the entire Mage and Wizard tree and adds twenty-five entries of its own. If you are coming from Wizard, the change is not raw power: it is that for the first time you have resources you stock up before the fight — spheres and memorised spells — and spells with casts so long that when you start them becomes a decision.
The three things that set it apart
The spheres. Four skills summon an elemental sphere that floats beside you. Five fit at once. They are the ammunition for Tetra Vortex (needs four) and Release level 2 (needs one). Each one costs 1 SP per second while you hold it.
The spellbook. With a magic book you memorise a spell you already know, and Release fires it with no cast time at all. It is the only way to land an instant Comet or Storm Gust.
Radius. A three-level passive that does two things at once: it gives you range and it trims the fixed cast time of almost the whole tree. It is the first thing you level and hardly anyone notices why.
Careful: most of the tree is Magic type. That matters for Stasis, which shuts down all magic in a huge area — yours included.
The 25 entries and their prerequisites
| Skill | Lv. | Requires | What it is |
|---|---|---|---|
| Radius | 3 | — | Passive: range and fixed cast time |
| Release | 2 | — | Fires the stored spell (lv. 1) or the spheres (lv. 2) |
| Reading Spellbook | 1 | — | Lets you use magic books |
| Mastery of Spell | 10 | — | Passive: spellbook memory capacity |
| Full Throttle | 5 | — | Full heal and +20% to everything, paid in SP |
| Drain Life | 5 | Radius 1 | Single-target damage that heals you |
| Soul Expansion | 5 | Drain Life 1 | Ghost-element splash |
| Stasis | 5 | Drain Life 1 | Shuts down magic in a huge area |
| White Imprison | 5 | Soul Expansion 3 | Locks the target away; bursts on release |
| Intense Telekinesis | 5 | Soul Expansion 5 | Variable cast −50% and Ghost +200% |
| Recognized Spell | 5 | White Imprison 1, Stasis 1, Release 2 | MATK always maxed, SP +25% |
| Summon Fire Ball | 2 | Meteor Storm 1 | Fire sphere |
| Summon Lightning Ball | 2 | Lord of Vermilion 1 | Wind sphere |
| Summon Water Ball | 2 | Storm Gust 1 | Water sphere |
| Summon Stone | 2 | Heaven's Drive 1 | Earth sphere |
| Frost Misty | 5 | Summon Water Ball 1 | Water mist; leaves Freezing |
| Jack Frost | 5 | Frost Misty 2 | The finisher of the ice combo |
| Crimson Rock | 5 | Summon Fire Ball 1 | Fire meteor with knockback |
| Hell Inferno | 5 | Crimson Rock 2 | Fire and, 0.3 s later, Shadow |
| Comet | 5 | Hell Inferno 3 | 13×13 cells and Magic Poison |
| Chain Lightning | 5 | Summon Lightning Ball 1 | A bolt that jumps from enemy to enemy |
| Sienna Execrate | 5 | Summon Stone 1 | Petrifies; costs 2 red gemstones |
| Earth Strain | 5 | Sienna Execrate 2 | An earth wave 15 cells wide |
| Marsh of Abyss | 5 | Quagmire 1 (Wizard) | Bog: AGI, DEX and movement |
| Tetra Vortex | 10 | Jack Frost 5, Hell Inferno 5, Chain Lightning 5, Earth Strain 5 | The finisher: four spheres, four hits |
Tetra Vortex costs you four maxed skills. Jack Frost, Hell Inferno, Chain Lightning and Earth Strain, all four at level 5. That is 20 points in prerequisites alone, plus the 10 in Tetra Vortex, plus the four sphere summons. It is not a skill you pick up in passing: it is the entire build.
Elements the job brings
| Element | Spells |
|---|---|
| Fire | Crimson Rock, Hell Inferno (first hit) |
| Water | Frost Misty, Jack Frost |
| Wind | Chain Lightning |
| Earth | Earth Strain |
| Shadow | Hell Inferno (second hit) |
| Ghost | Soul Expansion |
| Neutral | Drain Life, Comet |
| All four | Tetra Vortex and Release level 2 (whichever spheres you carry) |
Comet is neutral. Against a monster whose armour resists neutral it hits far less than its damage number suggests; what almost always pays off is the Magic Poison it leaves behind.
See also Elemental spheres: five slots at 1 SP per second each The spellbook: memorise a spell so you can cast it without casting it Tetra Vortex: four spheres in, four hits out The Wizard skill tree: fourteen spells, six more when you transcend, and an amplification that is NOT spent here Fourteen skills, and one of them cannot be bought with skill points
The four summons — Summon Fire Ball, Summon Lightning Ball, Summon Water Ball and Summon Stone — deal no damage. They place a sphere of their element floating next to you. There are five slots, and one sphere takes one.
The two levels do different things
Level 1 finds the first free slot and puts a sphere in it. If there is none, it fails with the summon error and costs you nothing.
Duration: 120 seconds.
Level 2 does not look for a slot: it wipes all five and refills them with its own element. That is how you get five identical spheres in one cast — and also how you throw away the four you already had.
Duration: 160 seconds.
| Figure | Level 1 | Level 2 |
|---|---|---|
| SP per cast | 10 | 12 |
| Spheres placed | 1 (first free slot) | 5 (wipes and refills) |
| Duration of each sphere | 120 s | 160 s |
| Cast time | 2 s variable | 2 s variable |
Every sphere charges you 1 SP per second while you hold it. Four spheres are 4 SP per second, constantly, whatever you are doing. And the moment you cannot pay that point, the sphere vanishes without warning. That is why summoning them "to have them ready" is a leak: you summon them when you are about to spend them.
What they are actually for
The element does matter
Each sphere carries its element, and that element is what comes out the other end: Tetra Vortex hits with the elements of the spheres it finds, and Release level 2 fires one bolt of each sphere's element. Five water spheres mean five water hits; one of each gives you variety and opens all four possible final effects of Tetra Vortex.
The traps
With @autoplay running, the AI only summons spheres if you know Tetra Vortex or Release 2, only above half SP, and deliberately rotates the four elements instead of filling every slot with fire.
See also Release: the same key does two completely different things Tetra Vortex: four spheres in, four hits out The Warlock skill tree: four spheres, a spellbook and the priciest spell on the server The SP economy: why a Warlock runs dry
Release is a two-level skill, and the level does not make it "stronger": it swaps it for a different skill. You can use level 1 even with level 2 learned, by picking it on the bar.
Level 1 — fire the stored spell
Takes the spell you memorised from a book and casts it instantly, with no cast time at all, at your current target. A Storm Gust or a Comet without its eight seconds of casting is the whole reason the spellbook exists.
Level 2 — fire the spheres
Turns every sphere you carry into a bolt aimed at the target. One per sphere, spaced by your own attack delay, each of its sphere's element. All of them are consumed.
| Figure | Level 1 | Level 2 |
|---|---|---|
| Release SP | 3 | 20 |
| Cast time | None | None |
| Own cooldown | None | None |
| Range | 11 cells +1 per Radius level | 11 cells +1 per Radius level |
| Consumes | One memorised spell | All spheres |
Release level 1 with nothing memorised does not throw an error. No message, no SP spent, nothing happens: you just lose the turn. Same if the stored spell has requirements you no longer meet (not enough SP for it, missing gemstones, whatever): it is dropped from memory and never fires.
Other traps
See also Elemental spheres: five slots at 1 SP per second each The spellbook: memorise a spell so you can cast it without casting it The ten magic books: where to get them and what each one stores The Warlock skill tree: four spheres, a spellbook and the priciest spell on the server
The spellbook system has three parts: the books (items), Reading Spellbook (the skill that lets you read them) and Mastery of Spell (the passive that says how much fits in your head). It is fired with Release level 1.
How to memorise a spell
If you do not know the spell, the book puts you to sleep. Reading a book for a spell you have not learned does not throw an error: it inflicts Sleep for 30 seconds. You literally doze off reading. Check that you have the skill, not just the book.
How much each spell weighs and how much fits
Every spell has a weight in preservation points. Your memory capacity is:
8 × Mastery of Spell level + INT / 10 + base level / 10
With Mastery of Spell at 10, 120 INT and base level 175: 80 + 12 + 17 = 109 points. With Mastery at 1, base level 100 and 60 INT: 8 + 6 + 10 = 24 points, which means a single Comet does not fit.
| Storable spell | Points |
|---|---|
| Drain Life | 8 |
| Storm Gust | 10 |
| Lord of Vermilion | 10 |
| Meteor Storm | 10 |
| Jack Frost | 10 |
| Crimson Rock | 12 |
| Chain Lightning | 12 |
| Earth Strain | 12 |
| Comet | 22 |
| Tetra Vortex | 22 |
On top of the points there is a hard cap: seven memorised spells at most, even if you have capacity to spare.
What you have memorised charges SP non-stop. Every 10 seconds you lose as many SP as the points your memory holds. A stored Comet is 22 SP every 10 seconds, forever, until you release it. And if you ever fail to pay, your whole memory is wiped, not just one spell. That is the real reason nobody walks around with a full spellbook.
How you cast it
With Release level 1, which costs 3 SP and is instant. Out comes the first spell you memorised (the memory is a queue) and you pay the spell's normal price again: its SP, its items and its cooldown. What the spellbook buys you is the cast time, nothing else — and that is a great deal: cast by hand, Comet is 10 variable seconds plus 2 fixed.
The traps
See also The ten magic books: where to get them and what each one stores Release: the same key does two completely different things The SP economy: why a Warlock runs dry The Warlock skill tree: four spheres, a spellbook and the priciest spell on the server
There are exactly ten books and every one of them comes from an NPC quest. None drop from monsters and none are sold in shops. They are not consumed when used, so you get them once and you are done.
| Book | Spell | Points | Where |
|---|---|---|---|
| Spell Book (Storm Gust) | Storm Gust | 10 | Lea — 100,000z |
| Spell Book (Lord of Vermilion) | Lord of Vermilion | 10 | Lea — 100,000z |
| Spell Book (Meteor Storm) | Meteor Storm | 10 | Lea — 100,000z |
| Spell Book (Drain Life) | Drain Life | 8 | Lea — 500,000z |
| Spell Book (Jack Frost) | Jack Frost | 10 | Lea — 500,000z |
| Spell Book (Earth Strain) | Earth Strain | 12 | Lea — 500,000z |
| Spell Book (Crimson Rock) | Crimson Rock | 12 | Lea — 500,000z |
| Spell Book (Chain Lightning) | Chain Lightning | 12 | Lea — 500,000z |
| Spell Book (Comet) | Comet | 22 | Galfos — long quest chain |
| Spell Book (Tetra Vortex) | Tetra Vortex | 22 | Galfos — long quest chain |
The first eight: Lea, in Geffen
First you must talk to Master Velofos (inside Geffen, in the mages' hall), who only deals with you if you are a Warlock — or something above it — and if you already have Release learned. After his lecture he sends you to Lea, a few tiles away.
The two heavy ones: Comet and Tetra Vortex
These are not lent, they are crafted, and the chain is long. You need:
Galfos will repeat the job as many times as you like, so losing a book is not the end of the world — but the recipes have to be earned again.
See also The spellbook: memorise a spell so you can cast it without casting it Release: the same key does two completely different things Ring of the Ancient Wise King: how to get it, and why you do not have to wear it here The Warlock skill tree: four spheres, a spellbook and the priciest spell on the server
Tetra Vortex consumes four spheres and turns them into four consecutive hits on your target, each of its sphere's element. It is the job's finisher and the most expensive spell in the branch.
How many spheres it needs
Never cast Tetra Vortex with five spheres up. The level 2 summon fills all five slots at once, so it is the easiest mistake there is: you summon at level 2 because it is quick, and you hand over a sphere and its SP drip for free.
Damage
Each of the four hits lands for 800% + 400% per level of Tetra Vortex. At level 10 that is 4,800% per hit, four times over. Unlike the rest of the tree, this damage is not multiplied by your base level: the number is the number.
| Level | % per hit | SP | Variable cast | Area |
|---|---|---|---|---|
| 1 | 1,200% | 120 | 5 s | Target only |
| 2 | 1,600% | 150 | 6 s | Target only |
| 3 | 2,000% | 180 | 7 s | Target only |
| 4 | 2,400% | 210 | 8 s | Target only |
| 5 | 2,800% | 240 | 9 s | Target only |
| 6 | 3,200% | 200 | 10 s | 3×3 |
| 7 | 3,600% | 240 | 11 s | 3×3 |
| 8 | 4,000% | 280 | 12 s | 5×5 |
| 9 | 4,400% | 320 | 13 s | 5×5 |
| 10 | 4,800% | 360 | 14 s | 7×7 |
Plus 1 second of fixed cast, a 15-second cooldown and 11 cells of range (+1 per Radius level) at every level. Look at the jump from level 5 to level 6: level 6 costs 40 SP less than level 5 and splashes as well. If you are going to run short of points, stopping at 5 is the worst thing you can do.
Element and final status
Each hit uses its sphere's element: fire, water, wind or earth. There is no choice beyond which spheres you were carrying.
From level 1 to 5, the last of the four hits applies — if the target is still alive — one status picked at random among the elements that took part:
| Sphere present | Possible status | Duration |
|---|---|---|
| Fire | Burning | 18 s |
| Water | Freezing | 27 s |
| Wind | Bleeding | 108 s |
| Earth | Stun | 4.5 s |
With four different spheres you get 25% of each. With four spheres of the same element the status is guaranteed. If what you want is to pin Freezing on a boss, summon the water sphere four times at level 1 — or once at level 2 and accept that you are wasting the fifth.
From level 6 onwards the final status never lands. The splashing version — levels 6 to 10 — takes a different path inside the engine and never marks the fourth hit as "the last one", so the status roll is never made. This is an engine bug, it has been reported and nothing was changed to work around it. If what you wanted from Tetra Vortex was the Freezing or the Bleeding, you have to stay at level 5 or below.
The traps
See also Elemental spheres: five slots at 1 SP per second each Release: the same key does two completely different things The Warlock skill tree: four spheres, a spellbook and the priciest spell on the server The SP economy: why a Warlock runs dry
Comet marks a cell and drops a meteor that strikes 13×13 cells — six cells of radius, the biggest area in the entire Mage branch. It is a single strike, not a field that lingers.
Numbers
| Level | Damage | SP | Variable cast |
|---|---|---|---|
| 1 | 3,200% | 70 | 6 s |
| 2 | 3,900% | 90 | 7 s |
| 3 | 4,600% | 110 | 8 s |
| 4 | 5,300% | 130 | 9 s |
| 5 | 6,000% | 150 | 10 s |
Formula: (2500 + 700 × level) × base level / 100. That total is split across the 10 hits you see on screen — those ten small numbers do not multiply anything, they are the same damage sliced up. Plus 2 seconds of fixed cast, 1.5 s after-cast delay and a 20-second cooldown. Knocks back 2 cells. Range 11 (+1 per Radius level).
Magic Poison: the real reason to cast Comet. Everything the meteor touches is left with Magic Poison for 20 seconds, at 100%, with no roll. While it lasts, that target takes 50% more damage — magic, weapon, anything. And bosses do not resist it. A Comet before the party engages an MVP is worth more than the meteor itself.
How to use it
The traps
See also Crimson Rock: the fire meteor that scatters the pack The spellbook: memorise a spell so you can cast it without casting it The Warlock skill tree: four spheres, a spellbook and the priciest spell on the server Which spell against what: the Warlock element cheat sheet
Crimson Rock drops a burning rock on your target. It strikes 7×7 cells around the impact point, it is fire, and it knocks everything back 3 cells outwards.
| Level | Damage | SP | Variable cast |
|---|---|---|---|
| 1 | 1,300% | 60 | 5 s |
| 2 | 1,900% | 70 | 5 s |
| 3 | 2,500% | 80 | 5 s |
| 4 | 3,100% | 90 | 5 s |
| 5 | 3,700% | 100 | 5 s |
Formula: (700 + 600 × level) × base level / 100, split across 7 hits. Fixed cast 1 s, after-cast delay 0.5 s, cooldown 5 s, range 11 (+Radius).
How to use it
This is the everyday fire area spell: five seconds of cooldown is short, and its damage per SP is among the best in the tree. Against packs weak to fire (plants, undead, insects) it is the first thing you throw.
The knockback comes from where the rock lands, not from you. Everyone hit is pushed outwards, away from the centre of the impact. That scatters enemies across the map and sometimes drops them on top of you. If your plan was to keep them bunched for the next area spell, Crimson Rock is exactly the wrong tool.
The traps
See also Hell Inferno: it hits twice, with two different elements Comet: 13×13 cells, one single hit, and a debuff worth more than the damage The Warlock skill tree: four spheres, a spellbook and the priciest spell on the server
Hell Inferno is cast on a target and splashes around it. Everyone hit takes two hits: a fire one immediately, and 0.3 seconds later a Shadow one that hits harder and arrives split into three impacts.
| Level | Fire hit | Shadow hit | SP | Area |
|---|---|---|---|---|
| 1 | 400% | 600% | 64 | 3×3 |
| 2 | 800% | 1,200% | 70 | 3×3 |
| 3 | 1,200% | 1,800% | 76 | 3×3 |
| 4 | 1,600% | 2,400% | 82 | 5×5 |
| 5 | 2,000% | 3,000% | 88 | 5×5 |
Both figures are further multiplied by your base level over 100. The shadow hit is split across 3 on-screen impacts. Cast 3 s variable + 1 s fixed, after-cast delay 0.5 s, cooldown 3 s, range 11 (+Radius).
Why the two elements matter
It is the only spell in the tree that delivers two elements in one cast, and the bulk of the damage sits in the shadow half. Against enemies that resist fire but not shadow it still performs; against those that resist shadow it drops to half.
The traps
See also Crimson Rock: the fire meteor that scatters the pack Comet: 13×13 cells, one single hit, and a debuff worth more than the damage The Warlock skill tree: four spheres, a spellbook and the priciest spell on the server
Chain Lightning throws a bolt at your target which then bounces to the nearest enemy, and from there to another, until it runs out of jumps. Each jump hits for less than the one before.
How many bounces and how hard each one lands
The total number of hits is 4 + the skill level: 5 at level 1 up to 9 at level 5. Each hit lands for:
(500 + 100 × level) × base level / 100, plus 100% for every bounce it still has left.
In practice: at level 5 and base level 175, the first hit is 2,550% and the last is 1,750%. The falloff is linear and always in the same order, so the hit you want landing on the important enemy is the first one.
| Level | Hits | SP | Variable cast |
|---|---|---|---|
| 1 | 5 | 80 | 3.5 s |
| 2 | 6 | 90 | 4 s |
| 3 | 7 | 100 | 4.5 s |
| 4 | 8 | 110 | 5 s |
| 5 | 9 | 120 | 5.5 s |
Plus 1 second of fixed cast. A 3-second after-cast delay — the longest in the tree — and no cooldown. Wind element. Range 11 (+Radius).
How the bounces work
Against a single enemy, Chain Lightning stops at four hits. The remaining five need somebody new to jump to and there is nobody. It is a pack spell: against a lone boss you are paying 120 SP and 5.5 seconds of casting for less than half of what it advertises.
Other traps
See also The Warlock skill tree: four spheres, a spellbook and the priciest spell on the server The spellbook: memorise a spell so you can cast it without casting it Which spell against what: the Warlock element cheat sheet
Earth Strain raises a series of earth waves that sweep the ground in a straight line. Each wave is a strip 15 cells wide (seven to each side), and you get level + 4 waves: from 5 to 9, one every 140 milliseconds.
The wave starts on YOUR cell, not the one you marked. All the marked spot does is set the direction: the engine works out which way you aimed and launches the wall from your feet that way. If you mark eight cells further out, the first wave still rises right in front of you. The tooltip does not say this and it is the mistake everybody makes.
| Level | Damage | Waves | SP | Variable cast |
|---|---|---|---|---|
| 1 | 1,600% | 5 | 70 | 2 s |
| 2 | 2,200% | 6 | 78 | 3 s |
| 3 | 2,800% | 7 | 86 | 4 s |
| 4 | 3,400% | 8 | 94 | 5 s |
| 5 | 4,000% | 9 | 102 | 6 s |
Formula: (1000 + 600 × level) × base level / 100, split across 6 to 10 hits depending on level. Fixed cast 1 s, after-cast delay 0.5 s, cooldown 7 s. Earth element. Range 6 cells.
How to use it
The traps
See also Sienna Execrate: petrify one and it spreads to the neighbours The Warlock skill tree: four spheres, a spellbook and the priciest spell on the server Radius: the three-point passive that does two jobs and only advertises one
Frost Misty is cast on a cell and raises a freezing mist in a square around it. It deals water damage, slows everything it catches and — crucially — leaves the Frost mark that powers up Jack Frost.
| Level | % per hit | Hits | Area | Freezing | SP | Cast |
|---|---|---|---|---|---|---|
| 1 | 300% | 1 | 7×7 | 30% | 40 | 2 s |
| 2 | 400% | 2 | 7×7 | 35% | 48 | 2.5 s |
| 3 | 500% | 3 | 9×9 | 40% | 56 | 3 s |
| 4 | 600% | 4 | 9×9 | 45% | 64 | 3.5 s |
| 5 | 700% | 5 | 11×11 | 50% | 72 | 4 s |
Here the hits multiply, they do not split. Almost every area spell in the job slices one total across several impacts. Frost Misty does not: at level 5 it is five hits of 700% each, each of them further multiplied by your base level over 100. It is by a wide margin the best damage per SP in the tree, which is why taking it from 4 to 5 is worth more than nearly anything else.
Per-hit formula: (200 + 100 × level) × base level / 100. Fixed cast 0.5 s, after-cast delay 1 s, cooldown 8 s, range 11 (+1 per Radius level). Water element.
The two marks it leaves
Freezing (25% + 5% per level chance, up to 40 seconds):
Duration is cut by the target's VIT and DEX (50 ms per combined point), but never below 10 seconds.
Frost (100%, always, 10 seconds):
It does nothing on its own. It is the flag Jack Frost looks for in order to hit much harder. It is not consumed: for those 10 seconds every Jack Frost you throw is amplified.
The traps
See also Jack Frost: nearly double damage if the Frost mark is there The Warlock skill tree: four spheres, a spellbook and the priciest spell on the server Monsters cast Orc Head again, and Healers clear the annoying debuffs
Jack Frost hits your target and everything around it with a burst of ice. It is the other half of the water combo: on its own it is fine; on somebody carrying Frost from Frost Misty, it nearly doubles.
| Level | Normal damage | With Frost | Area | SP | Variable cast |
|---|---|---|---|---|---|
| 1 | 1,300% | 1,800% | 7×7 | 50 | 2 s |
| 2 | 1,600% | 2,400% | 7×7 | 60 | 2.5 s |
| 3 | 1,900% | 3,000% | 9×9 | 70 | 3 s |
| 4 | 2,200% | 3,600% | 9×9 | 80 | 3.5 s |
| 5 | 2,500% | 4,200% | 11×11 | 90 | 4 s |
Formulas: (1000 + 300 × level) normally and (1200 + 600 × level) with Frost, both multiplied by your base level over 100 and split across 5 hits. Fixed cast 1 s, after-cast delay 0.5 s, cooldown 4 s. Water element.
The check is per target, not global. Every enemy caught in the burst is looked at separately: those carrying Frost take the amplified version and those who do not take the normal one, all in the same cast. And since Frost is not consumed, two full Jack Frosts (4-second cooldown) fit inside its 10-second window.
The ice rotation
The traps
See also Frost Misty: the mist that multiplies its hits and sets up the combo The spellbook: memorise a spell so you can cast it without casting it The Warlock skill tree: four spheres, a spellbook and the priciest spell on the server
Drain Life hits a single enemy and, with a good chance, returns part of that damage to you as health. It is the first skill in the tree you can learn (it only needs Radius 1) and the cheapest.
| Level | Damage | Heals you | Chance | SP |
|---|---|---|---|---|
| 1 | 200% + INT | 10% of the damage | 75% | 20 |
| 2 | 400% + INT | 15% of the damage | 80% | 24 |
| 3 | 600% + INT | 20% of the damage | 85% | 28 |
| 4 | 800% + INT | 25% of the damage | 90% | 32 |
| 5 | 1,000% + INT | 30% of the damage | 95% | 36 |
Formula: (200 × level + INT) × base level / 100. That "+ INT" is your raw INT added to the percentage, not a percentage of INT. Cast 4 s variable + 1 s fixed, cooldown 2 s. One hit. Neutral element. Range 11 (+Radius).
How to use it
The traps
See also Soul Expansion: Ghost element, and double against anyone imprisoned The spellbook: memorise a spell so you can cast it without casting it The Warlock skill tree: four spheres, a spellbook and the priciest spell on the server
Soul Expansion hits your target and whatever stands next to it with Ghost element damage, an element almost nothing resists. And it does something no other spell does: it goes through White Imprison.
| Level | Damage | Area | SP |
|---|---|---|---|
| 1 | 1,200% + INT | 3×3 | 30 |
| 2 | 1,400% + INT | 3×3 | 35 |
| 3 | 1,600% + INT | 3×3 | 40 |
| 4 | 1,800% + INT | 5×5 | 45 |
| 5 | 2,000% + INT | 5×5 | 50 |
Formula: (1000 + 200 × level + INT) × base level / 100, split across 2 hits. Cast time is 2 seconds, entirely variable, after-cast delay 0.5 s, no cooldown. Range 11 (+Radius).
No fixed cast and no cooldown. Soul Expansion is the only decent damage spell in the tree without a single millisecond of fixed cast: with enough DEX and INT (DEX×2 + INT reaching 530) it becomes instant and can be chained without pause. It is the filler spell of a well-built Warlock.
The White Imprison pairing
Against somebody locked in White Imprison, Soul Expansion is one of the very few things that damages them — and it hits twice as hard. The price is that the hit breaks the prison: you choose between the burst at the end of the prison or the doubled Soul Expansion, never both.
The traps
See also White Imprison: it makes the target untouchable, then bursts Intense Telekinesis: half the cast time on everything, one minute in five The Warlock skill tree: four spheres, a spellbook and the priciest spell on the server
White Imprison seals the target inside a white sphere. While it lasts they cannot move or cast, and they take damage from almost nothing. When the prison runs out on its own, it bursts and hurts them.
Chance and duration
| Target | Chance | Duration |
|---|---|---|
| Yourself | 100% | 5 seconds |
| Another player | 20% + 10% per level, + job level / 4 | 6 / 8 / 10 / 12 / 14 s |
| Monster | 40% + 10% per level, + job level / 4 | 18 seconds |
Against players that chance is cut down by the target's STR, LUK and base level. SP 50/55/60/65/70. Instant cast — it has no cast time of any kind — and a 4-second cooldown. Range 11 (+1 per Radius level).
What gets through the prison
Only four things damage an imprisoned target, and all four break the prison when they land:
Everything else bounces off. The imprisoned target also reflects no damage of any kind.
The burst only happens if the prison runs out by itself. On natural expiry it deals 400 × level damage (2,000 at level 5). If somebody breaks it early with one of the four hits above, there is no burst. That is the tactical choice built into the skill: either the doubled Soul Expansion or the burst, never both.
On yourself it works differently
Cast on yourself it always lands and lasts a flat 5 seconds, not what the table says. For those five seconds you are immune to almost everything, and in exchange you cannot move or cast. It is a way to survive a blow that is already on its way — and when it ends you eat the burst yourself, because the damage is credited to the caster and the caster is you.
The traps
See also Soul Expansion: Ghost element, and double against anyone imprisoned Stasis: it shuts down all magic in a huge area — yours included The Warlock skill tree: four spheres, a spellbook and the priciest spell on the server
Sienna Execrate tries to petrify your target. If it succeeds, the petrification spreads to every enemy around them, and for those there is no roll at all: they all go down.
| Level | Chance | Spread | Petrify | SP |
|---|---|---|---|---|
| 1 | 50% + job level / 4 | 3×3 | 7 s | 32 |
| 2 | 55% + job level / 4 | 5×5 | 9 s | 34 |
| 3 | 60% + job level / 4 | 5×5 | 11 s | 36 |
| 4 | 65% + job level / 4 | 7×7 | 13 s | 38 |
| 5 | 70% + job level / 4 | 7×7 | 15 s | 40 |
On top of SP, every cast burns 2 Red Gemstone. Cast 2 seconds variable (no fixed cast), after-cast delay 2 s, no cooldown. Range 7 cells (+1 per Radius level).
What petrification does to the target
Petrification breaks on the first hit. Any damage the petrified target takes pulls them out of the stone. As a way of "parking" an enemy while you kill another it is excellent; as a setup for your party to beat on them it is useless: the first archer who shoots frees them.
The traps
See also Earth Strain: a 15-cell-wide wall of earth that starts at your feet White Imprison: it makes the target untouchable, then bursts The Warlock skill tree: four spheres, a spellbook and the priciest spell on the server
Marsh of Abyss sinks an enemy into a bog. It deals no damage: it cuts their stats and leaves them wading.
| Level | AGI and DEX (player) | AGI and DEX (monster) | Speed | SP | Cooldown |
|---|---|---|---|---|---|
| 1 | −3% | −6% | −10% | 40 | 2.5 s |
| 2 | −6% | −12% | −20% | 42 | 3 s |
| 3 | −9% | −18% | −30% | 44 | 3.5 s |
| 4 | −12% | −24% | −40% | 46 | 4 s |
| 5 | −15% | −30% | −50% | 48 | 4.5 s |
Base duration 30 seconds, minus 50 milliseconds for every point of the target's INT + LUK, with a floor of 5 seconds. Cast: half a second fixed and nothing variable. After-cast delay 1 s. Range 11 (+1 per Radius level).
On landing it strips Increase Agi, Wind Walk and attack-speed potions. That is often worth more than the debuff itself: you knock off all three mobility buffs at once, and somebody has to recast them from scratch.
How to use it
The traps
See also Frost Misty: the mist that multiplies its hits and sets up the combo The Warlock skill tree: four spheres, a spellbook and the priciest spell on the server Monsters cast Orc Head again, and Healers clear the annoying debuffs
Stasis is cast on yourself and covers an enormous square around you. Everyone caught inside gets the status: while it lasts they cannot cast any Magic-type skill, nor any song, ensemble or chorus.
| Level | Area | Duration | Cooldown | SP |
|---|---|---|---|---|
| 1 | 19×19 | 20 s | 180 s | 50 |
| 2 | 21×21 | 30 s | 190 s | 60 |
| 3 | 23×23 | 40 s | 200 s | 70 |
| 4 | 25×25 | 50 s | 210 s | 80 |
| 5 | 27×27 | 60 s | 220 s | 90 |
Duration drops by 50 milliseconds per point of the target's VIT + DEX, with a floor of 10 seconds. Cast 3 seconds variable + 1 fixed, after-cast delay 2 s.
You lose your magic too. Stasis always applies to the caster, on any map. And since nearly the whole Warlock tree is Magic type — Release included — what you are doing is switching yourself off for up to a minute. It is a denial skill, not a way to win the exchange.
What is blocked and what is not
Who it reaches
On PvP, guild war and battleground maps, Stasis affects everyone: enemies, allies and you. Off those maps, only enemies and you. In a castle siege, dropping Stasis in a corridor silences the attacking mages and the defending priests alike.
The traps
See also Recognized Spell: no more weak rolls The spellbook: memorise a spell so you can cast it without casting it The Warlock skill tree: four spheres, a spellbook and the priciest spell on the server
Every time you cast a spell, the game rolls a number between your minimum and maximum MATK. Recognized Spell makes them equal: while it lasts, every spell you cast uses your maximum MATK.
| Level | Duration | Cooldown | SP |
|---|---|---|---|
| 1 | 60 s | 50 s | 100 |
| 2 | 90 s | 80 s | 120 |
| 3 | 120 s | 110 s | 140 |
| 4 | 150 s | 140 s | 160 |
| 5 | 180 s | 170 s | 180 |
Cast 1 second variable + 1 fixed, after-cast delay 1 s. Self-targeted.
At any level it can be kept up permanently. The cooldown is ten seconds shorter than the duration at all five levels. If you remember to recast it, it never drops — the only reason to level it is so you do not have to think about it.
The price
While you carry it, all your skills cost 25% more SP. All of them, not just damage spells. A 150 SP Comet becomes 187; a 360 SP Tetra Vortex becomes 450. On top of the sphere and spellbook drips, this is the number one reason a Warlock runs dry mid-fight.
What it is actually worth
It depends on how far apart your minimum and maximum MATK are, and that comes mostly from your weapon: the higher the weapon level, the wider the spread and the more Recognized Spell gives you. With a low-level weapon or one with no MATK of its own, the difference is small and the extra 25% SP is not worth paying.
The traps
See also The SP economy: why a Warlock runs dry Stasis: it shuts down all magic in a huge area — yours included The Warlock skill tree: four spheres, a spellbook and the priciest spell on the server
Intense Telekinesis is an instant self-buff that does three things at once. Two of them are about Ghost element. The third is not.
| Level | Ghost damage | SP of Ghost spells | Variable cast of EVERYTHING | SP |
|---|---|---|---|---|
| 1 | +40% | −10% | −10% | 100 |
| 2 | +80% | −20% | −20% | 150 |
| 3 | +120% | −30% | −30% | 200 |
| 4 | +160% | −40% | −40% | 250 |
| 5 | +200% | −50% | −50% | 300 |
Duration 60 seconds at every level. Cooldown 300 seconds. No cast time: it is instant.
The cast reduction is NOT limited to Ghost. The damage bonus and the SP saving apply only to Ghost element spells; the variable cast reduction applies to anything you cast. At level 5, during that minute, Comet drops from 10 variable seconds to 5, and Tetra Vortex from 14 to 7. That is the real reason to level it.
How to use it
The traps
See also Soul Expansion: Ghost element, and double against anyone imprisoned The SP economy: why a Warlock runs dry Radius: the three-point passive that does two jobs and only advertises one The Warlock skill tree: four spheres, a spellbook and the priciest spell on the server
Radius costs three points, is the first thing you level, and does two completely different things.
1. Range: +1 cell per level
Spells flagged as extendable-range go from 11 cells to 14 with Radius at 3. The list is specific:
They do get it:
They do not:
2. Fixed cast: the hidden effect
Radius also trims the fixed cast time of Warlock skills, by this formula:
(INT + base level) / 15 + 5 × Radius level, as a percentage.
With 120 INT, base level 175 and Radius 3: (120 + 175) / 15 = 19, plus 15, gives 34% less fixed cast. On Comet, with its 2 fixed seconds, that is 0.68 seconds saved on every cast.
This cut does not stack with others: the biggest one wins. If you also have Sacrament from an Arch Bishop or any other fixed-cast reduction, the engine keeps the largest and discards the rest. With a decent Sacrament on you, Radius stops contributing on this front — the range still counts.
The traps
See also The Warlock skill tree: four spheres, a spellbook and the priciest spell on the server Comet: 13×13 cells, one single hit, and a debuff worth more than the damage The SP economy: why a Warlock runs dry
Full Throttle is the shared skill of every third job. Casting it heals you to full and raises all your stats by 20% and your movement speed by 25%. Then it leaves you flat on the floor.
| Level | Duration | SP per second | Total SP spent |
|---|---|---|---|
| 1 | 10 s | 6% of max SP | 60% |
| 2 | 15 s | 4% of max SP | 60% |
| 3 | 20 s | 3% of max SP | 60% |
| 4 | 25 s | 2% of max SP | 50% |
| 5 | 30 s | 1% of max SP | 30% |
Instant cast, 1 SP to switch on. Cooldown: 50 minutes.
Levelling it makes it cheaper and longer at the same time. At level 1 it lasts 10 seconds and eats 60% of your SP; at level 5 it lasts 30 seconds and eats 30%. There is no reason to leave it half-levelled: either 5 or nothing.
The hangover
When it ends, the Rebound status kicks in for 10 seconds: movement speed −25% and no natural regeneration of health or SP. Ten seconds is a long time if you are stuck in the middle of something.
When to use it
The traps
See also The SP economy: why a Warlock runs dry The Warlock skill tree: four spheres, a spellbook and the priciest spell on the server
A Warlock does not run out of SP from casting expensive spells. A Warlock runs out because three things are dripping at once while doing nothing at all, and a fourth makes everything you do cast more expensive.
The four taps
| Tap | How much | What happens if you hit zero |
|---|---|---|
| Each elemental sphere | 1 SP per second | The sphere vanishes |
| Spellbook (per stored point) | As many SP as points, every 10 s | The whole memory is wiped |
| Full Throttle active | From 1% to 6% of max SP per second | It ends and the hangover starts |
| Recognized Spell | +25% to the cost of everything you cast | — |
A real example
A Warlock ready to fire Tetra Vortex level 10, with Recognized Spell up and a Comet memorised:
That is 6.2 SP per second standing still, doing nothing, plus 450 in one go. A minute of waiting before the fight is 372 points thrown away.
The rule: load spheres and spellbook right before you engage, not on the way out of town. And if you are going to be idle, release what you have stored: running out of SP with a loaded spellbook does not cost you one spell, it costs you all of them.
The savings
Variable cast reduction depends on DEX×2 + INT: at 530 the variable cast disappears entirely. That is the number a Warlock chases, because it is what makes Soul Expansion instant and Comet something you can finish casting without dying.
See also Elemental spheres: five slots at 1 SP per second each The spellbook: memorise a spell so you can cast it without casting it Recognized Spell: no more weak rolls Intense Telekinesis: half the cast time on everything, one minute in five
The Warlock has more distinct elements on its bar than any other job in the branch. Knowing which spell carries which is the difference between a Comet that does half damage and a Hell Inferno that does double.
| Spell | Element | Note |
|---|---|---|
| Crimson Rock | Fire | 7×7 area, knocks outwards |
| Hell Inferno | Fire and Shadow | The shadow hit is bigger than the fire one |
| Frost Misty | Water | Its hits multiply |
| Jack Frost | Water | Nearly double on a target carrying Frost |
| Chain Lightning | Wind | Needs several enemies to pay off |
| Earth Strain | Earth | Starts at your feet, not where you aim |
| Soul Expansion | Ghost | Almost nothing resists it; no fixed cast |
| Drain Life | Neutral | Returns part of the damage as health |
| Comet | Neutral | The biggest area, but no elemental advantage |
| Tetra Vortex | Whatever each sphere is | Four hits, four possible elements |
| Release level 2 | Whatever each sphere is | One bolt per sphere |
| Sienna Execrate | Earth | Deals no damage; it petrifies |
The two cases that catch people out
Comet is neutral. It has the biggest number in the tree and no advantage against anything; against armour that resists neutral it falls off badly. What always justifies it is the Magic Poison it leaves: 20 seconds of +50% damage taken, and bosses do not resist it. Comet is cast to open, not to finish.
Petrifying changes the target's element. An enemy under Sienna Execrate becomes Earth level 1, whatever they were before. If you were planning to finish them with Earth Strain, you have just made them the worst possible target.
Choosing spheres by element
Since Tetra Vortex and Release level 2 inherit their element from the spheres, you have real control over what you hit with:
Remember that the level 2 summon fills all five slots with its element and wipes whatever was there. It is the fast way to get four matching spheres — at the price of a fifth that Tetra Vortex throws away.
See also Comet: 13×13 cells, one single hit, and a debuff worth more than the damage Tetra Vortex: four spheres in, four hits out Elemental spheres: five slots at 1 SP per second each The Warlock skill tree: four spheres, a spellbook and the priciest spell on the server
The Sage's third job: elemental ground magic, crowd control, and an elemental companion that on this server is raised like a homunculus.
The Sorcerer is the Sage branch that keeps the element as its central theme. It inherits the whole Novice, Mage and Sage tree and adds three blocks of its own: ground magic that paints a square and punishes it for a few seconds, crowd control (sleep, root, area healing) and an elemental companion that works on this server in a way no guide on the internet describes.
First thing to know: on this server the four summons do not create an elemental, they create a homunculus. Read Summon Agni, Aqua, Ventus and Tera before you spend a single point on the bottom half of the tree.
The full tree
| Skill | Max | Requires |
|---|---|---|
| Fire Walk | 5 | Volcano 1 |
| Electric Walk | 5 | Violent Gale 1 |
| Spell Fist | 10 | Auto Spell 4 |
| Earth Grave | 5 | Earth Spike 5 |
| Diamond Dust | 5 | Deluge 3 |
| Cloud Kill | 5 | Heaven's Drive 5 |
| Poison Buster | 5 | Cloud Kill 2 |
| Psychic Wave | 5 | Dispell 2 |
| Varetyr Spear | 10 | Seismic Weapon 1 + Violent Gale 4 |
| Striking | 5 | Flame Launcher, Frost Weapon, Lightning Loader and Seismic Weapon at 1 |
| Warmer | 5 | Volcano 1 + Violent Gale 1 |
| Vacuum Extreme | 5 | Land Protector 2 |
| Arrullo | 5 | Warmer 2 |
| Four Spirit Analysis | 2 | Flame Launcher, Frost Weapon, Lightning Loader and Seismic Weapon at 1 |
| Spirit Control | 4 | Four Spirit Analysis 1 |
| Summon Agni | 3 | Warmer 3 + Spirit Control 1 |
| Summon Aqua | 3 | Diamond Dust 3 + Spirit Control 1 |
| Summon Ventus | 3 | Varetyr Spear 3 + Spirit Control 1 |
| Summon Tera | 3 | Earth Grave 3 + Spirit Control 1 |
| Elemental Status | 1 | Spirit Control 3 |
| Spirit Sympathy | 5 | Spirit Control 3 |
| Spirit Recovery | 1 | Spirit Sympathy 1 |
| Fire Insignia | 3 | Summon Agni 3 |
| Water Insignia | 3 | Summon Aqua 3 |
| Wind Insignia | 3 | Summon Ventus 3 |
| Earth Insignia | 3 | Summon Tera 3 |
| Elemental Shield | 5 | Spirit Control 3 |
| Full Throttle | 5 | — |
The four you cannot cast today
Elemental Status, Spirit Control, Spirit Recovery and Elemental Shield all carry the requirement have an elemental spirit summoned. That spirit belonged to the old companion system, and nothing on this server creates one any more: the four summons now create a homunculus instead. Try to cast them and you get the "you need an elemental spirit" message and nothing else. Nobody loses anything by leaving them at zero.
Points that pay off
The four summons (they create the creature and gate its evolution), Spirit Sympathy (which is what brings it up to the level of a normal homunculus), the insignias, and the ground damage block: Psychic Wave, Cloud Kill, Diamond Dust, Earth Grave and Varetyr Spear.
Points to weigh
Spirit Control 1 is compulsory (all four summons ask for it) and Spirit Control 3 gates nothing that works. Four Spirit Analysis 1 is a toll. Same with Striking: its learned level feeds the Varetyr Spear formula even if you never use the buff itself.
Full Throttle is the skill every third job shares; here it has no prerequisite.
See also Fourteen skills, and one of them cannot be bought with skill points The mage who studies instead of shouting: what a Sage is and what Professor adds Summon Agni, Aqua, Ventus and Tera do not summon an elemental: they create your elemental homunculus The four insignias: the level you cast decides which bonus you get The bonuses that depend on the elemental spirit are dormant, and there are eight of them
In stock Ragnarok, the Sorcerer's four summons pull out an elemental spirit that lasts a few minutes and vanishes. Not here. Since 2026-08-15 all four call the same part of the server that handles homunculi, and what comes out is a permanent creature: its own window, its own right-click menu, hunger, intimacy, level and skill tree. It is a homunculus wearing an elemental's face.
The summon is a toggle. If the creature is already out and alive, casting it again sends it to rest. It does not replace it and does not duplicate it: it puts it away. That also plugs a real hole, because the client menu's "Rest" button sends an Alchemist skill that a Sorcerer does not have.
The four cases, in order
| If... | the summon will |
|---|---|
| you have no creature | create the first form of the element you cast |
| it is resting | call it, and bring it up to date if you have raised Sympathy |
| it is dead | resurrect it at 100 % HP |
| it is already out and alive | send it to rest |
One creature per character
A character stores one single creature. If you already have a Ventus raised and you cast Summon Agni, the summon is rejected with a red message («Only one at a time») instead of deleting your Ventus. That is deliberate: replacing it would throw away everything you raised. The old system allowed all four at once; losing that is the price of gaining the full homunculus interface. And if you own a regular homunculus the summon is rejected too: they share the same slot.
Cost and timings
| Level | SP | Cast | Cooldown |
|---|---|---|---|
| 1 | 74 | 2 s variable + 1 s fixed | 60 s |
| 2 | 68 | 2 s variable + 1 s fixed | 60 s |
| 3 | 62 | 2 s variable + 1 s fixed | 60 s |
Note that the SP cost goes down with level, the opposite of stock rAthena (where it ran from 100 to 200). And they no longer require materials: the three elemental crystals the original version demanded were removed from the skill entry. Spirit Sympathy cuts that SP further by (5 + 5 × level) %, up to 30 % at level 5.
Traps
See also Twenty-eight skills, and the four summons are the backbone Three forms per element, and the third is a full Homunculus S Spirit Sympathy: the 25 growth points your elemental is missing Call Homunculus needs no Seed of Life or any other item Feeding it can never backfire, and every meal pays twice the usual
Each element has three forms: the one that comes out when you summon, the evolved one, and a third that the server treats as a Homunculus S. And the growth tables are not made up: each elemental copies a classic homunculus's tables literally.
| Elemental | Copies | Profile | Attack floor |
|---|---|---|---|
| Agni (fire) | Vanilmirth | the caster | 200 ms |
| Aqua (water) | Lif | the healer | 300 ms |
| Ventus (wind) | Filir | the fast one | 150 ms |
| Tera (earth) | Amistr | the tank | 400 ms |
The "attack floor" is the minimum number of milliseconds between two swings, and only forms 1 and 2 carry one. The third form has no floor, exactly like the five Homunculus S: it sits at the engine ceiling of 100 ms. That is the reward for getting there.
What changing form requires
Three gates, and all three must be open:
Evolution fires by itself. A normal homunculus needs you to use a stone on it; these creatures have no such item, so the server checks the three gates at the three moments any of them can change: on level up, on feeding and on summoning. When they all line up it changes form and tells you in green.
Level caps
Forms 1 and 2: level 99. Form 3: level 275, the same as a Homunculus S. And like a real S, past 99 it grows on its own tables and below that on the previous form's.
All four creatures are Formless race and carry the element in their name. Their skill tree is the one of the homunculus they copy: Agni gets the Vanilmirth skills, Aqua the Lif ones, Ventus the Filir ones and Tera the Amistr ones.
See also Summon Agni, Aqua, Ventus and Tera do not summon an elemental: they create your elemental homunculus Spirit Sympathy: the 25 growth points your elemental is missing Feeding it can never backfire, and every meal pays twice the usual Twenty-eight skills, and the four summons are the backbone
An elemental is born 25 percentage points below the homunculus whose tables it copies, and Spirit Sympathy exists precisely to close that gap. Each level gives back 5 points:
| Sympathy | Growth versus its homunculus | SP discount on the summon |
|---|---|---|
| 0 | 25 points below | — |
| 1 | 20 below | 10 % |
| 2 | 15 below | 15 % |
| 3 | 10 below | 20 % |
| 4 | 5 below | 25 % |
| 5 | exactly the same | 30 % |
The measure is relative, not a fixed number: Ventus is compared to the Filir, Tera to the Amistr, and so on. So the day a homunculus class has its growth retuned, the level-5 parity still holds by itself.
Raising Sympathy shows nothing until you put the creature away and call it back. A homunculus's stats are derived from its level and are rebuilt on load, on summon and on resurrection. With the creature already out, the new point does nothing; send it to rest and bring it out again (the same summon does both) and it updates on the spot.
Traps
See also Summon Agni, Aqua, Ventus and Tera do not summon an elemental: they create your elemental homunculus Three forms per element, and the third is a full Homunculus S Twenty-eight skills, and the four summons are the backbone Feeding it can never backfire, and every meal pays twice the usual
This is a workshop skill, not a combat one: it opens an inventory window and converts elemental crystals from one grade to the other. It works perfectly on this server, because it never touches the companion.
| Level | Converts | Result |
|---|---|---|
| 1 | 1 big crystal | 5 to 9 small ones (random) |
| 2 | 10 small crystals | 1 big one |
The pairs are the usual ones: Red Blood ↔ Flame Heart, Crystal Blue ↔ Mystic Frozen, Wind of Verdure ↔ Rough Wind and Green Live ↔ Great Nature.
Level 2 has a 25 % failure chance, and failing leaves you with nothing. The materials are removed from your inventory BEFORE the roll. If it fails you have lost the ten crystals and you get no big one. One attempt in four, on average.
Traps
See also Twenty-eight skills, and the four summons are the backbone Spirit Sympathy: the 25 growth points your elemental is missing Summon Agni, Aqua, Ventus and Tera do not summon an elemental: they create your elemental homunculus
In stock Ragnarok, Elemental Action manually fires your elemental's aggressive skill and locks you out for 3 to 9 seconds. Here it was rebuilt on 2026-08-13 with a different purpose: it was renamed Elemental Status, lost its SP cost and cooldown, was retargeted on yourself (asking for a target just to read a sheet made no sense) and instead of attacking it opened a panel with level, intimacy, hunger and three actions: feed, clean and cuddle.
It cannot be cast today. The skill entry still demands an elemental spirit summoned, and two days after that rewrite the four summons stopped creating elemental spirits and started creating the elemental homunculus instead. The requirement was never updated: press the button and you get the "you need an elemental spirit" notice and nothing happens.
What you can do in the meantime
Nothing the panel offered has been lost, because the new creature is a real homunculus and comes with the client interface built in: right-click it to open its window, and feed it like any homunculus — with its crystal, the same item you already knew. It is all covered in feeding your homunculus.
And the panel's headline feature — asking for the form change by hand — is not needed either: the elemental's evolution fires by itself as soon as the requirements are met.
Do not spend points here. The only effect of learning it is that it shows up on your bar.
See also Twenty-eight skills, and the four summons are the backbone Summon Agni, Aqua, Ventus and Tera do not summon an elemental: they create your elemental homunculus Spirit Control and Spirit Recovery: two skills tied to a spirit that no longer exists Three forms per element, and the third is a full Homunculus S
Both act on the elemental spirit of the old system, the one the summons no longer create. Both check for it twice over: the skill entry demands "an elemental spirit summoned" and, if that gate were ever bypassed, the code looks again and returns without doing anything.
Spirit Control — what it would do
| Level | Effect |
|---|---|
| 1 | puts the spirit in passive mode |
| 2 | assist mode |
| 3 | aggressive mode |
| 4 | dismisses it |
Cost 10 SP, 2 seconds cast, 5 seconds cooldown.
You still have to learn Spirit Control at level 1, because all four summons require it. One point and no more: level 3 only unlocks Elemental Status, Spirit Sympathy and Elemental Shield, and of those three only Spirit Sympathy works… and it also asks for level 3. No way around it: three points of toll.
Spirit Recovery — what it would do
It takes 10 % of the HP and SP you currently have (not of your maximum) and hands it to the spirit. Cost 10 SP and 2 seconds of cast. If you cannot pay that HP and SP, it fails.
Since the elemental homunculus is not a spirit, this skill never reaches it. Healing it works the same as for any homunculus: feed it and let it regenerate, or use whatever healing skills its own branch knows.
A note for players coming from another server: the companion's mode (passive, assist, aggressive) is no longer set from here. The new creature behaves like a homunculus and follows the same companion rules as the rest.
See also Twenty-eight skills, and the four summons are the backbone Elemental Status: the care panel that cannot be opened today Elemental Shield hands Safety Wall and Pneuma to the whole party, companions included Summon Agni, Aqua, Ventus and Tera do not summon an elemental: they create your elemental homunculus
Elemental Shield plants, under the feet of every party member within 11 cells, a Safety Wall at (your level + 5) and a level 1 Pneuma. In other words it covers them against melee and against ranged attacks at the same time. Cost 120 SP and one Blue Gemstone; no cast time, no cooldown.
Here the shield reaches companions too. Stock rAthena walks only the players in the party; this server uses its own walk that also picks up each member's homunculus and mercenary. It has been verified that nothing goes inert along the way: the shield really is planted on the companion's cell.
The distance rule is the same for a companion as for its master: it counts its own position, not the owner's. A homunculus that lagged behind, outside the 11 cells, gets nothing — exactly what would happen to a human party member who wandered off.
The catch
The skill entry demands an elemental spirit summoned — the old-system one, not the elemental homunculus — and on this server nothing creates that spirit any more. Press the button and you get the "you need one" notice and nothing is planted. The distribution logic is fine; it is the front door that is stuck.
Details for when it is unblocked
See also Twenty-eight skills, and the four summons are the backbone Spirit Control and Spirit Recovery: two skills tied to a spirit that no longer exists Summon Agni, Aqua, Ventus and Tera do not summon an elemental: they create your elemental homunculus
You paint a square on the ground and it pulses on its own. It is the Sorcerer's biggest damage dealer, and also the one whose tooltip reads worst: the entry says 1 hit because that is what one pulse does, not the whole spell.
With a staff (one or two handed) or a book equipped, every pulse hits TWICE. It is a check on the weapon you are wearing, not a card or status bonus. At level 5 that is 6 pulses × 2 hits = 12 impacts per cast.
Damage and size
| Level | Ratio | Area | Pulses | SP |
|---|---|---|---|---|
| 1 | 70 % + 3×INT | 7×7 | 2 | 48 |
| 2 | 140 % + 3×INT | 7×7 | 3 | 56 |
| 3 | 210 % + 3×INT | 9×9 | 4 | 64 |
| 4 | 280 % + 3×INT | 9×9 | 5 | 70 |
| 5 | 350 % + 3×INT | 11×11 | 6 | 78 |
The exact formula is (70 × level + 3 × INT) × base level / 100, applied to every pulse. Base level multiplies: at base 175 the ratio comes out nearly double what it is at base 99.
Traps
See also Twenty-eight skills, and the four summons are the backbone The bonuses that depend on the elemental spirit are dormant, and there are eight of them How to play it: pin them first, cast afterwards
A 7×7 cell poison cloud that pulses twice a second. Each pulse deals Poison element damage and refreshes the Cloud Poison status on whoever is inside, which lasts 5 seconds.
Numbers
| Level | Ratio per pulse | Duration | Pulses | SP |
|---|---|---|---|---|
| 1 | 40 % + 3×INT | 1 s | 2 | 48 |
| 2 | 80 % + 3×INT | 2 s | 4 | 56 |
| 3 | 120 % + 3×INT | 3 s | 6 | 64 |
| 4 | 160 % + 3×INT | 4 s | 8 | 70 |
| 5 | 200 % + 3×INT | 5 s | 10 | 78 |
Formula: (40 × level + 3 × INT) × base level / 100 per pulse. Cast 2.3 to 3.1 s variable plus 0.7 to 0 fixed, cooldown 5 s, range 9.
Traps
See also Twenty-eight skills, and the four summons are the backbone Poison Buster no longer requires a poisoned target How to play it: pin them first, cast afterwards
Every guide says the same thing: "Poison Buster can only be cast on a poisoned target". In this version that is not true. It was checked in the code: there is no poison check, neither when the cast starts nor when it lands. You can cast it on anything.
What does exist is a huge bonus if the target carries Cloud Poison, the status Cloud Kill leaves:
| Level | Base ratio | With Cloud Poison | SP |
|---|---|---|---|
| 1 | 1,300 % + INT | 1,500 % + INT | 70 |
| 2 | 1,600 % + INT | 2,000 % + INT | 90 |
| 3 | 1,900 % + INT | 2,500 % + INT | 110 |
| 4 | 2,200 % + INT | 3,000 % + INT | 130 |
| 5 | 2,500 % + INT | 3,500 % + INT | 150 |
Formula: (1,000 + 300 × level + INT + 200 × level if the target has Cloud Poison) × base level / 100. By far the highest ratio in the job.
How to use it
You target a monster and it bursts in 7×7 cells around it. Range 9, cooldown only 2 seconds. The cast time climbs steeply with level — 2.2 to 6 seconds of variable part — but the fixed part drops from 0.8 to 0, so with enough cast reduction level 5 is not as slow as it looks.
Traps
See also Cloud Kill poisons the area and sets up the finisher Twenty-eight skills, and the four summons are the backbone How to play it: pin them first, cast afterwards
A wind spear on a target, with splash around it. It is the job's direct damage skill: no ground zone, no waiting for pulses, it just goes and hits.
It lands three hits and each one deals full damage. This is not a split: the entry declares 3 hits as a positive number, and that multiplies. The number you see on screen is one hit; the total is three times that.
The formula, which is odd
[ 2 × INT + 150 × (Striking level + Lightning Loader level) + INT × level / 2 ] / 3 × base level / 100
What matters is inside the bracket: 150 ratio points for every level of Striking and every level of Lightning Loader, the Sage skill. With both at 5 that is 1,500 points before dividing by three, so 500 ratio for free. It counts the learned level; you do not need the buff active.
Numbers
| Level | Splash | Cast | SP |
|---|---|---|---|
| 1-3 | 3×3 | 2.2-2.6 s + 1.8-1.6 fixed | 65-75 |
| 4-6 | 5×5 | 2.8-3.2 s + 1.6-1.4 fixed | 80-90 |
| 7-9 | 7×7 | 3.4-3.8 s + 1.2-1.0 fixed | 95-105 |
| 10 | 9×9 | 4.0 s + 1.0 fixed | 110 |
Wind element, range 9, cooldown 5 s. It stuns with a 5 % chance per level for 1.8 to 3.6 seconds.
Traps
See also Striking hands an ally attack power and charges them SP per second Twenty-eight skills, and the four summons are the backbone How to play it: pin them first, cast afterwards
They are the same skill written twice with a different element. Both are planted on the ground, but they are not zones that linger: the unit lives half a second and hits once. One burst, done.
| Earth Grave | Diamond Dust | |
|---|---|---|
| Element | Earth | Water |
| Hits | 3 (split) | 5 (split) |
| Area level 1-3 | 7×7 | 7×7 |
| Area level 4-5 | 9×9 | 9×9 |
| SP | 62 to 94 | 50 to 74 |
| Variable cast | 2.2 to 3.0 s | 5.0 to 7.0 s |
| Fixed cast | 1.8 to 1.0 s | 0.8 to 0 s |
| Side effect | Bleeding 5 % per level, 8 to 20 s | Crystalize 10 to 30 %, 12 to 20 s |
The "hits" split the damage, they do not multiply it. Earth Grave declares 3 and Diamond Dust 5 as negative numbers: the total is divided between those hits and shown in slices. The total is the same as a single hit.
The formulas
Earth Grave: (2 × INT + 300 × Seismic Weapon level + INT × level) × base level / 100
Diamond Dust: (2 × INT + 300 × Frost Weapon level + INT × level) × base level / 100
That 300 per level of the matching Sage Endow is the biggest term in both: with Seismic Weapon at 5, Earth Grave collects 1,500 ratio points before it even looks at your INT. It is the same trick Varetyr Spear plays with Striking, and the reason a Sorcerer should not squander the points brought over from the Sage.
Crystalize, which does not do what it looks like
The status Diamond Dust leaves drains 2 % of max HP and 1 % of max SP per second and prevents attacking. But it only blocks movement and casting for players: a crystallized monster keeps walking and keeps casting. Against monsters it is worth it for the drain and because Wind magic hits them 50 % harder while it lasts. Any Fire damage removes it instantly, and Warmer stops it from applying at all. Resistance comes from the target's base VIT.
Traps
See also Twenty-eight skills, and the four summons are the backbone Warmer heals everyone standing in it and thaws them, but only players How to play it: pin them first, cast afterwards
You plant a vortex and whoever stands inside cannot move. It deals no damage; its value is that a Sorcerer needs between 3 and 12 seconds of casting for almost everything, and that only pays off if the enemy stays put.
| Level | Area | Duration | Cast | SP |
|---|---|---|---|---|
| 1 | 3×3 | 4 s | 1.0 s | 34 |
| 2 | 3×3 | 6 s | 1.5 s | 42 |
| 3 | 5×5 | 8 s | 2.0 s | 50 |
| 4 | 5×5 | 10 s | 2.5 s | 58 |
| 5 | 7×7 | 12 s | 3.0 s | 66 |
No fixed cast, cooldown 5 s, range 9 cells.
The pull
Besides rooting, it drags the target toward the centre cell. But only once per victim, and only if it is standing still at that moment: someone already walking is not moved. It is a bonus repositioning, not a Gravitation.
Traps
See also Twenty-eight skills, and the four summons are the backbone Arrullo sleeps an area, but the first hit wakes them and lands 50 % harder How to play it: pin them first, cast afterwards
A carpet of heat 7×7 cells wide. Whoever steps on it gets a status that heals 1 % of their max HP per skill level, every 3 seconds. At level 5 that is 5 % every 3 seconds: for a party standing still, more than any area heal a Sorcerer has.
| Level | Heal per 3 s | Lasts | Cooldown | SP |
|---|---|---|---|---|
| 1 | 1 % | 40 s | 35 s | 40 |
| 2 | 2 % | 45 s | 40 s | 52 |
| 3 | 3 % | 50 s | 45 s | 64 |
| 4 | 4 % | 55 s | 50 s | 76 |
| 5 | 5 % | 60 s | 55 s | 88 |
Cast 2.2 to 3.0 s variable plus 1.8 to 1.0 fixed. Range 9. Fire element.
The other half: it thaws
Stepping onto the carpet instantly removes Crystalize, Freezing and Freeze, and while you carry it Crystalize cannot be applied. In an ice dungeon that is worth more than the healing.
Traps
See also Twenty-eight skills, and the four summons are the backbone Earth Grave and Diamond Dust: twin bursts that charge 300 ratio per level of a Sage Endow How to play it: pin them first, cast afterwards
You sing a lullaby over an area and every enemy inside rolls to fall into Deep Sleep: they cannot move, attack, cast, chat or use items.
The chance, exactly
15 + 5 × level + your INT/5 + your job level/5 − target's INT/6 − target's LUK/10 per cent.
A Sorcerer with 120 INT and job level 60 casting at level 5 starts from 15 + 25 + 24 + 12 = 76 %, minus whatever the target subtracts.
| Level | Range | Area | Duration | Cooldown | SP |
|---|---|---|---|---|---|
| 1 | 7 | 3×3 | 8 s | 5 s | 30 |
| 2 | 7 | 3×3 | 10 s | 6 s | 35 |
| 3 | 7 | 5×5 | 12 s | 7 s | 40 |
| 4 | 7 | 5×5 | 14 s | 8 s | 45 |
| 5 | 9 | 7×7 | 16 s | 9 s | 50 |
On top of the SP it consumes 1 Yellow Gemstone per cast. Cast 2.2 to 3.0 s variable plus 0.8 to 0 fixed.
Any damage wakes a sleeper, and that hit lands 50 % harder. It cuts both ways: if what you want is to keep a monster still while you cast Psychic Wave, one stray arrow from a party member ruins it. And if what you want is an opening, you have it: sleep, charge your biggest spell, and let the first impact collect the extra 50 %.
Traps
See also Vacuum Extreme pins the enemy to the ground and drags it to the centre once Twenty-eight skills, and the four summons are the backbone How to play it: pin them first, cast afterwards
A physical attack buff you place on a party member. It lasts 90 seconds, costs 50 to 70 SP, 1 second of cast and 2 of cooldown, and reaches 9 cells.
How much attack
20 × Striking level × the recipient's weapon level, as flat attack points.
| Striking | Weapon lv 1 | Level 2 | Level 3 | Level 4 |
|---|---|---|---|---|
| 1 | 20 | 40 | 60 | 80 |
| 2 | 40 | 80 | 120 | 160 |
| 3 | 60 | 120 | 180 | 240 |
| 4 | 80 | 160 | 240 | 320 |
| 5 | 100 | 200 | 300 | 400 |
The status drains SP from whoever carries it, not from you: (6 − level) points per second. At level 1 that is 5 per second — 450 across the 90 seconds — and at level 5 only 1. The lower the level, the more expensive it is for your ally. And the moment they cannot pay, the buff falls off.
Traps
See also Varetyr Spear hits three times and gains 150 ratio points per level of Striking Twenty-eight skills, and the four summons are the backbone How to play it: pin them first, cast afterwards
Spell Fist turns your melee attacks into the bolt you were casting. It has the strangest usage of any skill in the job, which is why most people never manage to cast it at all.
You must cast it while a bolt is still casting. The server demands two things at once: that the last spell you started is Fire Bolt, Cold Bolt or Lightning Bolt, and that the cast is still running at that moment. Casting Spell Fist cancels the bolt and keeps its energy in your fist. Wait for the bolt to finish and Spell Fist fails.
What happens next
While it lasts, every melee attack of yours:
There is no hit counter in this version: it is not spent in "so many punches". It ends when the duration runs out or when you cannot pay 20 SP for a swing.
| Level | Duration | SP to cast |
|---|---|---|
| 1 | 45 s | 40 |
| 3 | 75 s | 48 |
| 5 | 105 s | 56 |
| 7 | 135 s | 64 |
| 10 | 180 s | 76 |
Traps
See also Twenty-eight skills, and the four summons are the backbone How to play it: pin them first, cast afterwards
Both do the same thing with a different element: while you carry them, every step you take drops a trap on the cell you just left. Anyone who steps on it takes damage once per second.
The entry says 30 seconds, but what actually rules is the cell count: 8 at level 1, 10 at 2, 12 at 3, 14 at 4 and 16 at 5. The moment you drop the last one the status ends by itself. Cast it and stand still and you have thrown away 30-46 SP.
| Level | Cells | Ratio per cell | SP |
|---|---|---|---|
| 1 | 8 | 60 % | 30 |
| 2 | 10 | 120 % | 34 |
| 3 | 12 | 180 % | 38 |
| 4 | 14 | 240 % | 42 |
| 5 | 16 | 300 % | 46 |
Formula: 60 × level × base level / 100. Fire Walk is Fire, Electric Walk is Wind. Each trap lasts 12 seconds on the ground. One second of cast.
Traps
See also Twenty-eight skills, and the four summons are the backbone The bonuses that depend on the elemental spirit are dormant, and there are eight of them How to play it: pin them first, cast afterwards
An insignia is a 3×3 cell square that lasts 60 seconds and benefits anyone who steps on it, friend or foe. Cost 22, 30 or 38 SP and 1, 2 or 3 of its stone (Scarlet Point, Indigo Point, Yellow Wish Point or Lime Green Point). Cast 1 s variable + 1 s fixed, cooldown 60 seconds, range 9.
The level you cast does NOT make it stronger: it changes it completely. Each level grants a different set of bonuses, incompatible with the other two. Pick the level to match how you play, not to max the skill.
Level 1 — does nothing today
The only effect of level 1 is to double the HP regeneration of an elemental spirit of that element. On this server elemental spirits no longer exist (the summons create a homunculus), so level 1 is money thrown away.
Level 2 — for those who hit
| Insignia | What it grants |
|---|---|
| All of them | your weapon takes on that element, and +10 % attack |
| Fire | +50 flat attack on top |
| Water | +10 % to heals received and to items that restore HP or SP |
| Wind | raises attack speed |
| Earth | +500 max HP and +50 DEF |
Level 3 — for those who cast
| Insignia | What it grants |
|---|---|
| All of them | +25 ratio points to your offensive magic of that element |
| Fire | +50 MATK |
| Water | −30 % variable cast on Water magic |
| Wind | −50 % after-cast delay on Wind magic |
| Earth | +50 max SP and +50 MDEF |
The two traps, and they are big
It opens a weakness
While you carry the insignia you take 50 % more damage from its opposing element, and this happens at all three levels. Fire makes you weak to Water; Water to Wind; Wind to Earth; Earth to Fire. Standing in your own Fire insignia in front of a Water caster hands them half the fight.
It can drain your HP
Every 5 seconds the insignia checks your defensive element (your armour's). If it matches its own, it heals you 1 % of max HP; if it is the one it punishes, it takes 1 % of your max HP. Fire punishes Earth, Water punishes Fire, Wind punishes Water and Earth punishes Wind.
They cannot be planted on a Land Protector, Dispell and Clearance cannot remove them, and you can only have one of each type at a time. The 60-second cooldown matches the duration: chained properly, there is no gap.
See also Twenty-eight skills, and the four summons are the backbone Summon Agni, Aqua, Ventus and Tera do not summon an elemental: they create your elemental homunculus How to play it: pin them first, cast afterwards
The skill every third job shares. It costs 1 SP and gives you, all at once:
| Level | Duration | SP burnt per second |
|---|---|---|
| 1 | 10 s | 6 % of max |
| 2 | 15 s | 4 % |
| 3 | 20 s | 3 % |
| 4 | 25 s | 2 % |
| 5 | 30 s | 1 % |
Look at the right-hand column: levelling it up both extends the buff and makes the SP cheaper. Level 1, at 10 seconds and 6 %, eats 60 % of your bar; level 5, at 30 seconds and 1 %, takes 30 %. It is the only skill in the tree where levelling has no downside at all.
When it ends comes Rebound: 10 seconds with no natural HP or SP regeneration, and 25 % slower movement. It shows up as the Decrease Agi icon, which confuses a lot of people. Ten seconds stuck in the middle of a fight is a long time: keep a potion handy.
Traps
See also Twenty-eight skills, and the four summons are the backbone How to play it: pin them first, cast afterwards
The old system's elemental spirit used to place statuses on its master called Heater Option (fire), Cooler Option (water), Blast Option (wind) and Cursed Soil Option (earth). Half a dozen Sorcerer skills read them and get stronger when they find them.
Nothing grants them today. The spirit itself cast them, and the four summons no longer create spirits but the elemental homunculus. That extra you see in the guides, and that you will find mentioned across several entries here, cannot be obtained.
What exactly you are missing
| Skill | Dormant bonus |
|---|---|
| Psychic Wave | +20 ratio, the ability to change its element… and 50 % more SP |
| Fire Walk | + half your job level, as ratio |
| Electric Walk | + half your job level |
| Earth Grave | + 5 × your job level |
| Diamond Dust | + 5 × your job level, and a higher Crystalize chance |
| Cloud Kill | + your job level (and ×16 with the fifth option's status) |
| Poison Buster | + 5 × your job level |
| Varetyr Spear | + 5 × your job level |
| Warmer | would heal three times as much per pulse |
Why we tell you anyway
Because it explains two things you can see while playing: why Psychic Wave is always Neutral element (the element switch hangs off these statuses) and why level 1 of the insignias does nothing (its only effect was on the spirit). And because if the chain is ever restored, all of these lines will light up by themselves: they are written and they work, what is missing is someone to switch them on.
There is an upside: without the options, Psychic Wave also spares you the 50 % extra SP it charges while they are active.
See also Psychic Wave: the job's heavy weapon, and with a staff or a book it hits twice as hard Summon Agni, Aqua, Ventus and Tera do not summon an elemental: they create your elemental homunculus Twenty-eight skills, and the four summons are the backbone
The Sorcerer has the longest casts in the Mage branch: 3 to 13 seconds counting the fixed part. Any hit interrupts them. The whole job revolves around solving that, which is why the skills that deal no damage are worth more than the ones that do.
The day-one mistake: opening with Psychic Wave. That is 9 to 13 seconds of casting while the monster runs at you. It never lands. You open by pinning, not by casting.
The four chains
| Situation | Order | Why |
|---|---|---|
| A pack of monsters | Vacuum Extreme → Psychic Wave | The vortex holds them 4-12 s, exactly the length of the cast. With a staff or a book the wave hits twice. |
| One big monster | Cloud Kill → Poison Buster | The cloud leaves Cloud Poison, which adds 200 ratio points per level to the finisher. Poison Buster only has a 2 s cooldown. |
| About to cast something long | Arrullo → the big spell | Sleepers do not hit back, and the first impact they take lands 50 % harder. Careful: if somebody else wakes them, you lose it. |
| Being chased | Fire Walk or Electric Walk → run | 8-16 cells of trail. Only worth it with someone behind you who will step on them. |
Choosing the element
This is your job advantage: you carry Earth damage (Earth Grave), Water (Diamond Dust), Wind (Varetyr Spear), Poison (Cloud Kill and Poison Buster) and Neutral (Psychic Wave). Before spending the expensive spell, check what you are hitting. And remember that Diamond Dust leaves Crystalize, which makes Wind magic hit 50 % harder: Diamond Dust and then Varetyr Spear is a real chain.
Before you go in
See also Twenty-eight skills, and the four summons are the backbone Psychic Wave: the job's heavy weapon, and with a staff or a book it hits twice as hard Vacuum Extreme pins the enemy to the ground and drags it to the centre once Cloud Kill poisons the area and sets up the finisher
Because the Sorcerer's companion is a homunculus, it does not inherit the old system's elemental skills: it inherits the full tree of the homunculus whose tables it copies, and behaves just like it.
| Elemental | Tree it learns | What it does in a fight |
|---|---|---|
| Agni | the Vanilmirth's | magic damage and the expensive suicide hit |
| Aqua | the Lif's | heal its master, cure statuses, shield |
| Ventus | the Filir's | hit fast, dodge, raise its own speed |
| Tera | the Amistr's | soak hits, raise defence, hold the front line |
Attack rhythm
Forms 1 and 2 carry a floor of milliseconds between swings — 150 for Ventus, 200 for Agni, 300 for Aqua and 400 for Tera — the same as the homunculus they copy. That cap is applied to the swing clock, not to AGI: the creature keeps its dodge, its accuracy and its defence intact, and the only thing limited is how often it can hit.
The third form has no floor. It sits at the engine ceiling of 100 ms, exactly like the five Homunculus S. It is the most visible difference between an evolved creature and a fully raised one.
How it learns its skills
Same as any homunculus: it levels up, earns points and spends them from its own window. The engine validates the tree by itself — level, intimacy, evolution and prerequisites — so there is nothing special to learn just because it is an elemental.
Traps
See also Three forms per element, and the third is a full Homunculus S Summon Agni, Aqua, Ventus and Tera do not summon an elemental: they create your elemental homunculus Spirit Sympathy: the 25 growth points your elemental is missing Feeding it can never backfire, and every meal pays twice the usual
Every spell has two halves: the variable one, which drops with DEX and INT and with gear reductions, and the fixed one, which only drops with effects that explicitly say they reduce fixed cast. A Sorcerer needs to understand the difference, because their two halves move in opposite directions as the skill level rises.
| Skill | Variable (level 1 → max) | Fixed | Cooldown |
|---|---|---|---|
| Psychic Wave | 8.0 → 12.0 s | 1.0 → 0.6 s | 5 s |
| Diamond Dust | 5.0 → 7.0 s | 0.8 → 0 s | 5 s |
| Poison Buster | 2.2 → 6.0 s | 0.8 → 0 s | 2 s |
| Varetyr Spear | 2.2 → 4.0 s | 1.8 → 1.0 s | 5 s |
| Cloud Kill | 2.3 → 3.1 s | 0.7 → 0 s | 5 s |
| Earth Grave | 2.2 → 3.0 s | 1.8 → 1.0 s | 5 s |
| Warmer | 2.2 → 3.0 s | 1.8 → 1.0 s | 35 → 55 s |
| Arrullo | 2.2 → 3.0 s | 0.8 → 0 s | 5 → 9 s |
| Vacuum Extreme | 1.0 → 3.0 s | — | 5 s |
| All four insignias | 1.0 s | 1.0 s | 60 s |
| All four summons | 2.0 s | 1.0 s | 60 s |
| Striking | 1.0 s | — | 2 s |
| Fire Walk / Electric Walk | 1.0 s | — | — |
| Spell Fist | — | — | — |
| Elemental Shield | — | — | — |
| Full Throttle | — | — | 50 min |
Look at Poison Buster and Diamond Dust: their fixed part drops to zero as the level rises, while the variable part climbs. With heavy cast reduction, maxing them can end up faster than leaving them half-levelled. With low DEX it is the other way round. There is no single answer: it depends on your gear.
The rule that decides fights
All of these skills are interrupted if you are hit while casting. There is no exception anywhere in the Sorcerer tree. That is why the job is not played by throwing the big spell first, but by rooting or sleeping first.
The instant ones
Three skills have no cast time at all: Spell Fist (which also has to be cast in the middle of another spell), Elemental Shield and Full Throttle. They are the only ones you can use with an enemy on top of you at no risk.
After-cast delay is 1 second across almost the whole tree, and 0.5 for Full Throttle. Wind Insignia at level 3 halves it, but only for Wind magic.
See also Twenty-eight skills, and the four summons are the backbone How to play it: pin them first, cast afterwards Psychic Wave: the job's heavy weapon, and with a staff or a book it hits twice as hard Vacuum Extreme pins the enemy to the ground and drags it to the centre once
The Wizard line's fourth job: nineteen skills built on two new stats (SPL and S.Matk), a bar that never refills on its own (AP), and one status, Climax, that does not raise numbers but rewrites what eight of your spells actually do.
The Arch Mage is the fourth job of the Mage → Wizard → High Wizard → Warlock line. It inherits everything that came before it —Mage, Wizard, High Wizard, Warlock and transcendent Warlock— and adds nineteen skills of its own: one passive, sixteen damage spells, one status that modifies the rest, and one that turns AP into SP.
Everything on this page comes from the emulator running right now. When a formula here disagrees with the client or with a wiki, this one wins.
The class is built as four identical columns
Water, earth, wind and fire. Each element gets exactly the same kit: a pulsing ground field, one heavy spell, and one cheap spell that grants AP. The numbers and the element change; the structure does not.
Picking an element is not picking a playstyle: it is picking which monsters you will deal a flat zero to. The details are in the element table.
And on top of that, Climax
Climax does not raise your damage: it changes what eight of your spells do, and the level you have it active at decides which of five behaviours you get. Four of those behaviours stop dealing damage entirely.
It is the single most important thing about the class and it has its own page: the full Climax table.
The full tree
| Skill | Max | Requires | What it is |
|---|---|---|---|
| Two-Handed Staff Mastery | 10 | — | Passive |
| Rain of Crystal | 5 | Frosty Misty 3 | Water field at your feet |
| Strantum Tremor | 5 | Sienna Execrate 3 | Earth field on the ground |
| Tornado Storm | 5 | Chain Lightning 3 | Wind field on the ground |
| Floral Flare Road | 5 | Crimson Rock 3 | Fire field on the ground |
| Soul Vulcan Strike | 5 | Two-Handed Staff Mastery 3, Soul Expansion 5 | Up to 7 hits in an area |
| Mystery Illusion | 5 | Soul Vulcan Strike 3, Hell Inferno 3 | Shadow field (+5 AP) |
| Deadly Projection | 5 | Mystery Illusion 3 | Single hit plus an anti-magic mark |
| Destructive Hurricane | 5 | Tornado Storm 3 | Wind burst centred on you |
| Violent Quake | 5 | Strantum Tremor 3 | Rain of falling rocks |
| All Bloom | 5 | Floral Flare Road 3 | Garden of exploding buds |
| Crystal Impact | 5 | Rain of Crystal 3 | Water burst centred on you |
| Rock Down | 5 | Strantum Tremor 1 | Five hits in an area (+2 AP) |
| Storm Cannon | 5 | Tornado Storm 1 | Wind line (+2 AP) |
| Crimson Arrow | 5 | Floral Flare Road 1 | Fire line plus a blast (+2 AP) |
| Frozen Slash | 5 | Rain of Crystal 1 | Three hits around you (+2 AP) |
| Astral Strike | 10 | Deadly Projection 3, Mystery Illusion 3, Comet 5 | Hit plus a neutral field (−15 AP) |
| Climax | 5 | Two-Handed Staff Mastery 3, Tetra Vortex 5 | Status that rewrites eight spells (−125 AP) |
| Energy Conversion | 5 | Recognized Spell 2, Climax 1 | Turns AP into SP |
The only root that asks nothing of the Warlock is Two-Handed Staff Mastery, and the two defining pieces of the class hang off it: Soul Vulcan Strike and Climax. Each of the four elemental fields hangs off a different Warlock skill, so climbing the Arch Mage tree means having climbed half the Warlock tree first.
The trap that decides how this class is played
All sixteen damage skills cast for 4 to 5.5 seconds (3 or 4 s of variable cast plus 1 or 1.5 fixed) and not one of them declares CastCancel: false, whose engine default is true. In plain words: any hit you take while casting drops the spell, and with those cast times that happens against almost anything that can walk up to you.
This is not a stylistic opinion: it is why an Arch Mage without no cast cancel gear casts from far away, with the monster already busy with someone else, or does not cast at all. The only spells that escape it are the short-cast ones inherited from the Warlock.
The @autoplay AI hits the same wall: it discards a spell when it works out the monster will arrive before the cast ends, so an automated Arch Mage only fires these sixteen at immobile targets.
Read these two before you spend a single point
SPL and S.Matk — where they come from, what they are really worth, and why fourth-job formulas look so different from third-job ones.
The AP bar — 200 points that never refill on their own, five skills that generate them and three that spend them. Climax takes 125 in one go.
Nothing in this section has been changed from the reference emulator: the Arch Mage on necromantic.online behaves exactly like the rAthena one. What is specific to this server are the caps (trait stats up to 110) and the global element tables, and that is stated on every page where it matters.
See also SPL and S.Matk: why fourth-job formulas look so strange The AP bar: 200 points that never refill on their own, and a Climax that eats 125 Climax does not raise damage: it changes what eight of your spells do Two-Handed Staff Mastery: half the class depends on carrying the right staff The Warlock skill tree: four spheres, a spellbook and the priciest spell on the server Fourteen skills, and one of them cannot be bought with skill points
Third-job skills read like this: «ratio × skill level, scaled by base level». Fourth-job skills add one more term: your SPL goes inside the ratio. That is why every Arch Mage formula has three pieces instead of two.
Trait points first
From base level 201 onwards a character gains 3 trait points per level, reaching 285 in total at level 275. They are a separate pool: ordinary stat points stop at 4,099 when you hit 200 and never grow again. Changing job to Arch Mage also grants 7 points up front.
| Trait | What it does | Exact conversion |
|---|---|---|
| SPL | Magic damage | +5 M.Atk per point, SPL ÷ 3 of S.Matk, and it also sits inside almost every skill formula |
| CON | Accuracy, evasion and S.Matk | +2 HIT and +2 FLEE per point, and CON ÷ 5 of S.Matk |
| WIS | Magic resistance | WIS + (WIS ÷ 3) × 5 of M.Res |
| STA | Physical resistance | STA + (STA ÷ 3) × 5 of Res |
| POW | Physical damage | POW ÷ 3 of P.Atk — the Arch Mage never uses it |
| CRT | Critical | +1 H.Plus per point and CRT ÷ 3 of C.Rate — no use here either |
This server's cap is not 100
The maximum per trait here is 110, not the reference emulator's 100. With 285 points and a cap of 110, an Arch Mage reaches SPL 110 comfortably and still has 175 points left for CON and WIS.
Job levels hand out more for free, up to job level 60: +15 INT, +14 SPL, +9 CON, +8 STA, +8 WIS, +8 VIT, +8 DEX, +7 AGI, +4 LUK. One point of POW. One point of CRT.
Where each piece enters, in order
This is the engine's real sequence for an Arch Mage spell. The order matters, because every step multiplies what the previous one handed it:
| # | Step | What happens |
|---|---|---|
| 1 | Base M.Atk | INT + INT ÷ 2 + DEX ÷ 5 + LUK ÷ 3 + level ÷ 4 + 5 × SPL |
| 2 | Gear M.Atk | The staff's M.Atk and everything else you are wearing |
| 3 | Cards and element | Race, size and element bonuses — and this is where the Climax marks on the target apply |
| 4 | Two-Handed Staff Mastery | +1 % per level, two-handed staff only |
| 5 | S.Matk | Multiplies by (100 + S.Matk) ÷ 100 |
| 6 | Skill ratio | This is where SPL shows up again, now inside the ratio |
| 7 | Base level | × base level ÷ 100 — only above level 99 |
| 8 | Target's M.Def | Magic defence reduction |
| 9 | Per-skill bonuses | The Climax adjustments that add or subtract a percentage land here, at the end |
| 10 | Hit count | Splits or multiplies depending on the sign — see below |
SPL counts TWICE, and not in the same way
At step 1 each point of SPL is worth +5 M.Atk, which is a small slice of an already large M.Atk. At step 6 each point is worth +5 ratio (or +3, or +10, depending on the skill) on a ratio that is then multiplied by your base level. At level 275 that second route is worth 2.75 times what the number says.
That is why SPL is by far the first trait to raise: it is the only stat that enters your damage through two different doors, and one of them scales with your level.
How much SPL each skill carries inside its formula
| Coefficient | Skills |
|---|---|
| 10 × SPL | Astral Strike and its field |
| 5 × SPL | Deadly Projection, Destructive Hurricane, Rain of Crystal, Mystery Illusion, Violent Quake, Strantum Tremor, All Bloom, Crystal Impact, Tornado Storm, Floral Flare Road, Rock Down, Storm Cannon, Frozen Slash and the Crimson Arrow blast |
| 3 × SPL | Soul Vulcan Strike and the Crimson Arrow line |
| 0 | The extra hit of Destructive Hurricane under Climax 1 and the final blast of All Bloom under Climax 5 — neither SPL nor base level, they are flat figures |
The sign of the hit count
In the engine a negative hit count SPLITS the total damage across those hits; a positive one MULTIPLIES it. Almost the whole Arch Mage kit carries negatives —Rock Down −5, Frozen Slash −3, Rain of Crystal −2…— and they are pure showmanship: the total does not change.
The exception is Soul Vulcan Strike, which carries 3 to 7 as positives. There it is real: at level 5 the calculated damage is multiplied by seven. That is why it hits hardest despite having the lowest ratio in the class.
The three steps with names —S.Matk multiplying before the ratio, base level multiplying after it, and the sign of the hit count— are what make two skills with similar ratios hit for wildly different amounts. If a formula in this section does not match what you see on screen, it is almost always one of those three.
See also The Arch Mage tree: nineteen skills, four elements in parallel, and one button that rewrites them all The AP bar: 200 points that never refill on their own, and a Climax that eats 125 Two-Handed Staff Mastery: half the class depends on carrying the right staff The Meister skill tree: seventeen skills, two different axes and a Madogear that locks out half of them
AP (Activity Points) is the third bar every fourth job carries. On this server the maximum is a flat 200 for all of them: it does not grow with level, it does not grow with stats, and —this is the important part— it does not regenerate over time. Not walking, not sitting, not resting: the engine has no natural AP recovery routine at all.
The only way to have AP is to generate it with skills that grant it. These are all of the Arch Mage's:
| Skill | AP | Cooldown | Note |
|---|---|---|---|
| Mystery Illusion | +5 | 4 s | The best by far, and it deals area damage too |
| Rock Down | +2 | 0.3 s | Shortest cooldown in the class |
| Storm Cannon | +2 | 0.3 s | Line-shaped |
| Crimson Arrow | +2 | 0.3 s | Line-shaped, plus a blast |
| Frozen Slash | +2 | 0.45 s | Centred on you |
| Astral Strike | −15 | 6 s | Flat at every level |
| Energy Conversion | −13 to −5 | 15 to 3 s | Higher level, lower cost |
| Climax | −125 | 60 s | Almost two thirds of the tank in one press |
The arithmetic to do before the fight starts
Climax's 125 AP are twenty-five casts of Mystery Illusion, or sixty-three of the +2 ones. And since the tank holds exactly 200, once Climax is up you have 75 AP left: five Astral Strikes, or four plus one Energy Conversion.
The right order is always the same: fill first, spend later. An Arch Mage who opens the fight with Climax has nothing left to do with the bar for the next minute.
AP survives death
When you are resurrected you find whatever AP you had: the engine does not touch it on a normal revive. What does not exist is any way to recover it standing still, so a long session is planned the opposite way round from mana.
And AP moves BEFORE the skill does anything
The cost is charged as the cast finishes, and the income is credited at the same moment. If the spell then fails on element, on range, or because the target has gone, the AP has already moved.
The loop that stops this class from ever running out of SP
Mystery Illusion costs 110 SP at level 5 and grants 5 AP. Energy Conversion at level 5 costs those same 5 AP and returns 1,200 SP. In other words: one Mystery Illusion pays for ten more of itself.
That loop is why the Arch Mage can carry the highest SP costs in its own tree —Destructive Hurricane and Crystal Impact reach 186— and still not depend on blue potions.
The AP bar is shared by all fourth jobs and works identically on all of them: if you have already read the Meister page, nothing here is new except who gives and who takes.
See also The Arch Mage tree: nineteen skills, four elements in parallel, and one button that rewrites them all SPL and S.Matk: why fourth-job formulas look so strange Climax does not raise damage: it changes what eight of your spells do Energy Conversion: five points of AP turn into twelve hundred of SP The Meister skill tree: seventeen skills, two different axes and a Madogear that locks out half of them
Climax is the strangest skill in the game and the one to understand before anything else in this class. It is not a damage buff. It is a five-position switch: the level you cast it at is stored inside the status, and eight Arch Mage spells read that number to decide what they are going to do. Four of them, in the wrong position, stop dealing damage entirely.
| Detail | Value |
|---|---|
| Levels | 5 |
| Duration | 300 s (5 min) |
| Cooldown | 60 s |
| Cast | 4 s fixed, 0 variable |
| Cost | 60 SP + 125 AP |
Those 4 seconds are fixed cast, so DEX and INT will not shorten them: only gear that reduces fixed cast does. And casting it cancels nothing you already have running.
The complete table
Each row is a skill; each column is the Climax level you have active. With no Climax they all behave as their own page describes.
| Skill | Climax 1 | Climax 2 | Climax 3 | Climax 4 | Climax 5 |
|---|---|---|---|---|---|
| Destructive Hurricane | Every target hit takes an extra 12,500 % hit | Knocks back 2 cells | +150 % damage | No damage at all: instead you get a 15-minute buff (+100 M.Atk, +30 % wind magic damage) | Area 19×19, but −20 % damage |
| Crystal Impact | No damage at all: buffs you and your allies for 15 minutes (+300 DEF, +100 M.DEF, +30 % water resistance and water magic damage) | Hits twice | +50 % damage | Main hit −50 %, but the aftershock +150 % | Area 15×15 and the aftershock becomes 5×5 |
| Violent Quake | Twice the rocks, but each one at −50 % | Each rock splashes 9×9 instead of 7×7 | +200 % damage per rock | No rocks fall: marks enemies in the area for 30 s with double earth damage taken | Rocks fall inside a 7×7 box instead of spreading over the whole area |
| All Bloom | Buds sprout at double speed (the garden lasts half as long) | Twice the buds, no penalty | +300 % damage per bud | Nothing sprouts: marks enemies in the area for 30 s with double fire damage taken | At the very end, one 85,000 % blast the size of the garden |
| Rock Down | +300 % per level of ratio — with any Climax level | ||||
| Storm Cannon | +300 % per level of ratio — with any Climax level | ||||
| Frozen Slash | +150 % plus 350 % per level of ratio — with any Climax level | ||||
| Crimson Arrow | The blast stops splitting its damage across 2 hits and starts multiplying it by 2 — with any Climax level | ||||
Read that again: there are two columns where your attack stops attacking
Under Climax 1, Crystal Impact splits its area among allies instead of enemies. Under Climax 4, Destructive Hurricane, Violent Quake and All Bloom deal no damage whatsoever. There is no error message and no warning: the spell goes off, the animation plays, and none of what you expected happens.
It is the number one cause of «this skill is broken» in this class, and the answer is always the same: your Climax is at the wrong level.
The four ways to use it
Climax 3, the pure damage one
It is the only level that only adds and never changes behaviour: +150 % to Destructive Hurricane, +200 % per rock to Violent Quake, +300 % per bud to All Bloom, +50 % to Crystal Impact, and the flat bonuses to the four cheap ones.
If you do not know which to pick, pick this.
Climax 4, the setup one
It turns Violent Quake and All Bloom into 30-second area debuffs that make the target take double earth or fire damage. And not only from you: from anyone, and it applies to physical and trap damage as well.
In a party with a fire-damage dealer, marking with All Bloom is worth more than anything you could cast yourself.
Climax 1, the survival one
Crystal Impact stops hitting and hands out +300 DEF and +100 M.DEF for fifteen minutes to every ally nearby. It is by a distance the heaviest defensive buff any mage can produce.
And it has to be cast before you need it: fifteen minutes covers a whole instance.
Climax 5, the bomb
All Bloom leaves a final 85,000 % blast the size of the entire garden. It scales with neither SPL nor your base level: it is a flat figure, and it is still the biggest number in the class.
In exchange, Destructive Hurricane loses 20 % of its damage. Nothing is free.
The trap: recasting it at a lower level DOES downgrade you
Almost every status in the game ignores a lower-level recast. Climax does not: it carries the flag that tells the engine not to check the level. Casting Climax 1 over an active Climax 5 leaves you on Climax 1, and it cost you 125 AP to do it.
With a 60-second cooldown and 125 AP per attempt, picking the wrong level costs more than a minute of the fight.
The four cheap skills —Rock Down, Storm Cannon, Crimson Arrow and Frozen Slash— are the only ones that do not care which level you picked: from 1 to 5 they gain the same. Since they are also the ones that generate AP, any Climax level improves the way you refill the bar.
See also The Arch Mage tree: nineteen skills, four elements in parallel, and one button that rewrites them all The AP bar: 200 points that never refill on their own, and a Climax that eats 125 Destructive Hurricane: 14,850 % in a single hit, centred on you Crystal Impact hits twice without telling you, and under Climax 1 stops hitting at all Violent Quake: twenty rocks falling at random, or a debuff that doubles earth damage All Bloom: a garden of exploding buds, and under Climax 5 an 85,000 % bomb
Two-Handed Staff Mastery is the Arch Mage's only passive, the only root in the tree that asks nothing of the Warlock, and the prerequisite for the two central pieces of the class: Soul Vulcan Strike and Climax. It gives two things, and both of them only with a TWO-handed staff equipped.
| Level | S.Matk | Magic damage |
|---|---|---|
| 1 | +2 | +1 % |
| 2 | +4 | +2 % |
| 3 | +6 | +3 % |
| 4 | +8 | +4 % |
| 5 | +10 | +5 % |
| 6 | +12 | +6 % |
| 7 | +14 | +7 % |
| 8 | +16 | +8 % |
| 9 | +18 | +9 % |
| 10 | +20 | +10 % |
The condition, which is the whole trap
The engine literally checks that the equipped weapon is of the two-handed staff class. A one-handed staff —the ordinary kind you have carried since Mage— is worth exactly zero, even with the passive at 10. Books, whips and bare hands are worth zero too.
And it is recalculated on every weapon change: swapping the staff for a shield removes the passive that same instant, with no warning.
The two bonuses do not apply in the same place
The +20 S.Matk
It is added to your base S.Matk, which comes from SPL ÷ 3 + CON ÷ 5. And S.Matk multiplies your M.Atk before the skill ratio is applied, so it reaches everything you cast, including the Wizard and Warlock skills you inherited.
+20 S.Matk on top of an S.Matk of 40 is not «+20 %»: it is going from multiplying by 1.40 to multiplying by 1.60, which is 14 % more damage.
The +10 % damage
It is a separate multiplier, applied right after cards and right before S.Matk. It also reaches any spell of yours, not just Arch Mage ones.
Careful, though: magic damage only. If you hit things with the staff, the passive does nothing.
Where to start
Three levels already unlock Soul Vulcan Strike and Climax, which is what the class actually needs to get going. The remaining seven are pure damage and can be left for last without anything staying locked.
This server carries over a hundred two-handed staves, from the level-1 Upgrade Staff up to level 265 gear. If you have just reached the job and you are still holding a one-handed staff, swapping it is probably the cheapest damage increase available to you.
See also The Arch Mage tree: nineteen skills, four elements in parallel, and one button that rewrites them all SPL and S.Matk: why fourth-job formulas look so strange Climax does not raise damage: it changes what eight of your spells do
Energy Conversion does exactly one thing: it gives you SP back. But it holds up the entire economy of the class, because Arch Mage spells carry the highest SP costs in the whole branch and this pays for all of them.
| Level | SP returned | Cost | Cooldown | Net SP per AP |
|---|---|---|---|---|
| 1 | 80 | 10 SP + 13 AP | 15 s | 5.4 |
| 2 | 240 | 10 SP + 11 AP | 12 s | 20.9 |
| 3 | 480 | 10 SP + 9 AP | 9 s | 52.2 |
| 4 | 800 | 10 SP + 7 AP | 6 s | 112.9 |
| 5 | 1,200 | 10 SP + 5 AP | 3 s | 238.0 |
Cast: 1 s variable + 1.5 s fixed. After-cast delay: 0.5 s. The last column is net SP: the 10 SP the cast itself costs are already deducted.
It levels up to cost less, wait less and give more
It is the only skill in the job where all three improve at once. It costs less AP (13 down to 5), has a shorter cooldown (15 s down to 3 s) and returns fifteen times more SP. The last column says it all: taking it from 1 to 5 multiplies its efficiency by forty-four.
There is no reason to leave it half-raised. Either it is at 5, or it is not there.
The loop
Mystery Illusion costs 110 SP and grants 5 AP. Energy Conversion at 5 costs those same 5 AP and returns 1,200 SP. So every Mystery Illusion pays for itself ten times over.
With the +2 AP skills the maths is worse but still positive: two and a half Rock Downs pay for one Energy Conversion.
With full SP, it fails
The engine first checks whether your SP is at maximum; if it is, you get a skill-failed message and nothing is spent. That is the skill's only gate, and it works in your favour: you cannot throw AP away by accident.
One point below maximum, though, it does fire and does spend the whole AP cost to give you that one point.
The sum to keep in your head
The tank is 200 AP. If you are going to cast Climax (125 AP), 75 are left. Every Energy Conversion takes 5 of those 75. With a 3-second cooldown you could chain fifteen in a row —18,000 SP— but you would be giving up Astral Strike and any chance of recasting Climax.
In practice: two or three Energy Conversions per fight cover an Arch Mage's SP bill comfortably, and the rest of the AP is worth more in Astral Strike.
Prerequisites: Recognized Spell 2 (Warlock) and Climax 1. It is the only skill in the class that hangs off Climax, and that makes sense: you do not need a tap until you have a large drain.
See also The Arch Mage tree: nineteen skills, four elements in parallel, and one button that rewrites them all The AP bar: 200 points that never refill on their own, and a Climax that eats 125 Climax does not raise damage: it changes what eight of your spells do
Deadly Projection is one of the largest single hits in the class and, above all, it is the key: the mark it leaves on the target switches off all of its magic protection for a few seconds. And the mark is applied before its own damage, so it benefits from it too.
| Level | Ratio | Mark lasts | SP |
|---|---|---|---|
| 1 | 2,800 % + 5×SPL | 4 s | 70 |
| 2 | 5,600 % + 5×SPL | 5 s | 75 |
| 3 | 8,400 % + 5×SPL | 6 s | 80 |
| 4 | 11,200 % + 5×SPL | 7 s | 85 |
| 5 | 14,000 % + 5×SPL | 8 s | 90 |
All of that is then multiplied by your base level ÷ 100. Range 9 cells, one hit, Undead element. Cast 3 s variable + 1.5 s fixed, 0.5 s after-cast delay, 2 s cooldown.
What the mark actually does
| What it switches off | Typical example |
|---|---|
| Total magic immunity | A target with a Ghostring card or equivalent stops being immune |
| Every kind of magic reflection | Magic Mirror, the Maya card, any reflect item… they all return zero |
And the skill itself ignores immunity
Deadly Projection carries the ignore magic immunity flag on its own entry, separately from the status it applies. That means it lands even when the target does not have the mark yet. This is what makes the natural order possible: Deadly Projection first, and from then on everything else works.
How to use it
As an opener, always
Against anything that reflects magic —and for a class that only casts magic, reflection means death— Deadly Projection goes first. Eight seconds at level 5 is plenty of room for an Astral Strike or a Soul Vulcan Strike behind it.
The mistake everybody makes
It is Undead element, which means that against Shadow, Poison or Undead targets it deals ZERO. Not a little: nothing at all. And that covers half of Niflheim and nearly every undead monster, which is exactly where you would expect to use it.
The mark still lands, so it is still useful as an opener even when the hit does nothing. Details in the element table.
Learned with Mystery Illusion 3, and it is in turn one of the three prerequisites of Astral Strike. In practice nobody leaves it below 3.
See also The Arch Mage tree: nineteen skills, four elements in parallel, and one button that rewrites them all The Arch Mage's eight elements and the four walls where you deal exactly zero Astral Strike: one hit, a six-second field, and a bonus against dragons and undead SPL and S.Matk: why fourth-job formulas look so strange
Judged on ratio alone, Soul Vulcan Strike looks like the weakest Arch Mage spell: 300 % per level, when its siblings run from 700 to 2,800. Judged on hit count, it is the strongest by a wide margin. The reason is the sign.
The rule of the sign
In the engine a negative hit count SPLITS total damage across those hits: the total does not change. A positive one MULTIPLIES it. Almost the whole Arch Mage kit carries negatives. Soul Vulcan Strike carries positives, from 3 to 7.
| Level | Ratio per hit | Hits | Effective ratio | Area | SP |
|---|---|---|---|---|---|
| 1 | 300 % + 3×SPL | 3 | 900 % + 9×SPL | 3×3 | 90 |
| 2 | 600 % + 3×SPL | 4 | 2,400 % + 12×SPL | 5×5 | 95 |
| 3 | 900 % + 3×SPL | 5 | 4,500 % + 15×SPL | 7×7 | 100 |
| 4 | 1,200 % + 3×SPL | 6 | 7,200 % + 18×SPL | 9×9 | 105 |
| 5 | 1,500 % + 3×SPL | 7 | 10,500 % + 21×SPL | 11×11 | 110 |
And on top of that, × base level ÷ 100. Range 9 cells, Ghost element. Cast 3 s variable + 1 s fixed —the shortest in the class— 0.5 s after-cast delay and a 0.7 s cooldown.
The area grows with level and follows the target
You aim at a monster and it splashes around it. At level 5 the area is 11×11, larger than most of the ground skills, and it leaves nothing on the floor for Land Protector to erase.
And every target in the area takes all seven hits
The multiplication is not shared out among victims: each one receives the full package. Against a pack of seven monsters at level 5, that is forty-nine hits.
The mistake everybody makes
It is Ghost element, and at the high element level —the one carried by fourth-job zone monsters— Ghost deals 0 % against Neutral targets. Against the most common element in the game, this skill does absolutely nothing.
It is the exact mirror of Astral Strike, which is Neutral and deals 0 % against Ghost. Carrying both covers both halves; carrying only one leaves half the screen immune.
Prerequisites: Two-Handed Staff Mastery 3 and the Warlock's Soul Expansion 5. It is the first offensive skill in the tree and the only one that can be cast every 0.7 seconds, so on top of hitting hard it is what fills the gaps between the long cooldowns.
See also The Arch Mage tree: nineteen skills, four elements in parallel, and one button that rewrites them all SPL and S.Matk: why fourth-job formulas look so strange The Arch Mage's eight elements and the four walls where you deal exactly zero Two-Handed Staff Mastery: half the class depends on carrying the right staff
Astral Strike is the most expensive and most complete skill in the tree: you aim at a spot on the ground and it does two things at once. First an instant hit across the area, and on top of that a field that stays for six seconds, hitting everything inside it every 0.3 s.
| Level | Initial hit | Per field tick | Area |
|---|---|---|---|
| 1 | 2,100 % + 10×SPL | 650 % + 10×SPL | 5×5 |
| 2 | 3,900 % + 10×SPL | 1,300 % + 10×SPL | 5×5 |
| 3 | 5,700 % + 10×SPL | 1,950 % + 10×SPL | 5×5 |
| 4 | 7,500 % + 10×SPL | 2,600 % + 10×SPL | 7×7 |
| 5 | 9,300 % + 10×SPL | 3,250 % + 10×SPL | 7×7 |
| 6 | 11,100 % + 10×SPL | 3,900 % + 10×SPL | 7×7 |
| 7 | 12,900 % + 10×SPL | 4,550 % + 10×SPL | 9×9 |
| 8 | 14,700 % + 10×SPL | 5,200 % + 10×SPL | 9×9 |
| 9 | 16,500 % + 10×SPL | 5,850 % + 10×SPL | 9×9 |
| 10 | 18,300 % + 10×SPL | 6,500 % + 10×SPL | 11×11 |
All of it, × base level ÷ 100. Flat cost at every level: 130 SP and 15 AP. Cast 4 s variable + 1.5 s fixed, 1 s after-cast delay, 6 s cooldown. Range 9 cells. Neutral element.
The SPL coefficient here is double the rest of the class
SPL enters at 10 per point —both in the initial hit and in every field tick— while almost everything else uses 5 and Soul Vulcan Strike uses 3. With SPL 110 that is 1,100 % extra on the hit and another 1,100 on each of the twenty ticks.
The dragon and undead bonus
If the target is of the Dragon or Undead race, the initial hit adds 100 % plus 300 % per level: at level 10 that is 3,100 % for free.
Watch the small print: it is race, not element. And the bonus only applies to the initial hit; the field ticks do not get it.
Twenty ticks, if the monster stands still
The field lasts 6 seconds and strikes every 0.3 s: up to twenty times per enemy. A monster that walks out after two ticks takes a tenth of what the table says.
Two traps in the Neutral element
Neutral has no strengths and no weaknesses against almost anything… with one exception: at the high element level it deals 0 % against Ghost-element targets. That is the exact mirror of Soul Vulcan Strike.
And the second: being Neutral, it gains nothing from the Climax 4 marks, which only double earth and fire damage.
Land Protector takes half the skill away
The initial hit is direct damage and goes straight through Land Protector. The six-second field does not: it is a ground unit and dies like all the others. On top of a Land Protector, Astral Strike is just an expensive single hit.
Full detail in which skills leave something on the ground.
Prerequisites: Deadly Projection 3, Mystery Illusion 3 and the Warlock's Comet 5. It is the last skill in the tree to open and the only damage skill that spends AP, so it competes head-on with Climax for the same tank.
See also The Arch Mage tree: nineteen skills, four elements in parallel, and one button that rewrites them all The AP bar: 200 points that never refill on their own, and a Climax that eats 125 The Arch Mage's eight elements and the four walls where you deal exactly zero What leaves something on the ground and what does not: the Land Protector list Soul Vulcan Strike: the lowest ratio in the class and still the hardest hitter
Destructive Hurricane is cast on yourself and tears through a square around you with a single wind hit. It has the highest per-hit ratio among the job's five-level skills, and also the highest SP cost in the whole tree.
| Level | Ratio | Area | SP |
|---|---|---|---|
| 1 | 3,450 % + 5×SPL | 7×7 | 170 |
| 2 | 6,300 % + 5×SPL | 7×7 | 174 |
| 3 | 9,150 % + 5×SPL | 9×9 | 178 |
| 4 | 12,000 % + 5×SPL | 9×9 | 182 |
| 5 | 14,850 % + 5×SPL | 11×11 | 186 |
And on top of that, × base level ÷ 100. Wind element, single hit. Cast 4 s variable + 1.5 s fixed, 0.5 s after-cast delay, 2.5 s cooldown.
The five Climax levels, one by one
| Climax | What happens |
|---|---|
| 1 | Every target hit also takes a flat extra hit of 12,500 %. That hit does not scale with SPL or base level: it is a closed figure, so it loses relative weight at high base level and is enormous at low level |
| 2 | Knocks targets back 2 cells. Handy for getting clear, counterproductive when you are trying to keep the pack together |
| 3 | +150 % damage. The best pure multiplier the skill has |
| 4 | No damage at all. Instead you receive a 15-minute buff: +100 M.Atk and +30 % wind magic damage |
| 5 | Area 19×19 —almost four times the surface of a normal level 5— but −20 % damage |
The trap that costs 186 SP
With Climax 4 active this skill does not attack. The animation plays, the 186 SP are spent and nothing happens to anyone: the only outcome is that you get the buff. If you already had it, all you did was refresh it.
Since the buff lasts fifteen minutes and Climax lasts five, the sensible sequence is: Climax 4 → one Destructive Hurricane to collect the buff → Climax at the level you actually want to fight with.
The Climax 4 buff is better than it looks
+100 flat M.Atk and +30 % wind magic damage, fifteen minutes, and it survives your Climax running out. It is the only self-buff the class has.
The mistake everybody makes
It is Wind: excellent against Water, poor against Earth and zero against Wind-element targets at the high element level. And being centred on you, casting it means standing in the middle of the pack with a 5.5-second cast that any hit cancels.
Learned with Tornado Storm 3. Together with Crystal Impact it forms the class's pair of «heavy» skills: same 186 SP, same cast time, and almost opposite Climax behaviours.
See also The Arch Mage tree: nineteen skills, four elements in parallel, and one button that rewrites them all Climax does not raise damage: it changes what eight of your spells do Crystal Impact hits twice without telling you, and under Climax 1 stops hitting at all The Arch Mage's eight elements and the four walls where you deal exactly zero
Crystal Impact is cast on yourself and freezes a square around you. What no description tells you is that it always hits twice: the main burst, and then an aftershock on each victim with the same ratio.
| Level | Ratio (burst and aftershock) | Area | SP |
|---|---|---|---|
| 1 | 1,550 % + 5×SPL | 9×9 | 170 |
| 2 | 2,850 % + 5×SPL | 9×9 | 174 |
| 3 | 4,150 % + 5×SPL | 11×11 | 178 |
| 4 | 5,450 % + 5×SPL | 11×11 | 182 |
| 5 | 6,750 % + 5×SPL | 13×13 | 186 |
And on top of that, × base level ÷ 100, on each of the two hits. Water element. Cast 4 s variable + 1.5 s fixed, 0.5 s after-cast delay, 2 s cooldown.
The aftershock is single-cell
The main burst covers the area in the table. The aftershock lands on each victim individually and does not splash: it is a one-tile hit. The only way to make it splash is Climax 5, which gives it a 5×5 box.
The five Climax levels, one by one
| Climax | What happens |
|---|---|
| 1 | No damage at all. The area is shared out among allies instead of enemies, and they all receive a 15-minute buff: +300 DEF, +100 M.DEF, +30 % water resistance and +30 % water magic damage |
| 2 | The main burst hits twice instead of once. With the aftershock, that is three hits per victim |
| 3 | +50 % damage on the main burst |
| 4 | Main burst −50 %, but the aftershock +150 %. On balance, a net gain |
| 5 | Area 15×15 and the aftershock starts splashing 5×5 |
+300 DEF is an absurd number, and it lasts fifteen minutes
The Climax 1 buff is comfortably the best thing a mage can hand a party in this game. And since it lasts three times longer than Climax itself, the play is always the same: Climax 1, one Crystal Impact to hand it out, then move on.
It reaches every ally inside the area, so cast it with the party grouped up, not in the middle of a monster pack.
The pairing with Destructive Hurricane
The two cost the same, cast the same, and centre on you. But their Climax behaviours are crossed: where one stops hitting (Hurricane at 4), the other hits fine; where the other stops hitting (Impact at 1), the first hits fine.
Under Climax 3 neither breaks, and both gain.
The mistake everybody makes
It is Water: excellent against Fire, zero against Water-element targets from element level 2 upwards, and fairly weak against Wind.
Learned with Rain of Crystal 3. It is the only skill in the class that, depending on a number you are carrying, deals damage to enemies or hands buffs to friends off the same button.
See also The Arch Mage tree: nineteen skills, four elements in parallel, and one button that rewrites them all Climax does not raise damage: it changes what eight of your spells do Destructive Hurricane: 14,850 % in a single hit, centred on you The Arch Mage's eight elements and the four walls where you deal exactly zero
Violent Quake is aimed at a spot on the ground and starts dropping rocks one at a time, at random positions inside the area, every 0.3 seconds. Each rock explodes exactly once and splashes 7×7.
| Level | Ratio per rock | Rocks | Landing area | SP |
|---|---|---|---|---|
| 1 | 1,400 % + 5×SPL | 4 | 7×7 | 110 |
| 2 | 2,600 % + 5×SPL | 8 | 7×7 | 114 |
| 3 | 3,800 % + 5×SPL | 12 | 9×9 | 118 |
| 4 | 5,000 % + 5×SPL | 16 | 9×9 | 122 |
| 5 | 6,200 % + 5×SPL | 20 | 9×9 | 126 |
Each ratio, × base level ÷ 100. Earth element. Cast 4 s variable + 1.5 s fixed, 1 s after-cast delay, 6 s cooldown. Range 9 cells.
The rocks land AT RANDOM, and that decides everything
The engine picks a random tile inside the area for each rock. Against a lone monster, half the rocks land where it is not and never touch it. Against a tight pack, almost every rock catches several at once.
That is why this skill's real damage cannot be calculated, only estimated. It is one of those that yields twice as much on a pack as on a single target.
The five Climax levels, one by one
| Climax | What happens |
|---|---|
| 1 | Twice the rocks, but each at −50 %. Total damage is unchanged: what changes is that you cover twice as many tiles, so it wins against a pack and against a single target too |
| 2 | Each rock splashes 9×9 instead of 7×7 |
| 3 | +200 % damage per rock. The best pure multiplier |
| 4 | Not one rock falls. Instead, every enemy inside the area takes 30 seconds of double earth damage received |
| 5 | Rocks are concentrated into a 7×7 box around the target point instead of spreading over the whole area. At levels 3, 4 and 5 that means less surface and far more density; at levels 1 and 2 the area was already 7×7, so nothing changes |
The Climax 4 mark helps the WHOLE party
The debuff does not say «your earth damage»: it says earth damage. It applies to the party member swinging an earth-endowed weapon, to a Ranger's earth trap, to another mage's earth spell. And it covers magic, physical and miscellaneous damage alike.
Thirty seconds and a large area: if the party has earth damage, marking is worth more than anything you would have done with those 126 SP.
Learned with Strantum Tremor 3. It is the exact twin of All Bloom: same ratios, same mechanic, same debuff, with earth swapped for fire. What they do not share are Climax 1, 2 and 5, which do different things on each.
See also The Arch Mage tree: nineteen skills, four elements in parallel, and one button that rewrites them all Climax does not raise damage: it changes what eight of your spells do All Bloom: a garden of exploding buds, and under Climax 5 an 85,000 % bomb What leaves something on the ground and what does not: the Land Protector list
All Bloom plants a garden on the ground from which buds sprout and explode one at a time, at random spots, every 0.3 seconds. Each bud detonates exactly once and splashes 7×7. It is the fire twin of Violent Quake, with the same numbers.
| Level | Ratio per bud | Buds | Garden area | SP |
|---|---|---|---|---|
| 1 | 1,400 % + 5×SPL | 4 | 7×7 | 94 |
| 2 | 2,600 % + 5×SPL | 8 | 7×7 | 102 |
| 3 | 3,800 % + 5×SPL | 12 | 9×9 | 110 |
| 4 | 5,000 % + 5×SPL | 16 | 9×9 | 118 |
| 5 | 6,200 % + 5×SPL | 20 | 9×9 | 126 |
Each ratio, × base level ÷ 100. Fire element. Cast 4 s variable + 1.5 s fixed, 1 s after-cast delay, 6 s cooldown. Range 9 cells. It costs 16 SP less than Violent Quake at level 1 and the same at level 5.
The five Climax levels, one by one
| Climax | What happens |
|---|---|
| 1 | Buds sprout at double speed: the same twenty, in half the time. The garden also lasts half as long. No damage penalty — this is the first difference from Violent Quake, where the equivalent costs −50 % |
| 2 | Twice the buds, also with no penalty |
| 3 | +300 % damage per bud. A hundred points more than Violent Quake's |
| 4 | Nothing sprouts. Every enemy inside the area takes 30 seconds of double fire damage received |
| 5 | Once the last bud has gone off, a final 85,000 % blast covering the whole garden |
The Climax 5 blast is the biggest number in the class, and it does not scale
Eight hundred and fifty times your M.Atk, across the entire garden, in one go. But it carries neither SPL nor base level: it is a closed figure. At base level 275 the rest of the class is multiplied by 2.75 and this hit is not, so its relative weight falls as you level.
Even so, at any level, it remains the largest single figure an Arch Mage can produce. And it lands after the twenty buds, so you have to let the garden run all the way through.
Against Violent Quake, All Bloom wins nearly every time
Same ratios, but its Climax 1, 2 and 3 are better (no penalty and +300 instead of +200), its Climax 5 is a bomb rather than a dispersion tweak, and it costs less SP at low levels.
The one thing Violent Quake does better is Climax 2, which widens each rock's splash.
The mistake everybody makes
It is Fire: brutal against Earth and undead, zero against Fire-element targets from element level 2 upwards, and weak against Water. And like everything that leaves ground units, Land Protector erases it.
Learned with Floral Flare Road 3. The Climax 4 mark doubles the fire damage the target takes from anyone, not just from you: in a party with fire damage, that mark is worth more than the twenty buds.
See also The Arch Mage tree: nineteen skills, four elements in parallel, and one button that rewrites them all Climax does not raise damage: it changes what eight of your spells do Violent Quake: twenty rocks falling at random, or a debuff that doubles earth damage What leaves something on the ground and what does not: the Land Protector list
Five skills in the tree do exactly the same thing: they leave a square on the ground that strikes everything inside it every few tenths of a second, for a few seconds. The element, the size and the rhythm change, and little else. They deserve one page because they are used the same way.
| Skill | Element | Ratio per tick | Ticks | Area (lv. 1–5) | SP | Cooldown |
|---|---|---|---|---|---|---|
| Rain of Crystal | Water | 940 to 3,980 % + 5×SPL | 8 | 9×9 to 13×13 | 85–125 | 5 s |
| Mystery Illusion | Shadow | 950 to 4,750 % + 5×SPL | 13 | 9×9 to 13×13 | 78–110 | 4 s |
| Strantum Tremor | Earth | 830 to 3,750 % + 5×SPL | 10 | 5×5 to 9×9 | 74–94 | 4 s |
| Tornado Storm | Wind | 860 to 3,900 % + 5×SPL | 10 | 5×5 to 9×9 | 78–94 | 5 s |
| Floral Flare Road | Fire | 790 to 3,750 % + 5×SPL | 10 | 3×3 to 11×11 | 70–94 | 5 s |
Every ratio, × base level ÷ 100. All five cast 3 s variable + 1.5 s fixed. «Ticks» is the maximum per enemy: anything that walks out early takes less.
Mystery Illusion is not just another one: it is the one that grants AP
It is the only one of the five that grants AP, and it grants +5, more than double what any other skill in the class gives. It also strikes the most times (thirteen ticks) and shares the shortest cooldown with Strantum Tremor. If you are only going to raise one of the five, raise this.
Its drawback is the element: Shadow deals zero against Shadow and Undead targets, and only 50 % against Poison.
Rain of Crystal is cast ON YOU, not on the ground
It is the only one of the five flagged as a self-targeting skill: it always lands at your feet, not where you aim. Trying to aim it at a distant monster makes the engine reject it silently, with no message.
It is the most common mistake with this skill, and it is hard to spot because there is no error: nothing simply happens.
Floral Flare Road grows the most
At level 1 it is a laughable 3×3 square. At level 5 it is 11×11, the largest of the five. No other skill multiplies its surface by thirteen as it levels.
Leaving it at level 1 purely to unlock Crimson Arrow is perfectly reasonable; leaving it at 3 is not, because there it is neither large nor strong.
All five die under Land Protector
They are ordinary ground units: not traps, not songs, and none of them carries the flag that ignores Land Protector. A Land Protector on top erases them, and while the square sits on protected tiles it does absolutely nothing.
The full picture is in which skills leave something on the ground.
Each hangs off a different Warlock skill —Frosty Misty, Sienna Execrate, Chain Lightning and Crimson Rock respectively, with Mystery Illusion off Hell Inferno— and each in turn unlocks its «heavy sibling» at level 3 and its «cheap sibling» at level 1. They are the whole skeleton of the tree.
See also The Arch Mage tree: nineteen skills, four elements in parallel, and one button that rewrites them all The AP bar: 200 points that never refill on their own, and a Climax that eats 125 What leaves something on the ground and what does not: the Land Protector list The Arch Mage's eight elements and the four walls where you deal exactly zero
Rock Down is aimed at a monster, drops stones on it and splashes onto whatever stands nearby. It has the shortest cooldown in the class —0.3 seconds— and is one of the four skills that generate AP.
| Level | Ratio | With Climax | Area | SP |
|---|---|---|---|---|
| 1 | 1,550 % + 5×SPL | 1,850 % | 5×5 | 72 |
| 2 | 3,100 % + 5×SPL | 3,700 % | 5×5 | 76 |
| 3 | 4,650 % + 5×SPL | 5,550 % | 5×5 | 80 |
| 4 | 6,200 % + 5×SPL | 7,400 % | 7×7 | 84 |
| 5 | 7,750 % + 5×SPL | 9,250 % | 7×7 | 88 |
And on top of that, × base level ÷ 100. Earth element, range 9 cells. Cast 4 s variable + 1.5 s fixed, 0.5 s after-cast delay, 0.3 s cooldown. Grants +2 AP per cast.
The five hits are decoration
The entry says five hits, and five numbers appear on screen. But the sign is negative, and in the engine that means the total damage is split across the five, not multiplied by them. Five small numbers add up to exactly the same as one big one.
It is the most common mistake when comparing skills in this class: only Soul Vulcan Strike genuinely multiplies.
With Climax, any level, it gains +300 % per level
Unlike the four heavy skills, Rock Down does not care which Climax level you have: from 1 to 5 the bonus is identical. Since the four cheap skills are the ones that refill the AP bar, any Climax improves the way you recharge.
How to use it
This is the gap filler. While the heavy skills sit on cooldown —2 to 6 seconds— Rock Down can be repeated endlessly, adding AP two at a time. With a 0.3 s cooldown, the only thing slowing you down is the cast itself.
And there lies its real drawback: 5.5 s of interruptible cast. You are not casting this on the move.
Learned with Strantum Tremor 1. Together with Storm Cannon, Crimson Arrow and Frozen Slash it forms the quartet of cheap skills, one per element, that exist mostly to grant AP.
See also The Arch Mage tree: nineteen skills, four elements in parallel, and one button that rewrites them all The AP bar: 200 points that never refill on their own, and a Climax that eats 125 Climax does not raise damage: it changes what eight of your spells do Frozen Slash: ice around you for 115 SP, and the best Climax bonus of the cheap four
Storm Cannon does not splash around the target: it fires a line from you towards the target and keeps going in that direction, catching everything it crosses. The line is three cells wide and can touch up to fourteen enemies.
| Level | Ratio | With Climax | SP |
|---|---|---|---|
| 1 | 1,550 % + 5×SPL | 1,850 % | 79 |
| 2 | 3,100 % + 5×SPL | 3,700 % | 79 |
| 3 | 4,650 % + 5×SPL | 5,550 % | 82 |
| 4 | 6,200 % + 5×SPL | 7,400 % | 85 |
| 5 | 7,750 % + 5×SPL | 9,250 % | 88 |
And on top of that, × base level ÷ 100. Wind element, range 9 cells, two hits that split the total. Cast 4 s variable + 1.5 s fixed, 0.5 s after-cast delay, 0.3 s cooldown. Grants +2 AP. Levels 1 and 2 cost the same, 79 SP.
How to position a line skill
The engine draws the line from your tile towards the target's and extends it. That means who you catch is not decided by where the monster is, but by where you are relative to it. Standing at the end of a row of monsters sweeps them all up; standing to the side catches one.
If the line ends up touching nobody, the engine has a safety net: it hits the target you aimed at anyway. The cast is never wasted entirely.
Fourteen, and that is not a theoretical figure
The per-line target cap is 14. In a corridor, against a row of monsters, this skill deals more total damage than any area skill in the class, and it costs 88 SP instead of 186.
The mistake everybody makes
Treating it as if it splashed. Against a lone monster in open ground, Storm Cannon is only a 7,750 % hit: less than Rock Down under Climax and with no advantage at all. Its value is in the geometry, not in the number.
Learned with Tornado Storm 1. It shares its exact ratio with Rock Down and its exact cooldown with Crimson Arrow: the only real differences are the shape of the area and the element.
See also The Arch Mage tree: nineteen skills, four elements in parallel, and one button that rewrites them all The AP bar: 200 points that never refill on their own, and a Climax that eats 125 Crimson Arrow: a fire line that pierces, and a blast that doubles under Climax Climax does not raise damage: it changes what eight of your spells do
Crimson Arrow does two things off a single cast: it fires a fire line like Storm Cannon's, and it also sets off a blast on the target that splashes around it. The blast is the heavy half; the line is nearly decoration.
| Level | Line | Blast | Blast area | SP |
|---|---|---|---|---|
| 1 | 400 % + 3×SPL | 750 % + 5×SPL | 5×5 | 74 |
| 2 | 800 % + 3×SPL | 1,500 % + 5×SPL | 5×5 | 78 |
| 3 | 1,200 % + 3×SPL | 2,250 % + 5×SPL | 5×5 | 82 |
| 4 | 1,600 % + 3×SPL | 3,000 % + 5×SPL | 7×7 | 86 |
| 5 | 2,000 % + 3×SPL | 3,750 % + 5×SPL | 7×7 | 90 |
All of it, × base level ÷ 100. Fire element on both halves, range 9 cells, a 3-cell-wide line capped at 14 targets. Cast 4 s variable + 1.5 s fixed, 0.5 s after-cast delay, 0.3 s cooldown. Grants +2 AP.
Under Climax the blast literally hits twice as hard
Without Climax the blast splits its damage across two hits (the total does not change). With Climax active —at any level— the engine flips the sign of that number, and the damage is then multiplied by two instead of split.
It is not a «+100 %» written anywhere: it is the same figure with a different sign. And it is the largest damage jump Climax hands to any of the four cheap skills.
The line is deliberately weak
2,000 % at level 5 against Storm Cannon's 7,750 %. Crimson Arrow is not competing there: its point is that on top of the line it drops a 3,750 % blast that doubles under Climax.
Against a single target with Climax up, it is the best of the four cheap skills.
The mistake everybody makes
Aiming it as if it were a square. The line goes out in the direction you aim and continues; the blast lands on the target. Position badly and you lose the whole line and keep half the skill.
Learned with Floral Flare Road 1. It is the only skill in the class that combines a line shape and a square shape in one cast, which is why it is the hardest to compare against the rest in a table.
See also The Arch Mage tree: nineteen skills, four elements in parallel, and one button that rewrites them all The AP bar: 200 points that never refill on their own, and a Climax that eats 125 Storm Cannon: a wind line that pierces up to fourteen enemies Climax does not raise damage: it changes what eight of your spells do
Frozen Slash shatters a square of ice around you. It is the most expensive of the four cheap skills, has the largest area, and gains the most from Climax.
| Level | Ratio | With Climax | Area | SP |
|---|---|---|---|---|
| 1 | 1,400 % + 5×SPL | 1,900 % | 9×9 | 103 |
| 2 | 2,350 % + 5×SPL | 3,200 % | 9×9 | 106 |
| 3 | 3,300 % + 5×SPL | 4,500 % | 11×11 | 109 |
| 4 | 4,250 % + 5×SPL | 5,800 % | 11×11 | 112 |
| 5 | 5,200 % + 5×SPL | 7,100 % | 13×13 | 115 |
And on top of that, × base level ÷ 100. Water element, three hits that split the total. Cast 4 s variable + 1.5 s fixed, 0.5 s after-cast delay, 0.45 s cooldown. Grants +2 AP.
In percentage terms, its Climax bonus is the largest of the cheap four
Rock Down and Storm Cannon gain +300 % per level, which on their 7,750 is 19 %. Frozen Slash gains +150 % plus 350 % per level, which on its 5,200 is 37 %. With Climax up, the gap between it and Rock Down narrows sharply.
13×13 is the largest area of the four
And by some distance: Rock Down tops out at 7×7 and the line skills are not squares at all. Against a tight pack, Frozen Slash deals more total damage than any of the other three.
The price of centring on yourself
For the area to matter you have to be inside the pack. With 5.5 seconds of cast that any hit cancels, that is exactly where an Arch Mage does not want to be.
It is the skill that works best with someone else soaking the hits, and the worst one solo.
Learned with Rain of Crystal 1. Like the other three of the quartet, it exists mainly to grant the +2 AP that feed Climax and Astral Strike: think of it as ammunition that happens to deal damage, not the other way round.
See also The Arch Mage tree: nineteen skills, four elements in parallel, and one button that rewrites them all The AP bar: 200 points that never refill on their own, and a Climax that eats 125 Climax does not raise damage: it changes what eight of your spells do Rock Down: five hits, a third of a second of cooldown, and two points of AP
The engine splits skills into two families: those that deal damage on the spot and those that leave a unit stuck to the map, acting on its own. The difference matters enormously, because Land Protector can only touch the second kind.
| Skill | Ground unit? | What gets planted |
|---|---|---|
| Rain of Crystal | Yes | The pulsing square, 4 s |
| Mystery Illusion | Yes | The pulsing square, 4 s |
| Strantum Tremor | Yes | The pulsing square, 4 s |
| Tornado Storm | Yes | The pulsing square, 3 s |
| Floral Flare Road | Yes | The pulsing square, 5 s |
| Violent Quake | Yes | The quake itself (decoration only) and each rock, which does the damage |
| All Bloom | Yes | The garden (decoration only) and each bud, which does the damage |
| Astral Strike | Half | The initial hit is direct; the 6-second field is a ground unit |
| Deadly Projection | No | — |
| Soul Vulcan Strike | No | — |
| Destructive Hurricane | No | — |
| Crystal Impact | No | — |
| Rock Down | No | — |
| Storm Cannon | No | — |
| Crimson Arrow | No | — |
| Frozen Slash | No | — |
None of the eight is exempt from Land Protector
The engine spares three families: traps, songs, and anything carrying an explicit ignore-Land-Protector flag. No Arch Mage skill belongs to any of the three. Everything on the list above falls.
Exactly what happens
If the Land Protector was already there
Your unit still gets planted, but while it sits on protected tiles it does nothing: the engine checks the tile the unit is on, not the monster's. Zero damage, no message.
If the Land Protector arrives afterwards
On creation, Land Protector deletes every non-trap unit it catches underneath. Your five-second field vanishes halfway through.
The check is on the UNIT's tile, not the target's
On this server the option is set to classic mode. In plain words: if your square lands outside the Land Protector and the monster is inside it, the hit does land. And the other way round, if your square lands inside and the monster is outside but in range, it does not.
It is counter-intuitive, and it is why it sometimes seems to «half work»: part of the square's tiles are outside the protected circle.
Rocks and buds fall too
The quake of Violent Quake and the garden of All Bloom are pure decoration: they deal no damage. The damage comes from the rocks and the buds, which are independent units, one per impact, each erasable on its own.
What to use under a Land Protector
Eight complete skills remain: Deadly Projection, Soul Vulcan Strike, Destructive Hurricane, Crystal Impact, Rock Down, Storm Cannon, Crimson Arrow and Frozen Slash. Plus the initial hit of Astral Strike.
That is half the class, and it is not a bad half: it contains both heavy skills and all four AP generators.
One technical detail you can feel while playing: each rock and each bud waits quietly for its turn, strikes once, and disappears. The five fields, by contrast, strike once per tick against every enemy standing in them. That is why a 4-second field on a stationary monster does far more than its ratio suggests.
See also The Arch Mage tree: nineteen skills, four elements in parallel, and one button that rewrites them all The five pulsing fields: water, earth, wind, fire and shadow Astral Strike: one hit, a six-second field, and a bonus against dragons and undead Violent Quake: twenty rocks falling at random, or a debuff that doubles earth damage All Bloom: a garden of exploding buds, and under Climax 5 an 85,000 % bomb
The Arch Mage spreads its sixteen damage skills across eight different elements, more than any other class. That sounds excellent until you notice that four of those elements deal a literal zero against certain targets.
Which element each skill carries
| Element | Skills |
|---|---|
| Water | Rain of Crystal, Crystal Impact, Frozen Slash |
| Earth | Strantum Tremor, Violent Quake, Rock Down |
| Wind | Tornado Storm, Destructive Hurricane, Storm Cannon |
| Fire | Floral Flare Road, All Bloom, Crimson Arrow |
| Shadow | Mystery Illusion |
| Ghost | Soul Vulcan Strike |
| Undead | Deadly Projection |
| Neutral | Astral Strike |
What each one deals zero against
These are the percentages at defence element level 4, which is what fourth-job zone monsters carry. At lower element levels the figures are less extreme, but the direction is the same.
| Your element | Deals ZERO against | Excellent against |
|---|---|---|
| Water | Water | Fire (200 %), Poison (125 %) |
| Earth | Earth | Wind (200 %), Poison (125 %) |
| Wind | Wind | Water (200 %), Poison (125 %) |
| Fire | Fire | Earth (200 %), Undead (200 %) |
| Shadow | Shadow, Undead | Holy (200 %) |
| Ghost | Neutral, and only 50 % against Poison | Ghost (200 %), Undead (175 %) |
| Undead | Shadow, Poison, Undead | Holy (200 %), Ghost (175 %) |
| Neutral | Ghost | Nothing in particular: 100 % against almost everything |
The two most expensive skills in the class are exact mirrors
Soul Vulcan Strike is Ghost and deals zero against Neutral. Astral Strike is Neutral and deals zero against Ghost. Each one covers exactly the other's blind spot.
Carrying both is what separates an Arch Mage who always has an answer from one who stares at the screen across half a zone. Carrying only one leaves half the game out.
Deadly Projection is the worst placed
It is Undead, and deals zero against Shadow, Poison and Undead: three of the most common elements in high-level zones. It is one of the largest single hits in the class and there are whole maps where it cannot be used for damage.
Its anti-magic mark still lands, though, so it keeps a job even when the hit does nothing.
The four classic elements cover each other
Water, earth, wind and fire form the usual circle, and the tree gives you three skills of each: a field, a heavy one and a cheap one. You are never short of the right option; what you are short of is cast time to switch between them.
And the Climax 4 marks only touch two elements
Violent Quake's debuff doubles earth damage and All Bloom's doubles fire. There is no water or wind equivalent, and certainly no neutral or ghost one.
So when the party is setting up a target, the winning pair is always All Bloom (mark) + anything that deals fire.
This table is this server's and it is the same for every class: it has not been altered from the reference emulator. What is specific to the Arch Mage is carrying so many different elements, and therefore having so many different ways to deal zero without noticing.
See also The Arch Mage tree: nineteen skills, four elements in parallel, and one button that rewrites them all Soul Vulcan Strike: the lowest ratio in the class and still the hardest hitter Astral Strike: one hit, a six-second field, and a bonus against dragons and undead Deadly Projection: the spell that switches off the target's magic immunity Climax does not raise damage: it changes what eight of your spells do
The Sage line's fourth job. Five elemental fields that pulse on the ground, a brand-new resource called AP, and half a class hanging off an elemental system this server no longer uses: here is what works, what does not, and why.
The Elemental Master is the fourth job of the Mage → Sage → Sorcerer line. To change you need base level 200 and job level 70 as a Sorcerer, and it inherits the Novice, Mage, Sage, Professor and Sorcerer trees (normal and transcendent), so nothing you already learned is lost.
Read this before you spend a single point. This server replaced the elemental system on 15 August 2026: the Sorcerer summons (Summon Agni, Aqua, Ventus and Tera) no longer create an elemental, they create an elemental homunculus. And the Elemental Master's five greater summons, Elemental Buster, Elemental Veil and Elemental Spirit Mastery all require an elemental from the old system, which can no longer exist. That is eight points of the tree that produce no effect today. Full details in the five greater summons.
The full tree
| Skill | Max | Requirements | Status |
|---|---|---|---|
| Magic Book Mastery | 10 | — | Works |
| Spell Enchanting | 5 | Magic Book Mastery 5 | Works |
| Activity Burn | 5 | Spell Enchanting 3 | Players only |
| Increasing Activity | 5 | Activity Burn 5 | Works |
| Diamond Storm | 5 | Magic Book Mastery 2 | Works |
| Lightning Land | 5 | Magic Book Mastery 2 | Works |
| Venom Swamp | 5 | Magic Book Mastery 2 | Works |
| Conflagration | 5 | Magic Book Mastery 2 | Works |
| Terra Drive | 5 | Magic Book Mastery 2 | Works |
| Elemental Spirit Mastery | 10 | Spirit Sympathy 1 | No effect today |
| Summon Elemental Ardor | 1 | Conflagration 1 · E. Spirit Mastery 1 · Summon Agni 3 | No effect today |
| Summon Elemental Diluvio | 1 | Diamond Storm 1 · E. Spirit Mastery 1 · Summon Aqua 3 | No effect today |
| Summon Elemental Procella | 1 | Lightning Land 1 · E. Spirit Mastery 1 · Summon Ventus 3 | No effect today |
| Summon Elemental Terremotus | 1 | Terra Drive 1 · E. Spirit Mastery 1 · Summon Tera 3 | No effect today |
| Summon Elemental Serpens | 1 | Venom Swamp 1 · E. Spirit Mastery 1 · all four Sorcerer summons at 3 | No effect today |
| Elemental Buster | 10 | E. Spirit Mastery 5 · all five greater summons | No effect today |
| Elemental Veil | 5 | Elemental Spirit Mastery 3 | No effect today |
| Psychic Stream | 5 | Magic Book Mastery 5 · all five fields at 3 | Works |
It does not all fit
Filling the whole tree costs 85 points. The job caps at job level 60, which grants 59 points (one per level-up, from 1 to 60). Even at the very top you are 26 short, so this class is planned from the first point rather than improvised.
What makes it different
The weapon is the book. Magic Book Mastery is the root of almost the entire tree and only counts with a book equipped. An Elemental Master carrying a staff loses their main passive and the keys to half the tree.
Area damage, not single target. Five of its six offensive skills are cast on the ground. There is nothing resembling a bolt: the class revolves around planting fields and staying out of them.
An AP economy. The five fields each grant 5 AP when cast; Psychic Stream, Elemental Buster and Increasing Activity spend it. It is the only resource in the class that never refills on its own: see AP explained.
Five elements, one per field. Water, Wind, Poison, Fire and Earth, one skill each, plus Psychic Stream in Neutral for whatever resists them all.
The 18 entries come from db/re/skill_tree.yml and db/re/skill_db.yml; the status of each one from the .cpp files in src/map/skills/mage/.
See also The five greater summons: why they currently summon nothing AP: 200 points, zero regeneration, and gone the moment you die Magic Book Mastery: +1% per level to five elements, and only with a book in hand Twenty-eight skills, and the four summons are the backbone
Magic Book Mastery is passive, goes up to level 10, and is the first gate of the tree: without it you cannot open the five ground fields (they need level 2), Spell Enchanting (level 5) or Psychic Stream (level 5).
What it actually does
With a book equipped, it adds +1% magic damage per level to five elements: Water, Earth, Fire, Wind and Poison. At level 10 that is +10% to each of them.
The bonus keys off the element of the spell you cast, not the element of the monster. If the attack is Fire, the +10% Fire bonus applies, whatever you are hitting.
Trap number one: Psychic Stream is Neutral. The strongest skill in the class is not on that list of five elements, so Magic Book Mastery adds nothing to it. Not one point. Everything else in the job does benefit.
Trap number two: the weapon
The check is literal: the engine tests that the equipped weapon is of the book type. With a staff, a two-handed staff, a dagger or bare hands, the passive is worth zero, even though the tree will happily let you take it to 10 and the tooltip says nothing. If you come from Sorcerer with a staff, switching weapons is the first decision of the job.
And it is not just the passive: the Arch Mage's two-handed staff bonus and the Elemental Master's book bonus are mutually exclusive by definition, because they are the same equipment slot.
Books you can carry
The classic Sage books (Book, Bible, Tablet, Principles of Magic, Ancient Magic) carry no class restriction, so an Elemental Master equips them without trouble. At the top end sit the fourth-job books, which do require a fourth job: Elemental Spirits, Frontier Elemental Book and Dimensions Elemental Magic Book, all with 260 magic attack and 2 slots.
Implemented in src/map/status.cpp (line 5042). The bonus goes into magic_atk_ele, which battle.cpp applies by the element of the attack, not of the defender.
See also The Elemental Master tree, and the seven skills that currently do nothing Psychic Stream: five hits that multiply, and it teleports you next to the target Spell Enchanting: +20% magic damage for the party, and only for casters
Spell Enchanting puts the Spell Enchanting status on a party member, granting S.MATK = 4 × level.
| Level | S.MATK | Duration | SP |
|---|---|---|---|
| 1 | +4 | 80 s | 43 |
| 2 | +8 | 120 s | 46 |
| 3 | +12 | 160 s | 49 |
| 4 | +16 | 200 s | 52 |
| 5 | +20 | 240 s | 55 |
What S.MATK is
It is not flat MATK: it is a percentage applied to magic damage that has already been calculated. The engine does damage += damage × S.MATK / 100 right before applying the skill ratio. With Spell Enchanting at 5, everything you cast hits 20% harder — and it stacks multiplicatively with the +10% from Magic Book Mastery, they are not added in the same bucket.
The numbers
Range 9 cells. No cast time, no cooldown. Party members only (the PartyOnly flag), though you can cast it on yourself.
The trap: it does nothing for weapon users. S.MATK only enters the magic damage path. Putting it on a Rune Knight or a mercenary spends your turn and 55 SP on a decorative icon. The @autoplay AI already knows this and only hands it out to casters; cast it by hand and the filtering is on you.
How to use it
This is a buff you apply before going in, not mid-fight: four minutes at level 5 covers a whole corridor comfortably. With two casters in the party, only one of you needs to carry it and hand it around.
Duration and cost from db/re/skill_db.yml; the 4 × level lives in src/map/status.cpp (line 13715) and the S.MATK application in src/map/battle.cpp (line 6087).
See also Magic Book Mastery: +1% per level to five elements, and only with a book in hand The Elemental Master tree, and the seven skills that currently do nothing AP: 200 points, zero regeneration, and gone the moment you die
Fourth jobs have one bar beyond health and mana: AP (Activity Points). On this server it works as follows, and it pays to understand the whole thing because it resembles nothing that came before.
How much you have
200, always. An Elemental Master's maximum is 200 from level 200 all the way to 275, without growing a single point per level, and no item on the server raises it: there is not one piece of gear with a maximum-AP bonus. The engine's global cap is 1000, but no class comes close.
How you earn it
Only by casting skills that grant it. For an Elemental Master those are exactly these five, and they all grant the same:
| Skill | AP granted |
|---|---|
| Diamond Storm | +5 |
| Lightning Land | +5 |
| Venom Swamp | +5 |
| Conflagration | +5 |
| Terra Drive | +5 |
The AP is credited when the cast completes and the spell goes off, not when you start it. If your cast gets interrupted, you get nothing.
What you spend it on
| Skill | AP | Fields you must cast to pay for it |
|---|---|---|
| Psychic Stream | 5 | 1 |
| Elemental Buster | 15 | 3 |
| Increasing Activity | 50 | 10 |
The three rules that will ruin a fight if you do not know them:
1. It does not regenerate. Sitting does not raise it, waiting does not raise it, and no consumable restores it — the command potions use does not even have a slot for AP. Whatever you do not earn by casting fields, you simply do not have.
2. You respawn with 0. Dying wipes your AP, and you come back with none (this server's respawn return is set to 0%). One death puts you ten Psychic Streams behind.
3. Entering a war zone also empties it. Stepping onto a PvP, GvG, WoE or Battleground map sets AP to zero. Arriving at the castle gate with a full bar buys you nothing.
The one piece of good news: logging out does not cost you any. Log off with 120 AP and you log in tomorrow with 120.
How this shapes play
The job's natural rotation reads itself: the fields finance Psychic Stream. Every field you plant pays for one Psychic Stream with exact change, so alternating one and one is sustainable forever. Adding Elemental Buster or Increasing Activity to the mix means banking AP first.
Maximum AP from db/re/job_basepoints.yml; restart_ap_rate: 0, loose_ap_on_death: yes, loose_ap_on_map: yes and keep_ap_on_logout: yes in conf/battle/player.conf. The GiveAp credit happens in skill_castend_id() and skill_castend_pos().
See also The Elemental Master tree, and the seven skills that currently do nothing Increasing Activity: you hand AP to an ally, and below level 5 you lose on the trade Activity Burn: it burns the target's AP, and only if the target is a player Psychic Stream: five hits that multiply, and it teleports you next to the target
Activity Burn rips AP off an enemy. That is all it does: no damage, no status, and it does not give you any AP either.
| Level | Chance | AP burned | SP |
|---|---|---|---|
| 1 | 30% | 20 | 30 |
| 2 | 40% | 30 | 40 |
| 3 | 50% | 50 | 50 |
| 4 | 60% | 60 | 60 |
| 5 | 70% | 70 | 70 |
The chance is 20 + 10 × level percent. Range 9 cells, cast time 2 s variable + 2 s fixed, 1 s after-cast delay and an 8 s cooldown.
The big trap: it only works on PLAYERS. The code checks that the target is a character before it even rolls the dice. Against a monster — any monster, MVPs included — the skill fails 100% of the time, and the message you get is the generic "cannot use", so it looks like a range or status problem when it is not. Monsters have no AP.
The second trap: failures are charged
SP is deducted before the roll, and the skill does not ask for a refund. A failed Activity Burn at level 5 has cost you 70 SP, four seconds of casting and eight of cooldown, for nothing. With a 30% failure rate at max level, that happens one time in three.
When it is worth it
In PvP and WoE against other fourth jobs, and especially against classes whose big hit costs a lot of AP. Seventy points is fourteen field casts of your opponent's work thrown away, and they cannot get it back by sitting down. Outside war zones it is a stepping stone: you need it at 5 to unlock Increasing Activity, and that one is useful everywhere.
src/map/skills/mage/activityburn.cpp; the burned-AP table is hard-coded in the .cpp, not in the skill_db.
See also AP: 200 points, zero regeneration, and gone the moment you die Increasing Activity: you hand AP to an ally, and below level 5 you lose on the trade The Elemental Master tree, and the seven skills that currently do nothing
Increasing Activity gives AP to a party member. It is a transfer, not a creation: what they get comes out of your bar.
| Level | Costs you | They get | Net | SP |
|---|---|---|---|---|
| 1 | 50 AP | 10 AP | −40 | 30 |
| 2 | 50 AP | 20 AP | −30 | 40 |
| 3 | 50 AP | 30 AP | −20 | 50 |
| 4 | 50 AP | 40 AP | −10 | 60 |
| 5 | 50 AP | 50 AP | 0 | 70 |
The AP cost is 50 at every level. It does not scale up, it does not scale down: it is 50 from level 1 to level 5. What scales is what you hand over. Which means taking it halfway is literally burning AP: at level 1 you spend 50 of yours so your ally collects 10. This skill goes to 5 or it does not get taken.
The numbers
Range 9 cells. Cast time 3 s fixed (DEX does not reduce it), 0.5 s after-cast delay and a 2.5 s cooldown. Party only, and it cannot be cast on yourself: the NoTargetSelf flag forbids it.
When it is worth it
When your ally spends AP better than you do. You generate it almost for free — every field you were going to cast anyway hands you 5 — and they may have a 100-AP strike that decides a fight. In a party with a Dragon Knight, a Cardinal or an Imperial Guard, the Elemental Master is the party's AP tap.
The trap
The AP you hand over is capped at the recipient's maximum. If your ally sits at 180 of 200, 20 go in and the other 30 evaporate — and you paid for all 50. Check their bar before casting, or save it for when they are genuinely dry.
src/map/skills/mage/increasingactivity.cpp; the flat ApCost: 50 is in db/re/skill_db.yml.
See also AP: 200 points, zero regeneration, and gone the moment you die Activity Burn: it burns the target's AP, and only if the target is a player The Elemental Master tree, and the seven skills that currently do nothing
Diamond Storm is cast on the ground and detonates an area of 9×9 cells with Water damage.
The formula
ratio = 500 + 2400 × level + 5 × SPL, and the result is multiplied by base level / 100.
| Level | Ratio (no SPL) | SP |
|---|---|---|
| 1 | 2,900% | 80 |
| 2 | 5,300% | 84 |
| 3 | 7,700% | 88 |
| 4 | 10,100% | 92 |
| 5 | 12,500% | 96 |
SPL is the fourth-job Spell stat. Each point adds 5% to the ratio, so 200 SPL is +1,000% — at level 1 that nearly doubles the damage.
Hits: five, and they split
The skill_db declares −5 hits, and the sign matters: in this engine a negative number means the total damage is divided across five impacts, not multiplied by five. The total is what the table says; all that changes is that it arrives in five pieces, which does help against defences that subtract per hit.
Timings
Cast time 5 s variable + 1.5 s fixed, 0.5 s after-cast delay, 1 s cooldown, range 9 cells. Grants +5 AP.
It is not a lingering field. Even though it paints an area on the ground, the group lasts 0.1 seconds: it strikes once and vanishes. Lightning Land, Venom Swamp and Conflagration do linger; this one and Terra Drive do not. Planting it "for the monster to walk into" does not work: you have to drop it on top of the monster.
The bonus you cannot have
The code carries a second, enormous term — +7,300 + 200 × level + 5 × SPL, which at level 5 nearly triples the skill — conditioned on carrying the Summon Elemental Diluvio status. On this server that status cannot be obtained: see the five greater summons.
The status it applies
A 5% chance of Frostbite for 10 s on whatever it hits. What that status really does, and why it lasts far less than advertised, in the five field statuses.
src/map/skills/mage/diamondstorm.cpp and db/re/skill_db.yml (id 5369).
See also Terra Drive: Diamond Storm's Earth twin, number for number The five field statuses: what the tooltip promises and what the server does AP: 200 points, zero regeneration, and gone the moment you die The Elemental Master tree, and the seven skills that currently do nothing
Terra Drive is, number for number, the same spell as Diamond Storm with the element swapped: it detonates over 9×9 cells with Earth damage.
The formula
ratio = 500 + 2400 × level + 5 × SPL, multiplied by base level / 100. Identical.
| Level | Ratio (no SPL) | SP |
|---|---|---|
| 1 | 2,900% | 80 |
| 2 | 5,300% | 84 |
| 3 | 7,700% | 88 |
| 4 | 10,100% | 92 |
| 5 | 12,500% | 96 |
−5 hits (the total is split across five impacts), cast time 5 s + 1.5 s fixed, 0.5 s delay, 1 s cooldown, range 9. Grants +5 AP. And like Diamond Storm it lasts 0.1 s: a burst, not a field.
The only difference
Earth element. Which is the entire reason to own both: whatever resists Water gets this one, whatever resists Earth gets the other. Since they cost and cast identically, the choice is purely the elemental table.
Crystallization status, 5% for 10 s, instead of Frostbite. In practice they do the same thing: see the five statuses.
The bonus you cannot have
Just like its twin, it carries a +7,300 + 200 × level + 5 × SPL term tied to the Summon Elemental Terremotus status, which cannot be obtained today. Full explanation in the five greater summons.
src/map/skills/mage/terradrive.cpp and db/re/skill_db.yml (id 5373).
See also Diamond Storm: the Water burst, five split hits, nine by nine The five field statuses: what the tooltip promises and what the server does AP: 200 points, zero regeneration, and gone the moment you die The Elemental Master tree, and the seven skills that currently do nothing
Lightning Land plants a 9×9 cell field that strikes every enemy inside it with Wind damage every 0.3 seconds for 3 seconds — up to ten pulses.
The formula, per pulse
ratio = 700 + 1100 × level + 5 × SPL, multiplied by base level / 100. One hit per pulse.
| Level | Ratio per pulse | Total if it takes all 10 | SP |
|---|---|---|---|
| 1 | 1,800% | 18,000% | 94 |
| 2 | 2,900% | 29,000% | 98 |
| 3 | 4,000% | 40,000% | 102 |
| 4 | 5,100% | 51,000% | 106 |
| 5 | 6,200% | 62,000% | 110 |
That last column is the theoretical ceiling, not what you will see. Ten pulses require the enemy to stay three full seconds inside the square, and almost nothing does: the moment it walks toward you, it leaves. Against something immobile or trapped, Lightning Land is by far the most efficient skill in the class; against something that chases you, count on two or three pulses and compare it to Diamond Storm on that basis.
Timings and rules
Cast time 5 s variable + 1.5 s fixed, 0.7 s after-cast delay, 2 s cooldown, range 9 cells. Grants +5 AP. The field is flagged NoOverlap: two Lightning Lands do not stack, the second replaces the first, so recasting on top only resets the clock. And it does a path check: it will not reach through walls.
The status
A 3% chance of Lightning Strike per hit, 10 s. What it really does in the five field statuses.
The bonus you cannot have
+200 × level + 2 × SPL while carrying the Summon Elemental Procella status, unreachable today. See the five greater summons.
src/map/skills/mage/lightningland.cpp and db/re/skill_db.yml (id 5370).
See also Venom Swamp: the same field in Poison, with the longest-lasting status Conflagration: the Fire field, and the priciest of the three that linger The five field statuses: what the tooltip promises and what the server does AP: 200 points, zero regeneration, and gone the moment you die
Venom Swamp is Lightning Land's sibling in Poison: a 9×9 field, one hit every 0.3 s for 3 s.
The formula, per pulse
ratio = 700 + 1100 × level + 5 × SPL, times base level / 100. The very same.
| Level | Ratio per pulse | SP |
|---|---|---|
| 1 | 1,800% | 92 |
| 2 | 2,900% | 97 |
| 3 | 4,000% | 102 |
| 4 | 5,100% | 107 |
| 5 | 6,200% | 112 |
Cast time 5 s + 1.5 s fixed, 0.7 s delay, 2 s cooldown, range 9, NoOverlap and a path check. Grants +5 AP.
What sets it apart
Poison. It is the odd element of the class and that is exactly why it earns its slot: plenty of things that laugh off Wind and Water do take Poison damage. Watch the reverse too — undead and poison-element monsters absorb or ignore it.
Its status lasts 20 s, twice as long as Lightning Land's, Diamond Storm's and Terra Drive's. The catch is that the status currently does nothing at all: see the five statuses.
The bonus you cannot have
+200 × level + 2 × SPL with the Summon Elemental Serpens status, which cannot be obtained on this server. See the five greater summons.
src/map/skills/mage/venomswamp.cpp and db/re/skill_db.yml (id 5371).
See also Lightning Land: a Wind field that pulses ten times in three seconds Conflagration: the Fire field, and the priciest of the three that linger The five field statuses: what the tooltip promises and what the server does AP: 200 points, zero regeneration, and gone the moment you die
Conflagration completes the trio of lingering fields with the Fire element: 9×9 cells, one hit every 0.3 s for 3 s.
The formula, per pulse
ratio = 700 + 1100 × level + 5 × SPL, times base level / 100.
| Level | Ratio per pulse | SP |
|---|---|---|
| 1 | 1,800% | 97 |
| 2 | 2,900% | 101 |
| 3 | 4,000% | 105 |
| 4 | 5,100% | 109 |
| 5 | 6,200% | 113 |
It is the most SP-hungry of the five fields, and in exchange it does not deal a single point more than Venom Swamp or Lightning Land. You are paying for the element alone.
Cast time 5 s + 1.5 s fixed, 0.7 s delay, 2 s cooldown, range 9, NoOverlap and a path check. Grants +5 AP.
Its status is the only one of the five with no declared effect whatsoever. The other four at least block item use; Conflagration's, on this server, is purely an icon. A 3% chance of nothing.
The bonus you cannot have
+200 × level + 2 × SPL with the Summon Elemental Ardor status, unreachable today. See the five greater summons.
How to split the five fields
If you are only taking two, the sensible pair is one burst and one field: Diamond Storm or Terra Drive for things that move, and one of these three for things that stand still. You only need all five at 3 if you want Psychic Stream, which demands the lot.
src/map/skills/mage/conflagration.cpp and db/re/skill_db.yml (id 5372).
See also Lightning Land: a Wind field that pulses ten times in three seconds Venom Swamp: the same field in Poison, with the longest-lasting status The five field statuses: what the tooltip promises and what the server does AP: 200 points, zero regeneration, and gone the moment you die
Each of the Elemental Master's five area spells leaves its own status on what it hits. The names sound like hard control — frostbite, lightning strike, crystallization — and they are not. Here is what they really do.
| Status | Applied by | Chance | Lasts | Real effect |
|---|---|---|---|---|
| Frostbite | Diamond Storm | 5% | 10 s | Cannot use items · removed on taking damage |
| Crystallization | Terra Drive | 5% | 10 s | Cannot use items · removed on taking damage |
| Lightning Strike | Lightning Land | 3% | 10 s | Cannot use items · removed on taking damage |
| Deadly Poison | Venom Swamp | 3% | 20 s | Icon only |
| Conflagration | Conflagration | 3% | 20 s | Icon only |
They do not root and they do not silence. In this server's status database, the lines that would take away movement and casting from Frostbite, Lightning Strike and Crystallization are commented out: written, but switched off. The only thing left running on those three is the ban on using items.
The trap that reduces them to nothing
Frostbite, Lightning Strike and Crystallization all carry the removed when damaged flag. And all three are applied by a skill that is dealing damage at that exact moment: Diamond Storm lands five hits, and the fields pulse every 0.3 s. The very spell that plants the status is the one that strips it. In practice those ten seconds are a fraction of a second.
And the other two
Deadly Poison asks the engine to recalculate the target's defence, but there is no line of code that modifies it: the recalculation returns exactly what was there before. Conflagration's status does not even ask for that. Both last a clean 20 seconds — they do not fall off when damaged — and do absolutely nothing.
What to do with this
Do not count on the control. All five spells are chosen for damage, element and area shape, never for their status. And if you were levelling Diamond Storm hoping to freeze someone in WoE, change your reason: what it does is hit.
Statuses in db/re/status.yml (the Handicapstate_* blocks). Chances and durations in each .cpp's applyAdditionalEffects() and in the skill_db's Duration2. The damage sweep lives in status_fix_damage(), src/map/status.cpp line 1606.
See also Diamond Storm: the Water burst, five split hits, nine by nine Terra Drive: Diamond Storm's Earth twin, number for number Lightning Land: a Wind field that pulses ten times in three seconds Venom Swamp: the same field in Poison, with the longest-lasting status Conflagration: the Fire field, and the priciest of the three that linger
Psychic Stream is the last skill in the tree and the one that decides whether the job hits or not. It requires Magic Book Mastery 5 and all five area spells at level 3 — 20 points in prerequisites alone.
The formula
ratio = 1000 + 3500 × level + 5 × SPL, multiplied by base level / 100.
| Level | Ratio per hit | Hits | Area | SP | Cooldown |
|---|---|---|---|---|---|
| 1 | 4,500% | 5 | 5×5 | 77 | 10 s |
| 2 | 8,000% | 5 | 5×5 | 84 | 8 s |
| 3 | 11,500% | 5 | 5×5 | 91 | 6 s |
| 4 | 15,000% | 5 | 7×7 | 98 | 4 s |
| 5 | 18,500% | 5 | 7×7 | 105 | 2 s |
Here the five hits MULTIPLY, they do not split. The skill_db declares HitCount: 5 as a positive number, and the sign changes everything: unlike Diamond Storm or Terra Drive, the ratio in the table is applied five times over. At level 5 that is 92,000% total ratio per cast, plus 25 × SPL. Nothing else in the job comes close, and that is why the whole tree ends here.
It moves you
On cast, the engine teleports you to the cell adjacent to your target before dealing damage. This is not decoration: you end up in melee range, in the middle of whatever you were keeping away from. If that cell is occupied or unwalkable, the skill fails entirely — and that is the single most common silent reason it "does not go off".
The primary target eats both the direct hit and the splash, so in practice it takes more than the enemies around it.
The two engine traps
Energy Coat blocks it. With Energy Coat up — the mana shield you learn as a Mage and that almost every caster keeps running permanently — the engine refuses Psychic Stream. It is an explicit check, not a side effect. If you play Elemental Master, Energy Coat stays off; there is no middle ground. (The @autoplay AI already accounts for this: anyone who knows Psychic Stream stops having Energy Coat maintained.)
Fog Wall eats it 75% of the time. Psychic Stream is on the explicit list of skills affected by fog, alongside ordinary offensive skills and Jump Kick. Against a target standing inside a Fog Wall, three casts in four are lost.
And a third, subtler one
It is Neutral, so Magic Book Mastery adds nothing to it — the passive only covers Water, Earth, Fire, Wind and Poison. In exchange, being Neutral is exactly what makes it universal: no elemental resistance shuts it down completely.
How to use it
Cast time 2 s variable + 1.5 s fixed, and it gets interrupted if you are hit. With a 2 s cooldown at level 5, the rotation is: field (which grants 5 AP), Psychic Stream (which spends 5), field, Psychic Stream. That nets out to zero AP indefinitely. Always cast it from behind the field you just planted, so the teleport drops you inside your own zone rather than outside it.
src/map/skills/mage/psychicstream.cpp; the Energy Coat block is in src/map/skill.cpp line 9780, and the Fog Wall case on line 5088.
See also AP: 200 points, zero regeneration, and gone the moment you die Magic Book Mastery: +1% per level to five elements, and only with a book in hand The Elemental Master tree, and the seven skills that currently do nothing The five field statuses: what the tooltip promises and what the server does
This is the part of the job to read in full before spending a point, because nothing in the game will warn you.
How it used to work
In the original design, a Sorcerer used Summon Agni / Aqua / Ventus / Tera to call an elemental, a creature with three sizes (small, medium and large) depending on the summon's level. The Elemental Master came later and, on top of a large elemental, cast one of the five greater summons to turn it into its definitive form: Ardor, Diluvio, Procella, Terremotus or Serpens.
What changed here
On 15 August 2026 this server replaced the entire system. The Sorcerer's four summons no longer create an elemental: they create an elemental homunculus, with a proper client window, right-click menu, hunger and evolution. It is a change for the better, and it is documented in how to summon your companion and how evolution works.
But the Elemental Master's five greater summons were not changed. They still require, literally, an elemental from the old system — and nothing creates one any more. Both paths coexist in the code, but only one of them has a way in.
The circle, step by step
| Skill | What it requires | Can it be met? |
|---|---|---|
| Summon Elemental Ardor | Owning a large Agni elemental | No |
| Summon Elemental Diluvio | Owning a large Aqua elemental | No |
| Summon Elemental Procella | Owning a large Ventus elemental | No |
| Summon Elemental Terremotus | Owning a large Tera elemental | No |
| Summon Elemental Serpens | Owning any of the four, large | No |
The only places on the server that still know how to create an elemental are those same five skills, and all five require having one already. It is a closed circle with no entrance.
And there is one more lock
When you cast a Sorcerer summon, the first thing it does is delete your old elemental, if you had one, before creating the homunculus. So not even an elemental inherited from before the change would survive your first summon. As of today there is not a single elemental left in the server's entire database: the table is empty.
What happens if you cast them anyway
You get the client's failure message and nothing happens. The stone is not consumed — the engine never reaches the point of charging the requirement, because the check comes first — but you do lose the 5 seconds of casting and the minute of cooldown.
What it drags down with it
This is not five skills: it is eight points of the tree. Because you cannot own any of the five greater elementals, the following are inert too:
An honest recommendation
Do not spend points on that half of the tree. With 59 points available and 85 needed, the part that works — Magic Book Mastery, Spell Enchanting, the five area spells and Psychic Stream — adds up to 45, leaving fourteen for Increasing Activity and whatever else you fancy. The elemental half will switch itself on the day the chain is restored; until then, every point you put there is a point thrown away.
The five .cpp files live in src/map/skills/mage/summonelemental*.cpp and still call elemental_create(). The new path is hom_elemental_summon(), src/map/homunculus.cpp line 2246. The server's own comments spell it out in src/map/pc.cpp (line 37670) and src/map/ai_skills.cpp (line 3789).
See also Elemental Buster: the job's biggest strike, in whatever element your elemental lends you Elemental Veil: it makes your elemental untargetable by anything that is not a boss Elemental Spirit Mastery: +40,000 HP for an elemental that does not exist Call Homunculus needs no Seed of Life or any other item Twenty-eight skills, and the four summons are the backbone
Each greater summon requires one fourth-job elemental stone per cast, on top of 100 SP.
| Summon | Stone | Price |
|---|---|---|
| Summon Elemental Ardor | Flame Stone 4th | 1,000 z |
| Summon Elemental Diluvio | Ice Stone 4th | 1,000 z |
| Summon Elemental Procella | Wind Stone 4th | 1,000 z |
| Summon Elemental Terremotus | Earth Stone 4th | 1,000 z |
| Summon Elemental Serpens | Poison Stone 4th | 1,000 z |
Where to buy them
From the Point Merchants, the same shopkeepers who sell shards to Sorcerers. They are spread across half the world:
prt_in 131,66
geffen 129,49
gef_tower 105,172
aldebaran 133,114
alberta 105,52
izlude 138,163
comodo 193,159
ra_in01 256,273
veins 202,128
mora 115,118
malangdo 214,163
manuk 261,206
splendide 207,160
dicastes01 207,200
mid_camp 224,237
Before you spend the 5,000 zeny: the five summons these stones serve produce no effect on this server. Read the five greater summons before buying. The good news is that the rejection happens before the requirement is charged, so the stone is not lost if you try.
Prices and items from item_db_re in the database. The shop is Shard_Seller in npc/re/merchants/3rd_trader.txt, priced at -1, meaning the catalogue price.
See also The five greater summons: why they currently summon nothing The Elemental Master tree, and the seven skills that currently do nothing
Elemental Spirit Mastery is passive, reaches level 10, requires Spirit Sympathy 1 from the Sorcerer tree, and is the key to the five greater summons, to Elemental Buster (level 5) and to Elemental Veil (level 3).
What it would do
On the five greater elementals — Ardor, Diluvio, Procella, Terremotus and Serpens; not on the Sorcerer's own — it adds:
| Stat | Bonus | At level 10 |
|---|---|---|
| Maximum HP | 10,000 + 3,000 × level | +40,000 |
| Maximum SP | 100 × level | +1,000 |
| Attack | 100 + 20 × level | +300 |
| Magic attack | 20 × level | +200 |
| Defence | 20 × level | +200 |
| Magic defence | 4 × level | +40 |
| Flee | 10 × level | +100 |
It is comfortably the largest bonus in the whole tree: forty thousand hit points turn a greater elemental into a genuine tank.
The two reasons it does nothing today.
1. It only applies to the five greater elementals, and on this server you cannot own any of them.
2. Even if you could, the bonus is calculated exactly once, at the moment the creature is created. It is a snapshot: levelling the passive afterwards adds nothing to an elemental already out. You would have to resummon it.
And what it does not do, however much it looks like it should
It does not touch the elemental homunculus. The Agni, Aqua, Ventus and Tera you actually can own on this server are homunculi, not elementals, and this passive never looks at them. Their growth runs through a different path: evolution and feeding.
src/map/elemental.cpp, line 998, inside elemental_create(). That is the skill's only appearance in the entire engine.
See also The five greater summons: why they currently summon nothing Elemental Buster: the job's biggest strike, in whatever element your elemental lends you Elemental Veil: it makes your elemental untargetable by anything that is not a boss The Elemental Master tree, and the seven skills that currently do nothing
Elemental Buster is an explosion centred on you covering radius 6 — 13×13 cells, by far the largest area in the job. It is the tree's only level-10 offensive skill.
Your elemental picks the element
| Elemental you carry | Element of the strike |
|---|---|
| Ardor | Fire |
| Diluvio | Water |
| Procella | Wind |
| Terremotus | Earth |
| Serpens | Poison |
And only those five: with one of the smaller elementals, or with none, the skill does not go off.
The formula (identical across all five elements)
ratio = 550 + 2650 × level + 10 × SPL, and if the target is of the Formless or Dragon race, a further +150 × level. All of it multiplied by base level / 100.
| Level | Ratio | vs Formless / Dragon |
|---|---|---|
| 1 | 3,200% | 3,350% |
| 2 | 5,850% | 6,150% |
| 3 | 8,500% | 8,950% |
| 4 | 11,150% | 11,750% |
| 5 | 13,800% | 14,550% |
| 6 | 16,450% | 17,350% |
| 7 | 19,100% | 20,150% |
| 8 | 21,750% | 22,950% |
| 9 | 24,400% | 25,750% |
| 10 | 27,050% | 28,550% |
SPL weighs twice as much here as in any other spell in the job: 10% per point, or +2,000% with 200 SPL.
Hits: ten, and they split
It declares −10 hits. Negative, meaning the table total is divided across ten impacts. It does not multiply — that is the difference with Psychic Stream, which does multiply and therefore beats it comfortably on total damage.
Cost and timings
140 SP and 15 AP, cast time 4 s variable + 1.5 s fixed, 0.5 s after-cast delay, 2 s cooldown. Those 15 AP are three area spells' worth of work: see AP explained.
Two corrections to what gets repeated around.
It does not consume the elemental. People say it does; the code does not. There is not one line that deletes it. Your elemental stays with you afterwards, unchanged.
If it fails, you are not charged. When you have no greater elemental, the skill explicitly marks the requirement as not consumed: you lose neither the SP nor the 15 AP. Only the time.
And the trap that sidelines it
Elemental Buster needs one of the five greater elementals, and on this server you cannot own any. Its prerequisites are also the most expensive in the tree: Elemental Spirit Mastery 5 plus all five greater summons. That is 10 points of keys and 10 more in the skill itself, for something that currently cannot be cast.
src/map/skills/mage/elementalbuster.cpp; the radius of 6 is hard-coded in the .cpp and matches the SplashArea: 6 of the five sub-skills in the skill_db.
See also The five greater summons: why they currently summon nothing Elemental Spirit Mastery: +40,000 HP for an elemental that does not exist AP: 200 points, zero regeneration, and gone the moment you die Psychic Stream: five hits that multiply, and it teleports you next to the target
Elemental Veil is the job's defensive skill, and it protects the elemental, not you.
What it does
It places a veil on your greater elemental that makes it impossible to select as a target. This is not damage reduction or evasion: nothing can aim at it at all, neither with normal attacks nor with skills. While it lasts, the elemental is untouchable and keeps fighting.
| Level | Duration | SP |
|---|---|---|
| 1 | 120 s | 70 |
| 2 | 150 s | 75 |
| 3 | 180 s | 80 |
| 4 | 210 s | 85 |
| 5 | 240 s | 90 |
Cast time 4 s variable + 2 s fixed, 1 s after-cast delay, 10 s cooldown. Requires Elemental Spirit Mastery 3.
The two exceptions
Bosses see through it. Any MVP-class creature ignores the veil entirely. In a boss fight, the skill that looks designed for exactly that is the one that does not help.
Detectors too. Monsters with the ability to see the hidden — the same ones that spot a cloaked Assassin — will target it regardless.
And the trap that undoes all of it: it only works on the five greater elementals, and this server cannot create any of them. It does nothing to an elemental homunculus: the veil is cast on a creature that no longer exists in the game. With anything else, or with nothing, the skill simply fails.
src/map/skills/mage/elementalveil.cpp; the boss and detector exemptions are in src/map/status.cpp, lines 2387 and 2452.
See also The five greater summons: why they currently summon nothing Elemental Spirit Mastery: +40,000 HP for an elemental that does not exist The Elemental Master tree, and the seven skills that currently do nothing
Team battles against the Nightwing guild: what each field pays and what you can spend it on.
Battlegrounds are played as a team against the Nightwing guild. The challenge is issued by a party leader, in one of two ways:
bat_room 152, 150).
How many you need
Tierra Gorge and Flavius: a party of 6. KvM: a party of 5.
What counts is the size of the party, whether or not everyone is online. The leader and the members who are online go in, up to the number the field asks for.
On the other side come as many Nightwing as the field asks for, from the tier that matches the average level of those who enter: up to level 80, up to 150, or above.
You win by defeating every Nightwing. You lose if your whole party falls or 10 minutes go by. When it ends, everyone returns to the room. Only one battle runs at a time.
Inside the field, the damage a player takes is held at 30 % of normal, so that battles last.
Automatic balance
Difficulty is not fixed. An automatic balancing system fits the rival to your group and keeps correcting it from one battle to the next, depending on how results go. There is nothing to configure.
See also What each field pays: badges, KvM points and ranking Erundek: the 35 badge weapons, one by one KVM Logistic Officer: everything KvM points buy
The reward is per person and is paid whether you win or lose; winning pays three times as much (five times in KvM). Each field pays in its own currency:
Field · currency›win / loss
 Bravery Badge9 / 3
 Valor Badge9 / 3
Plus the ranking
Every battle adds Battleground ranking points: 3 for a win and 1 for a loss, on any field. The table is at /ranking/battleground/.
See also How a Battleground against Nightwing is played Erundek: the 35 badge weapons, one by one Erundek: badge garments, shoes and armor Erundek: Medals of Honor and consumables KVM Logistic Officer: everything KvM points buy
Every weapon costs 100 badges of a single kind: the ones marked (BB) are paid with Bravery Badge and the ones marked (VB) with Valor Badge. They cannot be mixed.
Each card carries the in-game name and opens the item page in a new tab. Below it is the exact path through Erundek’s menu (bat_room 160, 150) and, in bold, how the item is written in his list. Everything Erundek hands out is character bound.
Slots
The number in brackets next to the name is the count of card slots, repeated on its own line. None of the 35 badge weapons has slots: all are [0].
Dagger/OneSword/TwoSword/TwoSpear
Card slots [0] none
At the NPC Exchange Badges›Weapon›Dagger/OneSword/TwoSword/TwoSpear›Brave Assassin's Damascus(BB)
Bravery Badge×100
A dagger especially used for assassinations such as killing any enemy.
STR +1, AGI +1
Increases physical damage against all enemies by 11%.
Ignores 10% of the physical defense of all enemies.
When equipped by Ninja or Rogue classes:
MATK +90
Indestructible in battle
Type: Dagger
Attack: 120
Weight: 0
Weapon Level: 3
Requirement:
Base Level 80
Novice, Swordsman, Magician, Archer, Merchant, Thief, Soul Linker and Ninja
 Valorous Assassin's Damascus [0]
Card slots [0] none
At the NPC Exchange Badges›Weapon›Dagger/OneSword/TwoSword/TwoSpear›Valorous Assassin's Damascus(VB)
Valor Badge×100
A dagger especially used for assassinations such as killing any enemy.
STR +1, AGI +1
Increases physical damage against all enemies by 11%.
Has a chance of enchanting compounded weapons with the Investigate skill effect for 6 seconds. when attacking.
When equipped by Ninja or Rogue classes:
MATK +90
Indestructible in battle
Type: Dagger
Attack: 120
Weight: 0
Weapon Level: 3
Requirement:
Base Level 80
Novice, Swordsman, Magician, Archer, Merchant, Thief, Soul Linker and Ninja
Card slots [0] none
At the NPC Exchange Badges›Weapon›Dagger/OneSword/TwoSword/TwoSpear›Brave Gladiator Blade(BB)
Bravery Badge×100
A sword favored by gladiators, it is especially designed for battles against any enemy.
STR +1
DEX +1
MATK +74
Increases physical damage against all enemies by 11%.
Indestructible in battle
Type: One-Handed Sword
Attack: 115
Weight: 0
Weapon Level: 3
Requirement:
Base Level 80
Novice, Swordsman, Merchant and Thief classes
Card slots [0] none
At the NPC Exchange Badges›Weapon›Dagger/OneSword/TwoSword/TwoSpear›Valorous Gladiator Blade(VB)
Valor Badge×100
A sword favored by gladiators, it is especially designed for battles against any enemy.
STR +1
DEX +1
Increases physical damage against all enemies by 11%.
Ignores 10% of the physical defense of all enemies.
Indestructible in battle
Type: One-Handed Sword
Attack: 115
Weight: 0
Weapon Level: 3
Requirement:
Base Level 80
Novice, Swordsman, Merchant and Thief classes
 Brave Assaulter's Katzbalger [0]
Card slots [0] none
At the NPC Exchange Badges›Weapon›Dagger/OneSword/TwoSword/TwoSpear›Brave Assaulter's Katzbalger(BB)
Bravery Badge×100
A Two-Handed Sword made to rush at the enemy's position, especially designed for battles against any enemy.
STR +2
Ignores 10% of the physical defense of all enemies.
Increases physical damage against all enemies by 8%.
Indestructible in battle
Type: Two-Handed Sword
Attack: 200
Weight: 0
Weapon Level: 3
Requirement:
Base Level 80
Swordman classes
 Valorous Assaulter's Katzbalger [0]
Card slots [0] none
At the NPC Exchange Badges›Weapon›Dagger/OneSword/TwoSword/TwoSpear›Valorous Assaulter's Katzbalger(VB)
Valor Badge×100
A Two-Handed Sword made to rush at the enemy's position, especially designed for battles against any enemy.
Critical +20
Increases Critical Damage by 20%.
Increases physical damage against all enemies by 8%.
Indestructible in battle
Type: Two-Handed Sword
Attack: 200
Weight: 0
Weapon Level: 3
Requirement:
Base Level 80
Swordman classes
Card slots [0] none
At the NPC Exchange Badges›Weapon›Dagger/OneSword/TwoSword/TwoSpear›Assaulter Spear(BB)
Bravery Badge×100
A special spear made for charging at the enemy's position. It is especially designed for battles against any enemy.
STR +2
Increases physical damage against all enemies by 14%.
Ignores 10% of the physical defense of all enemies.
When equipped by Crusader classes:
Increases Attack Speed (decreases After Attack Delay by 20%).
Indestructible in battle
Type: One-Handed Spear
Attack: 126
Weight: 0
Weapon Level: 3
Requirement:
Base Level 80
Swordman classes
Card slots [0] none
At the NPC Exchange Badges›Weapon›Dagger/OneSword/TwoSword/TwoSpear›Assaulter Lance(VB)
Valor Badge×100
A Two-Handed Spear made to rush at the enemy's position, especially designed for battles against any enemy.
STR +2
Increases physical damage against all enemies by 4%.
Ignores 25% of the physical defense of all enemies.
Indestructible in battle
Type: Two-Handed Spear
Attack: 160
Weight: 0
Weapon Level: 3
Requirement:
Base Level 80
Swordman classes
Staff/Mace/TwoAxe/Shuriken
Card slots [0] none
At the NPC Exchange Badges›Weapon›Staff/Mace/TwoAxe/Shuriken›Warlock's Magic Wand(BB)
Bravery Badge×100
A rod that has been modified for brave magicians who face enemies in battle.
It is especially designed for battles against any enemy.
INT +4, DEX +3
MATK +126
Ignores 13% of the magical defense of all enemies.
Random chance to inflict Stun status when dealing magical damage.
Indestructible in battle
Type: One-Handed Staff
Attack: 70
Weight: 0
Weapon Level: 3
Requirement:
Base Level 80
Magician, Acolyte and Soul Linker
Card slots [0] none
At the NPC Exchange Badges›Weapon›Staff/Mace/TwoAxe/Shuriken›Warlock's Battle Wand(VB)
Valor Badge×100
A rod that has been modified for brave magicians who face enemies in battle.
It is especially designed for battles against any enemy.
INT +3, DEX +3
MATK +126
Increases magical damage against all enemies by 8%.
Random chance to inflict Stun status when dealing magical damage.
Indestructible in battle
Type: One-Handed Staff
Attack: 70
Weight: 0
Weapon Level: 3
Requirement:
Base Level 80
Magician, Acolyte and Soul Linker
Card slots [0] none
At the NPC Exchange Badges›Weapon›Staff/Mace/TwoAxe/Shuriken›Strong Recovery Wand(BB)
Bravery Badge×100
A rod that is intended to heal people during battle.
It provides special treatment to serious wounds.
MATK +126
Increases Healing skills effectiveness by 14%.
Restores 5 SP every 10 seconds.
Indestructible in battle
Type: One-Handed Staff
Attack: 70
Weight: 0
Weapon Level: 3
Requirement:
Base Level 80
Magician, Acolyte and Soul Linker
Card slots [0] none
At the NPC Exchange Badges›Weapon›Staff/Mace/TwoAxe/Shuriken›Speedy Recovery Wand(VB)
Valor Badge×100
A Rod that is intended to heal people during battle.
It has been optimized to heal more rapidly.
INT +3
DEX +2
MATK +126
Decreases After Skill Delay by 15%.
Restores 5 SP every 10 seconds.
Indestructible in battle
Type: One-Handed Staff
Attack: 70
Weight: 0
Weapon Level: 3
Requirement:
Base Level 80
Magician, Acolyte and Soul Linker
 Brave Battlefield Morning Star [0]
Card slots [0] none
At the NPC Exchange Badges›Weapon›Staff/Mace/TwoAxe/Shuriken›Brave Battlefield Morning Star(BB)
Bravery Badge×100
A deadly mace that is usually worn by the best fighter; it seems to be capable of damaging through an enemy's armor.
It is especially designed for battles against any enemy.
STR +1, DEX +1
Increases physical damage against all enemies by 11%.
Random chance to inflict Stun status for 6 seconds when dealing melee physical attacls.
Indestructible in battle
Type: Mace
Attack: 119
Weight: 0
Weapon Level: 3
Requirement:
Base Level 80
Novice, Swordsman, Merchant, Acolyte
 Valorous Battlefield Morning Star [0]
Card slots [0] none
At the NPC Exchange Badges›Weapon›Staff/Mace/TwoAxe/Shuriken›Valorous Battlefield Morning Star(VB)
Valor Badge×100
A deadly mace that is usually worn by the best fighter; it seems to be capable of damaging through an enemy's armor.
It is especially designed for battles against any enemy.
STR +1, DEX +1
Increases physical damage against all enemies by 11%.
Ignores 10% of the physical defense of all enemies.
Indestructible in battle
Type: Mace
Attack: 119
Weight: 0
Weapon Level: 3
Requirement:
Base Level 80
Novice, Swordsman, Merchant, Acolyte
Card slots [0] none
At the NPC Exchange Badges›Weapon›Staff/Mace/TwoAxe/Shuriken›Brave Insane Battle Axe(BB)
Bravery Badge×100
A terrifying Two-Handed axe that is said to stimulate the nerves in order to kill any enemy, once it's in the wearer's hands.
STR +3
Increases physical damage against all enemies by 8%.
Random chance to destroy target's armor for 3 seconds when dealing physical damage.
Indestructible in battle
Type: Two-Handed Axe
Attack: 210
Weight: 0
Weapon Level: 3
Requirement:
Base Level 80
Swordsman and Merchant
 Valorous Insane Battle Axe [0]
Card slots [0] none
At the NPC Exchange Badges›Weapon›Staff/Mace/TwoAxe/Shuriken›Valorous Insane Battle Axe(VB)
Valor Badge×100
A terrifying Two-Handed axe that is said to stimulate the nerves in order to kill any enemy, once it's in the wearer's hands.
STR +3
Increases physical damage against all enemies by 8%.
Ignores 10% of the physical defense of all enemies.
Indestructible in battle
Type: Two-Handed Axe
Attack: 210
Weight: 0
Weapon Level: 3
Requirement:
Base Level 80
Swordsman and Merchant
 Brave Huuma Front Shuriken [0]
Card slots [0] none
At the NPC Exchange Badges›Weapon›Staff/Mace/TwoAxe/Shuriken›Brave Huuma Front Shuriken(BB)
Bravery Badge×100
Huuma Shuriken that holds great strength and brings extraordinary power in battles against any enemy.
STR +2
DEX +1
Increases physical damage against all enemies by 14%.
Ignores 10% of the physical defense of all enemies.
Indestructible in battle
Type: Huuma Shuriken
Attack: 140
Weight: 0
Weapon Level: 3
Requirement:
Base Level 80
Ninja
 Valorous Huuma Front Shuriken [0]
Card slots [0] none
At the NPC Exchange Badges›Weapon›Staff/Mace/TwoAxe/Shuriken›Valorous Huuma Front Shuriken(VB)
Valor Badge×100
Huuma Shuriken that holds great strength and brings extraordinary power in battles against any enemy.
STR +2
DEX +1
Increases physical damage against all enemies by 14%.
Has a chance of increasing Attack Strength to Throw Huuma Shuriken and Killing Stroke by 100% for 10 seconds.
Indestructible in battle
Type: Huuma Shuriken
Attack: 140
Weight: 0
Weapon Level: 3
Requirement:
Base Level 80
Ninja
Bow/Katar/Music/Whip
Card slots [0] none
At the NPC Exchange Badges›Weapon›Bow/Katar/Music/Whip›Brave Battle CrossBow(BB)
Bravery Badge×100
A Crossbow that has been designed to deal more damage to any enemy.
DEX +2, INT +10
Increases physical damage against all enemies by 8%.
Indestructible in battle
Type: Bow
Attack: 119
Weight: 0
Weapon Level: 3
Requirement:
Base Level 80
Thief and Archer
Card slots [0] none
At the NPC Exchange Badges›Weapon›Bow/Katar/Music/Whip›Valorous Battle CrossBow(VB)
Valor Badge×100
A Crossbow that has been designed to deal more damage to any enemy.
DEX +2
Increases physical damage against all enemies by 8%.
Ignores 10% of the physical defense of all enemies.
Indestructible in battle
Type: Bow
Attack: 119
Weight: 0
Weapon Level: 3
Requirement:
Base Level 80
Thief and Archer
Card slots [0] none
At the NPC Exchange Badges›Weapon›Bow/Katar/Music/Whip›Brave Carnage Katar(BB)
Bravery Badge×100
A particularly modified Katar created for battles against any enemy. It makes for a battlefield full of blood and terrible crimes if equipped by a Master Assassin.
STR +1
DEX +1
LUK +1
Increases physical damage against all enemies by 10%.
Ignores 10% of the physical defense of all enemies.
Indestructible in battle
Type: Katar
Attack: 133
Weight: 0
Weapon Level: 3
Requirement:
Base Level 80
Assassin classes
Card slots [0] none
At the NPC Exchange Badges›Weapon›Bow/Katar/Music/Whip›Valorous Carnage Katar(VB)
Valor Badge×100
A particularly modified Katar created for battles against any enemy. It can be used for terrible crimes if equipped by a Master Assassin.
STR +1
DEX +1
LUK +1
Increases Attack Speed (decreases After Attack Delay by 5%).
Increases physical damage against all enemies by 10%.
Increases Critical Damage by 20%.
Indestructible in battle
Type: Katar
Attack: 133
Weight: 0
Weapon Level: 3
Requirement:
Base Level 80
Assassin classes
Card slots [0] none
At the NPC Exchange Badges›Weapon›Bow/Katar/Music/Whip›Brave Battlefield Guitar(BB)
Bravery Badge×100
A guitar which was created to encourage armies amidst battle.
It looks useful for battles against any enemy.
DEX +2
Increases physical damage against all enemies by 14%.
Increases damage of Arrow Vulcan by 20%.
Indestructible in battle
Type: Musical Instrument
Attack: 112
Weight: 0
Weapon Level: 3
Requirement:
Base Level 80
Bard classes
 Valorous Battlefield Guitar [0]
Card slots [0] none
At the NPC Exchange Badges›Weapon›Bow/Katar/Music/Whip›Valorous Battlefield Guitar(VB)
Valor Badge×100
A guitar which was created to encourage armies amidst battle.
It looks useful for battles against any enemy.
DEX +2
Increases physical damage against all enemies by 14%.
Ignores 10% of the physical defense of all enemies.
Indestructible in battle
Type: Musical Instrument
Attack: 112
Weight: 0
Weapon Level: 3
Requirement:
Base Level 80
Bard classes
Card slots [0] none
At the NPC Exchange Badges›Weapon›Bow/Katar/Music/Whip›Brave Battle Lariat(BB)
Bravery Badge×100
An especially made whip for battling against any enemy; this whip is strong enough to cut their flesh.
DEX +2
Increases physical damage against all enemies by 14%.
Increases damage of Arrow Vulcan by 20%.
Indestructible in battle
Type: Whip
Attack: 105
Weight: 0
Weapon Level: 3
Requirement:
Base Level 80
Dancer classes
Card slots [0] none
At the NPC Exchange Badges›Weapon›Bow/Katar/Music/Whip›Valorous Battle Lariat(VB)
Valor Badge×100
An especially made whip for battling against any enemy; this whip is strong enough to cut their flesh.
DEX +2
Increases physical damage against all enemies by 14%.
Ignores 10% of the physical defense of all enemies.
Indestructible in battle
Type: Whip
Attack: 105
Weight: 0
Weapon Level: 3
Requirement:
Base Level 80
Dancer classes
Book/Knuckle
 Brave Battle Strategy Book [0]
Card slots [0] none
At the NPC Exchange Badges›Weapon›Book/Knuckle›Brave Battle Strategy Book(BB)
Bravery Badge×100
A battlefield book written by ancient strategists from a far east country. It is still being studied by many militarists.
STR +2
INT +1
MATK +90
Increases physical damage against all enemies by 11%.
Ignores 10% of the physical defense of all enemies.
Indestructible in battle
Type: Book
Attack: 105
Weight: 0
Weapon Level: 3
Requirement:
Base Level 80
Priest, Sage and Star Gladiator
 Valorous Battle Strategy Book [0]
Card slots [0] none
At the NPC Exchange Badges›Weapon›Book/Knuckle›Valorous Battle Strategy Book(VB)
Valor Badge×100
A battlefield book written by ancient strategists from a far east country. It is still being studied by many militarists.
STR +1, INT +2
MATK +125
Ignores 13% of the magical defense of all enemies.
Indestructible in battle
Type: Book
Attack: 105
Weight: 0
Weapon Level: 3
Requirement:
Base Level 80
Priest, Sage and Star Gladiator
Card slots [0] none
At the NPC Exchange Badges›Weapon›Book/Knuckle›Brave Battle Fist(BB)
Bravery Badge×100
Battle Gloves used by combatants in the field of battle. Its wearer is never exhausted because it brings unlimited power once worn.
STR +2, INT +1
Increases physical damage against all enemies by 14%.
Decreases Asura Strike casting time by 25%.
When attacking and weapon awakening in consistent probability,
Has a chance of negating Asura Strike Variable Casting Time by 100% for 6 secs.
Indestructible in battle
Type: Knuckle
Attack: 122
Weight: 0
Weapon Level: 3
Requirement:
Base Level 80
Priest and Monk classes
Card slots [0] none
At the NPC Exchange Badges›Weapon›Book/Knuckle›Valorous Battle Fist(VB)
Valor Badge×100
Battle Gloves used by combatants in the field of battle. Its wearer is never exhausted because it brings unlimited power once worn.
STR +2, AGI +1
Increases physical damage against all enemies by 14%.
Ignores 10% of the physical defense of all enemies.
Each physical attack adds the chance of auto casting Dangerous Soul Collect skill.
Indestructible in battle
Type: Knuckle
Attack: 122
Weight: 0
Weapon Level: 3
Requirement:
Base Level 80
Priest and Monk classes
Its auto-cast also triggers with magical attacks, at a fixed skill level.
Revolver/Rifle/Gatling/Shotgun/Launcher
Card slots [0] none
At the NPC Exchange Badges›Weapon›Revolver/Rifle/Gatling/Shotgun/Launcher›Soldier Revolver(BB)
Bravery Badge×100
A revolver made for short and medium ranged battles against any enemy.
It seems to be capable of doing damage even through a bulletproof vest.
DEX +2
HIT -10
Increases physical damage against all enemies by 8%.
Ignores 10% of the physical defense of all enemies.
Random chance to Reduces After Attack Delay by 100% for 3 sec when dealing physical damage.
Indestructible in battle
Type: Revolver
Attack: 105
Weight: 0
Weapon Level: 3
Requirement:
Base Level 80
Gunslinger
Card slots [0] none
At the NPC Exchange Badges›Weapon›Revolver/Rifle/Gatling/Shotgun/Launcher›Soldier Rifle(VB)
Valor Badge×100
A Rifle made for short and medium ranged battles against any enemy, that enables a reduction to the targeting delay;
as it is designed to limit the trembling of the shooter's hands.
DEX +2
HIT +10
Critical +10
Increases physical damage against all enemies by 11%.
Ignores 10% of the physical defense of all enemies.
Decreases Variable Casting Time of Tracking by 25%.
Indestructible in battle
Type: Rifle
Attack: 140
Weight: 0
Weapon Level: 3
Requirement:
Base Level 80
Gunslinger
Card slots [0] none
At the NPC Exchange Badges›Weapon›Revolver/Rifle/Gatling/Shotgun/Launcher›Soldier Gatling Gun(BB)
Bravery Badge×100
A specialized Gatling Gun made for battles against any enemy; occasionally, it shoots high-powered bullets.
DEX +2
Increases physical damage against all enemies by 5%.
Ignores 10% of the physical defense of all enemies.
Has a chance of adding 80 ATK for 6 seconds,
but due to the recoil will drain 120 HP every second.
Indestructible in battle
Type: Gatling Gun
Attack: 140
Weight: 0
Weapon Level: 3
Requirement:
Base Level 80
Gunslinger
Card slots [0] none
At the NPC Exchange Badges›Weapon›Revolver/Rifle/Gatling/Shotgun/Launcher›Soldier Shotgun(VB)
Valor Badge×100
A Shotgun that has a great attack in short ranged battles against any enemy.
It shows a wide variety of strength betweeneach attack.
DEX +2
Deals Splash Damage.
Increases physical damage against all enemies by 8%.
Ignores 10% of the physical defense of all enemies.
Has a chance of adding 80 ATK for 6 seconds,
but drains 100 HP every second.
Indestructible in battle
Type: Shotgun
Attack: 175
Weight: 0
Weapon Level: 3
Requirement:
Base Level 80
Gunslinger
Card slots [0] none
At the NPC Exchange Badges›Weapon›Revolver/Rifle/Gatling/Shotgun/Launcher›Soldier Grenade Launcher(VB)
Valor Badge×100
A Grenade Launcher that shows great fire-power in battles against any enemy.
DEX +2
Increases physical damage against all enemies by 5%.
Ignores 10% of the physical defense of all enemies.
Has a chance of adding 300 ATK for 9 seconds,
but drains 120 HP every second.
Indestructible in battle
Type: Grenade Launcher
Attack: 300
Weight: 0
Weapon Level: 3
Requirement:
Base Level 80
Gunslinger
See also What each field pays: badges, KvM points and ranking Erundek: badge garments, shoes and armor Erundek: Medals of Honor and consumables Battleground gear upgrades: card slots and Superior pieces
Garments, shoes and armor are paid with badges of either kind: on confirming, Erundek (bat_room 160, 150) asks whether you pay with Bravery Badge or Valor Badge. The two price lines on each card are alternatives, not a sum.
Garments and shoes: 50 badges. Armor: 80. Everything is character bound.
Slots
All 13 pieces have one card slot: every one is [1]. The number is shown in brackets next to the name and on its own line.
Garments / Shoes
Card slots [1] one slot
At the NPC Exchange Badges›Armor›Garments / Shoes›Captain's Manteau
Bravery Badge×50
Valor Badge×50
A dignified, splendid Manteau that is provided to any warrior who brings great honor from the battlefield.
MaxHP +50
MDEF +1
Decreases damage taken from all enemies by 1%.
Type: Garment
Defense: 28
Weight: 0
Armor Level: 1
Requirement:
Base Level 80
Swordsman, Merchant, Thief Classes, Ninja, Taekwon Boy/Girl and Star Gladiator
Card slots [1] one slot
At the NPC Exchange Badges›Armor›Garments / Shoes›Commander's Manteau
Bravery Badge×50
Valor Badge×50
A Manteau that is provided to any superior commander who has the outstanding ability to support their base.
MaxHP +50
MDEF +1
Decreases damage taken from all enemies by 1%.
Type: Garment
Defense: 20
Weight: 0
Armor Level: 1
Requirement:
Base Level 80
Magician, Acolyte, Archer, Soul Linker
Card slots [1] one slot
At the NPC Exchange Badges›Armor›Garments / Shoes›Sheriff's Manteau
Bravery Badge×50
Valor Badge×50
A Manteau imbued with tension and the mysterious spirit of desolate wilderness.
MaxHP +50
MDEF +1
Decreases damage taken from all enemies by 1%.
Type: Garment
Defense: 20
Weight: 0
Armor Level: 1
Requirement:
Base Level 80
Gunslinger
Card slots [1] one slot
At the NPC Exchange Badges›Armor›Garments / Shoes›Battle Greaves
Bravery Badge×50
Valor Badge×50
A greaves that optimizes the quality of one's ability for battle.
MaxHP +100
MDEF +1
Decreases damage taken from all enemies by 1%.
Type: Shoes
Defense: 15
Weight: 0
Armor Level: 1
Requirement:
Base Level 80
Swordsman, Merchant, Thief Classes, Ninja, Taekwon Boy/Girl and Star Gladiator
Card slots [1] one slot
At the NPC Exchange Badges›Armor›Garments / Shoes›Combat Boots
Bravery Badge×50
Valor Badge×50
A pair of shoes that are comfortable and solidly made for battle.
MaxHP +100
MDEF +1
Decreases damage taken from all enemies by 1%.
Type: Shoes
Defense: 9
Weight: 0
Armor Level: 1
Requirement:
Base Level 80
Magician, Acolyte, Archer, Soul Linker
Card slots [1] one slot
At the NPC Exchange Badges›Armor›Garments / Shoes›Battle Boots
Bravery Badge×50
Valor Badge×50
They don't look any different than other boots, but they are designed exclusively for Gunslingers.
MaxHP +100
MDEF +1
Decreases damage taken from all enemies by 1%.
Type: Shoes
Defense: 9
Weight: 0
Armor Level: 1
Requirement:
Base Level 80
Gunslinger
Armor
Card slots [1] one slot
At the NPC Exchange Badges›Armor›Armor›Assaulter Plate
Bravery Badge×80
Valor Badge×80
Designed for brave warriors who face enemies at the forefront.
It gives off multiple effects when compounded as a set.
MaxHP +150
MDEF +2
Decreases damage taken from all enemies by 1%.
When equipped with Battle Greaves and Captain's Manteau:
VIT +3
MaxHP +12%
Increases recovery amount gained from Healing skills and Restorative items by 10%.
Adds a chance of restoring 6,000 HP per second for 10 seconds when receiving physical damage.
Type: Armor
Defense: 57
Weight: 0
Armor Level: 1
Requirement:
Base Level 80
Swordsman, Merchant, Taekwon Boy/Girl and Star Gladiator
Card slots [1] one slot
At the NPC Exchange Badges›Armor›Armor›Elite Engineer Armor
Bravery Badge×80
Valor Badge×80
Designed to be used by outstanding warriors who have remarkable attack skills. It gives off multiple effects when compounded as a set.
MaxHP +150
MDEF +2
Decreases damage taken from all enemies by 1%.
When equipped with Battle Greaves and Captain's Manteau:
STR +3
MaxHP +12%
Increases damage of Mammonite by 20%.
Increases recovery amount gained from Heal and Potion Pitcher by 10%.
Indestructible in battle
Type: Armor
Defense: 50
Weight: 0
Armor Level: 1
Can be enchanted by:
<NAVI>Apprentice Craftsman<INFO>prontera,165,60,0,100,0,0</INFO></NAVI>
Requirement:
Base Level 80
Merchant
Card slots [1] one slot
At the NPC Exchange Badges›Armor›Armor›Assassin Robe
Bravery Badge×80
Valor Badge×80
If you desire to move more quickly, this might help. It gives off multiple effects when compounded as a set.
MaxHP +150
MDEF +2
Decreases damage taken from all enemies by 1%.
When equipped with Battle Greaves and Captain's Manteau:
AGI +3
MaxHP +12%
Critical +5
Increases Attack Speed (decreases After Attack Delay by 5%).
Adds a chance of restoring 3,000 HP per second for 10 seconds when receiving physical damage.
Type: Armor
Defense: 41
Weight: 0
Armor Level: 1
Can be enchanted by:
<NAVI>Apprentice Craftsman<INFO>prontera,165,60,0,100,0,0</INFO></NAVI>
Requirement:
Base Level 80
Thief and Ninja
Card slots [1] one slot
At the NPC Exchange Badges›Armor›Armor›Warlock's Battle Robe
Bravery Badge×80
Valor Badge×80
A Battle Robe that helps increase the possibility of survival. It gives off multiple effects when compounded as a set.
MaxHP +150
MDEF +2
Decreases damage taken from all enemies by 1%.
When equipped with Combat Boots and Commander's Manteau:
INT +3
MaxHP +12%
Increases resistance against Stun by 20%.
Adds a chance of enchanting Armor with Ghost element for 10 seconds when receiving physical damage.
Type: Armor
Defense: 36
Weight: 0
Armor Level: 1
Can be enchanted by:
<NAVI>Apprentice Craftsman<INFO>prontera,165,60,0,100,0,0</INFO></NAVI>
Requirement:
Base Level 80
Magician and Soul Linker classes
Card slots [1] one slot
At the NPC Exchange Badges›Armor›Armor›Medic's Robe
Bravery Badge×80
Valor Badge×80
Designed to be used by responsible warriors who take charge of the survival of the guild or party.
It gives off multiple effects when compounded as a set.
MaxHP +150
MDEF +2
Decreases damage taken from all enemies by 1%.
When equipped with Combat Boots and Commander's Manteau:
INT +3
MaxHP +12%
Decreases Holy Light Variable Casting Time by 50%.
Increases Healing skills effectiveness by 6%.
Adds a chance of enchanting Armor with Ghost element for 10 seconds when receiving physical damage.
Type: Armor
Defense: 25
Weight: 0
Armor Level: 1
Can be enchanted by:
<NAVI>Apprentice Craftsman<INFO>prontera,165,60,0,100,0,0</INFO></NAVI>
Requirement:
Base Level 80
Acolyte
Card slots [1] one slot
At the NPC Exchange Badges›Armor›Armor›Elite Archer Suit
Bravery Badge×80
Valor Badge×80
If you desire to become an accurate and efficient warrior in battle, this might help.
It gives off multiple effects when compounded as a set.
MaxHP +150
MDEF +2
Decreases damage taken from all enemies by 1%.
When equipped with Combat Boots and Commander's Manteau:
DEX +3
MaxHP +12%
Decreases damage taken from Ranged Physical Damage by 10%.
Decreases cast delay by 25%.
Type: Armor
Defense: 35
Weight: 0
Armor Level: 1
Can be enchanted by:
<NAVI>Apprentice Craftsman<INFO>prontera,165,60,0,100,0,0</INFO></NAVI>
Requirement:
Base Level 80
Archer
Card slots [1] one slot
At the NPC Exchange Badges›Armor›Armor›Elite Shooter Suit
Bravery Badge×80
Valor Badge×80
If you are a true Gunslinger, you might want this suit! It gives off multiple effects when compounded as a set.
MaxHP +150
MDEF +2
Decreases damage taken from all enemies by 1%.
When equipped with Battle Boots and Sheriff's Manteau:
DEX +3
MaxHP +12%
Decreases damage taken from Ranged Physical Damage by 10%.
Decreases cast delay by 25%.
Type: Armor
Defense: 25
Weight: 0
Armor Level: 1
Can be enchanted by:
<NAVI>Apprentice Craftsman<INFO>prontera,165,60,0,100,0,0</INFO></NAVI>
Requirement:
Base Level 80
Gunslinger
See also What each field pays: badges, KvM points and ranking Erundek: the 35 badge weapons, one by one Erundek: Medals of Honor and consumables Battleground gear upgrades: card slots and Superior pieces
The Medals of Honor are the accessory of each job branch and cost 500 badges; consumables cost 5 or 10. Either way you pay with Bravery Badge or Valor Badge, chosen when you confirm with Erundek (bat_room 160, 150).
Each medal can only be worn by its own branch: Erundek reminds you before handing it over. The two price lines on each card are alternatives.
Slots
None of the seven medals has card slots: all are [0]. Consumables have no slots.
Accessory
Card slots [0] none
At the NPC Exchange Badges›Accessory›Sheriff Badge
Bravery Badge×500
Valor Badge×500
A badge rewarded to honorable warriors.
MaxHP +300
MaxSP +80
MATK +5%
DEF +1
Critical +10
ATK +5%
1% chance to inflict Blind on the target each time you deal damage with normal attacks or skills (physical or magical).
Type: Accessory
Weight: 0
Armor Level: 1
Requirement:
Base Level 80
Gunslinger
Card slots [0] none
At the NPC Exchange Badges›Accessory›Medal of Honor
Bravery Badge×500
Valor Badge×500
A medal rewarded to honorable warriors.
MaxHP +500
MaxSP +50
MATK +5%
HIT +10
DEF +1
ATK +5%
1% chance to inflict Stun on the target each time you deal damage with normal attacks or skills (physical or magical).
Type: Accessory
Weight: 0
Armor Level: 1
Requirement:
Base Level 70
Swordsman and Star Gladiator
Card slots [0] none
At the NPC Exchange Badges›Accessory›Medal of Honor
Bravery Badge×500
Valor Badge×500
A medal rewarded to honorable warriors.
MaxHP +300
MaxSP +80
MATK +5%
FLEE +10
DEF +1
ATK +5%
1% chance to inflict Poison on the target each time you deal damage with normal attacks or skills (physical or magical).
Type: Accessory
Weight: 0
Armor Level: 1
Requirement:
Base Level 70
Thief and Ninja
Card slots [0] none
At the NPC Exchange Badges›Accessory›Medal of Honor
Bravery Badge×500
Valor Badge×500
A medal rewarded to honorable warriors.
MaxHP +600
MATK +5%
DEF +1
MDEF +6
ATK +5%
1% chance to inflict Silence on the target each time you deal damage with normal attacks or skills (physical or magical).
Type: Accessory
Weight: 0
Armor Level: 1
Requirement:
Base Level 70
Acolyte
Card slots [0] none
At the NPC Exchange Badges›Accessory›Medal of Honor
Bravery Badge×500
Valor Badge×500
A medal rewarded to honorable warriors.
MaxHP +600
MATK +5%
DEF +1
MDEF +6
ATK +5%
1% chance to inflict Stone Curse on the target each time you deal damage with normal attacks or skills (physical or magical).
Type: Accessory
Weight: 0
Armor Level: 1
Requirement:
Base Level 70
Magician and Soul Linker classes
Card slots [0] none
At the NPC Exchange Badges›Accessory›Medal of Honor
Bravery Badge×500
Valor Badge×500
A medal rewarded to honorable warriors.
MaxHP +300
MaxSP +80
MATK +5%
DEF +1
Critical +10
ATK +5%
1% chance to inflict Blind on the target each time you deal damage with normal attacks or skills (physical or magical).
Type: Accessory
Weight: 0
Armor Level: 1
Requirement:
Base Level 70
Archer Classes
Card slots [0] none
At the NPC Exchange Badges›Accessory›Medal of Honor
Bravery Badge×500
Valor Badge×500
A medal rewarded to honorable warriors.
MaxHP +500
MaxSP +50
MATK +5%
DEF +1
ATK +5%
Increases Attack Speed (decreases After Attack Delay by 10%).
1% chance to inflict Curse on the target each time you deal damage with normal attacks or skills (physical or magical).
Type: Accessory
Weight: 0
Armor Level: 1
Requirement:
Base Level 70
Merchant
Consumable
At the NPC Exchange Badges›Consumable›Tasty Pink Ration
Bravery Badge×10
Valor Badge×10
Foodstuffs prepared for urgent situations. Don't eat too fast, you might choke on it.
Type: Stat booster
Effect: ATK +10
Duration: 10 minutes
Weight: 7
At the NPC Exchange Badges›Consumable›Tasty White Ration
Bravery Badge×10
Valor Badge×10
Foodstuffs prepared for urgent situations. Don't eat too fast, you might choke on it.
Type: Supportive
Effect: MATK +10
Duration: 10 minutes
Weight: 7
At the NPC Exchange Badges›Consumable›Military Ration A
Meal Ready to eat. Improved Ration A, which is convenient for a busy life. Don't be so sure about the taste.
Type: Restorative
Heal: 5% HP
Weight: 7
At the NPC Exchange Badges›Consumable›Military Ration B
Bravery Badge×10
Valor Badge×10
Meal Ready to eat. Improved Ration B, which is convenient for a busy life. Don't be so sure about the taste.
Type: Stat booster
Effect: HIT +33
Duration: 10 minutes
Weight: 7
At the NPC Exchange Badges›Consumable›Military Ration C
Bravery Badge×10
Valor Badge×10
Meal Ready to eat. Improved Ration C, which is convenient for a busy life. Don't be so sure about the taste.
Type: Stat booster
Effect: FLEE +33
Duration: 10 minutes
Weight: 7
See also What each field pays: badges, KvM points and ranking Erundek: the 35 badge weapons, one by one Erundek: badge garments, shoes and armor Battleground gear upgrades: card slots and Superior pieces
KvM points are not an item: they are kept on the character. You spend them at the KVM Logistic Officer (bat_room 151, 144), option Purchase KVM Items.; Confirm KVM Points. tells you how many you have.
Each weapon costs 2,000 points; armor and accessories range from 10 to 1,200. Purchases cannot be undone. If you still hold an old KVM Badge, the officer turns it into points when you talk to him.
Slots
Nothing the officer sells has card slots: the 28 weapons and the 10 armor and accessory pieces are all [0].
Weapon · Dagger/Sword/Spear
Card slots [0] none
At the NPC Purchase KVM Items.›Weapon›Dagger/Sword/Spear›Dagger›Glorious Gladius
A weapon that only a champion of battlefield can wield.
Increases physical damage against all enemies by 11%.
Ignores 10% of the physical defense of all enemies.
Random chance to auto-cast Level 1 Lex Divina when dealing physical or magical damage.
***Additional Weapon Refining Level Option***
+6 Upgrade: Ignores 3% of the physical defense of all enemies, [Slaughter] Lv 1 (Damage bonus of Slaughter increases up to the Refine Level 14.)
+9 Upgrade: Random chance to inflict Bleeding on 5x5 cells when using Raid skill.
Refine bonus: physical damage against all enemies +2% at +9, +6% at +12, +10% at +14 (it stops growing there).
Type: Dagger
Attack: 120
Weight: 0
Weapon Level: 4
Requirement:
Base Level 80
Novice, Swordsman, Magician, Archer, Merchant, Thief, Soul Linker and Ninja
Card slots [0] none
At the NPC Purchase KVM Items.›Weapon›Dagger/Sword/Spear›One-handed Sword›Glorious Flamberge
A weapon that only a champion of battlefield can wield.
Increases physical damage against all enemies by 11%.
Ignores 10% of the physical defense of all enemies.
Refine Level +6:
Ignores 3% of the physical defense of all enemies.
Enables Level 1 Slaughter (Damage bonus of Slaughter increases up to the Refine Level 14.)
Refine Level +7 :
Increases Attack Speed (decreases After Attack Delay by 10%)
Refine Level +9 :
Random chance to auto-cast Level 2 Critical Wound when using Bash skill.
Refine bonus: physical damage against all enemies +2% at +9, +6% at +12, +10% at +14 (it stops growing there).
Type: One-Handed Sword
Attack: 130
Weight: 0
Weapon Level: 4
Requirement:
Base Level 80
Novice, Swordsman, Merchant and Thief classes
Card slots [0] none
At the NPC Purchase KVM Items.›Weapon›Dagger/Sword/Spear›One-handed Sword›Glorious Rapier
A weapon that only a champion of battlefield can wield.
INT +6, MATK +80, increases Int based on Refine Level.
***Additional Weapon Refining Level Option***
+6 Upgrade: Reduces SP cost of all skills by 10%.
+9 Upgrade: INT +5
Type: One-Handed Sword
Attack: 130
Weight: 0
Weapon Level: 4
Requirement:
Base Level 80
Novice, Swordsman, Merchant and Thief classes
Card slots [0] none
At the NPC Purchase KVM Items.›Weapon›Dagger/Sword/Spear›One-handed Sword›Glorious Holy Avenger
A weapon that only a champion of battlefield can wield.
INT +6, MATK +80, Increases Int based on Refine Level.
***Additional Weapon Refining Level Option***
+6 Upgrade: Decreases SP Consumption by 10%
+9 Upgrade: When using [Pressure], will also cast Level 1 [Lex Aeterna].
+10 Upgrade: INT +5
Type: One-Handed Sword
Attack: 130
Weight: 0
Weapon Level: 4
Requirement:
Base Level 80
Swordsman and Merchant
Card slots [0] none
At the NPC Purchase KVM Items.›Weapon›Dagger/Sword/Spear›Two-handed Sword›Glorious Claymore
A weapon that only a champion of battlefield can wield.
Increases physical damage against all enemies by 10%.
Ignores 13% of the physical defense of all enemies.
Refine Level +6:
Ignores additional 3% of the physical defense of all enemies.
[Slaughter] Lv 2 (Damage bonus of Slaughter increases up to the Refine Level 14.)
Refine Level +9:
Random chance to auto-cast Level 1 Concentration or Level 1 Aura Blade when dealing physical or magical damage.
*If a higher Level of either spell has been learned, the corresponding Level is activated.
Refine bonus: physical damage against all enemies +3% at +9, +8% at +12, +12% at +14 (it stops growing there).
Type: Two-Handed Sword
Attack: 220
Weight: 0
Weapon Level: 4
Requirement:
Base Level 80
Swordman classes
Card slots [0] none
At the NPC Purchase KVM Items.›Weapon›Dagger/Sword/Spear›One-handed Spear›Glorious Spear
A weapon that only a champion of battlefield can wield.
Increases physical damage against all enemies by 14%.
Ignores 10% of the physical defense of all enemies.
Refine Level +6:
Ignores additional 3% of the physical defense of all enemies.
Increases Attack Speed (decreases After Attack Delay by 5%).
[Slaughter] Lv 1 (Damage bonus of Slaughter increases up to the Refine Level 14.)
Refine Level +9:
When equipped by Knight classes:
Random chance to inflict Level 2 Critical Wound when using Pierce skill.
When equipped by Crusader classes:
Increases Attack Speed (decreases After Attack Delay by 5%).
Random chance to auto-cast Level 5 Pressure when dealing physical or magical damage.
Refine bonus: physical damage against all enemies +2% at +9, +6% at +12, +10% at +14 (it stops growing there).
Type: One-Handed Spear
Attack: 130
Weight: 0
Weapon Level: 4
Requirement:
Base Level 80
Swordman classes
Card slots [0] none
At the NPC Purchase KVM Items.›Weapon›Dagger/Sword/Spear›Two-handed Spear›Glorious Lance
A weapon that only a champion of battlefield can wield.
Increases physical damage against all enemies by 10%.
Ignores 13% of the physical defense of all enemies.
Refine Level +6:
Ignores additional 3% of the physical defense of all enemies.
Slaughter Lv 1 (Damage bonus of Slaughter increases up to the Refine Level 14.)
Refine Level +9:
When equipped by Crusader classes:
Random chance to auto-cast Level 5 Pressure when dealing physical or magical damage.
When equipped by Knight classes:
Random chance to inflict Level 2 Critical Wound when using Pierce skill.
Refine bonus: physical damage against all enemies +2% at +9, +6% at +12, +10% at +14 (it stops growing there).
Type: Two-Handed Spear
Attack: 220
Weight: 0
Weapon Level: 4
Requirement:
Base Level 80
Swordman classes
Weapon · Staff/Mace/Axe/Shuriken
 Glorious Destruction Staff [0]
Card slots [0] none
At the NPC Purchase KVM Items.›Weapon›Staff/Mace/Axe/Shuriken›Staff›Glorious Destruction Staff
A weapon that only a champion of battlefield can wield.
MATK +210
Increases magical damage against all enemies by 8%.
Ignores 13% of the magical defense of all enemies.
Refine Level +6:
Ignores additional 3% of the magical defense of all enemies.
[Destruction] Lv 1 (Damage bonus of Destruction increases up to the Refine Level 14.)
Refine Level +9:
Using Level 10 Lord of Vermilion, Meteor Storm or Storm Gust has a chance of casting Level 10 Safety Wall.
Refine bonus (total): magical damage against all enemies +11% at +9, +14% at +12, +16% at +14 (it stops growing there).
Type: Two-Handed Staff
Attack: 70
Weight: 0
Weapon Level: 4
Requirement:
Base Level 80
Magician, Acolyte Class and Soul Linker
Card slots [0] none
At the NPC Purchase KVM Items.›Weapon›Staff/Mace/Axe/Shuriken›Staff›Glorious Arc Wand
A weapon that only a champion of battlefield can wield.
MATK +135
Increases magical damage against all enemies by 8%.
Ignores 13% of the magical defense of all enemies.
Indestructible in battle
Refine Level +6:
Ignores additional 3% of the magical defense of all enemies.
Refine Level +9:
MATK +5%
Decreases Variable Casting Time by 5%.
Decreases After Skill Delay by 5%.
Type: One-Handed Staff
Attack: 70
Weight: 0
Weapon Level: 4
Requirement:
Base Level 80
Magician, Acolyte and Soul Linker
Card slots [0] none
At the NPC Purchase KVM Items.›Weapon›Staff/Mace/Axe/Shuriken›Staff›Glorious Cure Wand
A weapon that only a champion of battlefield can wield.
MATK +135
Increases Healing skills effectiveness by 14%.
Decreases After Skill Delay by 10%.
Refine Level +6:
Ignores 3% of the magical defense of all enemies.
Increases Healing skills effectiveness by additional 5%.
Refine Level +9:
Using Heal has a chance of casting Level 10 Heal.
Refine Level +10:
Increases Healing skills effectiveness by additional 10%.
Type: One-Handed Staff
Attack: 70
Weight: 0
Weapon Level: 4
Requirement:
Base Level 80
Magician, Acolyte and Soul Linker
Card slots [0] none
At the NPC Purchase KVM Items.›Weapon›Staff/Mace/Axe/Shuriken›Mace›Glorious Morning Star
A weapon that only a champion of battlefield can wield.
Increases physical damage against all enemies by 11%.
Ignores 10% of the physical defense of all enemies.
Refine Level +6:
Ignores additional 13% of the physical defense of all enemies.
Increases Attack Speed (decreases After Attack Delay by 5%).
Slaughter Lv 1 (Damage bonus of Slaughter increases up to the Refine Level 14.)
Refine Level +9:
Increases Attack Speed (decreases After Attack Delay by 5%).
Random chance to inflict Stun when dealing physical damage.
Refine bonus: physical damage against all enemies +2% at +9, +6% at +12, +10% at +14 (it stops growing there).
Type: Mace
Attack: 130
Weight: 0
Weapon Level: 4
Requirement:
Base Level 80
Novice, Swordsman, Acolyte and Merchant
Card slots [0] none
At the NPC Purchase KVM Items.›Weapon›Staff/Mace/Axe/Shuriken›One-handed Axe›Glorious Cleaver
A weapon that only a champion of battlefield can wield.
Increases physical damage against all enemies by 11%.
Ignores 10% of the physical defense of all enemies.
Refine Level +6:
Ignores additional 3% of the physical defense of all enemies.
Increases Attack Speed (decreases After Attack Delay by 5%).
[Slaughter] Lv 1 (Damage bonus of Slaughter increases up to the Refine Level 14.)
Refine Level +9:
5% chance to inflict Critical Wound status on the target when dealing physical damage.
Increases Attack Speed (decreases After Attack Delay by 5%).
Random chance to inflict Level 2 Critical Wound status on the target when using Mammonite skill.
Refine bonus: physical damage against all enemies +2% at +9, +6% at +12, +10% at +14 (it stops growing there).
Type: One-Handed Axe
Attack: 130
Weight: 0
Weapon Level: 4
Requirement:
Base Level 80
Swordsman and Merchant
Its auto-cast also triggers with magical attacks, at a fixed skill level.
Card slots [0] none
At the NPC Purchase KVM Items.›Weapon›Staff/Mace/Axe/Shuriken›Two-handed Axe›Glorious Two-Handed Axe
A weapon that only a champion of battlefield can wield.
Increases physical damage against all enemies by 10%.
Ignores 13% of the physical defense of all enemies.
Refine Level +6:
Ignores additional 3% of the physical defense of all enemies.
[Slaughter] Lv 2 (Damage bonus of Slaughter increases up to the Refine Level 14.)
Random chance to inflict Level 1 Critical Wound when dealing physical damage.
Refine Level +9:
Increases the chance of inflicting Critical Wound by 5%.
Using Mammonite or Cart Termination has a chance of casting Level 2 Critical Wound
Refine bonus: physical damage against all enemies +3% at +9, +8% at +12, +12% at +14 (it stops growing there).
Type: Two-Handed Axe
Attack: 220
Weight: 0
Weapon Level: 4
Requirement:
Base Level 80
Swordsman and Merchant
Its auto-cast also triggers with magical attacks, at a fixed skill level.
Card slots [0] none
At the NPC Purchase KVM Items.›Weapon›Staff/Mace/Axe/Shuriken›Shuriken›Glorious Shuriken
A weapon that only a champion of battlefield can wield.
Increases physical damage against all enemies by 14%.
Ignores 10% of the physical defense of all enemies.
MATK +90
Increases damage by 100% of [Throw Huuma Shuriken] and [Killing Strike] for 10 seconds. when attacking and synchronizing the weapon by 5%
Indestructible in battle
***Additional Weapon Refining Level Option***
+6 Refining
Ignores 3% of the physical defense of all enemies.
[Slaughter] Lv 2(Damage bonus of Destruction increases up to the Refine Level 14.)
+9 Refining
When using [Killing Strike], auto-spell Level 10 Heal.
When using [Throw Huuma Shuriken], has a chance of inflicting consistent
Refine bonus: physical damage against all enemies +3% at +9, +8% at +12, +12% at +14 (it stops growing there).
Type: Huuma Shuriken
Attack: 140
Weight: 0
Weapon Level: 4
Requirement:
Base Level 80
Ninja
Weapon · Bow/Katar/Instrument/Whip
Card slots [0] none
At the NPC Purchase KVM Items.›Weapon›Bow/Katar/Instrument/Whip›Bow›
A weapon that only a champion of battlefield can wield.
Increases physical damage against all enemies by 8%.
Ignores 10% of the physical defense of all enemies.
For each Refine Level:
Critical +1
Refine Level +6:
Ignores additional 3% of the physical defense of all enemies.
[Slaughter] Lv 1 (Damage bonus of Slaughter increases up to the Refine Level 14.)
Refine Level +9:
Increases damage of Double Strafe by 20%.
Refine bonus: physical damage against all enemies +2% at +9, +6% at +12, +10% at +14 (it stops growing there).
Type: Bow
Attack: 119
Weight: 0
Weapon Level: 4
Requirement:
Base Level 80
Archer, Thief and Rogue
Card slots [0] none
At the NPC Purchase KVM Items.›Weapon›Bow/Katar/Instrument/Whip›Katar›Glorious Bloody Roar
A weapon that only a champion of battlefield can wield.
Increases physical damage against all enemies by 10%.
Ignores 10% of the physical defense of all enemies.
Refine Level +6:
Ignores additional 3% of the physical defense of all enemies.
[Slaughter] Lv 1 (Damage bonus of Slaughter increases up to the Refine Level 14.)
Refine Level +9:
Random chance to decreases After Attack Delay by 100% for 3 seconds when dealing physical damage.
Refine bonus: physical damage against all enemies +2% at +9, +6% at +12, +10% at +14 (it stops growing there).
Type: Katar
Attack: 140
Weight: 0
Weapon Level: 4
Requirement:
Base Level 80
Assassin classes
Card slots [0] none
At the NPC Purchase KVM Items.›Weapon›Bow/Katar/Instrument/Whip›Katar›Glorious Jamadhar
A weapon that only a champion of battlefield can wield.
Increases physical damage against all enemies by 10%.
Increases Critical Damage by 20%.
Refine Level +6:
Critical +3
[Slaughter] Lv 1 (Damage bonus of Slaughter increases up to the Refine Level 14.)
Refine Level +9:
Random chance to decreases After Attack Delay by 100% for 3 seconds when dealing physical damage.
Refine bonus: physical damage against all enemies +2% at +9, +6% at +12, +10% at +14 (it stops growing there).
Type: Katar
Attack: 140
Weight: 0
Weapon Level: 4
Requirement:
Base Level 80
Assassin classes
Card slots [0] none
At the NPC Purchase KVM Items.›Weapon›Bow/Katar/Instrument/Whip›Instrument›Glorious Guitar
A weapon that only a champion of battlefield can wield.
Increases physical damage against all enemies by 14%.
Ignores 10% of the physical defense of all enemies.
Refine Level +6:
Ignores additional 3% of the physical defense of all enemies.
Slaughter Lv 1 (Damage bonus of Slaughter increases up to the Refine Level 14.)
Refine Level +9:
Using Arrow Vulcan has a chance of casting Level 5 Tarot Card of Fate.
Refine bonus: physical damage against all enemies +2% at +9, +6% at +12, +10% at +14 (it stops growing there).
Type: Musical Instrument
Attack: 112
Weight: 0
Weapon Level: 4
Requirement:
Base Level 80
Bard classes
Card slots [0] none
At the NPC Purchase KVM Items.›Weapon›Bow/Katar/Instrument/Whip›Whip›Glorious Lariat
A weapon that only a champion of battlefield can wield.
Increases physical damage against all enemies by 14%.
Ignores 10% of the physical defense of all enemies.
Refine Level +6:
Ignores additional 3% of the physical defense of all enemies.
Slaughter Lv 1 (Damage bonus of Slaughter increases up to the Refine Level 14.)
Refine Level +9:
Using Arrow Vulcan has a chance of casting Level 5 Tarot Card of Fate.
Refine bonus: physical damage against all enemies +2% at +9, +6% at +12, +10% at +14 (it stops growing there).
Type: Whip
Attack: 105
Weight: 0
Weapon Level: 4
Requirement:
Base Level 80
Dancer classes
Weapon · Book/Knuckle
Card slots [0] none
At the NPC Purchase KVM Items.›Weapon›Book/Knuckle›Book›Glorious Tablet
A weapon that only a champion of battlefield can wield.
MATK +115
Increases physical damage against all enemies by 11%.
Ignores 13% of the physical defense of all enemies.
Refine Level +6:
Ignores additional 3% of the physical defense of all enemies.
[Slaughter] Lv 1 (Damage bonus of Slaughter increases up to the Refine Level 14.)
Refine Level +9:
Random chance to increase ATK by 200 for 3 seconds when dealing physical damage.
Refine bonus: physical damage against all enemies +2% at +9, +6% at +12, +10% at +14 (it stops growing there).
Type: Book
Attack: 105
Weight: 0
Weapon Level: 4
Requirement:
Base Level 80
Priest, Sage and Star Gladiator
Card slots [0] none
At the NPC Purchase KVM Items.›Weapon›Book/Knuckle›Book›Glorious Apocalypse
A weapon that only a champion of battlefield can wield.
MATK +115
Increases physical damage against all enemies by 11%.
Ignores 13% of the physical defense of all enemies.
Refine Level +6:
Ignores additional 3% of the physical defense of all enemies.
[Slaughter] Lv 1 (Damage bonus of Slaughter increases up to the Refine Level 14.)
Refine Level +9:
MATK +5%
Decreases Variable Casting Time by 5%.
Decreases After Skill Delay by 5%.
Type: Book
Attack: 105
Weight: 0
Weapon Level: 4
Requirement:
Base Level 80
Priest, Sage and Star Gladiator
Card slots [0] none
At the NPC Purchase KVM Items.›Weapon›Book/Knuckle›Knuckle›Glorious Claw
A weapon that only a champion of battlefield can wield.
Increases physical damage against all enemies by 14%.
Ignores 13% of the physical defense of all enemies.
Refine Level +6:
Ignores additional 3% of the physical defense of all enemies.
[Slaughter] Lv 1 (Damage bonus of Slaughter increases up to the Refine Level 14.)
Refine Level +9:
Random chance to auto-cast Level 5 Investigate & Level 1 Decrease Agi when dealing physical or magical damage.
Refine bonus: physical damage against all enemies +2% at +9, +6% at +12, +10% at +14 (it stops growing there).
Type: Knuckle
Attack: 122
Weight: 0
Weapon Level: 4
Requirement:
Base Level 80
Priest and Monk classes
Card slots [0] none
At the NPC Purchase KVM Items.›Weapon›Book/Knuckle›Knuckle›Glorious Fist
A weapon that only a champion of battlefield can wield.
Increases physical damage against all enemies by 14%.
Ignores 10% of the physical defense of all enemies.
Refine Level +6:
Ignores additional 3% of the physical defense of all enemies.
[Slaughter] Lv 1 (Damage bonus of Slaughter increases up to the Refine Level 14.)
Refine Level +9:
Using Explosion Spirits auto-casts Level 1 Dangerous Soul Collect.
Decreases Variable Casting Time of Asura Strike by 100%.
Refine bonus: physical damage against all enemies +2% at +9, +6% at +12, +10% at +14 (it stops growing there).
Type: Knuckle
Attack: 122
Weight: 0
Weapon Level: 4
Requirement:
Base Level 80
Priest and Monk classes
Weapon · Revolver/Rifle/Gun/Grenade Launcher
Card slots [0] none
At the NPC Purchase KVM Items.›Weapon›Revolver/Rifle/Gun/Grenade Launcher›Revolver›Glorious Pistol
This item cannot be traded with other accounts.
A weapon that only a champion of battlefield can wield.
Increases physical damage against all enemies by 8%.
Ignores 10% of the physical defense of all enemies.
***Additional Weapon Refining Level Option***
Refine Level +6:
Ignores additional 3% of the physical defense of all enemies.
Slaughter Lv 1: (Damage bonus of Slaughter increases up to the Refine Level 14.)
Refine Level +9:
When using Rapid Shower, auto-casts Level 1 Coin Flip.
Increases damage of Rapid Shower based on Refine Level.
Refine bonus: physical damage against all enemies +2% at +9, +6% at +12, +10% at +14 (it stops growing there).
Type: Revolver
Attack: 105
Weight: 0
Weapon Level: 4
Requirement:
Base Level 80
Gunslinger
Card slots [0] none
At the NPC Purchase KVM Items.›Weapon›Revolver/Rifle/Gun/Grenade Launcher›Rifle›Glorious Rifle
A weapon that only a champion of battlefield can wield.
Increases physical damage against all enemies by 11%.
Ignores 10% of the physical defense of all enemies.
Increases damage of Triple Action by 30%.
Refine Level +6:
Ignores additional 3% of the physical defense of all enemies.
[Slaughter] Lv 1 (Damage bonus of Slaughter increases up to the Refine Level 14.)
Refine Level +9:
Increases Variable Casting Time of Tracking skill by 25%.
Increases damage of Tracking by 3% per Refine Level.
Refine bonus: physical damage against all enemies +2% at +9, +6% at +12, +10% at +14 (it stops growing there).
Type: Rifle
Attack: 140
Weight: 0
Weapon Level: 4
Requirement:
Base Level 80
Gunslinger
Card slots [0] none
At the NPC Purchase KVM Items.›Weapon›Revolver/Rifle/Gun/Grenade Launcher›Gatling Gun›Glorious Gatling Gun
A weapon that only a champion of battlefield can wield.
Increases physical damage against all enemies by 5%.
Ignores 10% of the physical defense of all enemies.
Increases damage of Triple Action by 30%.
Refine Level +6:
Ignores additional 3% of the physical defense of all enemies.
[Slaughter] Lv 1 (Damage bonus of Slaughter increases up to the Refine Level 14.)
Refine Level +9:
Increases Physical Damage against enemies of all targets by% based on Refine Level.
Refine bonus: physical damage against all enemies +11% at +9, +18% at +12, +24% at +14 (it stops growing there).
Type: Gatling Gun
Attack: 140
Weight: 0
Weapon Level: 4
Requirement:
Base Level 80
Gunslinger
Card slots [0] none
At the NPC Purchase KVM Items.›Weapon›Revolver/Rifle/Gun/Grenade Launcher›Shotgun›Glorious Shotgun
A weapon that only a champion of battlefield can wield.
Increases physical damage against all enemies by 8%.
Ignores 10% of the physical defense of all enemies.
Deals Splash Damage.
Increases damage of Triple Action by 30%.
Indestructible in battle
***Additional Weapon Refining Level Option***
Refine Level +6:
Ignores additional 3% of the physical defense of all enemies.
[Slaughter] Lv 1 (Damage bonus of Slaughter increases up to the Refine Level 14.)
Refine Level +9:
Increases damage of Spread Attack by 2% per Refine Level.
Has a chance of stunning while using Spread Attack.
Refine bonus: physical damage against all enemies +2% at +9, +6% at +12, +10% at +14 (it stops growing there).
Type: Shotgun
Attack: 175
Weight: 0
Weapon Level: 4
Requirement:
Base Level 80
Gunslinger
Card slots [0] none
At the NPC Purchase KVM Items.›Weapon›Revolver/Rifle/Gun/Grenade Launcher›Grenade Launcher›Glorious Grenade Launcher
A weapon that only a champion of battlefield can wield.
Increases physical damage against all enemies by 5%.
Ignores 10% of the physical defense of all enemies.
Increases damage of Triple Action by 30%.
***Additional Weapon Refining Level Option***
Refine Level +6:
Ignores additional 3% of the physical defense of all enemies.
[Slaughter] Lv 1 (Damage bonus of Slaughter increases up to the Refine Level 14.)
Refine Level +9:
Increases damage of Ground Drift by 2% per Refine Level.
During normal attacks and the weapon can awaken, which increases your Attack Speed for 20 seconds (Decreases After Attack Delay by 20%).
Refine bonus: physical damage against all enemies +2% at +9, +6% at +12, +10% at +14 (it stops growing there).
Type: Grenade Launcher
Attack: 330
Weight: 0
Weapon Level: 4
Requirement:
Base Level 80
Gunslinger
Armor/Accessory
Card slots [0] none
At the NPC Purchase KVM Items.›Armor/Accessory›Armor›Glorious Suit
A suit that only a champion of battlefield can wear.
MaxHP +20%
Decreases damage taken from all enemies by 4%.
When equipped with Glorious Shoes and Glorious Muffler:
ATK +5%
MATK +5%
Increases recovery amount gained from Heal, Potion Pitcher and Sanctuary by 3%.
Prevents Frozen status.
Type: Armor
Defense: 10
Weight: 0
Armor Level: 1
Can be enchanted by:
<NAVI>Apprentice Craftsman<INFO>prontera,165,60,0,100,0,0</INFO></NAVI>
Requirement:
Base Level 81
All Jobs except Novice
Card slots [0] none
At the NPC Purchase KVM Items.›Armor/Accessory›Cloak›Glorious Muffler
A garment that only a champion of battlefield can wear.
MaxHP +5%
Decreases damage taken from all enemies by 3%.
Type: Garment
Defense: 3
Weight: 0
Armor Level: 1
Requirement:
Base Level 81
All Jobs except Novice
Card slots [0] none
At the NPC Purchase KVM Items.›Armor/Accessory›Shoes›Glorious Shoes
A pair of shoes that only a champion of battlefield can wear.
MaxHP +10%
Decreases damage taken from all enemies by 2%.
Random chance to auto-cast Level 1 Increase Agi on wearer when receiving physical damage.
Type: Shoes
Defense: 0
Weight: 0
Armor Level: 1
Requirement:
Base Level 81
All Jobs except Novice
Card slots [0] none
At the NPC Purchase KVM Items.›Armor/Accessory›Accessory›Glorious Ring
A ring that only a champion of battlefield can wear.
MaxHP +300
Increases Attack Speed (decreases After Attack Delay by 5%).
Decreases damage taken from Water, Wind, Earth and Fire elementals attack by 10%.
Decreases Variable Casting Time by 3%.
Increases Healing skills effectiveness by 5%.
When equipped with Medal of Honor:
ATK +5%
MATK +3%
Increases Healing skills effectiveness by 5%.
Type: Accessory
Weight: 0
Armor Level: 1
Requirement:
Base Level 81
All Jobs except Novice
Mass-Production Armor/Accessory
Card slots [0] none
At the NPC Purchase KVM Items.›Mass-Production Armor/Accessory›Mass-Production Armor›Glorious Popularized Suit
A suit that only a champion of battlefield can wear.
MaxHP +600
Increases SP Recovery Rate by 10%.
Type: Armor
Defense: 10
Weight: 0
Armor Level: 1
Can be enchanted by:
<NAVI>Apprentice Craftsman<INFO>prontera,165,60,0,100,0,0</INFO></NAVI>
Requirement:
Base Level 61
All Jobs except Novice
 Glorious Popularized Shoes [0]
Card slots [0] none
At the NPC Purchase KVM Items.›Mass-Production Armor/Accessory›Mass-Production Shoes›Glorious Popularized Shoes
A pair of shoes that only a champion of battlefield can wear.
MaxHP +5%
MaxSP +5%
Type: Shoes
Defense: 0
Weight: 0
Armor Level: 1
Requirement:
Base Level 61
All Jobs except Novice
 Glorious Mass-Production Ring [0]
Card slots [0] none
At the NPC Purchase KVM Items.›Mass-Production Armor/Accessory›Mass-Production Accessory›Glorious Mass-Production Ring
A ring that only a champion of battlefield can wear.
All Basic Stats +2
Type: Accessory
Weight: 0
Armor Level: 1
Requirement:
Base Level 61
All Jobs except Novice
Popularized Armor/Accessory
 Glorious Mass-Production Suit [0]
Card slots [0] none
At the NPC Purchase KVM Items.›Popularized Armor/Accessory›Popularized Armor›Glorious Mass-Production Suit
A suit that only a champion of battlefield can wear.
MaxHP +500
Type: Armor
Defense: 10
Weight: 0
Armor Level: 1
Can be enchanted by:
<NAVI>Apprentice Craftsman<INFO>prontera,165,60,0,100,0,0</INFO></NAVI>
Requirement:
All Jobs except Novice
 Glorious Mass-Production Shoes [0]
Card slots [0] none
At the NPC Purchase KVM Items.›Popularized Armor/Accessory›Popularized Shoes›Glorious Mass-Production Shoes
A pair of shoes that only a champion of battlefield can wear.
MaxHP +5%
Type: Shoes
Defense: 10
Weight: 0
Armor Level: 1
Requirement:
All Jobs except Novice
Card slots [0] none
At the NPC Purchase KVM Items.›Popularized Armor/Accessory›Popularized Accessory›Glorious Popularized Ring
A ring that only a champion of battlefield can wear.
All Basic Stats +1
Type: Accessory
Weight: 0
Armor Level: 1
Requirement:
All Jobs except Novice
See also What each field pays: badges, KvM points and ranking How a Battleground against Nightwing is played Battleground gear upgrades: card slots and Superior pieces
Battleground gear can be upgraded. Bring the item unequipped, in your inventory, pay, and the upgraded one comes out with the same refine and the same cards. It cannot be undone.
What “Superior” means
A Superior piece has 50 % more Attack, Magic Attack and Defense, and 50 % more on every permanent bonus, refine bonuses included. Auto-casts and timed effects do not change. Set bonuses do not either, but the set still works when you mix original and upgraded pieces.
Against every enemy
This gear no longer targets only the Demi-Human race: its bonuses apply against any enemy, monsters and players alike. In exchange the numbers are those of an ordinary third-job weapon: physical damage runs from 4 to 14 % (up to 21 % on Superior), 10-13 % of defense is ignored, magical damage goes up 8 % and armor takes 1 to 4 % off the damage received. Base attack of the weakest weapons has also been raised to that of their type at third job. Everything can still be equipped from level 80.
Medals
The status effect of each Medal of Honor has a 1 % chance and triggers every time you damage a target, with normal attacks or with skills, physical or magical.
Medals of Honor with a slot
At the NPC Erundek›Add a card slot to a Medal
The same medal with one slot [1]. It costs 1,000 badges (Bravery or Valor, your choice): twice the price of the medal.
 Sheriff Badge[1]
 Medal of Honor[1]
 Medal of Honor[1]
 Medal of Honor[1]
 Medal of Honor[1]
 Medal of Honor[1]
 Medal of Honor[1]
Superior garments, shoes and armor
At the NPC Erundek›Upgrade armor to Superior
1,000 badges of either kind. They keep their [1] slot.
 Superior Captain's Manteau[1]
 Superior Commander's Manteau[1]
 Superior Sheriff's Manteau[1]
 Superior Battle Greaves[1]
 Superior Combat Boots[1]
 Superior Battle Boots[1]
 Superior Assaulter Plate[1]
 Superior Elite Engineer Armor[1]
 Superior Assassin Robe[1]
 Superior Warlock's Battle Robe[1]
 Superior Medic's Robe[1]
 Superior Elite Archer Suit[1]
 Superior Elite Shooter Suit[1]
Superior badge weapons
At the NPC Erundek›Upgrade weapon to Superior
1,000 badges of the same kind the weapon is bought with (Bravery or Valor).
 Superior Brave Assassin's Damascus[0]
 Superior Valorous Assassin's Damascus[0]
 Superior Brave Gladiator Blade[0]
 Superior Valorous Gladiator Blade[0]
 Superior Brave Assaulter's Katzbalger[0]
 Superior Valorous Assaulter's Katzbalger[0]
 Superior Assaulter Spear[0]
 Superior Assaulter Lance[0]
 Superior Warlock's Magic Wand[0]
 Superior Warlock's Battle Wand[0]
 Superior Strong Recovery Wand[0]
 Superior Speedy Recovery Wand[0]
 Superior Brave Battlefield Morning Star[0]
 Superior Valorous Battlefield Morning Star[0]
 Superior Brave Insane Battle Axe[0]
 Superior Valorous Insane Battle Axe[0]
 Superior Brave Huuma Front Shuriken[0]
 Superior Valorous Huuma Front Shuriken[0]
 Superior Brave Battle CrossBow[0]
 Superior Valorous Battle CrossBow[0]
 Superior Brave Carnage Katar[0]
 Superior Valorous Carnage Katar[0]
 Superior Brave Battlefield Guitar[0]
 Superior Valorous Battlefield Guitar[0]
 Superior Brave Battle Lariat[0]
 Superior Valorous Battle Lariat[0]
 Superior Brave Battle Strategy Book[0]
 Superior Valorous Battle Strategy Book[0]
 Superior Brave Battle Fist[0]
 Superior Valorous Battle Fist[0]
 Superior Soldier Revolver[0]
 Superior Soldier Rifle[0]
 Superior Soldier Gatling Gun[0]
 Superior Soldier Shotgun[0]
 Superior Soldier Grenade Launcher[0]
KvM items: three upgrades
At the NPC KVM Logistic Officer›Upgrade a KVM item
Three steps, and each one costs the same as the original item in KvM points (a weapon, 2,000 per step): first it becomes Superior, then it gains one slot [1], and finally the second [2]. Suits, mufflers and shoes stop at one slot [1]: the second one is for weapons and rings only.
 Superior Glorious Gladius[0]
 Superior Glorious Gladius[1]
 Superior Glorious Gladius[2]
 Superior Glorious Flamberge[0]
 Superior Glorious Flamberge[1]
 Superior Glorious Flamberge[2]
 Superior Glorious Rapier[0]
 Superior Glorious Rapier[1]
 Superior Glorious Rapier[2]
 Superior Glorious Holy Avenger[0]
 Superior Glorious Holy Avenger[1]
 Superior Glorious Holy Avenger[2]
 Superior Glorious Claymore[0]
 Superior Glorious Claymore[1]
 Superior Glorious Claymore[2]
 Superior Glorious Spear[0]
 Superior Glorious Spear[1]
 Superior Glorious Spear[2]
 Superior Glorious Lance[0]
 Superior Glorious Lance[1]
 Superior Glorious Lance[2]
 Superior Glorious Destruction Staff[0]
 Superior Glorious Destruction Staff[1]
 Superior Glorious Destruction Staff[2]
 Superior Glorious Arc Wand[0]
 Superior Glorious Arc Wand[1]
 Superior Glorious Arc Wand[2]
 Superior Glorious Cure Wand[0]
 Superior Glorious Cure Wand[1]
 Superior Glorious Cure Wand[2]
 Superior Glorious Morning Star[0]
 Superior Glorious Morning Star[1]
 Superior Glorious Morning Star[2]
 Superior Glorious Cleaver[0]
 Superior Glorious Cleaver[1]
 Superior Glorious Cleaver[2]
 Superior Glorious Two-Handed Axe[0]
 Superior Glorious Two-Handed Axe[1]
 Superior Glorious Two-Handed Axe[2]
 Superior Glorious Shuriken[0]
 Superior Glorious Shuriken[1]
 Superior Glorious Shuriken[2]
 Superior Glorious Hunter Bow[0]
 Superior Glorious Hunter Bow[1]
 Superior Glorious Hunter Bow[2]
 Superior Glorious Bloody Roar[0]
 Superior Glorious Bloody Roar[1]
 Superior Glorious Bloody Roar[2]
 Superior Glorious Jamadhar[0]
 Superior Glorious Jamadhar[1]
 Superior Glorious Jamadhar[2]
 Superior Glorious Guitar[0]
 Superior Glorious Guitar[1]
 Superior Glorious Guitar[2]
 Superior Glorious Lariat[0]
 Superior Glorious Lariat[1]
 Superior Glorious Lariat[2]
 Superior Glorious Tablet[0]
 Superior Glorious Tablet[1]
 Superior Glorious Tablet[2]
 Superior Glorious Apocalypse[0]
 Superior Glorious Apocalypse[1]
 Superior Glorious Apocalypse[2]
 Superior Glorious Claw[0]
 Superior Glorious Claw[1]
 Superior Glorious Claw[2]
 Superior Glorious Fist[0]
 Superior Glorious Fist[1]
 Superior Glorious Fist[2]
 Superior Glorious Pistol[0]
 Superior Glorious Pistol[1]
 Superior Glorious Pistol[2]
 Superior Glorious Rifle[0]
 Superior Glorious Rifle[1]
 Superior Glorious Rifle[2]
 Superior Glorious Gatling Gun[0]
 Superior Glorious Gatling Gun[1]
 Superior Glorious Gatling Gun[2]
 Superior Glorious Shotgun[0]
 Superior Glorious Shotgun[1]
 Superior Glorious Shotgun[2]
 Superior Glorious Grenade Launcher[0]
 Superior Glorious Grenade Launcher[1]
 Superior Glorious Grenade Launcher[2]
 Superior Glorious Suit[0]
 Superior Glorious Suit[1]
 Superior Glorious Muffler[0]
 Superior Glorious Muffler[1]
 Superior Glorious Shoes[0]
 Superior Glorious Shoes[1]
 Superior Glorious Ring[0]
 Superior Glorious Ring[1]
 Superior Glorious Ring[2]
 Superior Glorious Popularized Suit[0]
 Superior Glorious Popularized Suit[1]
 Superior Glorious Popularized Shoes[0]
 Superior Glorious Popularized Shoes[1]
 Superior Glorious Mass-Production Ring[0]
 Superior Glorious Mass-Production Ring[1]
 Superior Glorious Mass-Production Ring[2]
 Superior Glorious Mass-Production Suit[0]
 Superior Glorious Mass-Production Suit[1]
 Superior Glorious Mass-Production Shoes[0]
 Superior Glorious Mass-Production Shoes[1]
 Superior Glorious Popularized Ring[0]
 Superior Glorious Popularized Ring[1]
 Superior Glorious Popularized Ring[2]
See also What each field pays: badges, KvM points and ranking Erundek: the 35 badge weapons, one by one Erundek: badge garments, shoes and armor Erundek: Medals of Honor and consumables KVM Logistic Officer: everything KvM points buy